


Jsp3.0 工程搭建步骤:


工程创建目录如下:

Jsp2.5 工程搭建步骤:


工程创建目录如下:

手动设置jsp的编码格式:

在jsp编写java代码
      <%
        Date date=new Date();
      %>

      <h1>现在时间是:<%=date %></h1>

运行服务器:

jsp的基本语法
1、jsp脚本片段
作用:用来写里面java代码
<!-- jsp脚本片段
作用:用来写里面java代码
-->
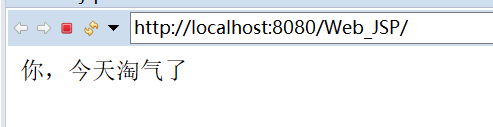
<%
for(int i=0;i<500; i++){
out.print("你,今天淘气了");
}
%>

运行服务器:

2、输出的表达式
       <!--输出的表达式  -->

       <%="你,今天淘气了 " %>

运行服务器:
JSP九大隐含对象
1、使用jsp的request方法拿数据
<h1>欢迎您,<%=request.getParameter("username") %></h1>

运行服务器:
效果图:

比如:我们可以在username可以传admin参数
语法:?属性名=传入值

1、在当前页面分别向四个域中添加四个属性
 <!-- 在当前页面分别向四个域中添加四个属性 -->
	 <%
	 	pageContext.setAttribute("pageKey", "pageValue");
	    request.setAttribute("reqKey", "reqValue");
	    session.setAttribute("sessKey", "sessValue");
	 	application.setAttribute("appKey", "appValue");
	 %>

      <h1>在当前页面中获取四个域中的属性值</h1>
      	 page域中的属性值是:<%=pageContext.getAttribute("pageKey") %><br>
         request域中的属性值是:<%=request.getAttribute("reqKey") %><br>
	     session域中的属性值是:<%=session.getAttribute("sessKey") %><br>
	     application域中的属性值是:<%=application.getAttribute("appKey") %><br>

运行服务器,效果图:

2、当我们新创建一个jsp工程为(scope2.jsp),想要在当前页面(scope.jsp)访问能获取跳转新创建jsp工程为(scope2.jsp)的数据
步骤:
首先,创建scope2.jsp

scope2.jsp
	  <!-- 在当前页面分别向四个域中添加四个属性 -->
	 <%
	 	pageContext.setAttribute("pageKey", "pageValue");
	    request.setAttribute("reqKey", "reqValue");
	    session.setAttribute("sessKey", "sessValue");
	 	application.setAttribute("appKey", "appValue");
	 %>

      <h1>在scope2.jsp页面中获取四个域中的属性值</h1>
      	 page域中的属性值是:<%=pageContext.getAttribute("pageKey") %><br>
         request域中的属性值是:<%=request.getAttribute("reqKey") %><br>
	     session域中的属性值是:<%=session.getAttribute("sessKey") %><br>
	     application域中的属性值是:<%=application.getAttribute("appKey") %><br>
接着,在当前页面启动服务器之前,添加一个转发属性
<!-- 转发到scope2.jsp页面 -->
<jsp:forward page="/scope2.jsp"></jsp:forward>

运行当前页面服务器,效果图:

3、当我们需要在这两个页面做跳转,可以使用超链接
<a href="/Web_JSP/scope2.jsp">去scope2.jsp页面</a>

运行当前页面服务器,效果图:

跳转后的效果图:


 932
932


 被折叠的 条评论
为什么被折叠?
被折叠的 条评论
为什么被折叠?
 到【灌水乐园】发言


