


上篇:第 10 节 DataStream之source讲解(java)
DataStream之自定义source
第一种方式:
1、代码编写操作
MyNoParalleSource.java
package xuwei.custormSource;

import org.apache.flink.streaming.api.functions.source.SourceFunction;

/**
 * 自定义实现并行度为1的source
 *
 * 模拟产生从1开始递增的数字
 * 注意:
 * SourceFunction和SourceCourceContext都需要指定数据类型,如果不指定,代码将会报错
 */
public class MyNoParalleSource implements SourceFunction<Long> {

    private Long count=0L;

    private boolean isRunning=true;

    /**
     * 主要的分发
     * 启动一个Source
     * 大部分情况下,都需要在这个run方法中实现一个循环,这个就可以循环产生数据了
     * @param ctx
     * @throws Exception
     */
    @Override
    public void run(SourceContext<Long> ctx)throws Exception {
        while (isRunning){
           ctx.collect(count);
           count++;
           //每秒产生一条数据
            Thread.sleep(1000);

        }

    }

    /**
     * 取消一个cancel的时候会调用的方法
     */
    @Override
    public void cancel() {
      isRunning = false;
    }
}
主程序类
StreamingDemoWithMyNoParalleSource,java
package xuwei.custormSource;

import org.apache.flink.api.common.functions.MapFunction;
import org.apache.flink.streaming.api.datastream.DataStream;
import org.apache.flink.streaming.api.datastream.DataStreamSource;
import org.apache.flink.streaming.api.environment.StreamExecutionEnvironment;
import org.apache.flink.streaming.api.windowing.time.Time;

/**
 * 使用并行度为1的source
 *
 */
public class StreamingDemoWithMyNoParalleSource  {
    public static void main(String[] args)throws Exception {
        //获取flink的运行环境
        StreamExecutionEnvironment env = StreamExecutionEnvironment.getExecutionEnvironment();
        //获取数据源
         DataStreamSource<Long>text= env.addSource(new MyNoParalleSource()).setParallelism(1);//注意,针对此source,并行度只能设置为1
;

        DataStream<Long>num= text.map(new MapFunction<Long, Long>() {
            @Override
            public Long map(Long value) throws Exception {
                System.out.println("接收到的数据"+value);
                return value;
            }
        });

        //每2秒钟处理一次数据
        DataStream<Long> sum = num.timeWindowAll(Time.seconds(2)).sum(0);

        //打印结果
        sum.print().setParallelism(1);

        String jobname = StreamingDemoWithMyNoParalleSource.class.getSimpleName();
        env.execute(jobname);

    }
}
控制台打印数据
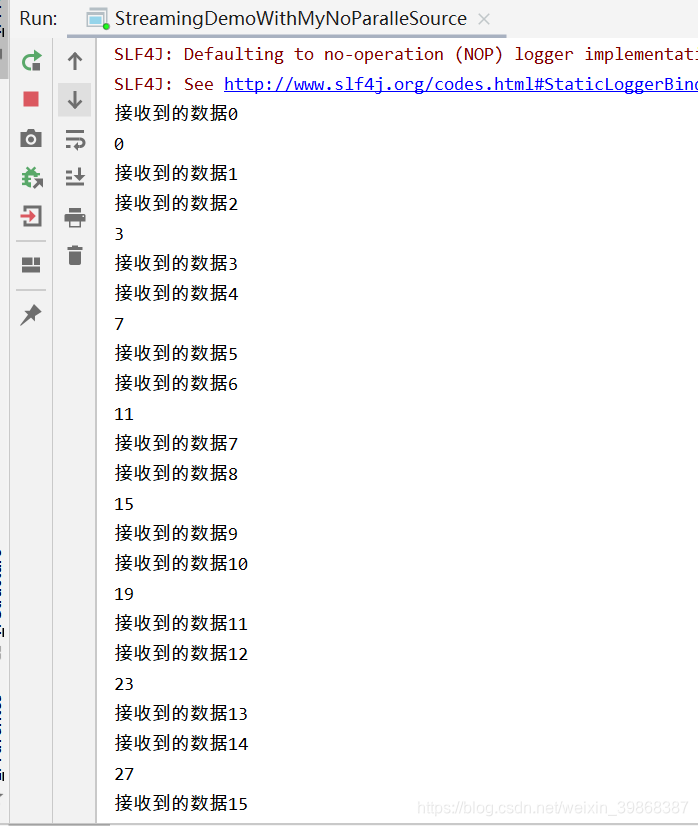
不断循环产生数据
2、第二种方式:多并行度
MyParalleSource.java
package xuwei.custormSource;

import org.apache.flink.streaming.api.functions.source.ParallelSourceFunction;

/**
 * 自定义实现支持多并行度source
 */
public class MyParalleSource implements ParallelSourceFunction<Long> {
    private Long count=0L;

    private boolean isRunning=true;

    /**
     * 主要的分发
     * 启动一个Source
     * 大部分情况下,都需要在这个run方法中实现一个循环,这个就可以循环产生数据了
     * @param ctx
     * @throws Exception
     */

    @Override
    public void run(SourceContext<Long> ctx) throws Exception {
        while (isRunning){
            ctx.collect(count);
            count++;
            //每秒产生一条数据
            Thread.sleep(1000);

        }
    }

    /**
     * 取消一个cancel的时候会调用的方法
     */
    @Override
    public void cancel() {
        isRunning = false;
    }
}
StreamingDemoWithMyParalleSource.java
package xuwei.custormSource;

import org.apache.flink.api.common.functions.MapFunction;
import org.apache.flink.streaming.api.datastream.DataStream;
import org.apache.flink.streaming.api.datastream.DataStreamSource;
import org.apache.flink.streaming.api.environment.StreamExecutionEnvironment;
import org.apache.flink.streaming.api.windowing.time.Time;

/**
 * 使用多并行度的source
 *
 */
public class StreamingDemoWithMyParalleSource {
    public static void main(String[] args)throws Exception {
        //获取flink的运行环境
        StreamExecutionEnvironment env = StreamExecutionEnvironment.getExecutionEnvironment();
        //获取数据源
        DataStreamSource<Long>text= env.addSource(new MyParalleSource());//注意,针对此source,并行度只能设置为1

        DataStream<Long>num= text.map(new MapFunction<Long, Long>() {
            @Override
            public Long map(Long value) throws Exception {
                System.out.println("接收到的数据"+value);
                return value;
            }
        });

        //每2秒钟处理一次数据
        DataStream<Long> sum = num.timeWindowAll(Time.seconds(2)).sum(0);

        //打印结果
        sum.print().setParallelism(1);

        String jobname = StreamingDemoWithMyParalleSource.class.getSimpleName();
        env.execute(jobname);

    }
}
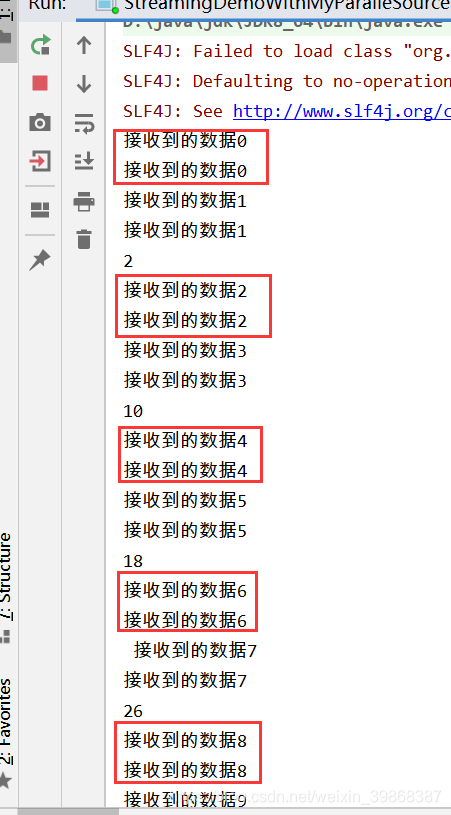
控制台打印数据,根据自己电脑的CPU核数打印数据

也是,不断循环产生数据
当然,我们也可以自定义设置打印的核数,设置代码参数是:
DataStreamSource<Long>text= env.addSource(new MyParalleSource()).setParallelism(2);//注意,针对此source,并行度只能设置为1
重新运行,控制台打印数据是2核的并行度
当然,也是,不断循环产生数据
3、方式三:继承RichParallelSourceFunction
MyRichParalleSource .java
package xuwei.custormSource;

import org.apache.flink.configuration.Configuration;
import org.apache.flink.streaming.api.functions.source.RichParallelSourceFunction;
import org.apache.flink.streaming.api.functions.source.SourceFunction;

/**
 * 自定义实现支持多并行度source
 * RichAggregateFunctiong会额外提供open和close方法
 * 针对source中如果要获取其他链接资源,那么可以在open方法中获取资源链接,在close中关闭资源链接
 */
public class MyRichParalleSource extends RichParallelSourceFunction<Long> {
    private Long count=0L;

    private boolean isRunning=true;

    /**
     * 主要的分发
     * 启动一个Source
     * 大部分情况下,都需要在这个run方法中实现一个循环,这个就可以循环产生数据了
     * @param ctx
     * @throws Exception
     */

    public void run(SourceFunction.SourceContext<Long> ctx) throws Exception {
        while (isRunning){
            ctx.collect(count);
            count++;
            //每秒产生一条数据
            Thread.sleep(1000);

        }
    }

    /**
     * 取消一个cancel的时候会调用的方法
     */

    public void cancel() {
        isRunning = false;
    }


    /**
     * 这个方法只会在最开始的时候被调用一次
     * 实现资源链接代码
     * @param parameters
     * @throws Exception
     */
    public void open(Configuration parameters) throws Exception {
        System.out.println("open..............");
        super.open(parameters);
    }

    /**
     * 实现关闭资源的代码
     * @throws Exception
     */
    public void close() throws Exception {
        super.close();
    }
}
StreamingDemoWithMyRichParalleSource .java
package xuwei.custormSource;

import org.apache.flink.api.common.functions.MapFunction;
import org.apache.flink.streaming.api.datastream.DataStream;
import org.apache.flink.streaming.api.datastream.DataStreamSource;
import org.apache.flink.streaming.api.environment.StreamExecutionEnvironment;
import org.apache.flink.streaming.api.windowing.time.Time;

/**
 * 使用多并行度的source
 *
 */
public class StreamingDemoWithMyRichParalleSource {
    public static void main(String[] args)throws Exception {
        //获取flink的运行环境
        StreamExecutionEnvironment env = StreamExecutionEnvironment.getExecutionEnvironment();
        //获取数据源
        DataStreamSource<Long>text= env.addSource(new MyRichParalleSource()).setParallelism(2);//注意,针对此source,并行度只能设置为1

        DataStream<Long>num= text.map(new MapFunction<Long, Long>() {
            @Override
            public Long map(Long value) throws Exception {
                System.out.println("接收到的数据"+value);
                return value;
            }
        });

        //每2秒钟处理一次数据
        DataStream<Long> sum = num.timeWindowAll(Time.seconds(2)).sum(0);

        //打印结果
        sum.print().setParallelism(1);

        String jobname = StreamingDemoWithMyRichParalleSource.class.getSimpleName();
        env.execute(jobname);

    }
}
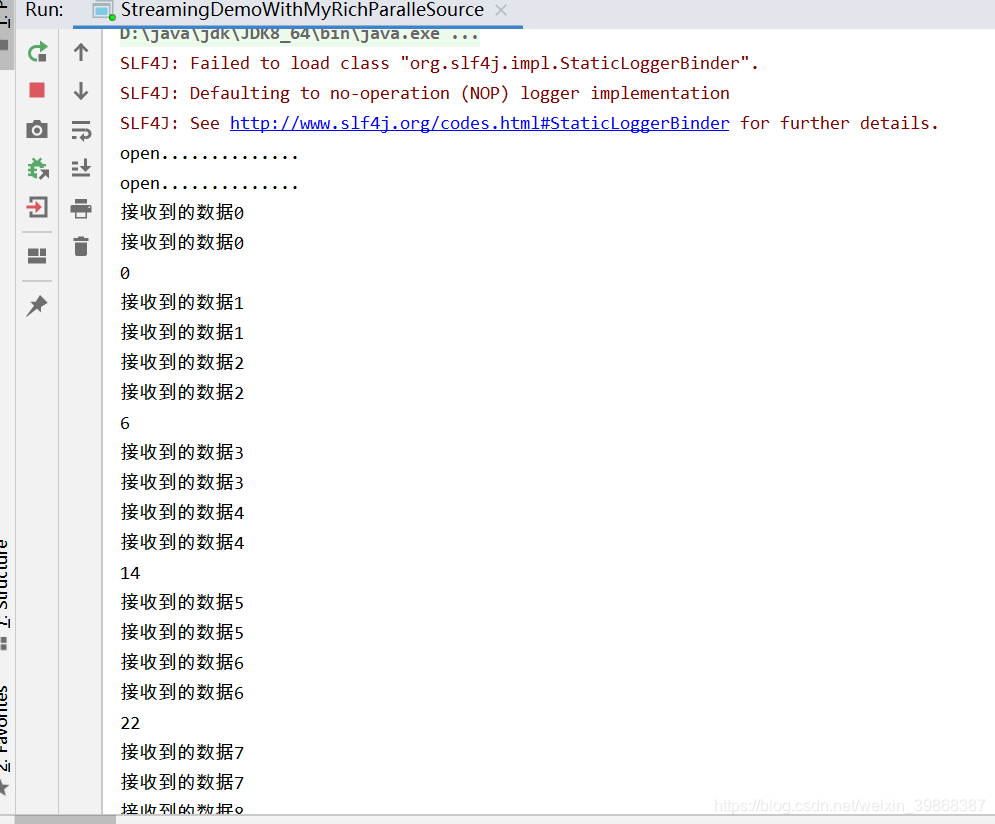
控制台打印数据,是2个线程,不断循环下去
3、总结
自定义source
实现并行度为1的自定义source
- 实现SourceFunction
- 一般不需要实现容错性保证
- 处理好cancel方法(cancel应用的时候,这个方法会被调用)
实现并行化的自定义source
- 实现ParallelSourceFunction
- 或者继承RichParallelSourceFunction


 340
340


 被折叠的 条评论
为什么被折叠?
被折叠的 条评论
为什么被折叠?
 到【灌水乐园】发言


