


方案简介
Mongodb的三种集群方式的搭建:Replica Set,Sharding,Master-Slaver。本方案是基于Replica Set模式进行构建。
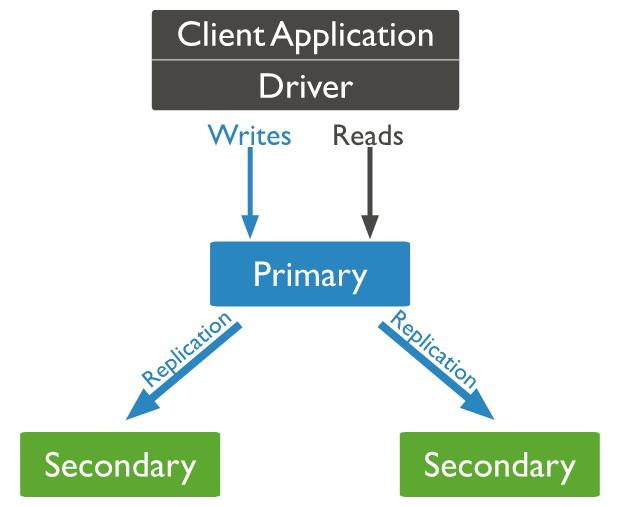
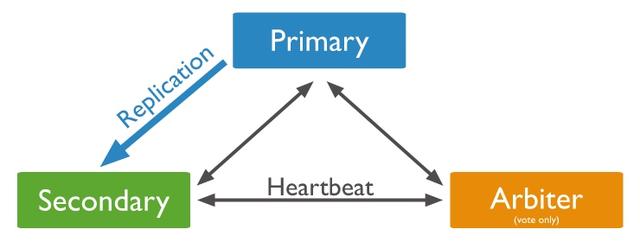
Replica Set (副本集)
集群中包含多分数据,主节点挂掉,副节点继续提供服务,仲裁节点是特殊的节点,本身不存储数据,主要作用决定哪个备用节点成为主节点,所以客户端不需要连接此节点。
部署方案
1-准备
服务器,多台,本方案是一主,两从,一仲裁。所以是四台服务器,并且四台服务器可以互相通讯而且需要明确服务器的地址,查看下面表格
| 服务器 | IP | 端口 | 备注 |
| Master | 192.168.1.1 | 27017 | 主服务 |
| Slave1 | 192.168.1.2 | 27018 | 备份服务 |
| Slave2 | 192.168.1.3 | 27019 | 备份服务 |
| Arbiter | 192.168.1.4 | 27020 | 仲裁服务 |
端口号最好避免官方规定,用其他的端口号代替,防止被扫描攻击
MongoDB安装包 https://www.mongodb.com/try/download/community
因为服务器需要通过秘钥文件通讯,所以需要用过OpenSSL生成一个
> openssl rand -base64 756 > /home/config/mongodb-keyfilechmod 400 /home/config/mongodb-keyfile然后这个 mongodb-keyfile 文件上传到各自服务器的路径下,例如 /hone/config 路径。
根据各自环境选择,Linux建议选择tgz压缩包安装
2-配置信息
配置信息介绍
dbpath:数据存放目录 logpath:日志存放路径 pidfilepath:进程文件,方便停止mongodb directoryperdb:为每一个数据库按照数据库名建立文件夹存放 logappend:以追加的方式记录日志 replSet:replica set的名字 bind_ip:mongodb所绑定的ip地址 port:mongodb进程所使用的端口号,默认为27017 oplogSize:mongodb操作日志文件的最大大小。单位为Mb,默认为硬盘剩余空间的5% fork:以后台方式运行进程 auth:是否开启auth模式,也就是用户密码模式 keyFile:秘钥路径,集群模式需要的条件,服务间需要通过这个进行验证通讯 noprealloc:不预先分配存储(这个暂时不需要,启动会出问题)Master配置信息
# master.confdbpath=/home/masterlogpath=/home/log/master.logpidfilepath=/home/log/master.piddirectoryperdb=truelogappend=truereplSet=ebizbind_ip=0.0.0.0port=27017oplogSize=10000fork=true#auth=true#keyFile=/home/config/mongodb-keyfile#noprealloc=trueSlave1
#slaver1.confdbpath=/home/slaver1logpath=/home/log/slaver1.logpidfilepath=/home/log/slaver1.piddirectoryperdb=truelogappend=truereplSet=ebizbind_ip=0.0.0.0port=27018oplogSize=10000fork=true#auth=true#keyFile=/home/config/mongodb-keyfile#noprealloc=trueSlave2
#slaver2.confdbpath=/home/slaver2logpath=/home/log/slaver2.logpidfilepath=/home/log/slaver2.piddirectoryperdb=truelogappend=truereplSet=ebizbind_ip=0.0.0.0port=27019oplogSize=10000#fork=true#auth=truekeyFile=/home/config/mongodb-keyfile#unoprealloc=trueArbiter
#arbiter.confdbpath=/home/arbiterlogpath=/home/log/arbiter.logpidfilepath=/home/log/arbiter.piddirectoryperdb=truelogappend=truereplSet=ebizbind_ip=0.0.0.0port=27020oplogSize=10000fork=true#auth=true#keyFile=/home/config/mongodb-keyfile#noprealloc=truebing_ip我写0.0.0.0是为了方便测试,不限制访问地址,具体情况根据实际情况进行判定里面对应的dbpath logpath pidfilepath这些路径都需要创建,以免部署报错注意,auth 和 keyfile目前都已经注释了,后续开发auth时候的在开启
3-启动命令
各个服务器上的启动命令
#Master服务器/home/mongodb-linux-x86_64-rhel70-4.4.0/bin/mongod -f /home/config/master.conf#Slaver1服务器/home/mongodb-linux-x86_64-rhel70-4.4.0/bin/mongod -f /home/config/slaver1.conf#Slaver2服务器/home/mongodb-linux-x86_64-rhel70-4.4.0/bin/mongod -f /home/config/slaver2.conf#Arbiter服务器/home/mongodb-linux-x86_64-rhel70-4.4.0/bin/mongod -f /home/config/arbiter.conf然后在master链接MongoDB,下面配置集群配置信息
$ /home/mongodb-linux-x86_64-rhel70-4.4.0/bin/mongo 127.0.0.1:27017操作MongoDB
> user admin> cfg = { "_id": "ebiz", "members": [ { "_id": 0, "host": "192.168.1.1:27017", "priority": 3 }, { "_id": 1, "host": "192.168.1.1:27018", "priority": 2 }, { "_id": 2, "host": "192.168.1.1:27019", "priority": 1 }, { "_id": 3, "host": "192.168.1.1:27020", "arbiterOnly": true } ]}> rs.initiate(cfg)> rs.status()cfg是可以任意的名字,当然最好不要是mongodb的关键字,conf,config都可以。最外层的_id表示replica set的名字,members里包含的是所有节点的地址以及优先级。优先级最高的即成为主节点,即这里的192.168.1.1:27017。特别注意的是,对于仲裁节点,需要有个特别的配置——arbiterOnly:true。这个千万不能少了,不然主备模式就不能生效。rs.initiate(cfg)使配置生效,rs.status()查看集群状态,如果没有意外,会显示集群的信息。
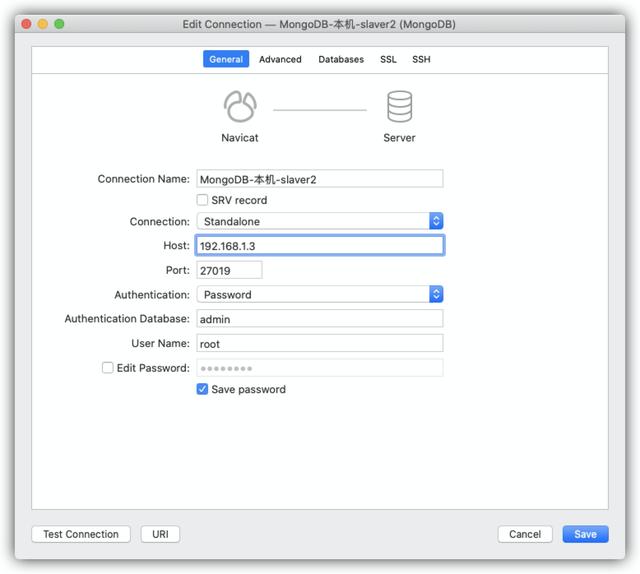
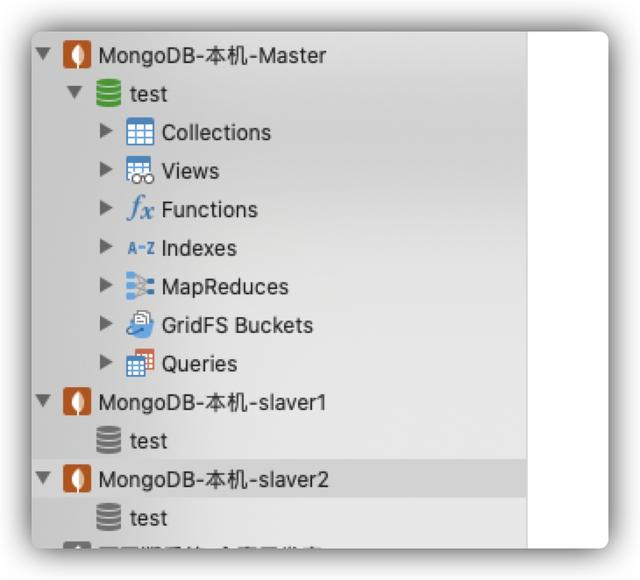
此时就可以通过客户端进行连接了,navicat了解测试效果,三个MongoDB都连接,然后在master进行测试,查看slaver是否同步信息,可能会有延迟。
3-Auth模式
上一步别退出,继续进行用户设置,依然是在master分支上
> db.createUser({user:"root",pwd:"123456",roles:[{role:"root",db:"admin"}]})> db.shutdownServer() > exit其他的所有MongoDB服务也关闭,可是 ps -ef|grep mongo 然后 kill -9 杀死进程
然后将配置文件中的auth keyfile开启,重新启动。命令还是2里面的步骤。
然后在master本机进行连接查看Replica Set配置信息
# /home/mongodb-linux-x86_64-rhel70-4.4.0/bin/mongo --port 27017 -u root -p 123456ebiz:PRIMARY> rs.status(){ "set" : "ebiz", "date" : ISODate("2020-09-14T05:28:34.134Z"), "myState" : 1, "term" : NumberLong(2), "syncSourceHost" : "", "syncSourceId" : -1, "heartbeatIntervalMillis" : NumberLong(2000), "majorityVoteCount" : 3, "writeMajorityCount" : 3, "votingMembersCount" : 4, "writableVotingMembersCount" : 3, "optimes" : { "lastCommittedOpTime" : { "ts" : Timestamp(1600061309, 1), "t" : NumberLong(2) }, "lastCommittedWallTime" : ISODate("2020-09-14T05:28:29.199Z"), "readConcernMajorityOpTime" : { "ts" : Timestamp(1600061309, 1), "t" : NumberLong(2) }, "readConcernMajorityWallTime" : ISODate("2020-09-14T05:28:29.199Z"), "appliedOpTime" : { "ts" : Timestamp(1600061309, 1), "t" : NumberLong(2) }, "durableOpTime" : { "ts" : Timestamp(1600061309, 1), "t" : NumberLong(2) }, "lastAppliedWallTime" : ISODate("2020-09-14T05:28:29.199Z"), "lastDurableWallTime" : ISODate("2020-09-14T05:28:29.199Z") }, "lastStableRecoveryTimestamp" : Timestamp(1600061299, 1), "electionCandidateMetrics" : { "lastElectionReason" : "electionTimeout", "lastElectionDate" : ISODate("2020-09-11T10:47:58.170Z"), "electionTerm" : NumberLong(2), "lastCommittedOpTimeAtElection" : { "ts" : Timestamp(0, 0), "t" : NumberLong(-1) }, "lastSeenOpTimeAtElection" : { "ts" : Timestamp(1599821199, 1), "t" : NumberLong(1) }, "numVotesNeeded" : 3, "priorityAtElection" : 3, "electionTimeoutMillis" : NumberLong(10000), "numCatchUpOps" : NumberLong(0), "newTermStartDate" : ISODate("2020-09-11T10:47:58.360Z"), "wMajorityWriteAvailabilityDate" : ISODate("2020-09-11T10:48:00.406Z") }, "members" : [ { "_id" : 0, "name" : "192.1681.1:27017", "health" : 1, "state" : 1, "stateStr" : "PRIMARY", "uptime" : 240049, "optime" : { "ts" : Timestamp(1600061309, 1), "t" : NumberLong(2) }, "optimeDate" : ISODate("2020-09-14T05:28:29Z"), "syncSourceHost" : "", "syncSourceId" : -1, "infoMessage" : "", "electionTime" : Timestamp(1599821278, 1), "electionDate" : ISODate("2020-09-11T10:47:58Z"), "configVersion" : 1, "configTerm" : 2, "self" : true, "lastHeartbeatMessage" : "" }, { "_id" : 1, "name" : "192.1681.2:27018", "health" : 1, "state" : 2, "stateStr" : "SECONDARY", "uptime" : 240044, "optime" : { "ts" : Timestamp(1600061309, 1), "t" : NumberLong(2) }, "optimeDurable" : { "ts" : Timestamp(1600061309, 1), "t" : NumberLong(2) }, "optimeDate" : ISODate("2020-09-14T05:28:29Z"), "optimeDurableDate" : ISODate("2020-09-14T05:28:29Z"), "lastHeartbeat" : ISODate("2020-09-14T05:28:33.600Z"), "lastHeartbeatRecv" : ISODate("2020-09-14T05:28:33.700Z"), "pingMs" : NumberLong(2), "lastHeartbeatMessage" : "", "syncSourceHost" : "192.1681.1:27017", "syncSourceId" : 0, "infoMessage" : "", "configVersion" : 1, "configTerm" : 2 }, { "_id" : 2, "name" : "192.1681.3:27019", "health" : 1, "state" : 2, "stateStr" : "SECONDARY", "uptime" : 240042, "optime" : { "ts" : Timestamp(1600061309, 1), "t" : NumberLong(2) }, "optimeDurable" : { "ts" : Timestamp(1600061309, 1), "t" : NumberLong(2) }, "optimeDate" : ISODate("2020-09-14T05:28:29Z"), "optimeDurableDate" : ISODate("2020-09-14T05:28:29Z"), "lastHeartbeat" : ISODate("2020-09-14T05:28:32.352Z"), "lastHeartbeatRecv" : ISODate("2020-09-14T05:28:33.994Z"), "pingMs" : NumberLong(2), "lastHeartbeatMessage" : "", "syncSourceHost" : "192.1681.1:27017", "syncSourceId" : 0, "infoMessage" : "", "configVersion" : 1, "configTerm" : 2 }, { "_id" : 3, "name" : "192.1681.4:27020", "health" : 1, "state" : 7, "stateStr" : "ARBITER", "uptime" : 240039, "lastHeartbeat" : ISODate("2020-09-14T05:28:32.232Z"), "lastHeartbeatRecv" : ISODate("2020-09-14T05:28:33.695Z"), "pingMs" : NumberLong(2), "lastHeartbeatMessage" : "", "syncSourceHost" : "", "syncSourceId" : -1, "infoMessage" : "", "configVersion" : 1, "configTerm" : 2 } ], "ok" : 1, "$clusterTime" : { "clusterTime" : Timestamp(1600061309, 1), "signature" : { "hash" : BinData(0,"/YUy30cIEtnEunhHWC4IDigPpaw="), "keyId" : NumberLong("6871178483611992067") } }, "operationTime" : Timestamp(1600061309, 1)}客户端连接
NAVICAT
注意这里使用的是15版本,12之前的版本是没有MongoDB。当然也可以使用其他的,例如Robo3T 下载链接 选择Robo3T 即可。
验证效果就是在master里操作,数据会同步到其他的slaver。


SpringBoot连接
使用uri链接方式。
org.springframework.boot spring-boot-starter-data-mongodb配置代码
data: mongodb: database: test authentication-database: admin uri: mongodb://root:123456@192.168.1.1:27017,192.168。1.2:27018,192.168.1.3:27019/?replicaSet=ebizdatabase是需要操作的数据库,
authentication-database是授权的数据库,
uri是连接,多个路径,然后还有用户名和密码,
replicaSet是集群的名称,之前的配置文件。


 446
446


 被折叠的 条评论
为什么被折叠?
被折叠的 条评论
为什么被折叠?
 到【灌水乐园】发言


