手机app怎给数据蓝牙模块传输数据_你知道蓝牙模块上的接口都表示什么吗?

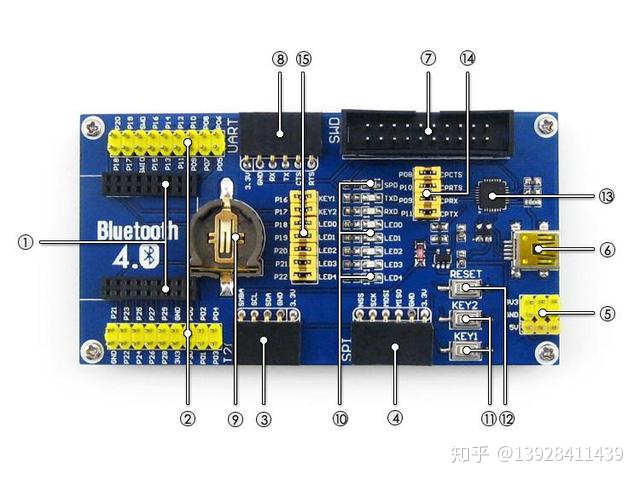
今天这里告诉你蓝牙模块上那么多接口是干什么用的:

其实蓝牙模块上有很多个接口,不是专业人士压根不知道是干嘛用的,如果你都知道那你绝对是专业人士!因为即使作为行内人士,有些接口我们都不一定能说出个具体,肯定有很多人听到UART接口、IIC接口、SPI接口什么的都听得糊里糊涂,现在我们主要是来简单的概述一些常见的接口与区别。

6b3a6d299688b7db51af7406eda49df5.png

一般情况下数据传输的接线方式,分为两种:

第一种是并行接口,其中另一种就是串行接口。

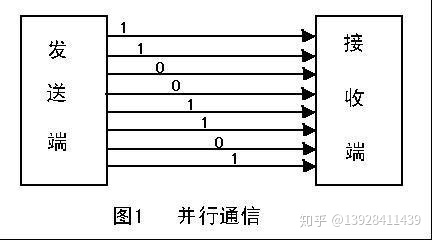
下面给大家讲解一下第一种 并行接口 到底是什么?

其实就是大家常说的并口,它是通过并行方式来完成传输数据的接口,通过并行线 进行传送数据信息,那么这样数据传送速度就可以大大的提高了,当然并行传送也是有缺陷,它的线路长度通常会受到限制,因为长度跟数据干扰是成正比的 长度增加干扰也会随之增加,那数据传输就无法保证100%的准确。
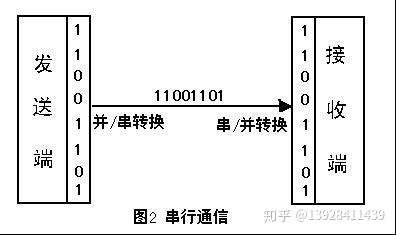
6ce18f9ba19cb99424e746c0bb71b19b.png

第二种:串行接口

所谓串行接口就是我们俗称的串口,是指数据在有限的几个IO上按照顺序,一位一位的进行传输。这类有很多,一般包括:UART、IIC、SPI、CAN、USB等等,只要是串行传输的接口,都是串口的一种。这里值得一说的是,由于早期人们都习惯把UART口称为串口,所以大家所说串口的时候一般特指UART接口。如云里物里的蓝牙模块MS49SF1C就是串口了。

1361f54bd42e09db522703185c44b1f8.png

接下来我们来讲讲“并行接口“和“串行接口”它们都有哪些优缺点?

优点

串行接口 :使用的数据线少,在远距离通信中可以节约通信成本

并行接口:因为可以多位数据一起传输,所以传输速度很快

缺点

串行接口 :因为每次只能传输一位数据,所以传输速度比较低

并行接口 :内存有多少位,就要用多少数据线,所以需要大量的数据线,成本很高

USART、SPI、IIC的区别

UART接口

UART(Universal Asynchronous Receiver/Transmitter,即通用异步收发器)串行接口是单片机最常用的一种通信技术,通常用于单片机和电脑之间以及单片机和单片机之间的通信。

SPI接口

SPI(Serial Peripheral Interface)就是串行外围设备接口。

SPI是一种同步串行数据传输标准,也是一种高速的、全双工、同步的通信总线,在很多器件中被广泛应用。

IIC接口

IIC(Inter-Integrated Circuit,集成电路总线)又称 I2C,一种两线式串行的总线结构,用于连接微控制器及其外围设备。IIC总线最主要的优点是简单性和有效性。

abcb87b6080243a3a7a6e66390f78250.png

I2C SPI IIC接口修改

区别1:UART就是两线,一根发送一根接收,可以全双工通信,线数也比较少。数据是异步传输的,对双方的时序要求比较严格,通信速度也不是很快。在多机通信上面用的最多。

区别2:SPI接口和上面UART相比,多了一条同步时钟线,上面UART的缺点也就是它的优点了,对通信双方的时序要求不严格不同设备之间可以很容易结合,而且通信速度非常快。一般用在产品内部元件之间的高速数据通信上面,如大容量存储器等。

00fcd23ada966f50de5a3f5f6e90e95c.png

区别3:IIC接口也是两线接口,它是两根线之间通过复杂的逻辑关系传输数据的,通信速度不高,程序写起来也比较复杂。一般单片机系统里主要用来和24C02等小容易存储器连接。

注:SPI和UART可以实现全双工,但I2C不行;I2C的速度比SPI慢一点,协议比SPI复杂一点,但是连线也比标准的SPI要少。

蓝牙模块上的接口大致就这些,讲得不专业的地方欢迎在评论区指导!

  • 1
    点赞
  • 3
    收藏
    觉得还不错? 一键收藏
  • 0
    评论
### 回答1: 要实现蓝牙WiFi模块数据传输到手机上显示的App,需要结合蓝牙和WiFi通信的相关技术和编程知识。以下是一个简单的代码示例。 首先,你需要创建一个Android Studio项目,并在布局文件中定义一个TextView用于显示接收到的数据。 ```xml <RelativeLayout xmlns:android="http://schemas.android.com/apk/res/android" xmlns:tools="http://schemas.android.com/tools" android:layout_width="match_parent" android:layout_height="match_parent" android:paddingLeft="16dp" android:paddingTop="16dp" android:paddingRight="16dp" android:paddingBottom="16dp" tools:context=".MainActivity"> <TextView android:id="@+id/dataTextView" android:layout_width="match_parent" android:layout_height="wrap_content" android:textSize="16sp" /> </RelativeLayout> ``` 接下来,在MainActivity.java文件中,你需要添加蓝牙和WiFi模块的代码,并实现数据接收和显示的逻辑。 ```java import android.bluetooth.BluetoothAdapter; import android.bluetooth.BluetoothDevice; import android.bluetooth.BluetoothSocket; import android.content.BroadcastReceiver; import android.content.Context; import android.content.Intent; import android.content.IntentFilter; import android.net.wifi.ScanResult; import android.net.wifi.WifiManager; import android.os.Bundle; import android.support.v7.app.AppCompatActivity; import android.widget.TextView; import android.widget.Toast; import java.io.IOException; import java.io.InputStream; import java.io.OutputStream; import java.util.UUID; public class MainActivity extends AppCompatActivity { private TextView dataTextView; private BluetoothSocket socket; private BluetoothAdapter bluetoothAdapter; private WifiManager wifiManager; private final UUID UUID_SERIAL_PORT_PROFILE = UUID.fromString("00001101-0000-1000-8000-00805F9B34FB"); @Override protected void onCreate(Bundle savedInstanceState) { super.onCreate(savedInstanceState); setContentView(R.layout.activity_main); dataTextView = findViewById(R.id.dataTextView); // 初始化蓝牙适配器 bluetoothAdapter = BluetoothAdapter.getDefaultAdapter(); if (bluetoothAdapter == null) { Toast.makeText(this, "设备不支持蓝牙", Toast.LENGTH_SHORT).show(); finish(); return; } // 启动蓝牙 if (!bluetoothAdapter.isEnabled()) { Intent enableIntent = new Intent(BluetoothAdapter.ACTION_REQUEST_ENABLE); startActivityForResult(enableIntent, 0); } // 开始搜索蓝牙设备 IntentFilter filter = new IntentFilter(BluetoothDevice.ACTION_FOUND); registerReceiver(bluetoothReceiver, filter); bluetoothAdapter.startDiscovery(); // 初始化WifiManager wifiManager = (WifiManager) getApplicationContext().getSystemService(Context.WIFI_SERVICE); if (!wifiManager.isWifiEnabled()) { wifiManager.setWifiEnabled(true); } // 开始扫描可用WiFi网络 wifiManager.startScan(); IntentFilter wifiFilter = new IntentFilter(WifiManager.SCAN_RESULTS_AVAILABLE_ACTION); registerReceiver(wifiReceiver, wifiFilter); } @Override protected void onDestroy() { super.onDestroy(); unregisterReceiver(bluetoothReceiver); unregisterReceiver(wifiReceiver); } private final BroadcastReceiver bluetoothReceiver = new BroadcastReceiver() { @Override public void onReceive(Context context, Intent intent) { String action = intent.getAction(); if (action.equals(BluetoothDevice.ACTION_FOUND)) { BluetoothDevice device = intent.getParcelableExtra(BluetoothDevice.EXTRA_DEVICE); // 连接蓝牙设备 connectToDevice(device); } } }; private final BroadcastReceiver wifiReceiver = new BroadcastReceiver() { @Override public void onReceive(Context context, Intent intent) { StringBuilder networks = new StringBuilder(); for (ScanResult scanResult : wifiManager.getScanResults()) { networks.append(scanResult.SSID).append("\n"); } // 在TextView上显示接收到的WiFi网络列表 dataTextView.setText(networks.toString()); } }; private void connectToDevice(BluetoothDevice device) { try { socket = device.createRfcommSocketToServiceRecord(UUID_SERIAL_PORT_PROFILE); socket.connect(); // 从蓝牙模块读取数据 InputStream inputStream = socket.getInputStream(); byte[] buffer = new byte[1024]; int bytesRead = inputStream.read(buffer); // 在TextView上显示接收到的数据 String data = new String(buffer, 0, bytesRead); dataTextView.setText(data); } catch (IOException e) { e.printStackTrace(); } } } ``` 以上就是一个简单的代码示例,实现了通过蓝牙和WiFi模块传输数据手机上并显示在TextView中。由于代码中涉及到与蓝牙和WiFi模块连接的相关操作,实际应用中还需要加入适当的错误处理和安全验证等功能。 ### 回答2: 要实现蓝牙WiFi模块数据传输到手机上显示的APP代码,需要先确定开发环境和编程语言。以下是使用Android Studio和Java语言实现的示例代码: 1. 在Android Studio中创建新项目,并配置相关依赖项。 2. 创建一个布局文件(例如activity_main.xml),用于显示接收到的数据。 3. 在MainActivity.java中编写代码,实现蓝牙和WiFi模块数据传输和显示。 ```java import android.Manifest; import android.bluetooth.BluetoothAdapter; import android.bluetooth.BluetoothDevice; import android.bluetooth.BluetoothSocket; import android.content.BroadcastReceiver; import android.content.Context; import android.content.Intent; import android.content.IntentFilter; import android.net.wifi.ScanResult; import android.net.wifi.WifiInfo; import android.net.wifi.WifiManager; import android.os.AsyncTask; import android.os.Bundle; import android.os.Handler; import android.os.Message; import android.support.annotation.NonNull; import android.support.v7.app.AppCompatActivity; import android.util.Log; import android.view.View; import android.widget.Button; import android.widget.TextView; import android.widget.Toast; import java.io.IOException; import java.io.InputStream; import java.io.OutputStream; import java.util.List; import java.util.Set; import java.util.UUID; public class MainActivity extends AppCompatActivity { private static final int REQUEST_ENABLE_BT = 1; private static final int MESSAGE_READ = 2; private BluetoothAdapter mBluetoothAdapter; private BluetoothDevice mDevice; private ConnectThread mConnectThread; private ConnectedThread mConnectedThread; private WifiManager mWifiManager; private WifiReceiver mWifiReceiver; private TextView mDataTextView; private class WifiReceiver extends BroadcastReceiver { @Override public void onReceive(Context context, Intent intent) { List<ScanResult> results = mWifiManager.getScanResults(); // 处理WiFi扫描结果 // 可以将数据显示在界面上或进行其他操作 } } private class ConnectThread extends Thread { private final BluetoothSocket mmSocket; public ConnectThread(BluetoothDevice device) { // 获取BluetoothSocket } public void run() { // 连接蓝牙设备并处理连接过程 } public void cancel() { // 关闭连接 } } private class ConnectedThread extends Thread { private final BluetoothSocket mmSocket; private final InputStream mmInStream; private final OutputStream mmOutStream; public ConnectedThread(BluetoothSocket socket) { // 获取输入输出流 } public void run() { byte[] buffer = new byte[1024]; int bytes; while (true) { try { bytes = mmInStream.read(buffer); mHandler.obtainMessage(MESSAGE_READ, bytes, -1, buffer).sendToTarget(); } catch (IOException e) { // 处理错误 break; } } } public void write(byte[] bytes) { try { mmOutStream.write(bytes); } catch (IOException e) { // 处理写入错误 } } public void cancel() { // 关闭连接 } } private final Handler mHandler = new Handler(new Handler.Callback() { @Override public boolean handleMessage(@NonNull Message msg) { if (msg.what == MESSAGE_READ) { byte[] buffer = (byte[]) msg.obj; // 处理接收到的数据 // 可以将数据显示在界面上或进行其他操作 } return true; } }); @Override protected void onCreate(Bundle savedInstanceState) { super.onCreate(savedInstanceState); setContentView(R.layout.activity_main); mDataTextView = findViewById(R.id.dataTextView); Button connectButton = findViewById(R.id.connectButton); connectButton.setOnClickListener(new View.OnClickListener() { @Override public void onClick(View v) { connectBluetoothDevice(); } }); mWifiManager = (WifiManager) getApplicationContext().getSystemService(Context.WIFI_SERVICE); mWifiReceiver = new WifiReceiver(); if (!mWifiManager.isWifiEnabled()) { mWifiManager.setWifiEnabled(true); } registerReceiver(mWifiReceiver, new IntentFilter(WifiManager.SCAN_RESULTS_AVAILABLE_ACTION)); mBluetoothAdapter = BluetoothAdapter.getDefaultAdapter(); if (mBluetoothAdapter == null) { // 设备不支持蓝牙 Toast.makeText(this, "Device does not support Bluetooth", Toast.LENGTH_LONG).show(); } else { if (!mBluetoothAdapter.isEnabled()) { Intent enableBtIntent = new Intent(BluetoothAdapter.ACTION_REQUEST_ENABLE); startActivityForResult(enableBtIntent, REQUEST_ENABLE_BT); } } } @Override protected void onDestroy() { super.onDestroy(); unregisterReceiver(mWifiReceiver); if (mConnectThread != null) { mConnectThread.cancel(); } if (mConnectedThread != null) { mConnectedThread.cancel(); } } private void connectBluetoothDevice() { Set<BluetoothDevice> pairedDevices = mBluetoothAdapter.getBondedDevices(); if (pairedDevices.size() > 0) { for (BluetoothDevice device : pairedDevices) { if (device.getName().equals("Your Bluetooth Device Name")) { mDevice = device; break; } } } if (mDevice != null) { mConnectThread = new ConnectThread(mDevice); mConnectThread.start(); } else { Toast.makeText(this, "Bluetooth device not found", Toast.LENGTH_LONG).show(); } } } ``` 以上是一个简单的示例代码,通过蓝牙连接到特定名称的设备,接收该设备发送的数据,并通过WiFi扫描来获取WiFi模块数据。开发者可以根据实际需求进行修改和扩展。这段代码只是基本示例,具体操作和功能需根据实际情况进行修改。 ### 回答3: 要编写一个能够接收蓝牙WiFi模块数据并显示在手机上的App代码,主要包括以下几个步骤: 1. 引入相关库和类:在代码的开头部分引入Android的相关库和类,例如蓝牙、WiFi和UI界面等库和类。 2. 建立蓝牙连接:在App中建立与蓝牙WiFi模块的连接,可以使用Android提供的BluetoothAdapter和BluetoothSocket等类来实现。 3. 接收数据:通过BluetoothSocket对象获取输入流,利用循环不断从流中读取数据。可以使用BufferedReader或者DataInputStream等类来读取数据。 4. 处理数据:对接收到的数据进行必要的处理和解析,例如根据约定的数据协议进行分割和解码。 5. 显示数据:将解析后的数据显示在手机界面上,可以通过自定义的UI控件来实现,例如TextView或者ListView等。 6. 更新数据:在数据接收过程中,如果有新的数据到达,及时更新显示界面,可以通过Handler等方式实现UI界面的更新。 7. 资源释放:在App结束或者断开连接时,需要释放相关资源,例如关闭输入流、关闭蓝牙连接等操作。 需要注意的是,以上步骤只是大致的框架,具体的实现方式和设计取决于具体的需求和功能。可以根据实际情况进行修改和补充。除了编写App代码,还需要适配不同的手机系统和版本,测试和调试App,确保其能稳定运行并正确显示蓝牙WiFi模块传输的数据
评论
添加红包

请填写红包祝福语或标题

红包个数最小为10个

红包金额最低5元

当前余额3.43前往充值 >
需支付:10.00
成就一亿技术人!
领取后你会自动成为博主和红包主的粉丝 规则
hope_wisdom
发出的红包
实付
使用余额支付
点击重新获取
扫码支付
钱包余额 0

抵扣说明:

1.余额是钱包充值的虚拟货币,按照1:1的比例进行支付金额的抵扣。
2.余额无法直接购买下载,可以购买VIP、付费专栏及课程。

余额充值