


SpringBoot使用Redis实现 自动缓存 更新 删除
本篇主要讲述如何使用基本的注解 @Cacheable @CachePut @CacheEvict 操作缓存
1.我们导入Redis的依赖
<!--这里Redis我给了版本-->
 <dependency>
 <groupId>org.springframework.boot</groupId>
 <artifactId>spring-boot-starter-data-redis</artifactId>
 <version>1.5.10.RELEASE</version>
 </dependency>
 <dependency>
 <groupId>org.springframework.boot</groupId>
 <artifactId>spring-boot-starter-cache</artifactId>
 </dependency>
<!--使用配置类时,防止乱码需要用到的包-->
 <dependency>
 <groupId>org.springframework.boot</groupId>
 <artifactId>spring-boot-configuration-processor</artifactId>
 <optional>true</optional>
 </dependency>
2.编写配置类
@ConfigurationProperties(prefix = "spring.cache.redis")
@Configuration
public class RedisConfig {
 private Duration timeToLive = Duration.ZERO;
 public void setTimeToLive(Duration timeToLive) {
 this.timeToLive = timeToLive;
 }
 @Bean
 /**
 * 该bean只针对cache存入到数据乱码问题
 */
 public RedisCacheManager cacheManager(RedisConnectionFactory factory) {
 RedisSerializer<String> redisSerializer = new StringRedisSerializer();
 Jackson2JsonRedisSerializer jackson2JsonRedisSerializer = new Jackson2JsonRedisSerializer(Object.class);
 //解决查询缓存转换异常的问题
 ObjectMapper om = new ObjectMapper();
 om.setVisibility(PropertyAccessor.ALL, JsonAutoDetect.Visibility.ANY);
 om.enableDefaultTyping(ObjectMapper.DefaultTyping.NON_FINAL);
 jackson2JsonRedisSerializer.setObjectMapper(om);
 // 配置序列化(解决乱码的问题)
 RedisCacheConfiguration config = RedisCacheConfiguration.defaultCacheConfig()
 .entryTtl(timeToLive)
 .serializeKeysWith(RedisSerializationContext.SerializationPair.fromSerializer(redisSerializer))
 .serializeValuesWith(RedisSerializationContext.SerializationPair.fromSerializer(jackson2JsonRedisSerializer))
 .disableCachingNullValues();
 RedisCacheManager cacheManager = RedisCacheManager.builder(factory)
 .cacheDefaults(config)
 .build();
 return cacheManager;
 }
}
3.配置文件
#要连接的数据是哪个
spring.redis.database=1
#数据连接地址
spring.redis.host=localhost
#端口号
spring.redis.port=6379
#连接超时时间
spring.redis.timeout=1s
#最大连接数
spring.redis.jedis.pool.max-active=20
#最大空闲连接
spring.redis.jedis.pool.max-idle=20
#最小空闲连接
spring.redis.jedis.pool.min-idle=10
#最大等待阻塞等待时间
spring.redis.jedis.pool.max-wait=-1ms
#在写入Redis时是否要使用key前缀
spring.cache.redis.use-key-prefix=true
#key前缀
spring.cache.redis.key-prefix=dev
#是否允许有null值
spring.cache.redis.cache-null-values=false
#设置缓存存在时间,只针对cacheable存入数据有用
spring.cache.redis.time-to-live=120s
4.现在我们的环境准备好了,开始编写代码
这里是pojo
@Table(name = "user1")
public class User implements Serializable {
 @Id
 private Integer id;
 private String name;
 private String pwd;
 public Integer getId() {
 return id;
 }
 public void setId(Integer id) {
 this.id = id;
 }
 public String getName() {
 return name;
 }
 public void setName(String name) {
 this.name = name;
 }
 public String getPwd() {
 return pwd;
 }
 public void setPwd(String pwd) {
 this.pwd = pwd;
 }
 @Override
 public String toString() {
 return "User{" +
 "id=" + id +
 ", name='" + name + ''' +
 ", pwd='" + pwd + ''' +
 '}';
 }
}
这里是dao类
@org.apache.ibatis.annotations.Mapper
public interface UserMapper extends Mapper<User> {
}
这里是在service类上使用注解
@CacheConfig(cacheNames = "user")//注意,用于同一配置给其它注解配置名称
public class UserServiceImpl implements UserService {
 @Autowired
 private UserMapper userMapper;
 @Override
 @Cacheable(key="#p0")//该注解用于向缓存中存入数据
 public User findUser(Integer id) {
 System.out.println("查询数据了"+id);
 User user = userMapper.selectByPrimaryKey(id);
 return user;
 }
 @Override
 @CachePut(key="#p0.id")//该注解用于更新缓存中的注解
 public User updateUser(User user) {
 userMapper.updateByPrimaryKeySelective(user);
 return user;
 }
 @Override
 @CacheEvict(key="#p0")//该注解用于删除缓存
 public void deleteUser(Integer id) {
 userMapper.deleteByPrimaryKey(id);
 }
 @Override
 public List<User> findUsers() {
 return userMapper.selectAll();
 }
}
注意,这里需要说明一下,#p0代表第一个参数,返回值默认是方法的返回值,@Cacheable之类的注解必须要有value值,这里我在类上加@CacheConfig注解,使下面的注解有了同一个value值
这里是controller里面的代码
@RestController
@RequestMapping("/user")
public class UserController {
 @Resource
 private UserService userService;
 @GetMapping
 public ResponseEntity<List<User>> findUsers(){
 try {
 List<User> users = userService.findUsers();

 return new ResponseEntity<>(users,HttpStatus.OK);
 } catch (Exception e) {
 e.printStackTrace();
 return new ResponseEntity<>(HttpStatus.INTERNAL_SERVER_ERROR);
 }
 }
 @GetMapping("/{id}")
 public ResponseEntity<User> findUser(@PathVariable("id")Integer id){
 try {
 User user = userService.findUser(id);
 return new ResponseEntity<>(user, HttpStatus.OK);
 } catch (Exception e) {
 e.printStackTrace();
 return new ResponseEntity<>(HttpStatus.INTERNAL_SERVER_ERROR);
 }
 }
 @PutMapping
 public ResponseEntity<String> updateUser(@RequestBody User user){
 try {
 userService.updateUser(user);
 return new ResponseEntity<>("修改成功",HttpStatus.OK);
 } catch (Exception e) {
 e.printStackTrace();
 return new ResponseEntity<>(HttpStatus.INTERNAL_SERVER_ERROR);
 }
 }
 @DeleteMapping("/{id}")
 public ResponseEntity<Void> deleteUser(@PathVariable("id")Integer id){
 try {
 userService.deleteUser(id);
 return new ResponseEntity<>(HttpStatus.OK);
 } catch (Exception e) {
 e.printStackTrace();
 return new ResponseEntity<>(HttpStatus.INTERNAL_SERVER_ERROR);
 }
 }
}
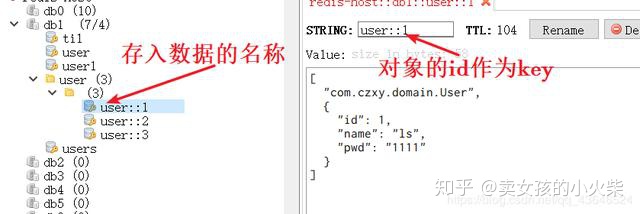
5.这里是数据库的数据
6.好了,后台代码到这基本就完成了,现在自己编写一下前台,完成测试
- 最后说一下需要注意的点,配置文件中的时间配置规定了缓存存在的时间,这里我设置的是120s
- 这里的配置类必须这样配置,否则,存入到数据的数据会乱码
- 更新的时候,注意方法的返回值,否则数据存入的数据为null


 1万+
1万+


 被折叠的 条评论
为什么被折叠?
被折叠的 条评论
为什么被折叠?
 到【灌水乐园】发言


