


今天的笔记为图像的平移、水平和垂直对称。前半部分是原理记录,后半部分将三种算法用python实现,定义一个便于扩展的类整合多个功能,如果有bug请帮我找出。
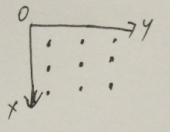
首先要引入图像坐标系的概念,按照自己看到的资料,比如数字图像处理教材,图像坐标系应该是左上角被定义为坐标原点,这样图像的像素位置就能用坐标表示了:
笔记包含两部分:
第一部分:图像平移,水平和垂直对称原理
第二部分:算法python实现
1.1、图像平移
图像平移的次序:图像的平移就是像素点的平移,首先选定一个像素点(x0,y0),目的就是把这个像素点移动到(x,y),自行设定移动的偏移量为(dx,dy)。如下图所示:
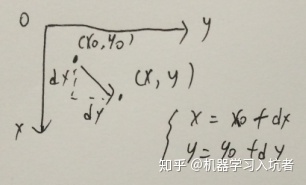
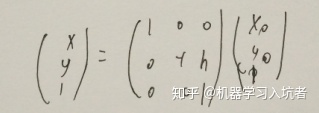
用方程组的形式表示为:
x = x0 + dx
y = y0 + dy
个人认为,接下来将方程组写成矩阵的形式目的是矩阵计算更快,而且能和其它的变换统一形式,后面写代码就能体现这种优势了,可以把几种变换统一通过3x3的核表示。查阅资料发现,三维的变换矩阵可以实现与缩放和旋转的连续变换,也就需要采用齐次坐标的形式:

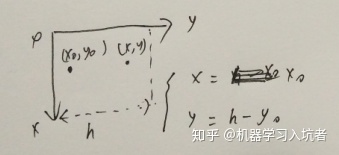
1.2 图像垂直对称
由于这里的x和y轴与中学阶段学习的坐标轴不太一样,容易把水平和垂直混淆起来。我觉得垂直对称应该是沿着y轴方向的。也就是说x=x0不变,但是y和y0翻转过来。另外,平移和对称操作与之前记录的图像增强是不同的,之前都是“值变换”,将像素值改变,图像的颜色纹理等会变换;这里是“位置变换”,像素值不变,仅仅是像素值的位置变换。
写成矩阵形式如下:
可以验证,这个矩阵计算展开就是前面的方程组。这个变换阵和平移变换阵都是3x3的,所以它们就这样可以统一计算了。
1.3 图像水平对称
水平对称和垂直对称的原理是类似的。研究的对象依旧是像素点的初试坐标(x0,y0),找到一个矩阵计算关系把它移动到新的位置(x,y),保持像素值大小不变。变换示意图如下:
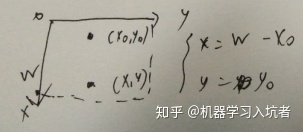
水平对称的时候y=y0不变,x进行反转。
这个矩阵计算展开就是水平对称的变换方程组。(最后面少写了1,应该是[x0, y0, 1])。
2、算法python实现
下面从数据准备,平移和对称函数以及变换函数开始记录,最后给出Transform类的整体代码。
2.1 数据读取:
为了更好的看出平移效果,可以给小图片加上一个大背景:
import 这样就得到了宇智波鼬:

当然也可以不选择加黑色的背景。
2.2 平移、水平、垂直对称的“核”
不知到把变换矩阵称为核是不是合适,但是我觉得这个卷积的原理是类似的。通过第一部分得到变换矩阵就能得到下面的几种核。
def get_move_kernel(self, dx, dy):
        """ get move kernel by dx dy"""
        return np.array([[1, 0, dx], [0, 1, dy], [0, 0, 1]])

    def get_flip_vertical_kernel(self, image_height):
        """ get vertical filp kernel"""
        return np.array([[1, 0, 0], [0, -1, image_height], [0, 0, 1]])

    def get_flip_horizontal_kernel(self, image_width):
        """ get horizontal filp kernel"""
        return np.array([[-1, 0, image_width], [0, 1, 0], [0, 0, 1]])
2.3 统一处理变换的函数trans
因为前面已经将几种变换矩阵获得了,接下来就能根据类的调用者指定的变换类型,从get_xxx()中取得相应的核,不需要调用者去考虑变换矩阵是什么。
def trans(self,image, trans_type, params_list):
        """
        excute transform by specific type
        Args:
            image: image with numpy type
            trans_type: a string within ["move", "flip_vertical", "flip_horizontal", "rotate"]
            params_list: put the dx/dy or rotate angle into this list
        Returns:
            processd image
        """
        #
        if not isinstance(image, np.ndarray):
            raise ValueError("desire np.ndarray but input is: {}".format(image.__class__))
        if not trans_type in self.__transform_type.keys():
            raise ValueError("no such transform type : {} in Tansfrom's functions".format(trans_tpye))

        kernel = eval("self.get_" + trans_type + "_kernel")(*params_list)

        target_image = np.zeros(shape=image.shape)

        # 平移的目的,对于原图的某个位置(x0,y0)的像素“值”
        # 把这个“值”放到新的位置(x,y)处
        # 那么计算核心就是计算出这个“值”要放到“哪个新的位置”
        # 所以下面的双层循环的目的是通过原始位置和偏移量计算出新位置
        for x0 in range(image.shape[0]):
            for y0 in range(image.shape[1]):
                original_position = np.array([x0, y0, 1])
                target_position = np.dot(kernel, original_position)

                def fill_value():
                    x, y, _ = target_position
                    x, y = int(x), int(y)
                    # 检查变换后的位置是不是超过图片尺寸边界
                    if x>(image.shape[0]-1) or y>(image.shape[1]-1) or x<0 or y<0:
                        pass
                    else:
                        target_image[x, y, :] = image[x0, y0, :]
                fill_value()
        return target_image
trans()函数首先进行类型检查和变换是不是包含在类属性内,self.__transfrom_type是一个私有的属性,定义在类初始化函数内,类的初始化函数如下:
 def __init__(self):
        """ initialize the transform type
        """
        self.__transform_type = {"move":2, "flip_vertical":1, "flip_horizontal":1, "rotate":1}
另外,trans()函数内部定义了fill_value()函数,这个函数单独用来对新位置进行赋值。
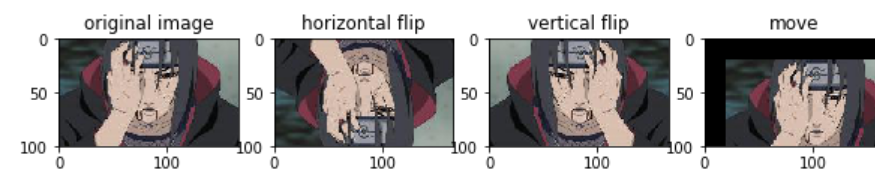
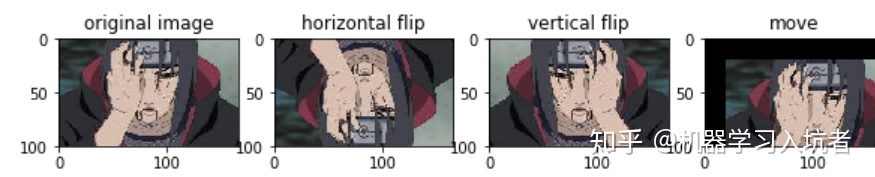
调用这个函数可以得到几种变换结果:
2.4 完整代码如下
import numpy as np
import matplotlib.pyplot as plt
from PIL import Image

def read_image(image_path, if_show=True, if_dark=False):
    """ read a image and put it into a bigger dark image
    Args:
        image_path:like data/1.jpg,string type
        if_show: show result numpy array image
        if_dark: make a larger black background for image
    Returns:
        numpy image
    """
    image = np.array(Image.open(image_path))
    if if_dark:
        w, h, c = image.shape
        # create new image container
        result_image = np.zeros(shape=(w*3, h*3, c))
        result_image[w:2*w, h:2*h] = image

    else:
        result_image = image

    if if_show:
        plt.imshow(result_image/255)
        plt.show()
    return result_image

image = read_image("ida.jpg", if_show=True, if_dark=True)
print(image.shape)

class Transform:
    """
    custom image transform operations
    """
    def __init__(self):
        """ initialize the transform type
        """
        self.__transform_type = {"move":2, "flip_vertical":1, "flip_horizontal":1, "rotate":1}

    def get_move_kernel(self, dx, dy):
        """ get move kernel by dx dy"""
        return np.array([[1, 0, dx], [0, 1, dy], [0, 0, 1]])

    def get_flip_vertical_kernel(self, image_height):
        """ get vertical filp kernel"""
        return np.array([[1, 0, 0], [0, -1, image_height], [0, 0, 1]])

    def get_flip_horizontal_kernel(self, image_width):
        """ get horizontal filp kernel"""
        return np.array([[-1, 0, image_width], [0, 1, 0], [0, 0, 1]])

    def get_rotate_kernel(self, beta):
        """ get rotate kernel by rotate angle """
        return np.array([[np.cos(beta), np.sin(beta), 0],
                         [-np.sin(beta), np.cos(beta), 0], [0, 0, 1]])

    def trans(self,image, trans_type, params_list):
        """
        excute transform by specific type
        Args:
            image: image with numpy type
            trans_type: a string within ["move", "flip_vertical", "flip_horizontal", "rotate"]
            params_list: put the dx/dy or rotate angle into this list
        Returns:
            processd image
        """
        #
        if not isinstance(image, np.ndarray):
            raise ValueError("desire np.ndarray but input is: {}".format(image.__class__))
        if not trans_type in self.__transform_type.keys():
            raise ValueError("no such transform type : {} in Tansfrom's functions".format(trans_tpye))

        kernel = eval("self.get_" + trans_type + "_kernel")(*params_list)

        target_image = np.zeros(shape=image.shape)

        # 平移的目的,对于原图的某个位置(x0,y0)的像素“值”
        # 把这个“值”放到新的位置(x,y)处
        # 那么计算核心就是计算出这个“值”要放到“哪个新的位置”
        # 所以下面的双层循环的目的是通过原始位置和偏移量计算出新位置
        for x0 in range(image.shape[0]):
            for y0 in range(image.shape[1]):
                original_position = np.array([x0, y0, 1])
                target_position = np.dot(kernel, original_position)

                def fill_value():
                    x, y, _ = target_position
                    x, y = int(x), int(y)
                    if x>(image.shape[0]-1) or y>(image.shape[1]-1) or x<0 or y<0:
                        pass
                    else:
                        target_image[x, y, :] = image[x0, y0, :]
                fill_value()
        return target_image


t = Transform()
# 旋转算法尚未完成,因为出现了某些位置无法对应的bug,可能需要辅助插值算法
# rotate_image = t.trans(image=image, trans_type="rotate", params_list=[np.pi/4])
hor_image = t.trans(image=image, trans_type="flip_horizontal", params_list=[image.shape[0]])
ver_image = t.trans(image=image, trans_type="flip_vertical", params_list=[image.shape[1]])
move_image = t.trans(image=image, trans_type="move", params_list=[20, 20])
# rotate_image = t.trans(image=image, trans_type="rotate", params_list=[30])

# plot_image = [hor_image, ver_image, move_image, rotate_image]
plot_image = {"original image":image, "horizontal flip":hor_image,
              "vertical flip":ver_image, "move":move_image}
plt.figure(figsize=(15, 10))
for i, temp_image in enumerate(plot_image.values()):
    plt.subplot(1, len(plot_image)+1, i+1)
    plt.title(list(plot_image.keys())[i])
    plt.imshow(temp_image/255)
plt.show()


 957
957

 被折叠的 条评论
为什么被折叠?
被折叠的 条评论
为什么被折叠?
 到【灌水乐园】发言


