


ps:activemq 安全版本,请尽量使用如下版本
Apache ActiveMQ 5.18.3
Apache ActiveMQ 5.17.6
Apache ActiveMQ 5.16.7
Apache ActiveMQ 5.15.16
系统目录
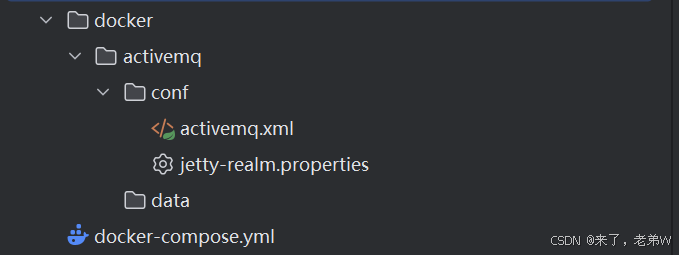
创建目录
mkdir -p /docker/activemq/data
mkdir -p /docker/activemq/conf
赋予权限
chmod 777 /docker/activemq/data
chmod 777 /docker/activemq/conf
修改 docker/activemq/conf/activemq.xml 文件
cd /docker/activemq/conf
vi activemq.xml
找到标签broker 加上schedulerSupport="true" 开启延迟队列
PS:(如果你们的系统也安装了rabbitmq并且用的是network_mode: "host"模式,需要修改下面的5672端口,因为会冲突)
<!--
Licensed to the Apache Software Foundation (ASF) under one or more
contributor license agreements. See the NOTICE file distributed with
this work for additional information regarding copyright ownership.
The ASF licenses this file to You under the Apache License, Version 2.0
(the "License"); you may not use this file except in compliance with
the License. You may obtain a copy of the License at
http://www.apache.org/licenses/LICENSE-2.0
Unless required by applicable law or agreed to in writing, software
distributed under the License is distributed on an "AS IS" BASIS,
WITHOUT WARRANTIES OR CONDITIONS OF ANY KIND, either express or implied.
See the License for the specific language governing permissions and
limitations under the License.
-->
<!-- START SNIPPET: example -->
<beans
xmlns="http://www.springframework.org/schema/beans"
xmlns:xsi="http://www.w3.org/2001/XMLSchema-instance"
xsi:schemaLocation="http://www.springframework.org/schema/beans http://www.springframework.org/schema/beans/spring-beans.xsd
http://activemq.apache.org/schema/core http://activemq.apache.org/schema/core/activemq-core.xsd">
<!-- Allows us to use system properties as variables in this configuration file -->
<bean class="org.springframework.beans.factory.config.PropertyPlaceholderConfigurer">
<property name="locations">
<value>file:${activemq.conf}/credentials.properties</value>
</property>
</bean>
<!--
The <broker> element is used to configure the ActiveMQ broker.
-->
<broker xmlns="http://activemq.apache.org/schema/core" brokerName="localhost" dataDirectory="${activemq.data}" schedulerSupport="true">
<destinationPolicy>
<policyMap>
<policyEntries>
<policyEntry topic=">" >
<!-- The constantPendingMessageLimitStrategy is used to prevent
slow topic consumers to block producers and affect other consumers
by limiting the number of messages that are retained
For more information, see:
http://activemq.apache.org/slow-consumer-handling.html
-->
<pendingMessageLimitStrategy>
<constantPendingMessageLimitStrategy limit="1000"/>
</pendingMessageLimitStrategy>
</policyEntry>
</policyEntries>
</policyMap>
</destinationPolicy>
<!--
The managementContext is used to configure how ActiveMQ is exposed in
JMX. By default, ActiveMQ uses the MBean server that is started by
the JVM. For more information, see:
http://activemq.apache.org/jmx.html
-->
<managementContext>
<managementContext createConnector="false"/>
</managementContext>
<!--
Configure message persistence for the broker. The default persistence
mechanism is the KahaDB store (identified by the kahaDB tag).
For more information, see:
http://activemq.apache.org/persistence.html
-->
<persistenceAdapter>
<kahaDB directory="${activemq.data}/kahadb"/>
</persistenceAdapter>
<!--
The systemUsage controls the maximum amount of space the broker will
use before disabling caching and/or slowing down producers. For more information, see:
http://activemq.apache.org/producer-flow-control.html
-->
<systemUsage>
<systemUsage>
<memoryUsage>
<memoryUsage percentOfJvmHeap="70" />
</memoryUsage>
<storeUsage>
<storeUsage limit="100 gb"/>
</storeUsage>
<tempUsage>
<tempUsage limit="50 gb"/>
</tempUsage>
</systemUsage>
</systemUsage>
<!--
The transport connectors expose ActiveMQ over a given protocol to
clients and other brokers. For more information, see:
http://activemq.apache.org/configuring-transports.html
-->
<transportConnectors>
<!-- DOS protection, limit concurrent connections to 1000 and frame size to 100MB -->
<transportConnector name="openwire" uri="tcp://0.0.0.0:61616?maximumConnections=1000&wireFormat.maxFrameSize=104857600"/>
<transportConnector name="amqp" uri="amqp://0.0.0.0:5673?maximumConnections=1000&wireFormat.maxFrameSize=104857600"/>
<transportConnector name="stomp" uri="stomp://0.0.0.0:61613?maximumConnections=1000&wireFormat.maxFrameSize=104857600"/>
<transportConnector name="mqtt" uri="mqtt://0.0.0.0:1883?maximumConnections=1000&wireFormat.maxFrameSize=104857600"/>
<transportConnector name="ws" uri="ws://0.0.0.0:61614?maximumConnections=1000&wireFormat.maxFrameSize=104857600"/>
</transportConnectors>
<!-- destroy the spring context on shutdown to stop jetty -->
<shutdownHooks>
<bean xmlns="http://www.springframework.org/schema/beans" class="org.apache.activemq.hooks.SpringContextHook" />
</shutdownHooks>
</broker>
<!--
Enable web consoles, REST and Ajax APIs and demos
The web consoles requires by default login, you can disable this in the jetty.xml file
Take a look at ${ACTIVEMQ_HOME}/conf/jetty.xml for more details
-->
<import resource="jetty.xml"/>
</beans>
<!-- END SNIPPET: example -->
接着修改 jetty-realm.properties 文件
cd /docker/activemq/conf
vi jetty-realm.properties
admin:admin,admin 这个修改成你自己的密码就可以
## ---------------------------------------------------------------------------
## Licensed to the Apache Software Foundation (ASF) under one or more
## contributor license agreements.  See the NOTICE file distributed with
## this work for additional information regarding copyright ownership.
## The ASF licenses this file to You under the Apache License, Version 2.0
## (the "License"); you may not use this file except in compliance with
## the License.  You may obtain a copy of the License at
##
## http://www.apache.org/licenses/LICENSE-2.0
##
## Unless required by applicable law or agreed to in writing, software
## distributed under the License is distributed on an "AS IS" BASIS,
## WITHOUT WARRANTIES OR CONDITIONS OF ANY KIND, either express or implied.
## See the License for the specific language governing permissions and
## limitations under the License.
## ---------------------------------------------------------------------------

# Defines users that can access the web (console, demo, etc.)
# username: password [,rolename ...]
admin: 123456, admin
user: user, user
返回docker目录,编写docker-compose.yml 文件
cd /docker
vi docker-compose.yml
复制下面内容
version: '3'

services:
  activemq:
    image: apache/activemq-classic:5.18.3
    container_name: activemq
    ports:
      - "8161:8161"   # Web 控制台端口
      - "61616:61616" # JMS 端口
    volumes:
      - /docker/activemq/data:/opt/apache-activemq/data
      - /docker/activemq/conf/activemq.xml:/opt/apache-activemq/conf/activemq.xml
      - /docker/activemq/conf/jetty-realm.properties:/opt/apache-activemq/conf/jetty-realm.properties
    network_mode: "host"
保存之后,执行下面命令,进行构建,并启动
docker-compose up -d activemq浏览器输入 http://127.0.0.1:8161/
登录查看延迟队列是否开启
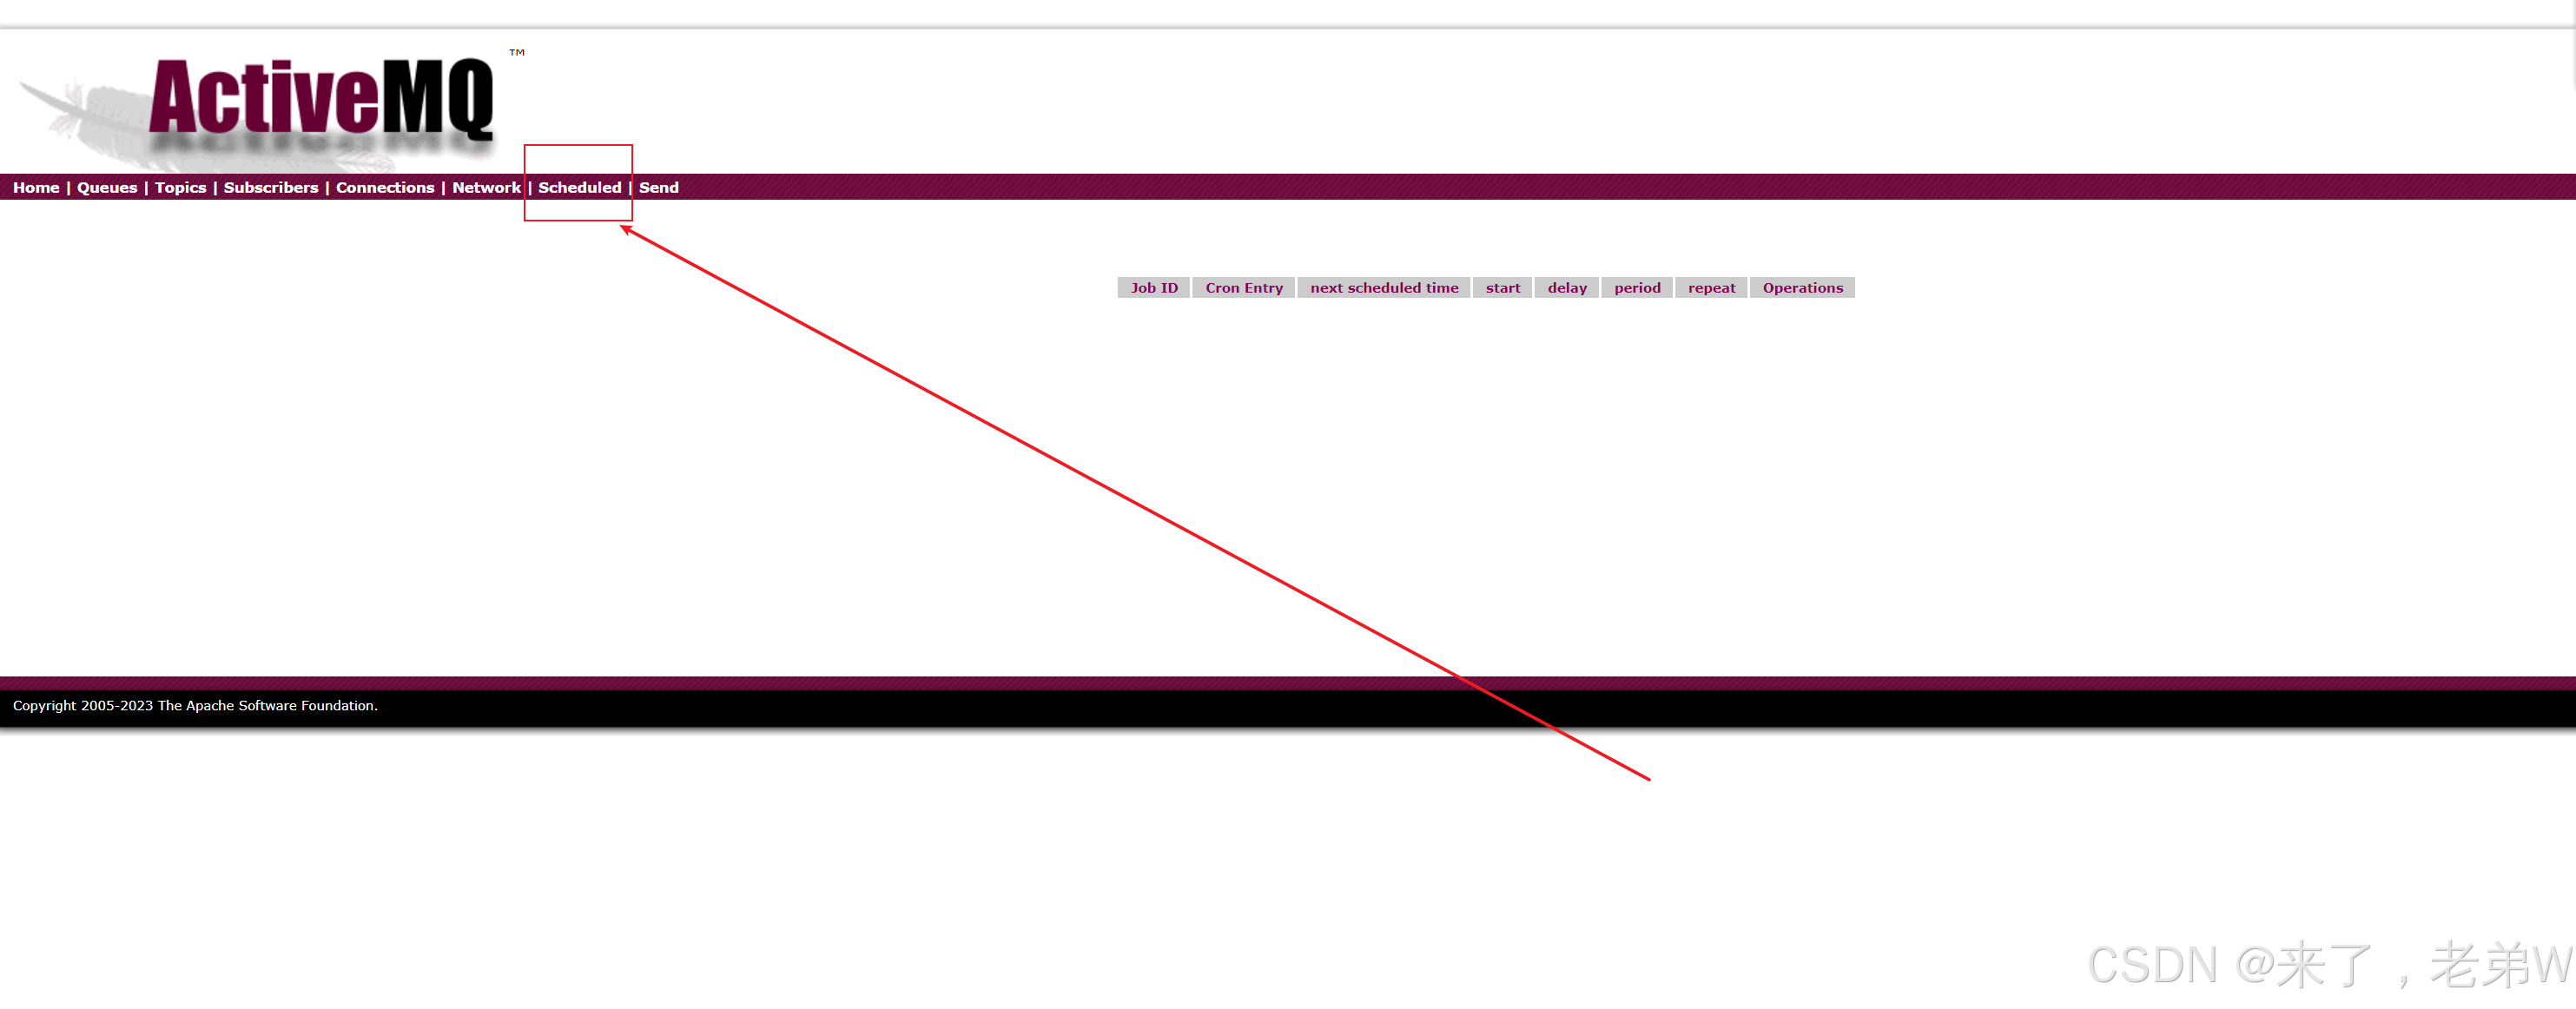
点击 Scheduled 能打开代表开启成功!


 936
936

 被折叠的 条评论
为什么被折叠?
被折叠的 条评论
为什么被折叠?
 到【灌水乐园】发言


