


本文将主要介绍tensorflow 的Estimator 这个高级API,它的主要作用就是提出一个高级范式(paradigm),将模型的训练,验证,预测,以及保存规范起来,免去了tensorflow的Session.run 的操作,并且很好地结合了 tf.data.Dataset 作为数据处理的包装,使得整个思路变得非常清晰。
Estimator 并没有改变网络结构的定义,而是将训练,验证,测试的管理抽象起来,并且简单化,形成一个范式,用户可以通过实现对应的部分,从而使得模型的管理便捷起来。
BERT的源码实现采用的是TPU的estimator的方式,但是大家日常训练模型的时候,很多都无法使用得Â上TPU,虽然 TPUEstimator 会自动适配到CPU 或者 GPU 的普通 Estimator, 但是我在使用tensorflow==1.14.0的时候,会发现在训练过程中的logging无法获得训练过程中的loss变化等,只有下图的log信息。see github issue
具体改动后的代码详见:https://github.com/dongxiaohuang/TextClassifier_Transformer/blob/master/run_classifier_serving_gpu.py
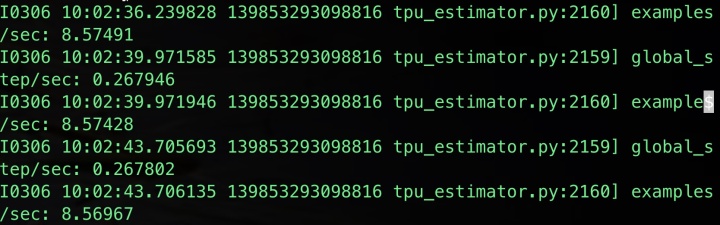
这些信息对于debug来说是远远不够的,当然可以通过增加log hook的方式定时打印需要的log,但是即使这样日志还是多条才看能到一次loss。于是我就将 TPUEstimator 收到改成普通的 Estimator 实现,并且成功地获得正常的日志输出。

本文将会介绍总体介绍 Estimator, 然后介绍各个component,并配以bert实现进行讲解。有问题麻烦指出,谢谢。
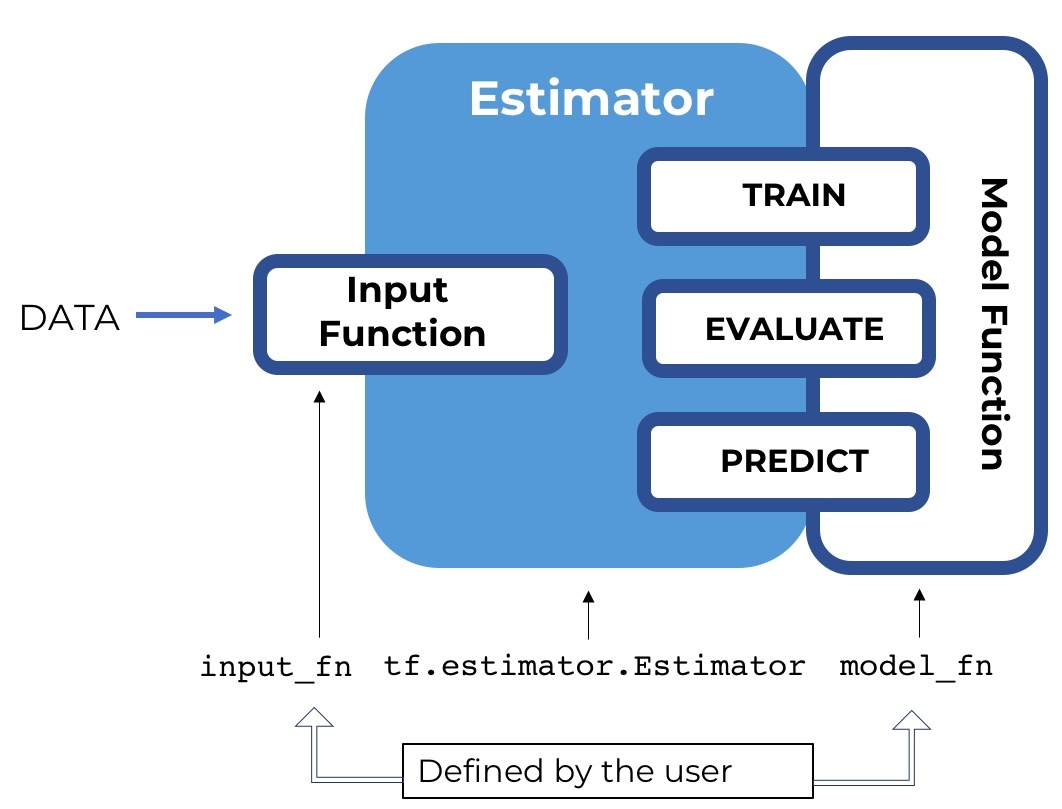
Estimator 组成
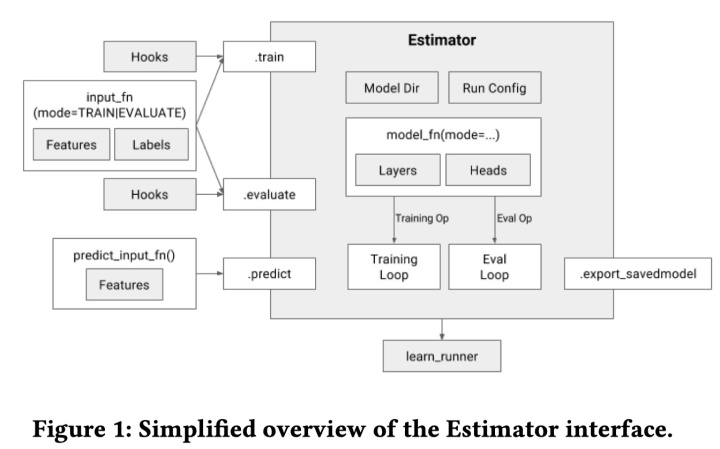
首先我们创建一个estimator,它对外暴露了4个接口,分别是: train(), evaluate(), predict(), export_savedmodel(),对应的是模型的训练,验证,预测,以及导出。estimator 通过用户实现 model_fn 构建模型,并且通过 model_fn 的实现不同的mode(ModeKeys.TRAIN,ModeKeys.EVAL,ModeKeys.PREDICT),返回不同的EstimatorSpec。
对于 train, evaluate, predict 都需要传入相应的 input_fn, 代表训练集,验证集,以及测试集。input_fn 将返回features,以及lables。具体的 input_fn 的将会单独介绍,我们只需要知道它构造 tf.data.Dataset, 作为estimator不同模式的数据源就行了。
def input_fn(dataset):
  ... #manipulate dataset, extracting teh feature dict and the label
  return feat_dict, label
我们可以通过不同hooks,在estimator执行的不同阶段,执行自己的某些操作,例如增加log,或者是early stopping等。
使用 estimator 构建模型
使用 estimator 构建模型,你需要实现 model_fn(features, labels, mode, params) -> tf.estimator.EstimatorSpec , 该函数有严格的函数签名,并且将会hold 模型图定义。
- features:input_fn 返回的第一个参数,即输入数据的特征Tensor
- labels: input_fn 返回的第二个参数,即输入数据的label
- mode: string,根据这个mode (PREDICT, EVAL or TRAIN) 去决定我们要运行 model_fn 中哪一部分的graph要被建立。我们会在 model_fn 中实现三种模式的不同的graph,然后通过estimator的不同的方法(train/evaluate/predict)被调用,执行不同部分,而build 不同的graph。
- params:一个参数的字典,与 estimator 的参数之一 params 对应,例如我们有一个params 的字典
  params = {
    'buffer': 15000,
    'lstm_size': 100,
    'words': str(Path(DATADIR, 'vocab.words.txt')),
    'chars': str(Path(DATADIR, 'vocab.chars.txt')),
    'tags': str(Path(DATADIR, 'vocab.tags.txt')),
    'glove': str(Path(DATADIR, 'glove.npz'))
}
我们要使用buffer,可以直接通过 params['buffer'] 使用。当然我们不使用这一参数也可以,我们可以通过构建一个 model_fn_builder() 将参数传入这个builder中,最后返回 model_fn(),BERT中也是这么实现的,待会会具体介绍。
模型的 model_fn 的主要实现框架如下,通过features的输入传入模型,得到输出,然后根据不同mode,实现特定输出。Estimator是通过 model_fn 进行配置的,该函数构建了tensorflow的图,并且返回了足够的信息使得模型可以进行训练,验证,测试及导出。使用自定义的estimator只需要实现这个函数。大概的实现框架如下图
def model_fn(features, labels, mode, params):
    # Define the inference graph
    graph_outputs = some_tensorflow_applied_to(features)

    if mode == tf.estimator.ModeKeys.PREDICT:
        # Extract the predictions
        predictions = some_dict_from(graph_outputs)
        return tf.estimator.EstimatorSpec(mode, predictions=predictions)
    else:
        # Compute loss, metrics, tensorboard summaries
        loss = compute_loss_from(graph_outputs, labels)
        metrics = compute_metrics_from(graph_outputs, labels)

        if mode == tf.estimator.ModeKeys.EVAL:
            return tf.estimator.EstimatorSpec(
                mode, loss=loss, eval_metric_ops=metrics)

        elif mode == tf.estimator.ModeKeys.TRAIN:
            # Get train operator
            train_op = compute_train_op_from(graph_outputs, labels)
            return tf.estimator.EstimatorSpec(
                mode, loss=loss, train_op=train_op)

        else:
            raise NotImplementedError('Unknown mode {}'.format(mode))
定义inference 图
首先我们将根据我们的特征输入,构建我们的graph。下面的代码主要是通过数据的features传入 BERT模型, 然后获得模型的loss, probabilities 等结果,然后通过预训练模型进行初始化,具体原理参考BERT详解。
# 正常图构造
input_ids = features["input_ids"]
input_mask = features["input_mask"]
segment_ids = features["segment_ids"]
label_ids = features["label_ids"]
is_real_example = None
if "is_real_example" in features:
  is_real_example = tf.cast(features["is_real_example"], dtype=tf.float32)
else:
  is_real_example = tf.ones(tf.shape(label_ids), dtype=tf.float32)

(total_loss, per_example_loss, probabilities, predictions) =
    create_model(albert_config, is_training, input_ids, input_mask,
                 segment_ids, label_ids, num_labels, use_one_hot_embeddings)
# 模型参数通过预训练模型进行初始化,fine-tuning
tvars = tf.trainable_variables()
initialized_variable_names = {}
if init_checkpoint:
  (assignment_map, initialized_variable_names
  ) = modeling.get_assignment_map_from_checkpoint(tvars, init_checkpoint)
  tf.train.init_from_checkpoint(init_checkpoint, assignment_map)
Train Mode
在训练模式的时候,EstimatorSpec需要返回三个参数
- mode(所有模式都必须有的)
- loss:训练的loss
- train_op:训练的operation,一般是通过 optimizer.minimise(loss)
if mode == tf.estimator.ModeKeys.TRAIN:

      train_op = optimization.create_optimizer(
          total_loss, learning_rate, num_train_steps, num_warmup_steps, False)

      output_spec = tf.estimator.EstimatorSpec(
        mode=mode,
        loss=total_loss,
        train_op=train_op
      )
Eval Mode
在 tf.estimator.ModeKeys.EVAL 模式下,我们需要返回
- - mode
- - loss
- - eval_metric_ops: 评测的Metric operation 指标。这是一个字典(metrics dictionary)的形式,key是评测指标的名称(string),value是tuple的形式,tuple由以下两个tensor 组成:
- 第一个元素是 value_op,它指的是真实最终的metrics value。
- 第二个元素是 update_op,它指的是用来更新metrics value的tensor,为什么这样设计是因为,我们通常在做验证的时候,数据不能一下子fit进memory 或者其它原因,我们不能通过一次性在验证集上进行验证,我们是通过mini batch的方式进行评测的,而batch的方式就导致我们需要每验证一个batch就更新我们的metrics value,而不是单独地使用某一个batch的metrics value作为结果。
其中 Metrics 是layers的一个特殊类,通常用于做evaluation:它的输入是真是值 labels,以及预测值 predictions,可选项权重weights;输出是metric 例如说是 log-likelihood, accuracy,或者MSE等。该输出由两个Tensor组成,update op:这每一个 minibatch 都会计算; 然后是 value op:这个计算最后的metric value。所以我们可以借助metrics这个类,来计算我们需要的验证指标,例如列了常见了几种metric的计算方式,其中 tf_metrics以及ref 里面实现了accuracy以及recall,f1等评测指标。
'accuracy': tf.metrics.accuracy(
            labels=label_ids, predictions=predictions, weights=is_real_example)
'loss': tf.metrics.mean(values=per_example_loss, weights=is_real_example)
'Recall@5': metrics.streaming_sparse_recall_at_k(predictions, tf.cast(labels["class_idx"], tf.int64), 5)
'precision': tf_metrics.precision(tags, pred_ids, num_tags, indices, weights),
'recall': tf_metrics.recall(tags, pred_ids, num_tags, indices, weights),
'f1': tf_metrics.f1(tags, pred_ids, num_tags, indices, weights),
其中tf_metrics 可以通过以下指令安装: pip install git+https://github.com/guillaumegenthial/tf_metrics.git
其中BERT的实现如下:
elif mode == tf.estimator.ModeKeys.EVAL:

      def metric_fn(per_example_loss, label_ids, predictions, is_real_example):
        accuracy = tf.metrics.accuracy(
            labels=label_ids, predictions=predictions, weights=is_real_example)
        loss = tf.metrics.mean(values=per_example_loss, weights=is_real_example)
        for metric_name, op in metrics.items(): # tensorboard
          tf.summary.scalar(metric_name, op[1])
        return {
            "eval_accuracy": accuracy,
            "eval_loss": loss,
        }
        eval_metric_ops = metric_fn(per_example_loss, label_ids, predictions, is_real_example)
        output_spec = tf.estimator.EstimatorSpec(
        mode=mode,
        loss=total_loss,
        eval_metric_ops=eval_metric_ops
Prediction Mode
prediction mode是最简单的模式,我们需要返回:
- mode
- predictions:这是一个字典,字典的key是我们要返回的tensor的名字,字典的value是我们要返回的tensor,例如说, 我们需要返回两个tensor,分别是 probabilities, predictions, 我们将他们直接构建一个字典,传入predictions这个参数中。
_,top_3 =  tf.nn.top_k(probabilities,k=3)
output_spec = tf.estimator.EstimatorSpec(
        mode=mode,
        predictions={"probabilities": probabilities,
                       "predictions": predictions,
                       "top_3":top_3
                       }
      )
BERT的model_fn 实现
bert的 model_fn 实现,并没有使用到estimator传入的params,而是通过构建一个 model_fn_builder, 将各种参数传入其中,最后返回需要的 model_fn(features, labels, mode, params) 函数。
def model_fn_builder(albert_config, num_labels, init_checkpoint, learning_rate,
                     num_train_steps, num_warmup_steps, use_one_hot_embeddings):

  def model_fn(features, labels, mode, params):  # pylint: disable=unused-argument
    """The `model_fn` for TPUEstimator."""

    tf.logging.info("*** Features ***")
    for name in sorted(features.keys()):
      tf.logging.info("  name = %s, shape = %s" % (name, features[name].shape))

    input_ids = features["input_ids"]
    input_mask = features["input_mask"]
    segment_ids = features["segment_ids"]
    label_ids = features["label_ids"]
    is_real_example = None
    if "is_real_example" in features:
      is_real_example = tf.cast(features["is_real_example"], dtype=tf.float32)
    else:
      is_real_example = tf.ones(tf.shape(label_ids), dtype=tf.float32)

    is_training = (mode == tf.estimator.ModeKeys.TRAIN)

    (total_loss, per_example_loss, probabilities, predictions) =
        create_model(albert_config, is_training, input_ids, input_mask,
                     segment_ids, label_ids, num_labels, use_one_hot_embeddings)

    tvars = tf.trainable_variables()
    initialized_variable_names = {}
    if init_checkpoint:
      (assignment_map, initialized_variable_names
      ) = modeling.get_assignment_map_from_checkpoint(tvars, init_checkpoint)
      tf.train.init_from_checkpoint(init_checkpoint, assignment_map)

    tf.logging.info("**** Trainable Variables ****")
    for var in tvars:
      init_string = ""
      if var.name in initialized_variable_names:
        init_string = ", *INIT_FROM_CKPT*"
      tf.logging.info("  name = %s, shape = %s%s", var.name, var.shape,
                      init_string)

    output_spec = None
    if mode == tf.estimator.ModeKeys.TRAIN:

      train_op = optimization.create_optimizer(
          total_loss, learning_rate, num_train_steps, num_warmup_steps, False)
      output_spec = tf.estimator.EstimatorSpec(
        mode=mode,
        loss=total_loss,
        train_op=train_op
      )
    elif mode == tf.estimator.ModeKeys.EVAL:

      def metric_fn(per_example_loss, label_ids, predictions, is_real_example):
        accuracy = tf.metrics.accuracy(
            labels=label_ids, predictions=predictions, weights=is_real_example)
        loss = tf.metrics.mean(values=per_example_loss, weights=is_real_example)
        return {
            "eval_accuracy": accuracy,
            "eval_loss": loss,
        }
      eval_metric_ops = metric_fn(per_example_loss, label_ids, predictions, is_real_example)
      output_spec = tf.estimator.EstimatorSpec(
        mode=mode,
        loss=total_loss,
        eval_metric_ops=eval_metric_ops
      )
    else:
      output_spec = tf.estimator.EstimatorSpec(
        mode=mode,
        predictions={"probabilities": probabilities,
                       "predictions": predictions}
      )
    return output_spec

  return model_fn
初始化Estimator
在定义完estimator之后,就可以初始化estimator了,estimator有四个参数:
- model_fn:我们上面定义的模型model_fn
- model_dir:模型保存的路径,如果没有设置,会使用config中的 model_dir 参数的值,如果两个都设置了,必须一致,如果两个都没有设置,那么将会保存在一个temp的路径下。
- config:estimator的config,下面会具体介绍
- params=None:params,字典形式,将会传给model_fn的params参数
- warm_start_from:string,checkpoint or SavedModel的文件路径用来warm_start
RunConfig
Runconfig主要用来设置模型保存的路径model_dir, 以及模型保存的频率 save_checkpoints_steps or save_checkpoints_secs (默认是600 seconds 保存一次,如果两个参数都设置未None,则不保存),以及Session的设置 session_config,例如说XLA是否开启等等。 或者说分布式策略设置train_distributeor eval_distribute 等等。
config = tf.compat.v1.ConfigProto()
  if FLAGS.horovod:
      tf.compat.v1.logging.info("Multi-GPU training with TF Horovod")
      tf.compat.v1.logging.info("hvd.size() = %d hvd.rank() = %d", hvd.size(), hvd.rank())
      global_batch_size = FLAGS.train_batch_size * FLAGS.num_accumulation_steps * hvd.size()
      master_process = (hvd.rank() == 0)
      hvd_rank = hvd.rank()
      config.gpu_options.visible_device_list = str(hvd.local_rank())

  if FLAGS.use_xla:
    config.graph_options.optimizer_options.global_jit_level = tf.compat.v1.OptimizerOptions.ON_1

  run_config = tf.estimator.RunConfig(
      model_dir=FLAGS.output_dir if master_process else None,
      session_config=config,
      save_checkpoints_steps=FLAGS.save_checkpoints_steps if master_process else None,
      keep_checkpoint_max=1)
实例化代码
estimator = tf.estimator.Estimator(
    model_fn=model_fn,
    config=run_config,
    params=None
  )
Estimator使用
estimator初始化完了之后,我们就很容易通过调用它的train 进行训练, 调用 evaluate进行验证, 调用predict 进行预测,同时调用export_saved_model导出SavedModel。通常我们还可以使用tf.estimator.train_and_evaluate()进行模型的训练及验证(推荐)。
训练
训练的脚本很简单,我们传入训练的input_fn(暂不cover在这个tutorial),以及hooks(下面会介绍),以及saving_listeners(每次checkpoint保存之后执行)。 train( input_fn, hooks=None, steps=None, max_steps=None, saving_listeners=None ) 具体的bert训练的脚本就是如下:
num_train_steps = int(len(train_examples) / FLAGS.train_batch_size * FLAGS.num_train_epochs)
estimator.train(input_fn=train_input_fn,
                max_steps=num_train_steps,
                hooks=[early_stopping_hook])
验证
evaluate(
    input_fn, steps=None, hooks=None, checkpoint_path=None, name=None
)
evaluate 函数将传入验证集的input_fn,验证的步数steps, hooks,以及模型的 checkpoint_path 注意如果:
- steps:验证步数,如果未None,则运行到input_fn raises an end-of-input exception.
- checkpoint_path:需要验证的模型的路径,如果 None, 会使用 model_dir 中最新的checkpoint。如果 model_dir 不存在或者没有checkpoints,会使用新初始化的参数下去验证,在我们bert例子中,就是用预训练的模型而不是fine-tuning的模型下去验证。
函数返回值是一个字典,即我们定义在 tf.estimator.ModeKeys.EVAL 模式下的字典结果。
result = estimator.evaluate(input_fn=eval_input_fn, steps=None, checkpoint_path=None)
for key in sorted(result.keys()):
    tf.logging.info("  %s = %s", key, str(result[key]))
预测
predict共有五个参数
predict(
    input_fn, predict_keys=None, hooks=None, checkpoint_path=None,
    yield_single_examples=True
)
- input_fn:测试集的传入input_fn
- predict_keys:list,如果未None,则返回所有的tf.estimator.EstimatorSpec里的 predictions 的所有key的值,否则,则只返回 predict_keys 里的key的值,过滤掉其他的keys。
- checkpoint_path:这个作用和evaluate的作用一致,如果没指定,则使用 model_dir 里最新的checkpoint,还是没有的话,则使用新初始化的参数模型进行预测。
- yield_single_examples:True 返回的结果以单条呈现,否则则按照feed进predictor的batch返回。
返回的是一个generator,yield 的是values of predictions tensors,其为字典形式,根据EstimatorSpec中predictions来的。我们要取用某个值时,跟平常字典使用类似。 例如我们要取得我们bert中的 probabilities 的值,我们可以采用以下的方式:
result = estimator.predict(input_fn=predict_input_fn)
for (i, (example, prediction)) in enumerate(zip(predict_examples, result)):
  probabilities = prediction["probabilities"]
导出
tensorflow具有三种模型保存的方式
- checkpoint
- SavedModel
- frozen graph
之后会专门出一篇介绍, 并介绍如何使用SavedModel进行single example和batch预测。我们这边主要讲一下 export_saved_model API,
export_saved_model(
    export_dir_base, serving_input_receiver_fn, assets_extra=None, as_text=False,
    checkpoint_path=None, experimental_mode=ModeKeys.PREDICT
)
- export_dir_base: 导出的路径,导出SavedModel
- serving_input_receiver_fn: 一个无参函数,返回 tf.estimator.export.ServingInputReceiver or tf.estimator.export.TensorServingInputReceiver.具体的作用就是定义我们模型的输入placeholders。
- assets_extra: 一个字典说明如何在SavedModel 路径下产生assets.extra 文件夹,None 代表不产生。
- as_text: 是否将 SaveModel 保存为 Text 格式
- checkpoint_path: 要被导出的checkpoint的路径,如果是None,则使用 model_dir 里最新的checkpoint
- experimental_mode: tf.estimator.ModeKeys 值,代表哪一个Mode要被exported。正常来说默认是 ModeKeys.PREDICT
具体可以参考:
def serving_input_fn():
    label_ids = tf.placeholder(tf.int32, [None], name='label_ids')
    input_ids = tf.placeholder(tf.int32, [None, FLAGS.max_seq_length], name='input_ids')
    input_mask = tf.placeholder(tf.int32, [None, FLAGS.max_seq_length], name='input_mask')
    segment_ids = tf.placeholder(tf.int32, [None, FLAGS.max_seq_length], name='segment_ids')
    input_fn = tf.estimator.export.build_raw_serving_input_receiver_fn({
        'label_ids': label_ids,
        'input_ids': input_ids,
        'input_mask': input_mask,
        'segment_ids': segment_ids,
    })()
    return input_fn


if FLAGS.do_export:
  estimator._export_to_tpu = False
  estimator.export_saved_model(FLAGS.output_dir, serving_input_fn)
train_and_evaluate
这个工具函数提供了一个estimator的train,evaluate,和export(可选)的接口。
所有训练相关的配置都在 train_spec 中配置(包括training input_fn 和 training max steps, etc),所有的验证相关的配置都在 eval_spec 中(evaluation input_fn 和 steps, etc),
这个函数函数的好处在于他将train 和 evaluate结合起来,然后在训练和验证之间的转换的时候,不需要销毁和重建graph,而之前的 estimator.train 和 estimator.evaluate 是异步的。使用这个函数之后,就能够很高效地实现训练和验证集合。并且它支持分布式训练等。 此外它支持导出最优模型的配置 BestExporter。
具体参考下面BERT的使用:
if FLAGS.do_train:
  train_spec = tf.estimator.TrainSpec(input_fn=train_input_fn,
                                      max_steps=num_train_steps,
                                      hooks=[early_stopping_hook])
  exporter = tf.estimator.BestExporter(
        serving_input_receiver_fn= serving_input_fn,
        exports_to_keep=2)
  eval_spec = tf.estimator.EvalSpec(input_fn=eval_input_fn,
                                    steps=None, # steps=None, evaluate on the entire eval dataset
                                    exporters=exporter)
  tf.estimator.train_and_evaluate(estimator, train_spec, eval_spec)
注意:EvalSpec中的 steps需要显性设置未None, 否则默认是100。并不是在整个验证集上面进行验证。
hooks
我们可以为训练 estimator.train() 和测试 estimator.evaluate() 增加hooks。hooks 顾名思义,就是钩子,指的是如果一个事件发生了,先被特定hook捕获,然后执行hook的操作,然后在传入下个pipeline。也即这项技术就是提供了一个入口,能够针对不同的消息或者API在执行前,先执行你的操作,你的操作也称为「钩子函数。
常见的操作有
- early_stopping_hooks
我们可以通过tf.estimator.experimental.stop_if_no_decrease_hook 或者 tf.contrib.estimator.stop_if_no_increase_hook 实现early stopping hook。比如说eval_loss 多少个steps都不下降,那么我们启动early stopping,或者说 f1 在多少个steps都不上升,那么我们进行early stopping。因为 hook somehow 假设模型 model’s eval_dir 已经存在,所以我们需要在其未存在的时候提前创建路径。
具体参考下面的代码:
Path(estimator.eval_dir()).mkdir(parents=True, exist_ok=True)
early_stopping_hook = tf.estimator.experimental.stop_if_no_decrease_hook(
        estimator=estimator,
        metric_name='eval_loss',
        max_steps_without_decrease=3*FLAGS.save_checkpoints_steps,
        eval_dir=None,
        min_steps=0,
        run_every_secs=None,
        run_every_steps=FLAGS.save_checkpoints_steps)
或者是
Path(estimator.eval_dir()).mkdir(parents=True, exist_ok=True)
hook = tf.contrib.estimator.stop_if_no_increase_hook(
    estimator, 'f1', 500, min_steps=8000, run_every_secs=120)
- LoggingHooks
logging_hook = tf.train.LoggingTensorHook({"loss": total_loss}, every_n_iter=10)
然后将我们这个hook加到
estimator.train(input_fn=train_input_fn,
                 max_steps=num_train_steps,
                 hooks=[early_stopping_hook, logging_hook])
或者是
train_spec = tf.estimator.TrainSpec(input_fn=train_input_fn,
                                        max_steps=num_train_steps,
                                        hooks=[early_stopping_hook, logging_hook])
ref
- https://towardsdatascience.com/first-contact-with-tensorflow-estimator-69a5e072998d
- https://arxiv.org/pdf/1708.02637.pdf
- https://towardsdatascience.com/an-advanced-example-of-tensorflow-estimators-part-1-3-c9ffba3bff03
- https://guillaumegenthial.github.io/serving-tensorflow-estimator.html
- https://github.com/tensorflow/docs/blob/master/site/en/guide/estimator.ipynb
- https://b23.tv/av80286594/p1
- https://guillaumegenthial.github.io/introduction-tensorflow-estimator.html
- https://github.com/NVIDIA/DeepLearningExamples/tree/master/TensorFlow/LanguageModeling/BERT


 3万+
3万+


 被折叠的 条评论
为什么被折叠?
被折叠的 条评论
为什么被折叠?
 到【灌水乐园】发言


