


正式开始之前插播一条硬广哈哈:
字节跳动2020届校园招聘已经正式开启,涉及研发、产品、设计、市场、销售、职能/支持、运营七大类,工作地点分布北京、上海、深圳、成都、厦门、南京、杭州、武汉、广州等热门城市,要求很简单,只要你是2020年毕业的高校学生,都可以积极参与,直接到到官网:https://job.bytedance.com/campus/position 查找自己感兴趣的职位,投递简历并填写专属内推码:GCHFTGZ 即可成功申请并享受优先处理福利。PS:1. 投递简历时填写内推码可以享受简历优先筛选、优先安排面试等一系列福利,而且根据每年的招聘经验,越早投递简历的同学拿到offer的概率越大哦~快快投起来简历吧~2. 社招以及日常实习生也一直有岗位哦,具体岗位见:https://job.bytedance.com/campus/position,内推码同样可用哦前言
ButterKnife又称黄油刀,是一款快速绑定Android视图中字段和方法的注解框架,也是Android开发中比较常用的一款快速注解框架,通过ButterKnife的合理运用,我们可以避免重复地书写findViewById,在各种场合下快速地绑定view中的多种事件,大大提高开发的效率,它具有如下几点主要的功能:
- 通过@BindView注解消除findViewById的使用
- 将多个view组成一个列表或者数组,使用action、setter、properties一次性地操作被分到一组的view
- 通过@OnClick注解来消除设置监听器(Listenter)时书写的各种匿名内部类
- 通过为字段添加注解,消除了手动对资源的查找
接下来,我将首先向大家介绍ButterKnife的用法,然后针对ButterKnife的核心源码展开分析,从源码级别带大家了解ButterKnife的原理和结构,本文结构如下:
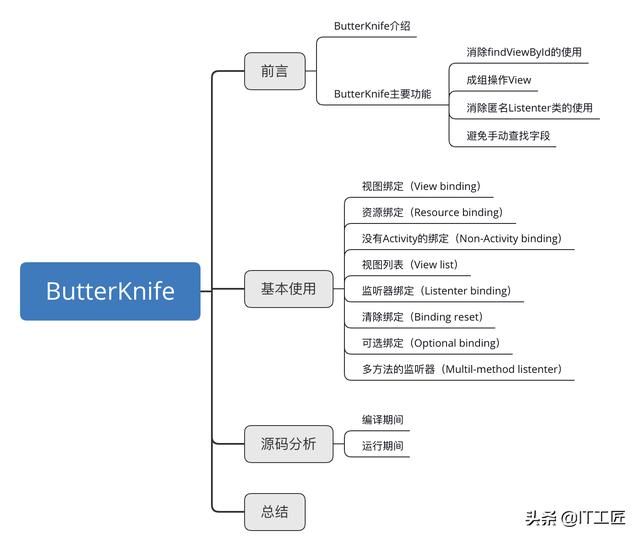
基本使用
在使用ButterKnife之前,我们需要先在项目中添加ButterKnife的依赖,打开你项目的build.gradle文件,添加如下代码:
android { ... // Butterknife requires Java 8. compileOptions { sourceCompatibility JavaVersion.VERSION_1_8 targetCompatibility JavaVersion.VERSION_1_8 }}dependencies { implementation 'com.jakewharton:butterknife:10.1.0' annotationProcessor 'com.jakewharton:butterknife-compiler:10.1.0' //如果你使用的是kotlin,把这里的annotationProcessor替换成kapt即可}然后我们就可以开始代码的编写了。
视图绑定(View binding)
我们本例针对下图这样一个登录/注册的场景向大家说明我们应该如何通过ButterKnife进行视图绑定:
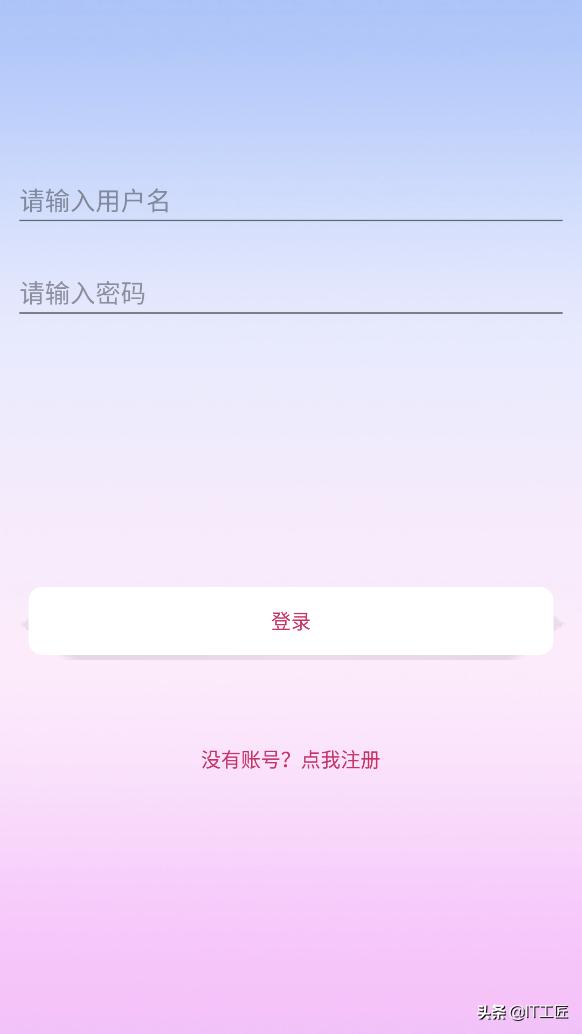
图中一共有4个View,分别是用户名输入框(EditText)、密码输入框(EditText)、登录按钮(Button)、注册提示(TextView),如果按照传统的视图绑定的方法,我们至少需要写4个findViewById(id)来将视图与字段进行绑定,通过ButterKnife,我们就可以这样:
public class MyActivity extends Activity { @BindView(R.id.et_username) EditText mEtUsername; @BindView(R.id.et_password) EditText mEtPassword; @BindView(R.id.bt_login) Button mBtLogin; @BindView(R.id.tx_signup) TextView mTxSignUp; @Override protected void onCreate(Bundle savedInstanceState) { super.onCreate(savedInstanceState); setContentView(R.layout.activity_my); ButterKnife.bind(this); }}可以看到,我们只需要为每一个字段添加一个@BindView(viewId)注解,然后在Activity的onCreate()方法中进行ButterKnife.bind(this)即可,ButterKnife会在编译期间为我们进行自动代码生成,基于上面的注解,ButterKnife会在编译期间为我们生成类似如下代码:
public void bind(MyActivity activity) { activity.mEtUsername = (android.widget.TextView) activity.findViewById(2130968578); activity.mEtPassword = (android.widget.TextView) activity.findViewById(2130968579); activity.mBtLogin = (android.widget.TextView) activity.findViewById(2130968577); activity.mTxSignUp = (android.widget.TextView) activity.findViewById(2130968567);}可以发现,ButterKnife其实是将我们的注解翻译为了findViewById这样的语句,然后为我们进行了自动代码生成,从而使我们可以通过更简单的代码完成原来的需求。
资源绑定(Resource binding)
我们可以使用@ BindBool,@ LabelColor,@ LabelDimen,@ LabelDrawable,@ LabelInt,@ StickString绑定预定义的资源,将R.bool.ID,R.Color.ID...(或您指定的类型)绑定到其对应的字段,比如:
public class MyActivity extends Activity { //将mUserName字段和string资源文件中的user_name绑定到一起 @BindString(R.string.user_name) String mUserName; //将mBackground字段与drawable资源文件中的login_signup_background绑定到一起 @BindDrawable(R.drawable.login_signup_background) Drawable mBackground; @Override protected void onCreate(Bundle savedInstanceState) { super.onCreate(savedInstanceState); setContentView(R.layout.activity_my); ButterKnife.bind(this); }}没有Activity的绑定(Non-Activity binding)
上面的例子我们都是在Activity中进行的绑定,ButterKnife也支持我们在任意对象中进行绑定,只要提供一个根view即可,比如:
public class FancyFragment extends Fragment { @BindView(R.id.button1) Button button1; @BindView(R.id.button2) Button button2; @Override public View onCreateView(LayoutInflater inflater, ViewGroup container, Bundle savedInstanceState) { View view = inflater.inflate(R.layout.fancy_fragment, container, false); //提供了一个根视图:view,将this与视图view进行了绑定 ButterKnife.bind(this, view); // TODO Use fields... return view; }}或者我们也可以在list的adapter中对view holder进行绑定:
public class MyAdapter extends BaseAdapter { @Override public View getView(int position, View view, ViewGroup parent) { ViewHolder holder; if (view != null) { holder = (ViewHolder) view.getTag(); } else { view = inflater.inflate(R.layout.whatever, parent, false); holder = new ViewHolder(view); view.setTag(holder); } holder.name.setText("John Doe"); // etc... return view; } static class ViewHolder { @BindView(R.id.title) TextView name; @BindView(R.id.job_title) TextView jobTitle; public ViewHolder(View view) { ButterKnife.bind(this, view); } }}总之,ButterKnife.bind可以在任何可以调用findViewById的地方被调用,除此之外,ButterKnife还提供了一些其他的关于绑定的API:
- 将activity作为根视图绑定任意对象,如果你使用类似MVC的项目架构,你可以使用ButterKnife.bind(this, activity)将activity绑定到其对应的controller
- 使用ButterKnife.bind(this)将View的子View绑定到字段上。比如在layout中使用标记并在自定义View的构造函数中进行inflate,则可以在inflate之后立即调用ButterKnife.bind(this)。或者,从XML中inflate的自定义视图类型可以在onFinishInflate()回调中使用ButterKnife.bind(this)。
视图列表(View list)
你可以将一组view组合成一个列表或者数组,比如:
@BindViews({ R.id.first_name, R.id.middle_name, R.id.last_name })List nameViews;apply方法允许您一次对列表中的所有视图执行操作:
ButterKnife.apply(nameViews, DISABLE);ButterKnife.apply(nameViews, ENABLED, false);Action和Setter接口允许你进行简单的操作:
static final ButterKnife.Action DISABLE = new ButterKnife.Action() { @Override public void apply(View view, int index) { view.setEnabled(false); }};static final ButterKnife.Setter ENABLED = new ButterKnife.Setter() { @Override public void set(View view, Boolean value, int index) { view.setEnabled(value); }};也可以在apply方法中使用Android的一些属性(property):
ButterKnife.apply(nameViews, View.ALPHA, 0.0f);监听器绑定(Listenter binding)
可以使用如下方法自动地进行监听器的配置:
@OnClick(R.id.submit)public void submit(View view) { // TODO submit data to server...}监听器中方法的参数都是可选的:
@OnClick(R.id.submit)public void submit() { // TODO submit data to server...}定义一个特殊的类型,他会被自动转换(cast):
@OnClick(R.id.submit)public void sayHi(Button button) { button.setText("Hello!");}在单个绑定中可以指定多个ID以进行常见事件处理:
@OnClick({ R.id.door1, R.id.door2, R.id.door3 })public void pickDoor(DoorView door) { if (door.hasPrizeBehind()) { Toast.makeText(this, "You win!


 608
608


 被折叠的 条评论
为什么被折叠?
被折叠的 条评论
为什么被折叠?
 到【灌水乐园】发言


