


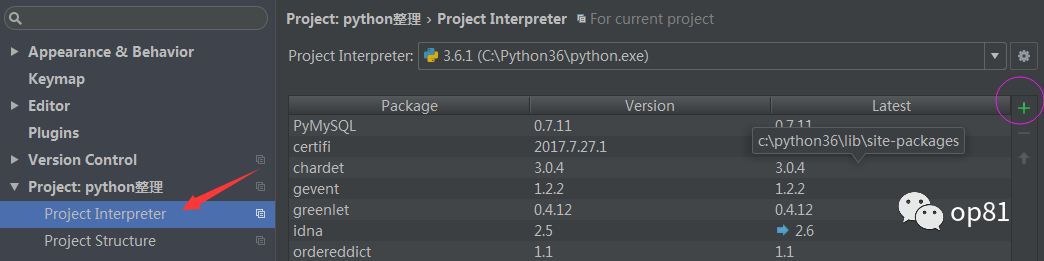
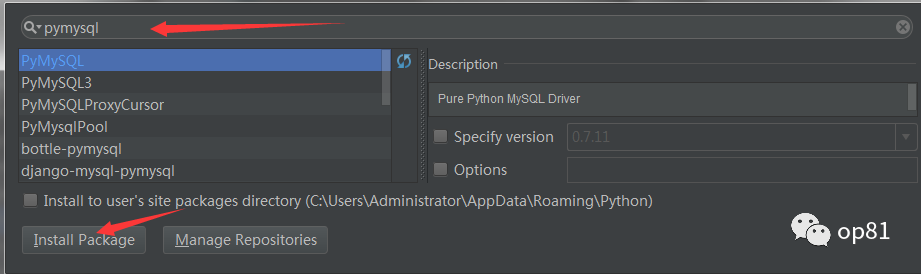
安装pymysql模块
两种方法:
第一种:pip安装
pip3 install pymysql第二种:
链接,执行sql,关闭(游标)
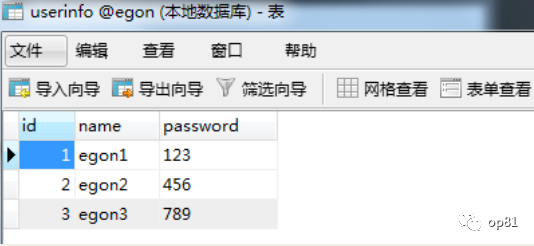
import pymysqluser= input('用户名:>>').strip()pwd= input('密码:>>').strip()#先链接,拿到游标conn=pymysql.connect(host='localhost',user='root',password='123456', database='day47',charset='utf8')cursor=conn.cursor() #拿到游标,即mysql >#执行sqlsql='select * from user where user="%s" and password="%s";'%(user,pwd)print(sql) #注意%s需要加双引号rows = cursor.execute(sql) #拿到受影响的行数cursor.close()conn.close()if rows: print('登录成功')else: print('登录失败')execute()之sql注入
注意:符号--会注释掉它之后的sql
正确的语法:--后至少有一个任意字符
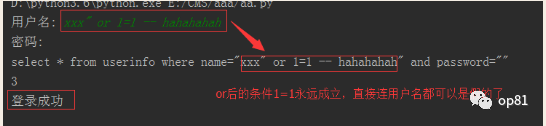
根本原理:就根据程序的字符串拼接name='%s',我们输入一个xxx' -- haha,用我们输入的xxx加'在程序中拼接成一个判断条件name='xxx' -- haha',最后那一个空格,在一条sql语句中,如果遇到select *from t1 where id > 3 -- and name='egon';则--之后的条件被注释掉了。
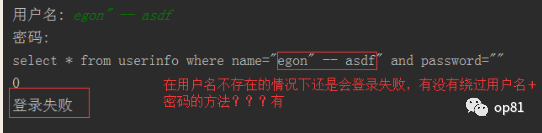
sql注入之:用户存在,绕过密码
egon' -- 任意字符sql注入之:用户不存在,绕过用户与密码
xxx' or 1=1 -- 任意字符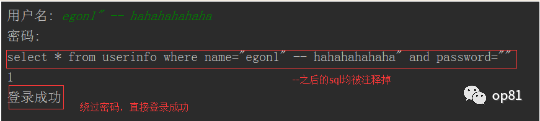
解决注入:
# 原来是我们对sql进行字符串拼接sql="select * from userinfo where name='%s' and password='%s'" %(user,pwd)print(sql)rows=cursor.execute(sql)#改写为(execute帮我们做字符串拼接,我们无需且一定不能再为%s加引号了)sql="select * from userinfo where name=%s and password=%s" # 注意%s需要去掉引号,因为pymysql会自动为我们加上rows=cursor.execute(sql,[user,pwd])# pymysql模块自动帮我们解决sql注入的问题,只要我们按照pymysql的规矩来。增、删、改:conn.commit()
增:
import pymysql# 先链接,拿到游标conn=pymysql.connect(host='localhost',user='root',password='123456',database='day47')cursor=conn.cursor() #拿到游标,即mysql >#执行sql 增:sql='insert into user1(user,password) VALUES (%s,%s)'print(sql)# rows = cursor.execute(sql,('xixi',123)) #插入一条记录rows = cursor.executemany(sql,[('xixi',123),('aaa',456),('ttt',147)]) #插入多行记录print('%s row in set (0.00 sec)'%rows)conn.commit() #提交到数据库cursor.close()conn.close()删:
import pymysql#先链接,拿到游标name=input('>>').strip()conn=pymysql.connect(host='localhost',user='root',password='123456',database='day47')cursor=conn.cursor() #拿到游标,即mysql >#执行sql 删:sql='delete from user1 where user =%s;' #删除数据print(sql)rows = cursor.execute(sql,(name))print('%s row in set (0.00 sec)'%rows)conn.commit() #提交到数据库cursor.close()conn.close()改:
import pymysql#先链接,拿到游标id=input('>>').strip()conn=pymysql.connect(host='localhost',user='root',password='123456',database='day47')cursor=conn.cursor() #拿到游标,即mysql >#执行sql 改:sql=' update user1 set password = "5555555" where id=%s;'print(sql)rows = cursor.execute(sql,(id))print('%s row in set (0.00 sec)'%rows)conn.commit() #提交到数据库cursor.close()conn.close()查:fetchone,fetchmany,fetchall
# 查fetchone,fetchmany,fetchallimport pymysqlconn=pymysql.connect(host='localhost',user='root',password='123456',database='day47')cursor=conn.cursor() #拿到游标,即mysql >#执行sql 查:sql='select * from user1;'rows = cursor.execute(sql)#查单条fetchoneres1=cursor.fetchone()res2=cursor.fetchone()res3=cursor.fetchone()print(res1)print(res2)print(res3)print(res3[0])#查多条fetchmanyprint(cursor.fetchmany(3))print(cursor.fetchone())#查所有fetchallprint(cursor.fetchall())print(cursor.fetchone())#-------光标的移动--------#1.绝对路径:从文件的开头位置算起print(cursor.fetchall())cursor.scroll(1,mode='absolute')print(cursor.fetchone())cursor.scroll(3,mode='absolute')print(cursor.fetchone())#2.相对路径:print(cursor.fetchone())print(cursor.fetchone())cursor.scroll(2,mode='relative') #相对于上面的两条向后移两条print(cursor.fetchone())print('%s row in set (0.00 sec)' %rows)cursor.close()conn.close()获取插入的最后一条数据的自增ID
------查看表中最后一行的iDimport pymysqlconn=pymysql.connect(host='localhost',user='root',password='123456', database='day47',charset='utf8')cursor=conn.cursor()sql='insert into user1(user,password) values(%s,%s);'rows=cursor.execute(sql,('alex','123'))# rows=cursor.executemany(sql,[('yuanhao','123'),('laowu','123'),('kgf','12323')])conn.commit()print(cursor.lastrowid) #查看表中最后一行的iDcursor.close()conn.close()


 4367
4367


 被折叠的 条评论
为什么被折叠?
被折叠的 条评论
为什么被折叠?
 到【灌水乐园】发言


