


最近在研究 nestjs,关于 nestjs 上传文件比较疑惑,不知道该如何使用,这里介绍下 nestjs 如何上传文件的。这里将学会如下:
1、学会上传一个文件
2、同时上传多个文件
3、使用自定义的字段
4、上传文件使用任意的字段名称,
5、全局配置,比如自定义文件保存的目录
1、上传一个文件
引入依赖
import { Controller, Post, UseInterceptors ,UploadedFile} from '@nestjs/common';
import { FileInterceptor } from '@nestjs/platform-express';
文件上传方法
@Post('upload')
@UseInterceptors(FileInterceptor('file'))
uploadFile(@UploadedFile() file) {
  console.log(file);
}
现在让我们测试下,看下收到的 file 是什么样的。可以使用 postman,或者其他工具,这里不介绍如何使用工具,如果需要可在评论区评论。如下:
{
  fieldname: 'file',
  originalname: 'ceshi.png',
  encoding: '7bit',
  mimetype: 'image/png',
  buffer: <Buffer 89 50 4e 47 0d 0a 1a 0a 00 00 00 0d 49 48 44 52 00 00 07 80 00 00 04 38 08 06 00 00 00 e8 d3 c1 43 00 00 20 00 49 44 41 54 78 9c ec dd 77 9c 94 f5 bd ... 1874657 more bytes>,
  size: 1874707
}
可以看到我们获得的一个文件的详细信息,以及一个 buffer,我们可以通过收到的 buffer 进行存储,如下。
import * as fs from 'fs';

fs.writeFileSync('./hah.jpg', file.buffer);
目前为止我们已经学会如何上传一个文件以及存储。
上面这种方式,每次都需要自已写保存文件的方式,可以通过配置,来定义上传。
直接在FileInterceptor修改
引入依赖
import { Controller, Post, UseInterceptors ,UploadedFile} from '@nestjs/common';
import { FileInterceptor } from '@nestjs/platform-express';
import multer = require('multer');
@Post('upload')
@UseInterceptors(FileInterceptor('file', {
storage: multer.diskStorage({
destination: (req, file, cb) => {
cb(null, '/Users/xxxxx/Desktop/aaa');
},
filename: (req, file, cb) => {
cb(null, file.originalname);
},
}),
}))
async uploade(@UploadedFile() file) {
return file;
}当然上面的方式也并不是最好了,假如我要写很多上传文件,总不能每次都进行这么多代码配置,有没有一种方式只需配置一次就可以呢,答案是有的,请看下面,5全局配置。
2、同时上传多个文件,
如下,与上面的不同之处有两个FilesInterceptor,UploadedFiles
引入依赖
import { Controller, Post, UseInterceptors, UploadedFile, UploadedFiles } from '@nestjs/common';
import { FileInterceptor, FilesInterceptor } from '@nestjs/platform-express';
@Post('upload')
@UseInterceptors(FilesInterceptor('file'))
uploadFile(@UploadedFiles() file) {
console.log(file);
}日志如下
[
  {
    fieldname: 'file',
    originalname: '1.png',
    encoding: '7bit',
    mimetype: 'image/png',
    buffer: <Buffer 89 50 4e 47 0d 0a 1a 0a 00 00 00 0d 49 48 44 52 00 00 07 80 00 00 04 38 08 06 00 00 00 e8 d3 c1 43 00 00 20 00 49 44 41 54 78 9c ec dd 7b ac 6d d9 55 ... 1770419 more bytes>,
    size: 1770469
  },
  {
    fieldname: 'file',
    originalname: '2.png',
    encoding: '7bit',
    mimetype: 'image/png',
    buffer: <Buffer 89 50 4e 47 0d 0a 1a 0a 00 00 00 0d 49 48 44 52 00 00 07 80 00 00 04 38 08 06 00 00 00 e8 d3 c1 43 00 00 20 00 49 44 41 54 78 9c ec dd 77 9c 94 f5 bd ... 1874657 more bytes>,
    size: 1874707
  }
]
3、自定义不同的字段名称键
@Post('upload')
@UseInterceptors(FileFieldsInterceptor([
  { name: 'avatar', maxCount: 1 },
  { name: 'background', maxCount: 1 },
]))
uploadFile(@UploadedFiles() files) {
  console.log(files);
}
也可携带其他参数
 @Post('uploads')
    @UseInterceptors(FileFieldsInterceptor([
        { name: 'avatar', maxCount: 1 },
        { name: 'background', maxCount: 1 },
        { name: 'avatar_name'},
        { name: 'background_name'}
    ]))
    async uploads(@UploadedFiles() files,@Body() body) {
        console.log(files,body)
    }
日志如下
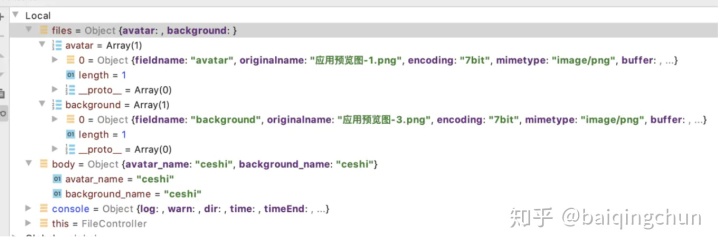
[Object: null prototype] {
  avatar: [
    {
      fieldname: 'avatar',
      originalname: '应用预览图-1.png',
      encoding: '7bit',
      mimetype: 'image/png',
      buffer: <Buffer 89 50 4e 47 0d 0a 1a 0a 00 00 00 0d 49 48 44 52 00 00 07 80 00 00 04 38 08 06 00 00 00 e8 d3 c1 43 00 00 20 00 49 44 41 54 78 9c ec dd 7b ac 6d d9 55 ... 1770419 more bytes>,
      size: 1770469
    }
  ],
  background: [
    {
      fieldname: 'background',
      originalname: '应用预览图-3.png',
      encoding: '7bit',
      mimetype: 'image/png',
      buffer: <Buffer 89 50 4e 47 0d 0a 1a 0a 00 00 00 0d 49 48 44 52 00 00 07 80 00 00 04 38 08 06 00 00 00 e8 d3 c1 43 00 00 20 00 49 44 41 54 78 9c ec dd 77 9c 94 f5 bd ... 1838100 more bytes>,
      size: 1838150
    }
  ]
} [Object: null prototype] {
  avatar_name: 'ceshi',
  background_name: 'ceshi'
}
断点截图:
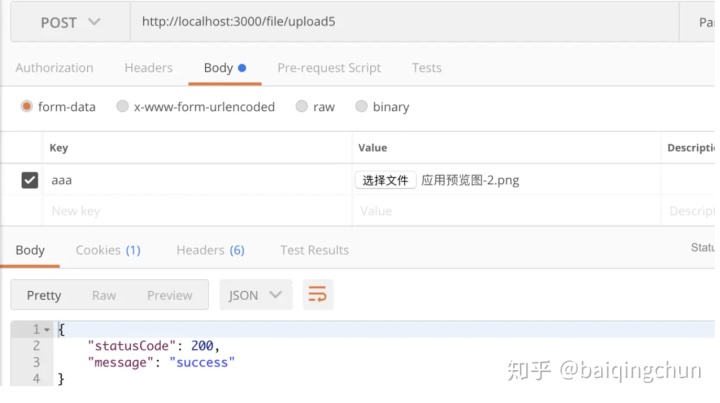
4、上传文件使用任意的字段名称,
  @Post('upload5')
  @UseInterceptors(AnyFilesInterceptor())
  uploadFileAny(@UploadedFiles() files) {
    console.log(files);
  }
比如定义字段名称为 aaa
5、也可以提前注册,配置好我们文件上传,下面是如何自定义一个目录保存我们的文件。
在Module添加,这种方式更友好,图片会存储在fileUpload目录下
file.module.ts
import { Module } from '@nestjs/common';
import { FileController } from './file.controller';
import { FileService } from './file.service';
import { MulterModule } from '@nestjs/platform-express';
import dayjs = require('dayjs');
import { diskStorage } from 'multer';
import * as nuid from 'nuid';
@Module({
  imports:[
    MulterModule.register({
      storage: diskStorage({
        //自定义路径
        destination: `./fileUpload/${dayjs().format('YYYY-MM-DD')}`,
        filename: (req, file, cb) => {
          // 自定义文件名
          // const filename = `${nuid.next()}.${file.mimetype.split('/')[1]}`;
          // return cb(null, filename);
          return  cb(null, file.originalname);
        },
      }),
    }),

  ],
  controllers: [FileController],
  providers: [FileService]
})
export class FileModule {}
file.controller.ts
  @Post('upload')
  @UseInterceptors(FileInterceptor('file'))
  async UploadedFile(@UploadedFile() file) {
    return file;
  }
写在最后
如何看到了这里,说明你也喜欢 nestjs,或者对文件上传也同样有疑惑,希望上面的介绍可以帮助你解决问题。


 2241
2241

 被折叠的 条评论
为什么被折叠?
被折叠的 条评论
为什么被折叠?
 到【灌水乐园】发言


