


随着5G时代的来临,物联网开始加速盛行,慢慢地融入到我们的生活当中,万物互联互通将不再只是纸上谈兵。现在各大物联网平台层出不穷,看似离我们很遥远,其实只要我们敢于去研究,敢于去发现,万物互联,近在咫尺之间。

今天给大家介绍一下,作为一个普通的.NET开发人员,如何不借助第三方的物联网平台,搭建一个简单实用的物联网平台框架。
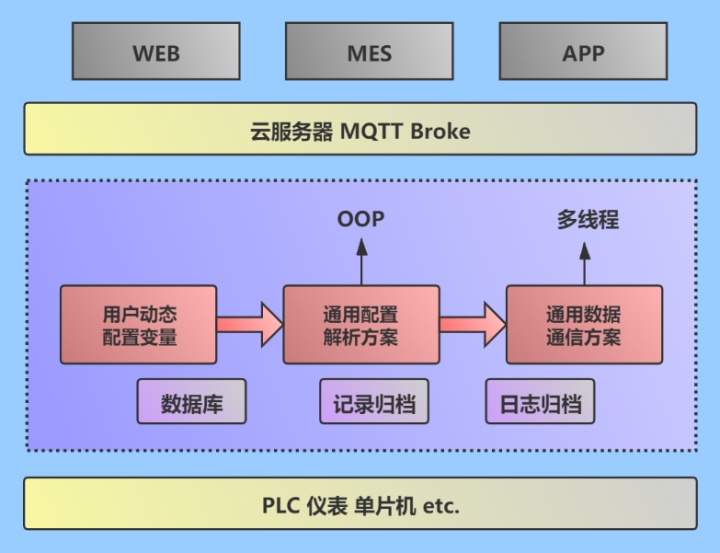
1、物联网框架
此物联网框架是在上位机框架的基础上,结合物联网通信协议MQTT实现。上位机本身就集成有采集、归档及日志等功能,只需要在这个基础上,连接MQTT服务器之后,并向指定的主题Topic中发布相关的数据,相关的WEB、APP只需要订阅相应的主题,即可获取到数据。
整体框架如下图示所示:
2、框架实现
为了测试方便,这里选择西门子S7-1200 PLC作为下位机,采用西门子S7进行通信,上位机先与PLC进行通信,同时连接MQTT服务器,并向指定主题发布数据。
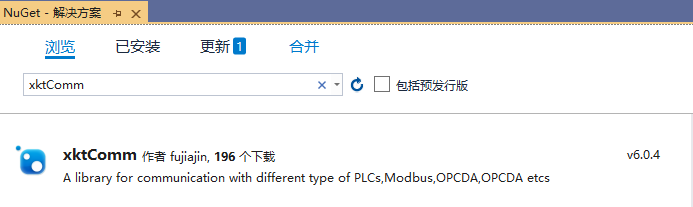
(1)首先创建一个新的Windows窗体应用,从NuGet上下载xktComm.dll。
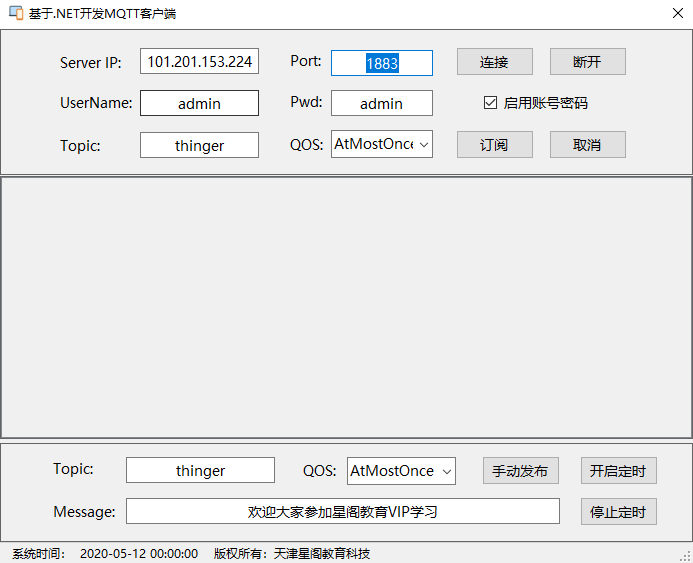
(2)开发UI界面开发,按照功能设计如下图所示:
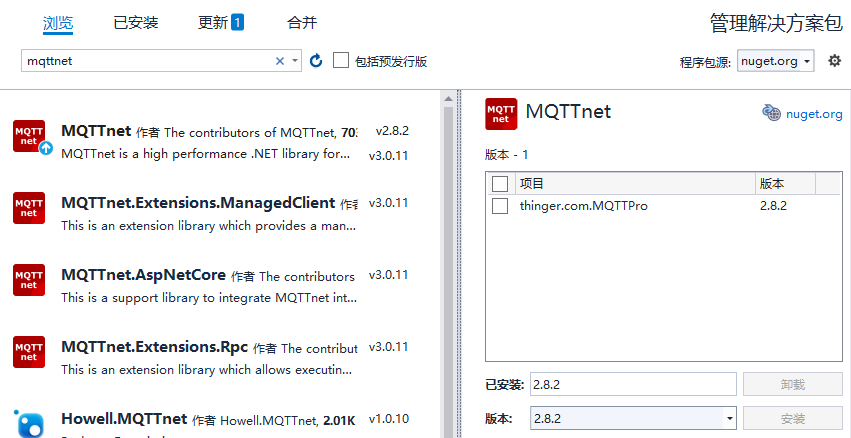
(3)UI界面设计完成之后,开始进行代码的编写,这里使用开源的mqtt库mqttnet,仍然通过NuGet下载安装一下,这里选择版本为2.8.2,选择不同的版本,会有一些使用上的区别:
(4)先实现基本的MQTT连接服务器及断开连接:
private IMqttClient mqttClient = null;
private void btn_Connect_Click(object sender, EventArgs e)
{
var option = new MqttClientOptions() { ClientId = Guid.NewGuid().ToString("D") };
//设置连接的服务器及端口号
option.ChannelOptions = new MqttClientTcpOptions()
{
Server = this.txt_ServerIP.Text,
Port = Convert.ToInt32(this.txt_Port.Text)
};
//是否需要账户密码
if (this.chk_IsUsePwd.Checked)
{
option.Credentials = new MqttClientCredentials()
{
Username = this.txt_UserName.Text,
Password = this.txt_Pwd.Text
};
}
option.CleanSession = true;
option.KeepAlivePeriod = TimeSpan.FromSeconds(100);
option.KeepAliveSendInterval = TimeSpan.FromSeconds(10000);
if (mqttClient != null)
{
mqttClient.DisconnectAsync();
mqttClient = null;
}
try
{
mqttClient = new MqttFactory().CreateMqttClient();
mqttClient.Connected += MqttClient_Connected;
mqttClient.Disconnected += MqttClient_Disconnected;
mqttClient.ApplicationMessageReceived += MqttClient_ApplicationMessageReceived;
mqttClient.ConnectAsync(option);
}
catch (Exception ex)
{
AddLog(1, "MQTT客户端连接失败:" + ex.Message);
return;
}
}
private void btn_DisConn_Click(object sender, EventArgs e)
{
mqttClient.DisconnectAsync();
}
(5)基于委托创建日志处理对象及方法体:
private AddLogDelegate AddLog;
private string CurrentTime
{
get { return DateTime.Now.ToString("HH:mm:ss"); }
}
/// 写入日志方法体
private void AddLogMethod(int index, string info)
{
if (this.lstInfo.InvokeRequired)
{
this.lstInfo.Invoke(new Action(() =>
{
ListViewItem lst = new ListViewItem(" " + CurrentTime, index);
lst.SubItems.Add(info);
lstInfo.Items.Insert(0, lst);
}));
}
else
{
ListViewItem lst = new ListViewItem(" " + CurrentTime, index);
lst.SubItems.Add(info);
lstInfo.Items.Insert(0, lst);
}
}
(6)确定并创建通信变量实体类及集合:
实际开发过程中,这块应该是基于CMS配置软件实现的,本案例用于测试,就不弄那么复杂了,这里以读取以下四个变量为例(实际应用时变量数据及结构可能要比这复杂),如下图所示:
通信变量列表
| 序号 | 变量名称 | 变量地址 | 变量类型 |
| 1 | 出口压力 | DB100.DBD0 | Float |
| 2 | 入口压力 | DB100.DBD4 | Float |
| 3 | 出口温度 | DB100.DBD8 | Float |
| 4 | 入口温度 | DB100.DBD20 | Float |
按照这个结构,创建一个实体类,如下图所示:
public enum DataType
{
Bit,
Byte,
Short,
UShort,
Int,
UInt,
Float,
Double
}
public class Variable
{
//变量名称
public string VarName { get; set; }
//变量地址
public string VarAddress { get; set; }
//开始地址
public string Start
{
get
{
if (VarAddress.Contains('.'))
{
string temp = VarAddress.Split('.')[1];
return temp.Substring(temp.IndexOf(temp.First(c => char.IsDigit(c))));
}
else
{
return VarAddress.Substring(VarAddress.IndexOf(VarAddress.First(c => char.IsDigit(c))));
}
}
}
VarList.Add(new Variable() { VarName = "出口压力", VarAddress = "DB100.DBD0", VarType = DataType.Float });
VarList.Add(new Variable() { VarName = "入口压力", VarAddress = "DB100.DBD4", VarType = DataType.Float });
VarList.Add(new Variable() { VarName = "出口温度", VarAddress = "DB100.DBD8", VarType = DataType.Float });
VarList.Add(new Variable() { VarName = "入口温度", VarAddress = "DB100.DBD12", VarType = DataType.Float });
(7)Nuget添加Newtonsoft.Json,引入JSON转换类:
public class JSONHelper
{
// 实体对象转换成JSON字符串
public static string EntityToJSON<T>(T x)
{
string result = string.Empty;
try
{
result = JsonConvert.SerializeObject(x);
}
catch (Exception)
{
result = string.Empty;
}
return result;
}
// JSON字符串转换成实体类
public static T JSONToEntity<T>(string json)
{
T t = default(T);
try
{
t = (T)JsonConvert.DeserializeObject(json, typeof(T));
}
catch (Exception)
{
t = default(T);
}
return t;
}
}
(8)PLC建立连接:
//通信对象
private SiemensS7 objS7 = new SiemensS7();
//PLC连接状态
private bool IsPLCConenected = false;
//PLC建立连接
IsPLCConenected= objS7.Connect("192.168.1.210", CPU_Type.S71200, 0, 0);
//写入日志
AddLog(IsPLCConenected?0:1, IsPLCConenected?"PLC连接成功":"PLC连接失败");
(9)定时器执行事件:
private void timer1_Tick(object sender, EventArgs e)
{
if (IsPLCConenected)
{
//PLC批量读取
byte[] array = objS7.ReadBytes(StoreType.DataBlock, 100, 0, 12);
if (array != null && array.Length == 12)
{
//变量解析 由于篇幅有限,这里仅对浮点型进行解析
foreach (var item in VarList)
{
switch (item.VarType)
{
case DataType.Float:
item.VarValue = FloatLib.GetFloatFromByteArray(array, Convert.ToInt32(item.Start)).ToString();
break;
case DataType.Double:
break;
default:
break;
}
}
//这里主要为了缩短发送的内容,减少发送数据长度
List<MQTTVariable> MqttVarList = new List<MQTTVariable>();
foreach (var item in VarList)
{
MqttVarList.Add(new MQTTVariable()
{
VarName = item.VarName,
VarValue = item.VarValue.ToString()
});
}
var msg = new MqttApplicationMessage()
{
Topic = this.txt_Topic.Text,
Payload = Encoding.UTF8.GetBytes(JSONHelper.EntityToJSON(MqttVarList)),
QualityOfServiceLevel = (MqttQualityOfServiceLevel)Enum.Parse(typeof(MqttQualityOfServiceLevel), this.cmb_QOSPublish.Text, true),
Retain = false
};
mqttClient.PublishAsync(msg);
}
}
}
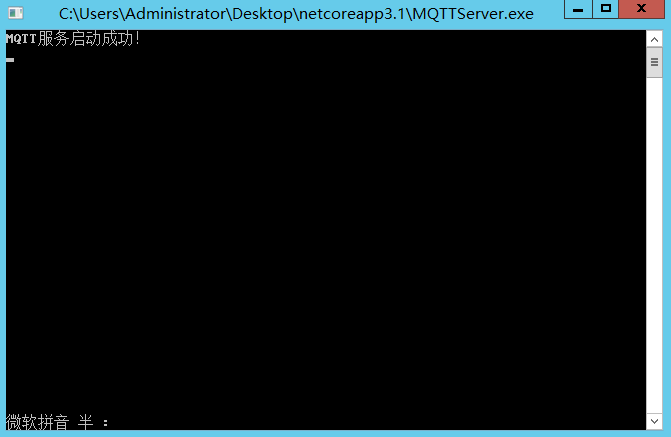
(10)在云服务器端开启MQTT服务器:
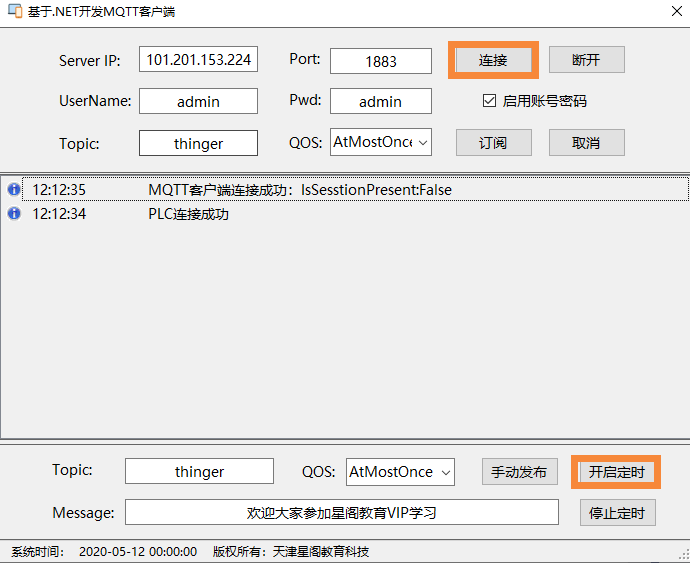
(11)运行MQTT客户端,连接服务器,并点击开始定时:
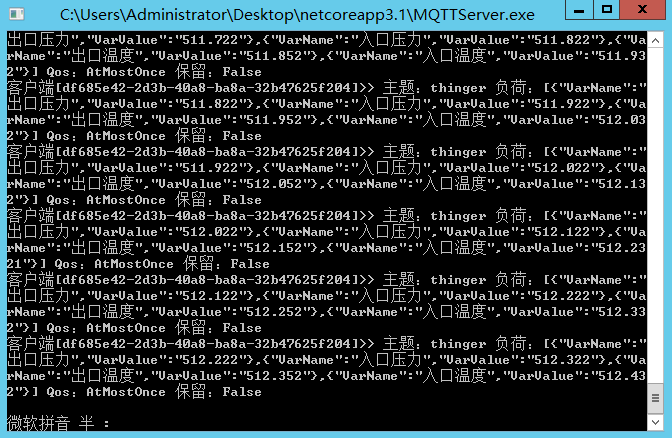
(12)连接成功后,可以观察到MQTT服务器中收到了来自MQTT客户端发来的信息:
3、框架应用
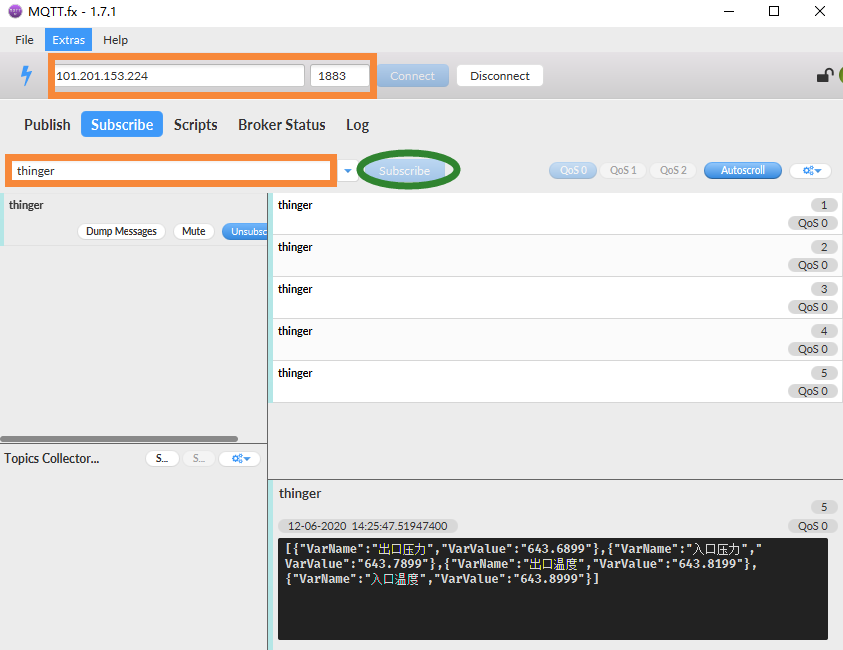
当数据已经上传到MQTT服务器后,那么如果需要获取这些数据,只需要开发一个MQTT,并订阅那个主题,这样,MQTT服务器就会自动将相关的信息推送到客户端软件中,可以先用MQTT.fx测试一下,MQTT.fx是一款基于Eclipse Paho,使用Java语言编写的MQTT客户端工具,支持通过Topic订阅和发布消息。打开MQTT.fx,输入正确的服务器地址、端口号、用户及密码,并订阅主题thinger后,就可以实时收到服务器发送过来的数据了,如下图所示:
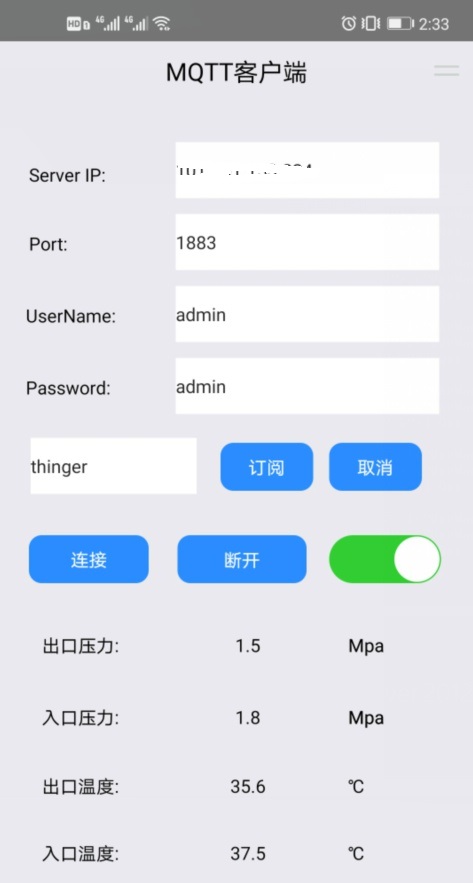
与此同时,我们也可以通过开发相关的WEB网页或者APP来获取数据,下面是一个简易APP的数据展示:
4、整体总结
本文主要是基于MQTT协议实现了本地PLC控制器数据上传的过程。基于阿里云服务器,你可以在任意地方访问到本地PLC的实时数据,实现数据的远程上传。本文主要针对的是电气和工控人员,物联网必然是未来发展的趋势,建议所有的PLC工程师及电气工程师,都应该掌握一门编程语言,也许现在用不到,但未来总会用得到。


 4922
4922

 被折叠的 条评论
为什么被折叠?
被折叠的 条评论
为什么被折叠?
 到【灌水乐园】发言


