


有几个关键点需要提前知道:
1、在router/index.js文件内的Vue.use(VueRouter):
(1)Vue.use()是用来注册插件的,它会接收一个参数
(2)如果参数是函数,Vue.use()直接调用这个函数来注册插件
(3)如果参数是对象,Vue.use()直接调用这个对象的install方法来注册插件
2、在router/index.js文件内的const router = new VueRouter({routes})
(1)routes是配置的路由规则是个数组:
const routes = [
  {
    path: '/',
    name: 'Home',
    component: Home,
  }]
new VueRouter()的VueRouter可能是个类,或者是个构造函数,同时里面要有一个静态方法install()
3、在src/main.js文件内的new Vue({router}).$mount('#app')
创建vue实例对象的时候,传入的router对象的作用是:给vue实例对象添加上$router、$route的两个属性
4、Hash 模式和 History 模式的区别
--> 详情点击链接查看 <--
5、在Node.js中使用History 模式
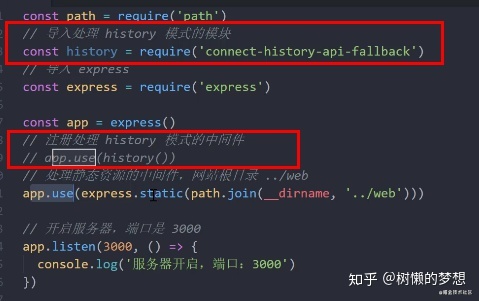
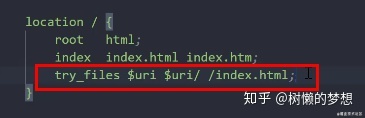
6、在nginx中使用History 模式
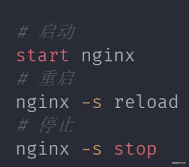
在nginx.conf文件中,添加一行代码:
vueRouter的模拟实现
1、用vue脚手架vue-cli4版本的,新建一个项目:
vue create my-vue-router
2、在router文件夹内新建一个myVueRouter.js文件,代码如下:
let _Vue = null // 他就是Vue构造函数

export default class VueRouter {
  // install 是静态方法
  // 第一个参数是vue的构造函数,第二个参数是可选的选项对象options
  static install(Vue) {
    // 1、判断当前插件是否已经被注册,在当前类的静态方法上添加一个标记属性installed
    if (VueRouter.install.installed) {
      retrun
    }
    // 1、当前插件没有被注册,做个标记,表示已经被注册了
    VueRouter.install.installed = true

    // 2、把Vue构造函数记录到全局变量中
    // 2、因为将来我们要在VueRouter的实例方法中使用Vue的构造函数
    _Vue = Vue

    // 3、把创建Vue实例的时候,传入的router对象,注入到Vue实例上
    // 混入
    // 混入的选项,所有的Vue实例中都会有,组件中也会有beforeCreate
    _Vue.mixin({
      beforeCreate() {
        // 只有是Vue实例的时候才会执行这个混入,组件中不需要执行这个混入
        if (this.$options.router) {
          // this 是对应的Vue实例
          _Vue.prototype.$router = this.$options.router

          // 给this.$options.router添加一个init()方法
          this.$options.router.init()
          // console.log(this)
        }
      },
    })
  }

  // VueRouter的构造函数constructor
  constructor(options) {
    this.options = options // options是传入进来的路由规则routes
    this.routeMap = {} // 是对传入进来的路由规则,解析成对应的键值对,然后保存
    this.data = _Vue.observable({
      // observable()方法可以创建响应式的对象
      current: '/', // 默认是根地址
    }) // 存的是当前的路由地址,是响应式的
  }

  // 遍历路由规则,把解析结果保存在构造函数constructor中的routeMap属性内
  createRouteMap() {
    this.options.routes.forEach((route) => {
      this.routeMap[route.path] = route.component
    })
  }

  // 创建路由使用时候的2个组件 <route-link> 和 <route-view>
  // Vue 是Vue的构造函数
  initComponents(Vue) {
    const self = this

    Vue.component('router-link', {
      props: {
        to: String,
      },
      // template: '<a :href="to"> <slot></slot> </a>'
      render(h) {
        // h函数是vue自动传递过来的,h函数有3个参数
        // 第一个参数是选择器,
        // 第二个参数是给创建的这个dom对象,设置一些属性
        // 第三个参数是标签之间的内部内容
        return h(
          'a',
          {
            attrs: {
              href: this.to,
            },
            on: {
              click: this.clickHandler,
            },
          },
          [this.$slots.default]
        )
      },
      methods: {
        clickHandler(e) {
          e.preventDefault()

          // 判断路由模式是hash模式还是history模式
          if (self.options.mode === 'history') {
            // 只是改变了url地址栏的url
            window.history.pushState(null, null, this.to)
            // history模式下,改变url地址栏的url,不会自动调用popstate监听事件
            // 所以需要手动设置,把改变后的url地址栏的url赋值给data的响应式数据current,
            // 调用router - view去加载对应的页面
            this.$router.data.current = this.to
          } else {
            // 点击router-link,改变url地址栏的url,
            // url一改变,hash模式下,就会自动调用hashchange监听事件,
            // 在hashchange监听事件内可以得到改变后的url
            window.location.hash = this.to
          }
        },
      },
    })

    Vue.component('router-view', {
      render(h) {
        // 获取当前路由地址,对应的路由组件
        const component = self.routeMap[self.data.current]

        return h(component)
      },
    })
  }

  // 点击浏览器的前进、后退按钮
  initEvent() {
    // 判断路由模式是hash模式还是history模式
    if (this.options.mode === 'history') {
      window.addEventListener('popstate', () => {
        this.data.current = window.location.pathname
      })
    } else {
      window.addEventListener('hashchange', () => {
        console.log(window.location.hash)
        // 把改变后的url地址栏的url赋值给data的响应式数据current,调用router-view去加载对应的页面
        this.data.current = window.location.hash.substr(1)
      })
    }
  }

  init() {
    this.createRouteMap()
    this.initComponents(_Vue)
    this.initEvent()
  }
}
3、在router文件夹下的index.js文件内,导入我们自己写的myVueRouter.js文件
import VueRouter from './myVueRouter'
4、可以直接运行项目,查看效果了
npm run serve


 1019
1019


 被折叠的 条评论
为什么被折叠?
被折叠的 条评论
为什么被折叠?
 到【灌水乐园】发言


