


一.什么是SSM?
SSM(Spring+SpringMVC+MyBatis)框架集由Spring、MyBatis两个开源框架整合而成(SpringMVC是Spring中的部分内容)。常作为数据源较简单的web项目的框架。
Spring
Spring就像是整个项目中装配bean的大工厂,在配置文件中可以指定使用特定的参数去调用实体类的构造方法来实例化对象。也可以称之为项目中的粘合剂。
Spring的核心思想是IoC(控制反转),即不再需要程序员去显式地`new`一个对象,而是让Spring框架帮你来完成这一切。SpringMVC
SpringMVC在项目中拦截用户请求,它的核心Servlet即DispatcherServlet承担中介或是前台这样的职责,将用户请求通过HandlerMapping去匹配Controller,Controller就是具体对应请求所执行的操作。SpringMVC相当于SSH框架中struts。mybatis
mybatis是对jdbc的封装,它让数据库底层操作变的透明。mybatis的操作都是围绕一个sqlSessionFactory实例展开的。mybatis通过配置文件关联到各实体类的Mapper文件,Mapper文件中配置了每个类对数据库所需进行的sql语句映射。在每次与数据库交互时,通过sqlSessionFactory拿到一个sqlSession,再执行sql命令。
页面发送请求给控制器,控制器调用业务层处理逻辑,逻辑层向持久层发送请求,持久层与数据库交互,后将结果返回给业务层,业务层将处理逻辑发送给控制器,控制器再调用视图展现数据。
二. SSM的配置
SSM的配置主要是依靠着xml来实现的,如图所示:
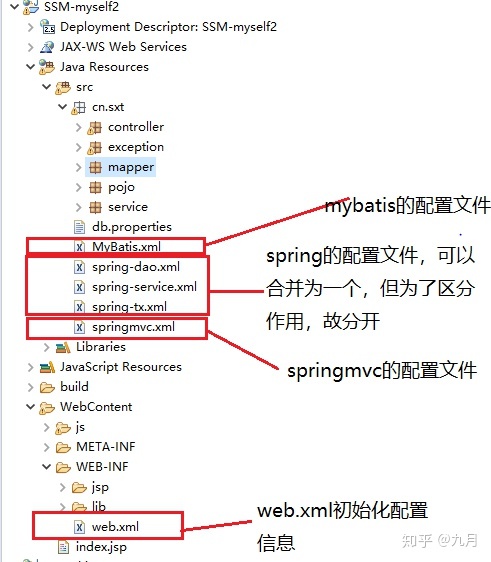
一个是SSM框架,基本就是这几个配置文件。
三 . web.xml 配置
在介绍web.xml的配置之前,我们先了解一下web.xml的作用:
1、初始化spring核心:通过ContextLoaderListener在web app启动的时候,获取contextConfigLocation配置文件的文件名applicationContext.xml,并进行Spring相关初始化工作
2、配置拦截器:springmvc的核心,有任何访问,都被DispatcherServlet所拦截,然后分发处理。
3、配置过滤器
<?xml version="1.0" encoding="UTF-8"?>
<web-app xmlns:xsi="http://www.w3.org/2001/XMLSchema-instance"
xmlns="http://java.sun.com/xml/ns/javaee"
xsi:schemaLocation="http://java.sun.com/xml/ns/javaee http://java.sun.com/xml/ns/javaee/web-app_2_5.xsd"
id="WebApp_ID" version="2.5">
  <display-name>SSM-myself</display-name>

  <context-param>
  	<!-- 配置spring文件的路径 ,支持使用Ant风格  	 -->
  	<param-name>contextConfigLocation</param-name>
  	<param-value>
  		classpath:spring-*.xml
  	</param-value>
  </context-param>
  <!-- 注册ContextLoaderListener:监听ServletContext,当其初始化时,创建spring容器对象,
  		并且将spring容器对象放到servletcontext作用域当中	 -->
  <listener>
  	<listener-class>org.springframework.web.context.ContextLoaderListener</listener-class>
  </listener>

  <!-- 注册前端控制器springmvc -->
  <servlet>
  	<servlet-name>springmvc</servlet-name>
  	<servlet-class>org.springframework.web.servlet.DispatcherServlet</servlet-class>
	  	<init-param>
	  		<!-- springmvc的配置文件路径  	 -->
	  		<param-name>contextConfigLocation</param-name>
	  		<param-value>classpath:springmvc.xml</param-value>
	  	</init-param>
  		<load-on-startup>1</load-on-startup>
  </servlet>
  <servlet-mapping>
  	<servlet-name>springmvc</servlet-name>
  	<url-pattern>*.do</url-pattern>
  </servlet-mapping>
  <!-- 字符编码过滤器 -->
  <filter>
  	<filter-name>encoding</filter-name>
  	<filter-class>org.springframework.web.filter.CharacterEncodingFilter</filter-class>
  	<init-param>
  		<param-name>encoding</param-name>
  		<param-value>utf-8</param-value>
  	</init-param>
  </filter>
  <filter-mapping>
  	<filter-name>encoding</filter-name>
  	<url-pattern>/*</url-pattern>
  </filter-mapping>
    <!-- 注册DelegatingFilterProxy:将filter交给servlet容器 -->
  <filter>
  	<filter-name>shiro</filter-name>
  	<filter-class>org.springframework.web.filter.DelegatingFilterProxy</filter-class>
  	<init-param>
  		<param-name>targetFilterLifecycle</param-name>
  		<param-value>true</param-value>
  	</init-param>
  	<init-param>
  		<param-name>targetBeanName</param-name>
  		<param-value>shiriFilter</param-value>
  	</init-param>
  </filter>
  <filter-mapping>
  	<filter-name>shiro</filter-name>
  	<url-pattern>/*</url-pattern>
  </filter-mapping>
  <welcome-file-list>
    <welcome-file>index.jsp</welcome-file>
  </welcome-file-list>
</web-app>
三. springmvc.xml的配置
在介绍springmvc.xml的配置之前,我们先了解一下springmvc.xml的作用:
1.拦截请求,这个实力中,我们在web.xml中配置的springmvc的拦截路径是所有以.do结尾的请求,所有以.do结尾的请求都会经过springmvc,再到达指定的controller。
2.过滤,有时我们将springmvc的拦截设置为所有时,所有静态的资源也会被拦截,致使我们的静态资源无法正常获取,这个时候我们就需要对静态资源进行放行。
<?xml version="1.0" encoding="UTF-8"?>
<beans xmlns="http://www.springframework.org/schema/beans"
	xmlns:xsi="http://www.w3.org/2001/XMLSchema-instance" xmlns:p="http://www.springframework.org/schema/p"
	xmlns:context="http://www.springframework.org/schema/context"
	xmlns:mvc="http://www.springframework.org/schema/mvc"
	xsi:schemaLocation="http://www.springframework.org/schema/beans http://www.springframework.org/schema/beans/spring-beans.xsd
        http://www.springframework.org/schema/mvc http://www.springframework.org/schema/mvc/spring-mvc-4.0.xsd
        http://www.springframework.org/schema/context http://www.springframework.org/schema/context/spring-context.xsd">
	 <!-- 使用注解开发,不用配置controller,需要配置一个组件扫描器,这里配置的是controller所在的包的路径	-->
     <context:component-scan base-package="cn.sxt.controller"/>
     <!--
     	 		springmvc会拦截所有请求,包括静态资源的请求,这个时候我们就需要配置视图解析器对某些静态资源放行
        <bean class="org.springframework.web.servlet.view.InternalResourceViewResolver">
            	 配置从项目根目录到指定目录一端路径 ,建议指定浅一点的目录
            <property name="prefix" value="/WEB-INF/jsp/"></property>
        		文件的后缀名
            <property name="suffix" value=".jsp"></property>
        </bean>
      -->

     <!-- 注册springMVC注解驱动 -->
     <mvc:annotation-driven/>
</beans>
四.mybatis.xml的配置
在整合SSM框架时,由于SqlSessionFactory对象的创建和数据源的配置都交给了spring来管理,所以mybatis的配置文件一般来说显得,没那么必要,但是有一些设置还是要基于mybatis.xml的,所有这里虽然我的mybatis中什么都没有,但还是选择保留。
<?xml version="1.0" encoding="UTF-8"?>
<!DOCTYPE configuration
  PUBLIC "-//mybatis.org//DTD Config 3.0//EN"
  "http://mybatis.org/dtd/mybatis-3-config.dtd">
  <configuration>
  <!-- 配置分页插件 -->
  </configuration>
五.spring-shiro.xml的配置文件
Shiro是一个强大易用的Java安全框架,提供了认证、授权、加密和会话管理等功能。shiro的使用是以过滤器的形式存在web中。
<?xml version="1.0" encoding="UTF-8"?>
<beans xmlns="http://www.springframework.org/schema/beans"
	xmlns:xsi="http://www.w3.org/2001/XMLSchema-instance" xmlns:p="http://www.springframework.org/schema/p"
	xmlns:context="http://www.springframework.org/schema/context"
	xmlns:mvc="http://www.springframework.org/schema/mvc"
	xsi:schemaLocation="http://www.springframework.org/schema/beans http://www.springframework.org/schema/beans/spring-beans.xsd
        http://www.springframework.org/schema/mvc http://www.springframework.org/schema/mvc/spring-mvc-4.0.xsd
        http://www.springframework.org/schema/context http://www.springframework.org/schema/context/spring-context.xsd">
	<!-- 注册凭证匹配器 -->
	<bean id="credentialsMatcher" class="org.apache.shiro.authc.credential.HashedCredentialsMatcher">
		<property name="hashAlgorithmName" value="md5"></property>
		<property name="hashIterations" value="2"></property>
	</bean>
	<!-- z注册自定义realm -->
	<bean id="custonRealm" class="cn.sxt.realms.CustomRealm">
		<property name="credentialsMatcher" ref="credentialsMatcher"></property>
	</bean>
	<!-- 注册sessionManager org.apache.shiro.web.session.mgt.DefaultWebSessionManager-->
	<bean id="sessionManager" class="org.apache.shiro.web.session.mgt.DefaultWebSessionManager">
		<!-- 在超类AbstractSessionManager中  设置session的有效时长 -->
		<property name="globalSessionTimeout" value="3000000"></property>
		<!-- 父类DefaultSessionManager  删除过期的session -->
		<property name="deleteInvalidSessions" value="true"></property>
	</bean>
	<!-- 注册SimpleCookie -->
    <bean id="simpleCookie" class="org.apache.shiro.web.servlet.SimpleCookie">
    	<!-- 设置Cookie名称 -->
    	<property name="name" value="rememberMe"></property>
    	<!-- 设置Cookie有效时间  单位为秒-->
    	<property name="maxAge" value="604800"></property>
    </bean>
    <!-- 注册RememberMeManager -->
    <bean id="rememberMeManager" class="org.apache.shiro.web.mgt.CookieRememberMeManager">
    	<property name="cookie" ref="simpleCookie"></property>
    </bean>
	<!-- 注册securityManager安全管理器 -->
	<bean id="securityManager" class="org.apache.shiro.web.mgt.DefaultWebSecurityManager">
		<!-- 在超类RealmSecurityManager中 -->
		<property name="realms" ref="custonRealm"></property>
		<!-- 在上级类SessionsSecurityManager中 -->
		<property name="sessionManager" ref="sessionManager"></property>
		<property name="rememberMeManager" ref="rememberMeManager"></property>
	</bean>
	<!-- 注册shirofilterFactoryBean -->
	<bean id="shiriFilter" class="org.apache.shiro.spring.web.ShiroFilterFactoryBean">
		<property name="securityManager" ref="securityManager"></property>
                 <!--loginUrl:没有登录的用户请求需要登录的页面时自动跳转到登录页面,不是必须的属性,不输入地址的话会自动寻找项目web项目的根目录下的”/login.jsp”页面。 -->
		<property name="loginUrl" value="/user/login.do"></property>
   	         <!--successUrl:登录成功默认跳转页面,不配置则跳转至”/”。如果登陆前点击的一个需要登录的页面,则在登录自动跳转到那个需要登录的页面。不跳转到此。 -->
		<property name="successUrl" value="/user/loginSuccess.do"></property>
                <!-- unauthorizedUrl:没有权限默认跳转的页面 -->
		<property name="unauthorizedUrl" value="/WEB-INF/jsp/refuse.jsp"></property>
                 <!-- 设置过滤器链属性 -->
		<property name="filterChainDefinitions">
			<value>
               <!--过滤器分为两组,一组是认证过滤器,一组是授权过滤器。其中anon,authcBasic,auchc,user是第一组,perms,roles,ssl,rest,port是第二组-->
                <!--authc 认证通过之后才能访问   anno 可以匿名访问 -->
				/user/login.do = authc
				/**=anon
				/user/loginSuccess.do=user
				/menu/showMen.do=user
			</value>
		</property>
	</bean>
</beans>
六 spring-*.xml 的配置
spring自不必多说:
1.Spring 能帮我们根据配置文件创建及组装对象之间的依赖关系。
2.Spring 面向切面编程能帮助我们无耦合的实现日志记录,性能统计,安全控制。
3.Spring 能非常简单的帮我们管理数据库事务。
4.Spring 还提供了与第三方数据访问框架无缝集成,而且自己也提供了一套JDBC访问模板来方便数据库访问。
5.Spring 还提供与第三方Web框架无缝集成,而且自己也提供了一套Spring MVC框架,来方便web层搭建。
6.Spring 能方便的与Java EE整合,与更多技术整合(比如缓存框架)。
<?xml version="1.0" encoding="UTF-8"?>
<beans xmlns="http://www.springframework.org/schema/beans"
	xmlns:xsi="http://www.w3.org/2001/XMLSchema-instance" xmlns:p="http://www.springframework.org/schema/p"
	xmlns:context="http://www.springframework.org/schema/context"
	xmlns:mvc="http://www.springframework.org/schema/mvc"
	xsi:schemaLocation="http://www.springframework.org/schema/beans http://www.springframework.org/schema/beans/spring-beans.xsd
        http://www.springframework.org/schema/mvc http://www.springframework.org/schema/mvc/spring-mvc-4.0.xsd
        http://www.springframework.org/schema/context http://www.springframework.org/schema/context/spring-context.xsd">
	<!-- 配置解析pripertise文件的工具类 -->
	<context:property-placeholder location="classpath:db.properties"/>

	<!-- 配置数据源 DataSource -->
	<bean id="dataSource" class="org.springframework.jdbc.datasource.DriverManagerDataSource">
		<property name="driverClassName" value="${jdbc.driver}"></property>
		<property name="url" value="${jdbc.url}"></property>
		<property name="username" value="${jdbc.username}"></property>
		<property name="password" value="${jdbc.password}"></property>
	</bean>
	<!-- 创建mybatis的上下文对象 -->
	<bean class="org.mybatis.spring.SqlSessionFactoryBean">
		<property name="dataSource">
			<ref bean="dataSource"/>
		</property>
		<property name="configLocation">
			<value>classpath:MyBatis.xml</value>
		</property>
		<property name="typeAliasesPackage" value="cn.sxt.pojo"></property>
	</bean>
	<!-- 扫描mybatis的接口与映射配置文件 -->
	<bean class="org.mybatis.spring.mapper.MapperScannerConfigurer">
		<property name="basePackage" value="cn.sxt.mapper"></property>
	</bean>

</beans>
<?xml version="1.0" encoding="UTF-8"?>
<beans xmlns="http://www.springframework.org/schema/beans"
	xmlns:xsi="http://www.w3.org/2001/XMLSchema-instance" xmlns:p="http://www.springframework.org/schema/p"
	xmlns:context="http://www.springframework.org/schema/context"
	xmlns:mvc="http://www.springframework.org/schema/mvc"
	xsi:schemaLocation="http://www.springframework.org/schema/beans http://www.springframework.org/schema/beans/spring-beans.xsd
        http://www.springframework.org/schema/mvc http://www.springframework.org/schema/mvc/spring-mvc-4.0.xsd
        http://www.springframework.org/schema/context http://www.springframework.org/schema/context/spring-context.xsd">
	<!-- 注册组件扫描器 -->
     <context:component-scan base-package="cn.sxt.service"/>

</beans>


 238
238


 被折叠的 条评论
为什么被折叠?
被折叠的 条评论
为什么被折叠?
 到【灌水乐园】发言


