


向微信推送定时消息


![]()


(English version is down below)
好用记得收藏(右上角加星★Star)哦!
Docker镜像支持在amd64、arm64、arm32v7、arm32v6、arm32v5、ppc64le、s390x、i386多架构(包括大型机、普通PC机以及树莓派等开发板)运行。
使用方法
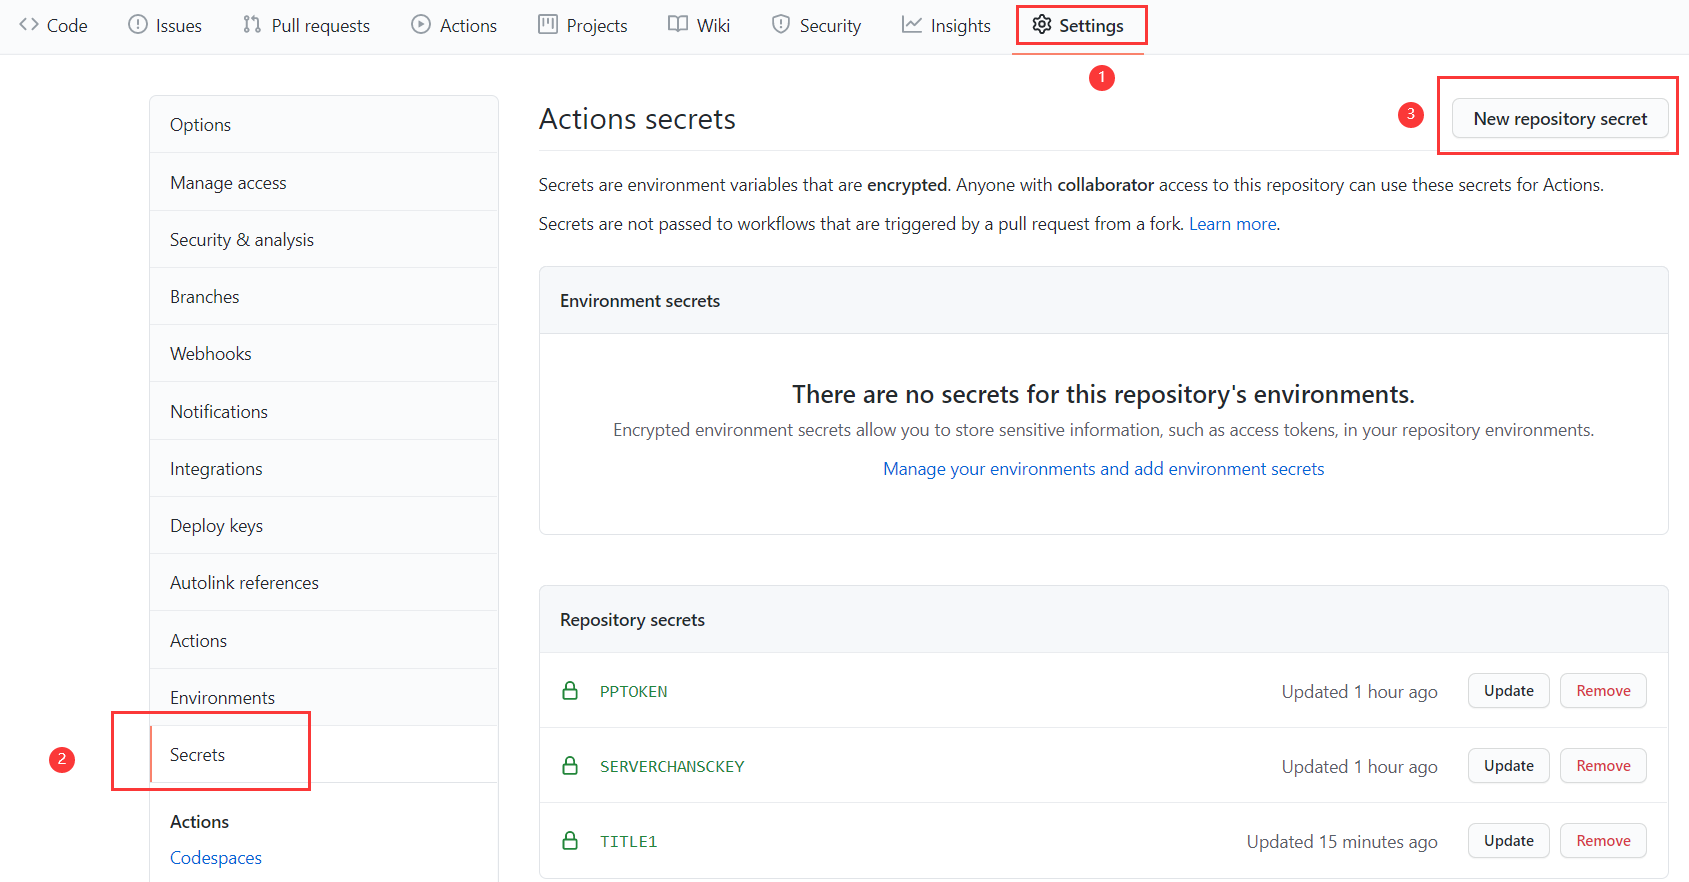
你需要fork本仓库,之后在你fork的仓库中创建相关Actions Secret并进行相关设置(按下图所示点击1,2,3的次序,即可进入新建Actions secrets的界面):
你可以从以下三个推送平台中任选一个或多个来接受推送的消息:
PushPlus(推荐)
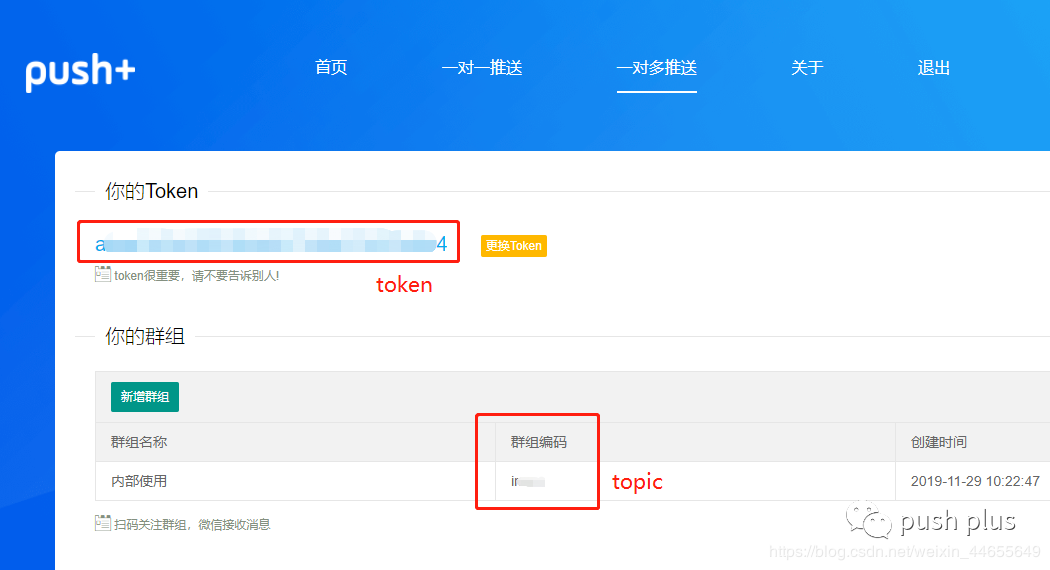
登录PushPlus,然后在pushplus网站中找到您的token,创建一个Name为PPTOKEN,value为您的token值的Actions secret,就可以进行一对一推送信息。
如果需要对多个账号推送信息,即一对多推送,还需要另外新建一个群组,记下群组编码,然后创建一个Name为PPTOPIC,value为您的群组编码的Actions secret。
Server酱
注: 因为微信发布公告将在2021年4月底下线模板消息,Server酱开发了以企业微信为主的多通道新版(Turbo版 sct.ftqq.com)。旧版将在4月后下线
如使用Server酱来实现,它的配置方法请参考其说明文档。
然后,你只需要创建一个Name为SERVERCHANSCKEY,value为你的SCKEY调用代码值的Actions secret即可自动让仓库的工作流通过Server酱为你推送消息。
Server酱测试号版
注: 因为微信发布公告将在2021年4月底下线模板消息,Server酱开发了以企业微信为主的多通道新版(Turbo版 sct.ftqq.com)。旧版将在4月后下线
如果要使用Server酱测试号版,请创建一个/修改Name为SERVERCHANSCKEY,value为你的SendKey值的Actions secret。另外创建一个Name为OPENID的Actions secret,如果value值为0则是通过公众号仅发给自己。否则将value值设定为关注你测试公众号的那个用户的微信号openid,这时将发给自己的同时还会发送给那个指定用户。
如果需要转换回普通的Sever酱请将OPENID Actions secret删除即可。
Server酱Turbo版
按照Server酱Turbo版教程在他们平台上企业微信配置成功之后,同Server酱测试号版处描述操作之后,然后只需要将OPENID value值置为0即可正常使用企业微信推送消息啦。
上述配置成功后,配置工作流文件,以工作流1.yml为模板,创建你自己的工作流或者在提供的工作流上进行修改。你可以任意更改name为无空格的英文字母和数字组合的字符串,cron为你想要发送消息的指定时间(你可以使用crontab guru进行cron表达式的调试,所有时间均为UTC时间,请进行时区换算)(因为Github方的原因,预定运行时间可能会有半小时左右的延迟)。然后创建一个或者两个Actions secrets,一个必须创建,其name为TITLE[name](请将这里的[name]修改为workflow的name),value为要发送消息的标题,例如在提供的工作流中,这里的name为TITLE1;另一个为可选的,其name为MSG[name],同理进行相应的替换,value为要发送消息的标题。
随后,按下图所示点击1,2,3,4的次序,你可以手动触发工作流的执行来进行测试。

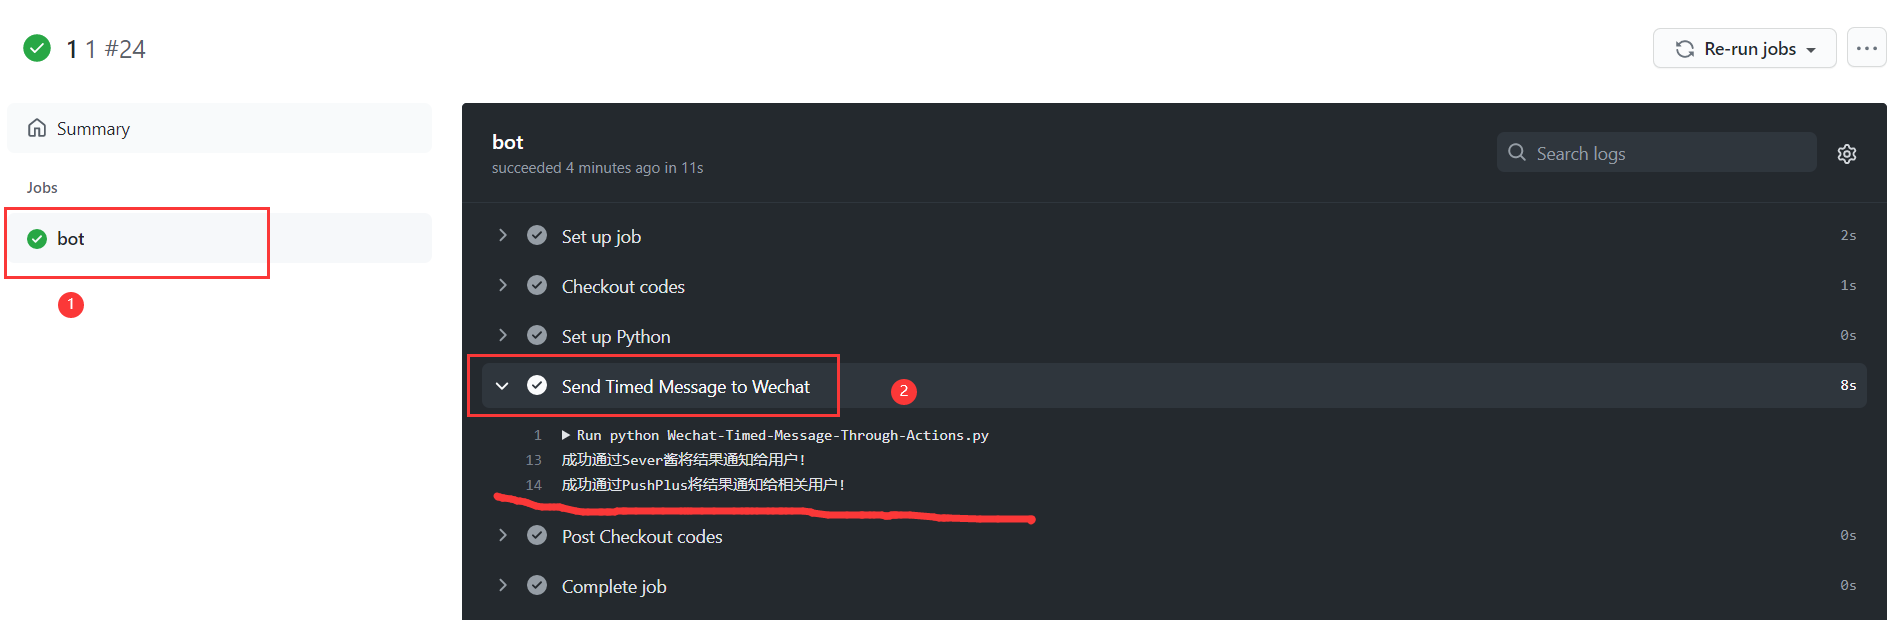
点开任意一个运行记录,依次点开下图所示1,2,你可以看到运行记录。
如果某次因为某些因素工作流运行失败,GitHub会自动发邮件提醒工作流运行失败。
新:增加可选的遇到发送消息失败的情况,自动重启工作流,并等待一段时间后再次发送消息。如果你需要这个功能,则请创建一个Personal Access Token, 获取教程(第7步令牌的作用域权限你只需要选中workflow这一栏即可)。然后创建一个Name为GPATOKEN,value为你的令牌值的Actions Secret。
默认再次发送消息等待时间为30分钟,如果你有需要可以修改你的fork仓库对应的这里的30m替换为你想要的数值,这里的时间遵循Linux sleep 函数对应时间语法:一个数字后接 s 对应秒, m 对应分钟等。
如果是因为本仓库程序本身因为失效而导致的报错,你可以取消正在运行中的工作流从而终止这一循环。
GitLab
你还可以使用GitLab的Pipeline来进行消息推送:
同理,fork完GitLab仓库到你的名下后,创建Variables(类似于GitHub Actions Secrets):


同理,你还可以创建一个Pipeline triggers(类似于Github Access Token)并加入到Variables中来启用自动打开失败再次消息推送:

默认再次消息推送等待时间为30分钟,如果你有需要可以修改你的fork仓库对应的这里的30m替换为你想要的数值。
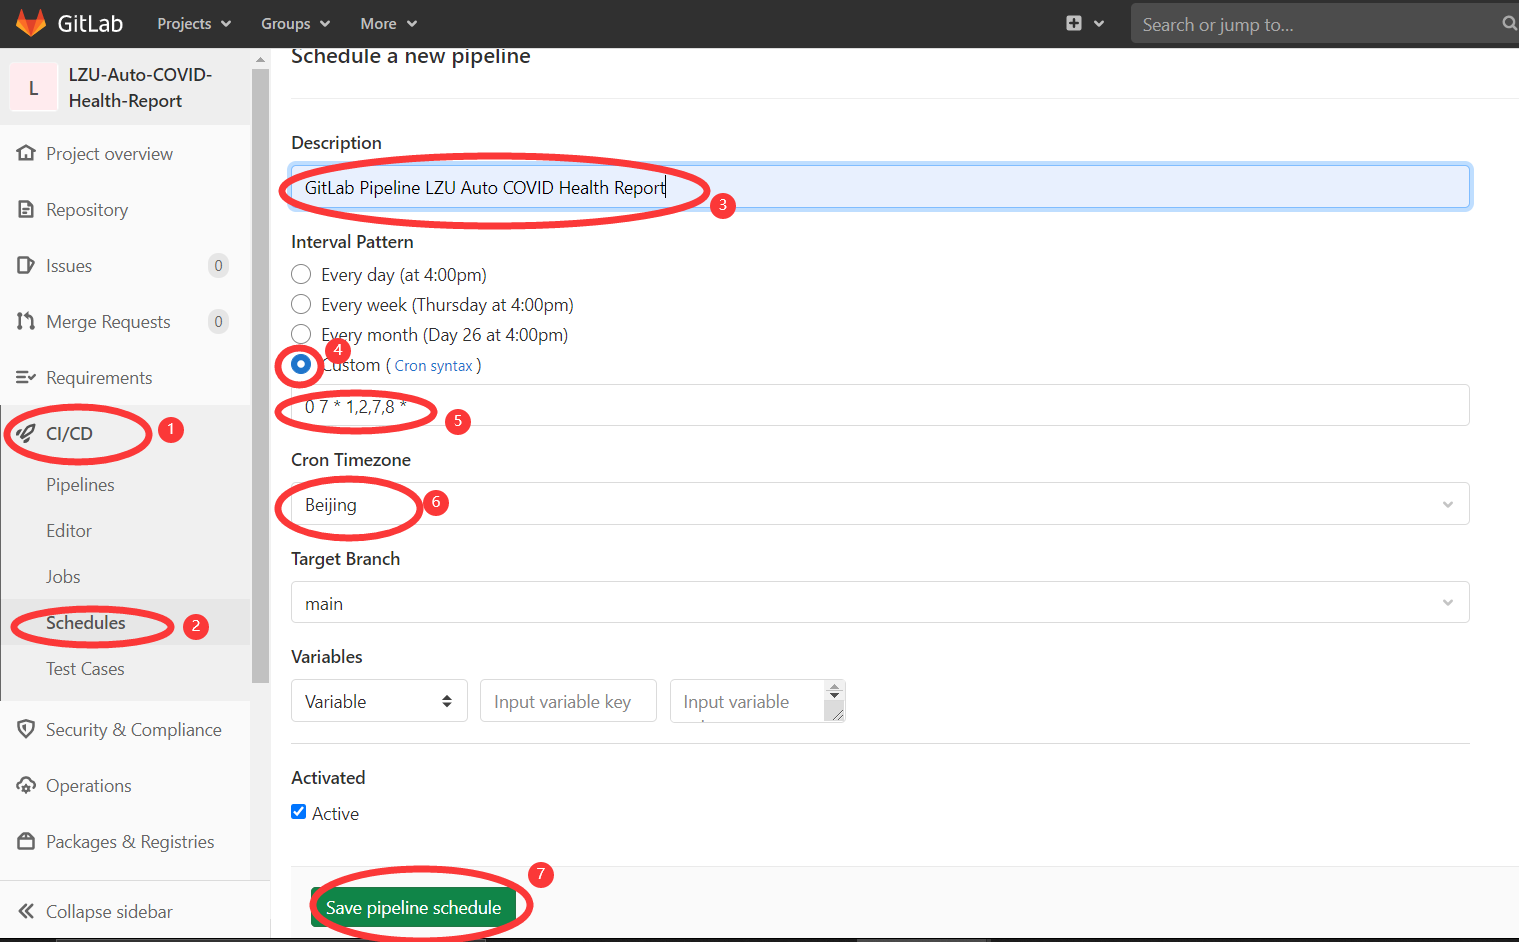
设定schedule:
自行配置工作流
你可以自行创建一个仓库并自行配置工作流进行使用,示例工作流文件
输入
必须
TITLE: 消息标题
可选
MSG: 消息主体
DELAYS: 设置发送消息时间延迟
SERVERCHANSCKEY: Server酱 SCKEY
OPENID: Server酱测试号版 微信公众号用户OpenID
PPTOKEN: PushPlus Token
PPTOPIC: PushPlus 群组编码
示例
- name: 'SendMessagetoWechat'
uses: HollowMan6/Wechat-Timed-Message@main
with:
DELAYS: ${{ github.event.inputs.delays }}
SERVERCHANSCKEY: ${{ secrets.SERVERCHANSCKEY }}
OPENID: ${{ secrets.OPENID }}
PPTOKEN: ${{ secrets.PPTOKEN }}
PPTOPIC: ${{ secrets.PPTOPIC }}
TITLE: ${{ secrets.TITLE }}
MSG: ${{ secrets.MSG }}
Docker
如果你需要通过Docker运行,只需要将上述Actions Secret变量名和值分别设置为环境变量(另外增加一个DELAYS为发送消息等待时间,值同使用方法步骤6中要求),然后执行下述命令即可:
docker run -it \
-e TITLE="$TITLE" \
-e MSG="$MSG" \
-e DELAYS=$DELAYS \
-e SERVERCHANSCKEY=$SERVERCHANSCKEY \
-e OPENID=$OPENID \
-e PPTOKEN=$PPTOKEN \
-e PPTOPIC=$PPTOPIC \
hollowman6/send-message-to-wechat
创建
docker build -t hollowman6/send-message-to-wechat .
该Docker镜像也可以在云服务器中结合Kubernetes的CronJob运行等,可能性无限多。
CronTab
注: 如要在自己的Linux服务器上使用crontab执行定时任务来进行自动发送消息,推荐使用Docker。你也可以clone本仓库,安装好相关Python依赖后改编entrypoint.sh文件中python程序的路径,将上述Actions Secret变量名和值分别设置为系统环境变量(另外增加一个DELAYS为发送消息等待时间,值同使用方法步骤6中要求),即可运行。
你还可以将上述Actions Secret变量名和值分别设置为系统环境变量后,另外增加一个DELAYS为等待时间,值同使用方法步骤6中要求,再增加一个CRONEXP为Cron表达式存储定时调度时间,然后后台运行python clock.py。这里为了方便使用,我制作了安装配置shell脚本,你可以直接运行该脚本,输入相关信息后即可在后台定时运行脚本。
Kubernetes
参考配置文件见K8s, 只要运行create.sh即可创建相关Actions Secret、ConfigMap和CronJob。
Helm
你可以参考这里来自定义一些values值。
V3
脚本会提示你输入相关Secrets和schedule(cron表达式),并且会自动创建一个名为wechat-timed-message的Kubernetes namespace,并将Helm Charts安装在其中。
参考命令:
kubectl create ns wechat-timed-message
helm repo add Wechat-Timed-Message http://hollowman.ml/Wechat-Timed-Message
helm installwechat-timed-message Wechat-Timed-Message/wechat-timed-message --namespace wechat-timed-message --set title='[你的消息标题]' --set message='[你的消息内容]' --set '[...]'
从仓库安装
参考命令:
kubectl create ns wechat-timed-message
cdhelmChart/wechat-timed-message
helm installwechat-timed-message . --namespace wechat-timed-message --set title='[你的消息标题]' --set message='[你的消息内容]' --set '[...]'
卸载
删除helm chart release:
helm uninstall wechat-timed-message --namespace wechat-timed-message
删除相关Kubernetes namespace:
kubectl delete ns wechat-timed-message
Heroku

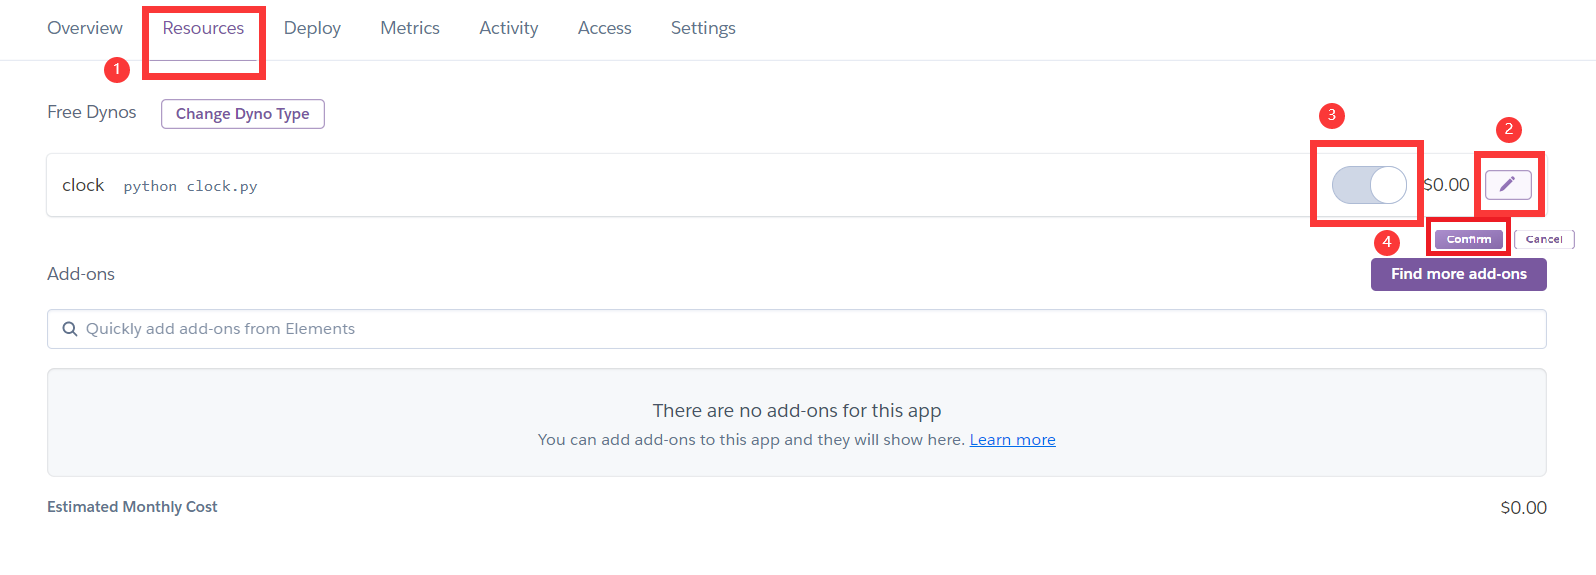
点击以上按钮部署成功后,请确保Overview中Dyno formation栏目中的clock为ON状态,如果不是请按开启:
因为Free Dyno 30分钟会自动休眠,实测休眠时不会自动唤醒消息推送,因而建议使用付费版,否则不推荐使用。
警告:
仅供测试使用,不可用于任何非法用途!
对于使用本代码所造成的一切不良后果,本人将不负任何责任!
Send timed message to Wechat
Please ★Star if you think it's great!
Docker Image support running on multiple architectures such as amd64, arm64, arm32v7, arm32v6, arm32v5, ppc64le, s390x, i386 including Mainframe, PC and Demoboard like Raspberry Pi.
Usage
you can fork this repository first, and then create Actions Secrets and set related settings in your forked repository (click in the order of 1, 2 and 3 as shown in the figure below).
You can choose one or more of the following three push platforms to receive pushed messages:
PushPlus(Recommended)
First log into pushplus, and then find your token in pushplus website, create a actions secret with the name of PPTOKEN and the value of your token value, and then one-to-one push the related information results.
If you need to push the related information to multiple Wechat accounts, that is, one-to-many push, you need to create a group, write down the group code, and then create an actions secret with the name of PPTOPIC and the value of your group code.
ServerChan
Note: because wechat announced that its template message will be offline at the end of April 2021, ServerChan have developed a new multi-channel Version (turbo version https://sct.ftqq.com) based on enterprise wechat. The old version will go offline in April
We Use Server Chan to realize its functionality. For its configuration method, please refer to its documentation (In Chinese).
Then, you just need to create an Actions Secret whose name is SERVERCHANSCKEY and value is Your SCKEY. Then the workflow can automatically push the relevant information for you.
ServerChan Testing Subscription Version
Note: because wechat announced that its template message will be offline at the end of April 2021, ServerChan have developed a new multi-channel Version (turbo version https://sct.ftqq.com) based on enterprise wechat. The old version will go offline in April
If you want to use ServerChan Testing Subscription Version, please create/modify the Actions secret with the Name SERVERCHANSCKEY and the value your sendkey value. In addition, create a Actions secret with Name as OPENID, if the value is 0, it is only send to yourself. Otherwise, set the value to be the specified user's Wechat openid who subscribed the Testing Subscription account, then it will send it to the designated user and yourself at the same time.
If you need to switch back to normal SeverChan, please delete the OPENID actions secret.
ServerChan Turbo Version
According to ServerChan Turbo Version tutorial, configuring Enterprise Wechat message pushing on their platform, then after doing the same actions as the tutorial describes in the ServerChan Testing Subscription Version part, you just need to set the openid value to 0 so that this way can be functional.
After the above configuration is successful, configure the workflow file and use 工作流1.yml as the template to create your own workflow or modify the workflow provided. You can change the name into a string of letters or numbers without spaces. Cron is the specified time when you want to send a message (you can use crontab guru For cron expression debugging, all the time zone is in UTC, please convert the time zone into yours. (Due to the mechanism realized by Github, there may exist a delay for about half an hour.) Then create one or two actions Secrets: one must be created, its name isTITLE[name](please change [name] here into the name of workflow), and value is the title of the message to be sent. For example, in the provided workflow, the name is TITLE1; the other is optional, its name is MSG[name], and the corresponding replacement is carried out, and value is the title of the message to be sent.
Then, click in the order of 1, 2, 3 and 4 as shown in the figure below. You can manually trigger the execution of workflow to test.
Click any running record, and then click in the order of 1 and 2 as shown in the figure below. You can see the running record and error description.
If the workflow fails due to some errors, GitHub will automatically send an email to remind the workflow of failure.
NEW: Add the optional option to restart the workflow automatically in case of Send Message to Wechat in failure, and wait for a period of time to re-run workflow again automatically. If you need this, please create a Personal Access Token, Here's Guides to create(In step 7 scopes or permissions, you only need to select the workflow row). Then create an Actions Secret with the name of GPATOKEN and the value with your token.
The default waiting time is 30 minutes. You can replace 30m here in your corresponding repository with the time you want. The time here follows the Linux sleep syntax for time units: a number followed by s for seconds, m for minutes, etc.
If the error is caused by the repository program itself, you can cancel the running workflow to terminate the loop.
GitLab
You can also use GitLab's Pipeline to auto-report:
In the same way, after forking the gitlab repository under your account, create Variables(similar to GitHub Actions Secrets):
In the same way, you can also create a Pipeline triggers (similar to Github Access Token) and add it to Variables to restart the workflow automatically in case of Auto Report in failure:
The default waiting time is 30 minutes. You can replace 30m here in your corresponding repository with the time you want.
Setup schedule:
Self-Configure Workflow
You can create your own repository and configure your own workflow to use, Example Workflow YAML File
Input
Required
TITLE: Your Message Title
Optional
MSG: Your Message Content
SERVERCHANSCKEY: ServerChan SCKEY
OPENID: ServerChan Testing Subscription Version Testing Subscription account User OpenID
PPTOKEN: PushPlus Token
PPTOPIC: PushPlus Topic
Example
- name: 'SendMessagetoWechat'
uses: HollowMan6/Wechat-Timed-Message@main
with:
DELAYS: ${{ github.event.inputs.delays }}
SERVERCHANSCKEY: ${{ secrets.SERVERCHANSCKEY }}
OPENID: ${{ secrets.OPENID }}
PPTOKEN: ${{ secrets.PPTOKEN }}
PPTOPIC: ${{ secrets.PPTOPIC }}
TITLE: ${{ secrets.TITLE }}
MSG: ${{ secrets.MSG }}
Docker
If you need to run through docker, just set the above Actions Secrets name and value as environment variables (In addition, add a DELAYS as the waiting time, and the value is the same requirement as that in step 6 of usage), and then execute the following command:
docker run -it \
-e TITLE="$TITLE" \
-e MSG="$MSG" \
-e DELAYS=$DELAYS \
-e SERVERCHANSCKEY=$SERVERCHANSCKEY \
-e OPENID=$OPENID \
-e PPTOKEN=$PPTOKEN \
-e PPTOPIC=$PPTOPIC \
hollowman6/send-message-to-wechat
Build
docker build -t hollowman6/send-message-to-wechat .
The docker image here can also be runned in combination with Kubernetes' CronJob in the Cloud Clusters etc. THere're unlimited possibilities.
CronTab
PS: If you want to use crontab on your own Linux server to execute the send message, I recommend using docker, otherwise please clone this repository and after installing relevant Python dependencies, adapt the path of the python program in entrypoint.sh. Set the Actions Aecrets name and value mentioned above as the environment variable respectively (In addition, add a DELAYS as the waiting time, and the value is the same requirement as that in step 6 of usage) to run.
You can also set the Actions Secrets name and value mentioned above as the environment variable respectively, in addition, add a DELAYS as the waiting time, and the value is the same requirement as that in step 6 of usage, and add a CRONEXP as the schedule time, the value being the cron expression. Finally run python clock.py in the background. Here, for the convenience of use, I made a install and configure shell script. you can run the script directly, and then the program will run and schedule in the background after inputting relevant information.
Kubernetes
You can refer to the configuration file K8s.Also create the relevant Secrets ConfigMap and CronJob by running create.sh
Helm
V3
The script will prompt users to enter the Secrets and schedule (cron expression), and automatically created a Kubernetes namespace called wechat-timed-message, and install Helm Charts into it.
Example command:
kubectl create ns wechat-timed-message
helm repo add Wechat-Timed-Message http://hollowman.ml/Wechat-Timed-Message
helm installwechat-timed-message Wechat-Timed-Message/wechat-timed-message --namespace wechat-timed-message --set title='[Your Message Title]' --set message='[Your Message Content]' --set '[...]'
From Repository
Example command:
kubectl create ns wechat-timed-message
cdhelmChart/wechat-timed-message
helm installwechat-timed-message . --namespace wechat-timed-message --set title='[Your Message Title]' --set message='[Your Message Content]' --set '[...]'
Uninstall
Delete helm chart release:
helm uninstall wechat-timed-message --namespace wechat-timed-message
Delete related Kubernetes namespace:
kubectl delete ns wechat-timed-message
Heroku
After sccessfully deployed the app, please make sure that the clock is ON at Dyno formation part in the Overview Section. If it's not, turn it on:
Because Free Dyno will automatically sleep in 30 minutes, it will not automatically wake up even the specified time arrives when it sleeps, so it is recommended to use the paid Dyno, otherwise is not recommended.
Warning:
For TESTING ONLY, not for any ILLEGAL USE!
I will not be responsible for any adverse consequences caused by using this code.


 4443
4443


 被折叠的 条评论
为什么被折叠?
被折叠的 条评论
为什么被折叠?
 到【灌水乐园】发言


