


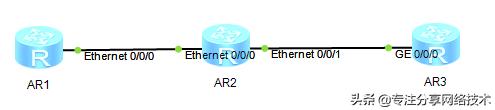
一、拓扑
二、步骤
1、查看 R1 的路由表,将会发现 R1 上收到的 R2,R3 的环回口路由都是 32 位的主机路由:
[R1]display ip routing protocol ospf
Destination/Mask Proto Pre Cost Flags NextHop Interface
22.1.1.1/32 OSPF 10 1 D 12.1.1.2 Ethernet0/0/0
23.1.1.0/24 OSPF 10 2 D 12.1.1.2 Ethernet0/0/0
33.1.1.1/32 OSPF 10 2 D 12.1.1.2 Ethernet0/0/0
2、查看 R2 上环回口的网络类型:
[R2]display ospf interface LoopBack 1
OSPF Process 1 with Router ID 22.1.1.1
Interfaces
Interface: 22.1.1.1 (LoopBack1)
Cost: 0 State: P-2-P Type: P2P MTU: 1500
Timers: Hello 10 , Dead 40 , Poll 120 , Retransmit 5 , Transmit Delay 1
//以上输出表示类型是 P2P
3、修改接口的网络类型如下:
[R2]interface LoopBack 1
[R2-LoopBack1]ospf network-type broadcast
4、去 R1 查看结果:
[R1]display ip routing protocol ospf
Destination/Mask Proto Pre Cost Flags NextHop Interface
22.1.1.0/24 OSPF 10 1 D 12.1.1.2 Ethernet0/0/0
23.1.1.0/24 OSPF 10 2 D 12.1.1.2 Ethernet0/0/0
33.1.1.1/32 OSPF 10 2 D 12.1.1.2 Ethernet0/0/0
//以上表示 R1 收到 R2 的路由是 24 位的了。
三、修改 OSPF 接口的 COST
通以上面的实验输出可以发现,LOOPBACK 口的 COST 值为 0,接下来把 R2 的环回口COST 值修改为 99,再去 R1 看结果。
[R2]interface loop 1
[R2-LoopBack1]ospf cost 99
[R1]display ip routing protocol ospf
Destination/Mask Proto Pre Cost Flags NextHop Interface
22.1.1.0/24 OSPF 10 100 D 12.1.1.2 Ethernet0/0/0
23.1.1.0/24 OSPF 10 2 D 12.1.1.2 Ethernet0/0/0
33.1.1.1/32 OSPF 10 2 D 12.1.1.2 Ethernet0/0/0
四、配置 OSPF 的被动接口
OSPF 的被动接口与 RIP 是不一样的,不再是只收不发,而是不收也不发任何 OSPF 的报文,会导至邻居关系都建立不起来,当然也学不到任何路由:
[R1]ospf 1
[R1-ospf-1]silent-interface Ethernet 0/0/0
[R1]display ospf peer
取消 E0/0/0 口的被动接口,去回环回:
[R1-ospf-1]undo silent-interface Ethernet 0/0/0
[R1-ospf-1]silent-interface LoopBack 1
再去 R2 上去查看结果:
[R2]display ip routing protocol ospf
Destination/Mask Proto Pre Cost Flags NextHop Interface
11.1.1.1/32 OSPF 10 1 D 12.1.1.1 Ethernet0/0/0
33.1.1.1/32 OSPF 10 1 D 23.1.1.3 Ethernet0/0/1
//以上表示 R2 正常收到的一个被 silent 掉的回环口的路由,也就是说被动接口只是不建
立邻居关系,但是这个接口所在的路由依然会通告出去。


 3051
3051


 被折叠的 条评论
为什么被折叠?
被折叠的 条评论
为什么被折叠?
 到【灌水乐园】发言


