


1. 前言
原文发布在语雀:
<Vue 源码笔记系列4>异步更新队列与$nextTick · 语雀www.yuque.com
上一章我们讲到了修改数据是如何触发渲染函数的观察者,最终调用 Watcher 的 run 方法重新求值并渲染页面。
当时我们提到了页面更新是异步的,本章我们来看一下 Vue 是如何实现的异步更新队列。
当然,提起异步更新,我们自然会想到与之相关的 $nextTick 方法,这个方法接收一个回调,在页面更新完成后执行。
2. 流程图
老规矩,先上图:
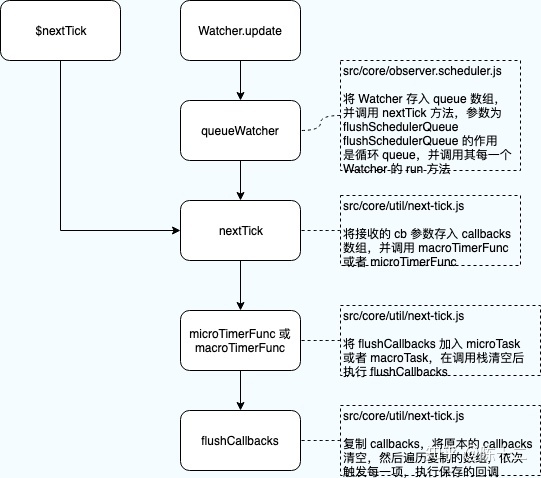
3. renderWatcher 与 $nextTick
3.1 renderWatcher
Watcher 的 update 代码如下:
// src/core/observer/watcher.js

update () {
  // ...
  queueWatcher(this)
}
调用 queueWatcher 并将自己作为参数
queueWatcher 代码:
// src/core/observer/scheduler.js

export function queueWatcher (watcher: Watcher) {
  const id = watcher.id
  if (has[id] == null) {
    has[id] = true
    if (!flushing) {
      queue.push(watcher)
    } else {
      // if already flushing, splice the watcher based on its id
      // if already past its id, it will be run next immediately.
      let i = queue.length - 1
      while (i > index && queue[i].id > watcher.id) {
        i--
      }
      queue.splice(i + 1, 0, watcher)
    }
    // queue the flush
    if (!waiting) {
      waiting = true
      nextTick(flushSchedulerQueue)
    }
  }
}
首先拿到 watcher 的 id。
if (has[id] == null) {
  has[id] = true
  if (!flushing) {
    queue.push(watcher)
  } else {
    // ...
    queue.splice(i + 1, 0, watcher)
  }
}
然后判断 has[id] 是否为空。has 是在 scheduler.js 文件声明的 Map。
let has: { [key: number]: ?true } = {}
由下一句 has[id] = true 可以知道,has 收集了所有 watcher 的 id,以 id 为键名,值为 true。这么做的目的是防止收集重复的 watcher。
下一个判断,if (!flushing) ,flushing 标志当前是否在执行更新,也就是是否在执行 watcher.run。如果为 false,说明当前的 queue 里的 watcher 还没有被触发,我们就将当前 watcher push 到 queue 中。如果 flushing 值为 true。说明 queue 队列中的 watcher 正在执行,我们不能简单地将 watcher 插入到 queue 末尾了,至于如何插入,我们将在另外的章节来讲。
再往下:
if (!waiting) {
  waiting = true
  nextTick(flushSchedulerQueue)
}
wating 定义在文件顶部,初始值为 false。目的是保证在 queue 中的 watcher 被执行前,只执行一次 nextTick。
为什么这么做呢,我们先来看一下 nextTick 传入的回调干了些什么。
flushSchedulerQueue:
// src/core/observer/scheduler.js

function flushSchedulerQueue () {
  flushing = true
  let watcher, id
  queue.sort((a, b) => a.id - b.id)

  for (index = 0; index < queue.length; index++) {
    watcher = queue[index]
    if (watcher.before) {
      watcher.before()
    }
    id = watcher.id
    has[id] = null
    watcher.run()
        // ...
  }
    // ...
  resetSchedulerState()
    // ...
}
flushSchedulerQueue 的主要作用就是先将 flushing 置为 true,然后遍历 queue 队列,依次调用其 watcher 的 run 方法。最后调用 resetSchedulerState,看名字这个方法应该是重置状态用的,将 wating 和 flushing 重置为 初始值 false。
// src/core/observer/scheduler.js
function resetSchedulerState () {
  // ...
  waiting = flushing = false
}
我们来回顾一下 queueWatcher。它会排除重复的 watcher,存入 queue。然后执行一次 nextTick,由 nextTick 在合适的时机执行回调,该回调将遍历 queue,执行存储的 watche r的 run 方法。
由此看来,nextTick 是决定回调什么时候执行,也就是页面什么时候更新的。先不着急看 nextTick。我们来看一下我们经常使用的 $nextTick。
3.2 $nextTick
在 renderMixin 中我们找到了 $nextTick
// src/core/instance/render.js

export function renderMixin (Vue: Class<Component>) {
  // ...
  Vue.prototype.$nextTick = function (fn: Function) {
    return nextTick(fn, this)
  }
  // ...
}
代码比较简单,$nextTick 实际上也是调用的 nextTick 方法,唯一的不同是将当前组件实例作为第二个参数传入了。
既然大家最终都是调用了 nextTick 方法,我们就来看一下。
4. nextTick
理解 nextTick 需要对 js 异步队列的执行机制有一定的了解,至少需要知道宏任务(macroTask),微任务(microTask),事件循环(Event Loop),调用栈(Call Stack),回调事件队列(Callback Queue)这些概念。
我们这里只作大致的讲解,详细的解释大家可以自行查阅资料,或者我哪天会单独发一篇文章讲这个。
4.1 JS 异步
JS 通过回调的方式,异步处理耗时操作。
Event Loop 负责监听 Call Stack 与 Callback Queue。当 Call Stack 为空时,取出 Callback Queue 中的第一个事件(回调函数)放到 Call Stack 中执行。后续不断循环此操作。
如下代码:
console.log('Hi')
setTimeout(function cb1() {
    console.log('cb1')
}, 5000)
console.log('Bye')
执行过程如下图:
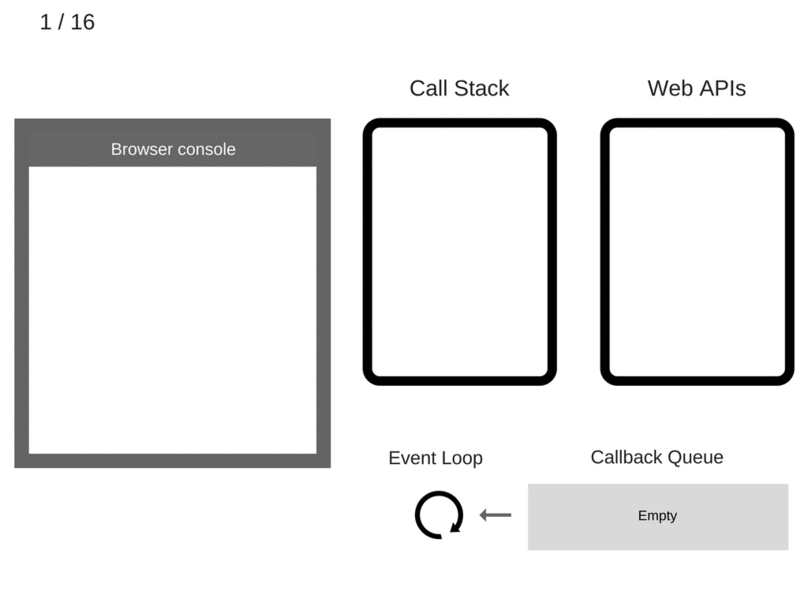
由此可以看出,setTimeout 并不是严格的延迟指定时间后执行回调。浏览器执行到 setTimeout 之后,会在 Callback Queue 中添加相应的回调,并且浏览器的 Web Api 会开启一个定时器,在 5s 后通知 Event Loop 将该回调放入 Call Stack 执行,但是此时 Call Stack 并不一定是空的,所以可能会等待 Call Stack 空了之后再将此回调放入 Call Stack 执行。
JS 除了有同步异步之分外,还有宏任务与微任务之分:
- macro-task(宏任务):包括整体代码script,setTimeout,setInterval;
- micro-task(微任务):Promise,process.nextTick;
事件循环的顺序,决定js代码的执行顺序。进入整体代码(宏任务)后,开始第一次循环。接着执行所有的微任务。然后再次从宏任务开始,找到其中一个任务队列执行完毕,再执行所有的微任务。
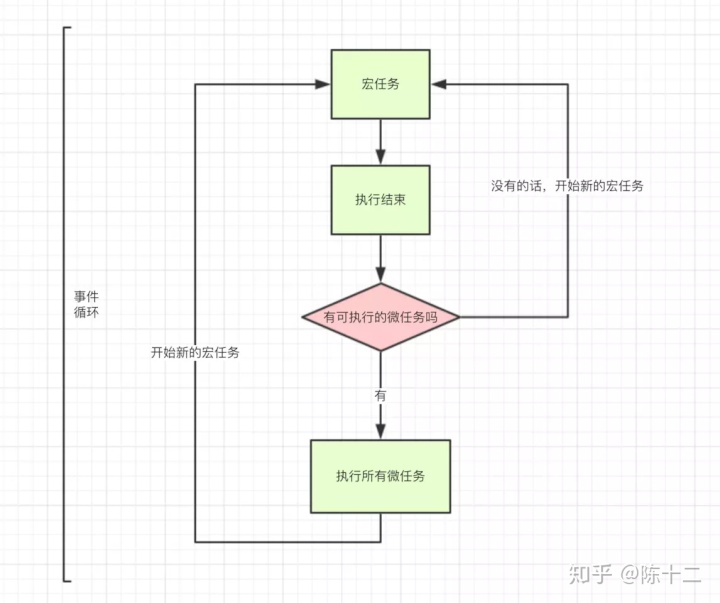
上边代码与图片来自 https://juejin.im/post/5a5d64fbf265da3e243b831f。
4.2 nextTick 实现
// src/core/util/next-tick.js
const callbacks = []
let pending = false

export function nextTick (cb?: Function, ctx?: Object) {
  let _resolve
  callbacks.push(() => {
    if (cb) {
      try {
        cb.call(ctx)
      } catch (e) {
        handleError(e, ctx, 'nextTick')
      }
    } else if (_resolve) {
      _resolve(ctx)
    }
  })
  if (!pending) {
    pending = true
    if (useMacroTask) {
      macroTimerFunc()
    } else {
      microTimerFunc()
    }
  }
  // $flow-disable-line
  if (!cb && typeof Promise !== 'undefined') {
    return new Promise(resolve => {
      _resolve = resolve
    })
  }
}
代码其实也不复杂,咱们慢慢看
export function nextTick (cb?: Function, ctx?: Object) {
  let _resolve
  callbacks.push(() => {
    if (cb) {
      try {
        cb.call(ctx)
      } catch (e) {
        handleError(e, ctx, 'nextTick')
      }
    } else if (_resolve) {
      _resolve(ctx)
    }
  })
    // ...
}
callbacks 并不是直接存储 cb,而是存储箭头函数,在函数内部调用 cb,因为 cb 可能为空。
再往下:
if (!pending) {
  pending = true
  if (useMacroTask) {
    macroTimerFunc()
  } else {
    microTimerFunc()
  }
}
pending 是一个标志位,与我们之前见到的 waiting 很像,保证了 if 内的语句只执行一次。
在 if 内部调用了 macroTimerFunc 或者 microTimerFunc,之所以出现这种情况,是因为有些浏览器不支持Promise 实现的 microTimerFunc。
先来看一下微任务 microTimerFunc 的实现:
// src/core/util/next-tick.js

if (typeof Promise !== 'undefined' && isNative(Promise)) {
  const p = Promise.resolve()
  microTimerFunc = () => {
    p.then(flushCallbacks)
    if (isIOS) setTimeout(noop)
  }
} else {
  microTimerFunc = macroTimerFunc
}
如果浏览器支持原生 Promise 的话,将 flushCallbacks 作为一个立即 resolve 的 Promise 的 then 回调。由于 promise 为 microTask,所以将在 call stack 空闲时,优先执行。所以我们优先使用 microTimerFunc。当浏览器不兼容时使用 macroTimerFunc。
// src/core/util/next-tick.js

if (typeof setImmediate !== 'undefined' && isNative(setImmediate)) {
  macroTimerFunc = () => {
    setImmediate(flushCallbacks)
  }
} else if (typeof MessageChannel !== 'undefined' && (
  isNative(MessageChannel) ||
  // PhantomJS
  MessageChannel.toString() === '[object MessageChannelConstructor]'
)) {
  const channel = new MessageChannel()
  const port = channel.port2
  channel.port1.onmessage = flushCallbacks
  macroTimerFunc = () => {
    port.postMessage(1)
  }
} else {
  /* istanbul ignore next */
  macroTimerFunc = () => {
    setTimeout(flushCallbacks, 0)
  }
}
我们知道 setTimeOut 为 macroTask,但在这里 setTimeOut 只作为优先级最低的方案。
首先使用 setImmediate,但是兼容性比较差,目前只有 IE10 实现了。其次使用 MessageChannel,这个是 webWorker 相关,可以了解一下。这两种方案都不需要超时检测,所以性能更好,最后我们使用 setTimeOut。
再来看一下被加入到 task 的方法 flushCallbacks:
// // src/core/util/next-tick.js

function flushCallbacks () {
  pending = false
  const copies = callbacks.slice(0)
  callbacks.length = 0
  for (let i = 0; i < copies.length; i++) {
    copies[i]()
  }
}
复制 callbacks 并清空,遍历复制体,依次执行。这里就会执行最开始 nextTick 接收的 cb。
最后,如果没有传入 cb 是什么情况呢。
nextTick 还有最后几行代码:
if (!cb && typeof Promise !== 'undefined') {
  return new Promise(resolve => {
    _resolve = resolve
  })
}
将 _resolve 赋值为 Promise.resolve,所以在此时 nextTick 会返回立即 resolve 的 Promise。
5. 小结
异步更新与 $nextTick 是我们经常接触到的 Vue 特性。如果没有异步更新的特性,性能会相当差。
比如:
for (let i = 0; i < 1000; i++) {
  this.text = i
}
我们修改 1000 次 text,如果没有异步更新的话,浏览器将刷新 1000 次,使用异步更新后,只会执行最后一次也即 this.text = 999。
在前边几章中,我们都是讲解大致的代码流程,很多细节都放过了。下一章我们来补一下 watch 的实现。


 1787
1787


 被折叠的 条评论
为什么被折叠?
被折叠的 条评论
为什么被折叠?
 到【灌水乐园】发言


