


前言
无论是自动化测试还是自动化部署,撸码肯定少不了,所以下面的基于java语言的接口自动化测试,要想在业务上实现接口自动化,前提是要有一定的java基础。
如果没有java基础,也没关系。这里小编也为大家提供了一套java基础精讲视频(虽然年代有点久2017,但是讲解内容绝对干货,小编看了很多的基础视频唯有这一套讲解到位)由于视频较大,放到了某盘上,后台回复关键字【java】即可获取。进入主题
使用技术
- Spring Boot
- mybatis
- testng
- Swagger2
- extentreports
- httpclient(这里抽取了一些方法非常好用)
- log4j2
项目结构

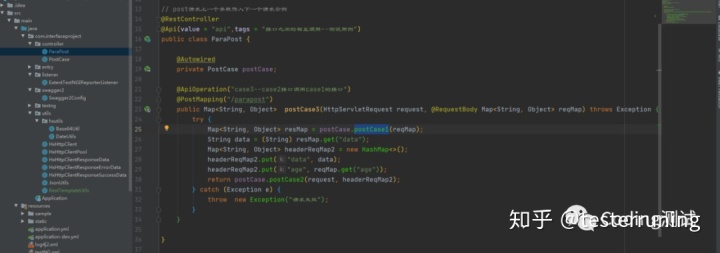
- httpclient 抽取工具类部分方法
import org.apache.http.impl.client.HttpClientBuilder;
import org.springframework.http.HttpEntity;
import org.springframework.http.HttpHeaders;
import org.springframework.http.HttpMethod;
import org.springframework.http.ResponseEntity;
import org.springframework.http.client.HttpComponentsClientHttpRequestFactory;
import org.springframework.web.client.RestTemplate;

import java.util.Map;

/**
 * @author lgl
 * @date 2020/05/15 15:19
 */
public class RestTemplateUtils {
    private static final RestTemplate REST_TEMPLATE;

    static {
        HttpComponentsClientHttpRequestFactory httpRequestFactory = new HttpComponentsClientHttpRequestFactory(HttpClientBuilder.create()
                .setMaxConnTotal(1000)
                .setMaxConnPerRoute(100)
                .build());
        httpRequestFactory.setConnectionRequestTimeout(5000);
        httpRequestFactory.setConnectTimeout(5000);
        httpRequestFactory.setReadTimeout(10000);
//        httpRequestFactory.setBufferRequestBody(false);
        REST_TEMPLATE = new RestTemplate(httpRequestFactory);
    }

    // ----------------------------------GET-------------------------------------------------------

    /**
     * GET请求调用方式
     *
     * @param url          请求URL
     * @param responseType 返回对象类型
     * @return ResponseEntity 响应对象封装类
     */
    public static <T> ResponseEntity<T> get(String url, Class<T> responseType) {
        return REST_TEMPLATE.getForEntity(url, responseType);
    }

    /**
     * GET请求调用方式
     *
     * @param url          请求URL
     * @param responseType 返回对象类型
     * @param uriVariables URL中的变量,按顺序依次对应
     * @return ResponseEntity 响应对象封装类
     */
    public static <T> ResponseEntity<T> get(String url, Class<T> responseType, Object... uriVariables) {
        return REST_TEMPLATE.getForEntity(url, responseType, uriVariables);
    }

// ----------------------------------POST-------------------------------------------------------

    /**
     * POST请求调用方式
     *
     * @param url          请求URL
     * @param responseType 返回对象类型
     * @return
     */
    public static <T> ResponseEntity<T> post(String url, Class<T> responseType) {
        return REST_TEMPLATE.postForEntity(url, HttpEntity.EMPTY, responseType);
    }

    /**
     * POST请求调用方式
     *
     * @param url          请求URL
     * @param requestBody  请求参数体
     * @param responseType 返回对象类型
     * @return ResponseEntity 响应对象封装类
     */
    public static <T> ResponseEntity<T> post(String url, Object requestBody, Class<T> responseType) {
        return REST_TEMPLATE.postForEntity(url, requestBody, responseType);
    }

    /**
     * POST请求调用方式
     *
     * @param url          请求URL
     * @param requestBody  请求参数体
     * @param responseType 返回对象类型
     * @param uriVariables URL中的变量,按顺序依次对应
     * @return ResponseEntity 响应对象封装类
     */
    public static <T> ResponseEntity<T> post(String url, Object requestBody, Class<T> responseType, Object... uriVariables) {
        return REST_TEMPLATE.postForEntity(url, requestBody, responseType, uriVariables);
    }

    /**
     * POST请求调用方式
     *
     * @param url          请求URL
     * @param requestBody  请求参数体
     * @param responseType 返回对象类型
     * @param uriVariables URL中的变量,与Map中的key对应
     * @return ResponseEntity 响应对象封装类
     */
    public static <T> ResponseEntity<T> post(String url, Object requestBody, Class<T> responseType, Map<String, ?> uriVariables) {
        return REST_TEMPLATE.postForEntity(url, requestBody, responseType, uriVariables);
    }
实战示例
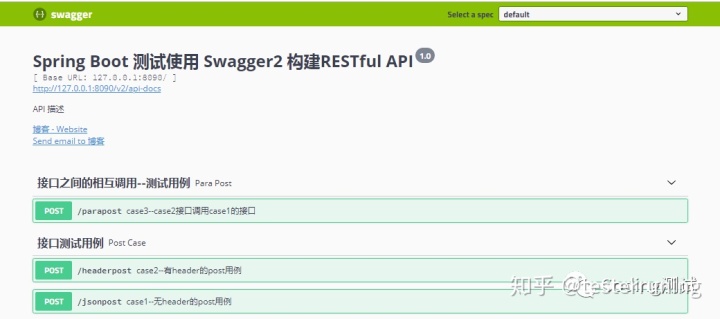
通过Swagger2调取controller层示例
- 请求示例
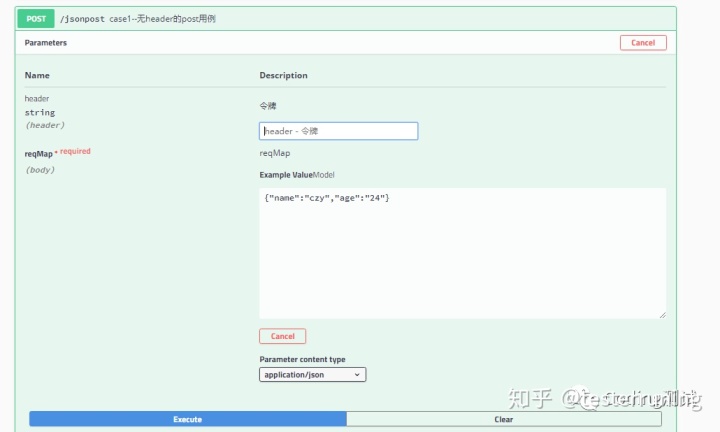
image
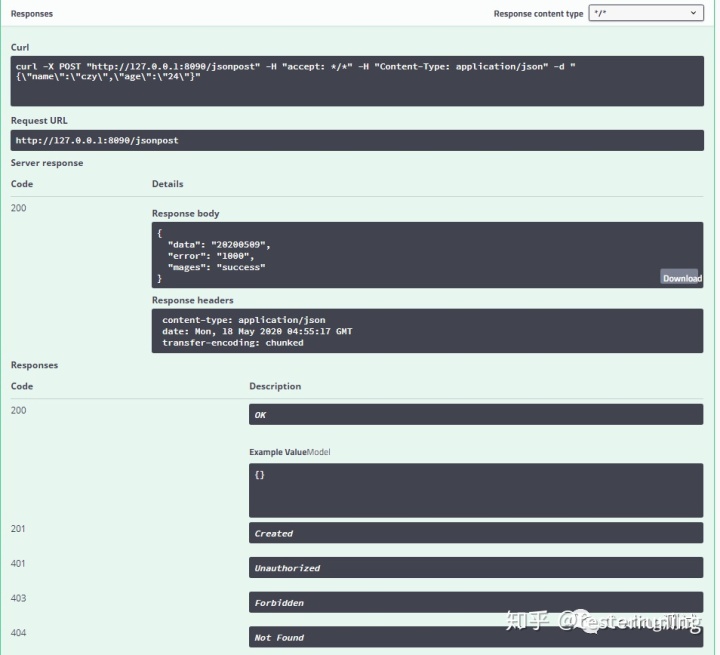
- 响应示例
接口测试用例通过extentreports生成测试报告
- 执行resources下的testNG.xml生成测试用例报告
示例测试报告如下:
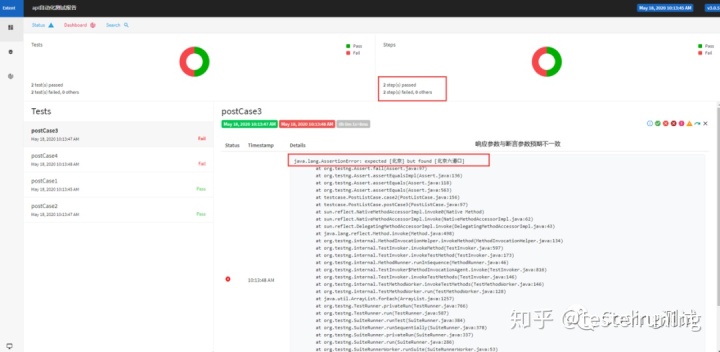
通过报告可以看到用例的总数,多少通过多少失败,失败的异常打印等信息。
- 接口的并发测试
测试单元ConcurrentTestCase类是测试并发的示例
根据入参参数设置并发量,测试结果如下:

简单的写了两个示例,具体的实现还需根据自己的接口文档去设计测试用例。
项目源码传送门:点击获取
- 更多测试技术分享、学习资源以及一些其他福利可关注公众号:【Coding测试】获取:


 943
943


 被折叠的 条评论
为什么被折叠?
被折叠的 条评论
为什么被折叠?
 到【灌水乐园】发言


