


 本文介绍了一个简易版MyBatis的实现过程,包括配置解析、动态代理和SQL执行等核心功能。
什么是 MyBatis ?
MyBatis 是一款优秀的持久层框架,它支持定制化 SQL、存储过程以及高级映射。
MyBatis 避免了几乎所有的 JDBC 代码和手动设置参数以及获取结果集。
MyBatis 可以使用简单的 XML 或注解来配置和映射原生信息,将接口和 Java 的 POJOs(Plain Old Java Objects,普通的 Java对象)映射成数据库中的记录。(这是官网解释)
MyBatis 运行原理
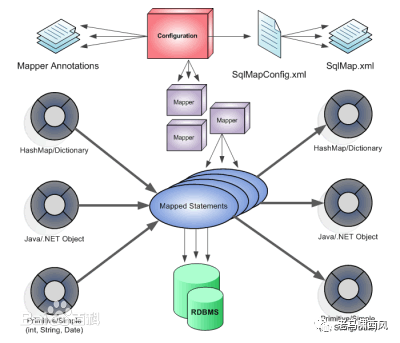
当框架启动时,通过configuration解析config.xml配置文件和mapper.xml映射文件,映射文件可以使用xml方式或者注解方式,然后由configuration获得sqlsessionfactory对象,再由sqlsessionfactory获得sqlsession数据库访问会话对象,通过会话对象获得对应DAO层的mapper对象,通过调用mapper对象相应方法,框架就会自动执行SQL语句从而获得结果。
手写 mybatis
其实整体流程就是这么简单,我们来一起实现一个简单版本的 mybatis。
创作目的
(1)深入学习 mybatis 的原理
一千个读者就有一千个哈姆雷特,一千个作者就有一千个莎士比亚。——老马
(2)实现属于自己的 mybatis 工具。
数据库的种类实际上有几百种,比如工作中就用到过 GreenPlum 这种相对小众的数据库,这时候 mybatis 可能就不能使用了。
感觉大可不必,符合 SQL 标准都应该统一支持下,这样更加方便实用。
实现方式
本系列目前共计 17 个迭代版本,基本完成了 mybatis 的核心特性。
耗时大概十天左右,相对实现的方式比较简单。
采用 mvp 的开发策略,逐渐添加新的特性。
本系列将对核心代码进行讲解,完整代码已经全部开源
https://github.com/houbb/mybatis
快速体验
mysql 安装
不是本系列重点,请自行找资料。
版本:使用的是 v5.7 版本,v8.0 之后依赖的驱动包会有所不同。
sql 执行
-- auto-generated definitioncreate table user( id int auto_increment primary key, name varchar(100) not null, password varchar(100) not null);insert into user (name, password) value ('ryo', '123456');maven 引入
com.github.houbb mybatis 0.0.1配置文件
•mybatis-config-5-7.xml
<?xml version="1.0" encoding="UTF-8"?> 测试代码
Config config = new XmlConfig("mybatis-config-5-7.xml");SqlSession sqlSession = new DefaultSessionFactory(config).openSession();UserMapper userMapper = sqlSession.getMapper(UserMapper.class);User user = userMapper.selectById(1L);System.out.println(user);输出结果:
User{id=1, name='ryo', password='123456'}是不是有种 mybatis 初恋般的感觉呢?
到这里都是引子,下面我们来讲述下一些核心实现。
代码实现
maven 依赖
这里我们需要访问 mysql,也需要解析 xml。
需要引入如下的依赖:
mysql mysql-connector-java 5.1.29 dom4j dom4j 1.6.1接口定义
上述的测试代码中,我们演示用到的几个核心接口如下:
•Config.java
配置接口
/** * 配置信息 * @author binbin.hou * @since 0.0.1 */public interface Config { /** * 获取数据源信息 * @return 数据源配置 * @since 0.0.1 */ DataSource getDataSource(); /** * 获取映射类信息 * @param clazz 类信息 * @return 结果 * @since 0.0.1 */ MapperClass getMapperData(final Class clazz); /** * 获取映射类信息 * @param clazz 类信息 * @param methodName 方法名称 * @return 结果 * @since 0.0.1 */ MapperMethod getMapperMethod(final Class clazz, final String methodName); /** * 数据库连接信息 * @return 连接信息 * @since 0.0.1 */ Connection getConnection();}•SqlSession.java
public interface SqlSession { /** * 查询单个 * @param mapperMethod 方法 * @param args 参数 * @param 泛型 * @return 结果 * @since 0.0.1 */ T selectOne(final MapperMethod mapperMethod, Object[] args); /** * Retrieves a mapper. * @param the mapper type * @param type Mapper interface class * @return a mapper bound to this SqlSession * @since 0.0.1 */ T getMapper(Class type); /** * 获取配置信息 * @return 配置 * @since 0.0.1 */ Config getConfig();}•UserMapper.java
UserMapper 就是我们经常定义的 mapper
public interface UserMapper { User selectById(final long id);}下面我们来看看对应的几个比较重要的实现。
xml 的配置初始化
我们的很多配置放在 config.xml 文件中,肯定是通过解析 xml 实现的。
基础属性
public class XmlConfig extends ConfigAdaptor { /** * 文件配置路径 * * @since 0.0.1 */ private final String configPath; /** * 配置文件信息 * * @since 0.0.1 */ private Element root; /** * 数据源信息 * * @since 0.0.1 */ private DataSource dataSource; /** * mapper 注册类 * * @since 0.0.1 */ private final MapperRegister mapperRegister = new MapperRegister(); public XmlConfig(String configPath) { this.configPath = configPath; // 配置初始化 initProperties(); // 初始化数据连接信息 initDataSource(); // mapper 信息 initMapper(); } @Override public DataSource getDataSource() { return this.dataSource; } @Override public Connection getConnection() { try { Class.forName(dataSource.driver()); return DriverManager.getConnection(dataSource.url(), dataSource.username(), dataSource.password()); } catch (ClassNotFoundException | SQLException e) { throw new MybatisException(e); } } @Override public MapperMethod getMapperMethod(Class clazz, String methodName) { return this.mapperRegister.getMapperMethod(clazz, methodName); }}配置初始化
这里就是解析 xml 文件的 root 节点,便于后续使用:
root 节点的初始化如下:
/** * 获取根节点 * @param path 配置路径 * @return 元素 * @since 0.0.1 */public static Element getRoot(final String path) { try { // 初始化数据库连接信息 InputStream inputStream = StreamUtil.getInputStream(path); SAXReader reader = new SAXReader(); Document document = reader.read(inputStream); return document.getRootElement(); } catch (DocumentException e) { throw new MybatisException(e); }}初始化数据连接信息
这就是解析 xml 中对于 dataSource 的配置信息:
/** * 初始化数据源 * * @since 0.0.1 */private void initDataSource() { // 根据配置初始化连接信息 this.dataSource = new DataSource(); Element dsElem = root.element("dataSource"); Map map = new HashMap<>(4); for (Object property : dsElem.elements("property")) { Element element = (Element) property; String name = element.attributeValue("name"); String value = element.attributeValue("value"); map.put("jdbc." + name, value); } dataSource.username(map.get(DataSourceConst.USERNAME)) .password(map.get(DataSourceConst.PASSWORD)) .driver(map.get(DataSourceConst.DRIVER)) .url(map.get(DataSourceConst.URL));}初始化 mapper
解析 xml 中的 mapper 配置。
/** * 初始化 mapper 信息 * * @since 0.0.1 */private void initMapper() { Element mappers = root.element("mappers"); // 遍历所有需要初始化的 mapper 文件路径 for (Object item : mappers.elements("mapper")) { Element mapper = (Element) item; String path = mapper.attributeValue("resource"); mapperRegister.addMapper(path); }}mapperRegister 就是对方法的元数据进行一些构建,比如出参,入参的类型,等等,便于后期使用。
比如我们的 UserMapper.xml 方法内容如下:
select * from user where id = ?sql 就是:select * from user where id = ?
方法标识:selectById
入参:Long
出参:User
创建 session
如何创建
SqlSession sqlSession = new DefaultSessionFactory(config).openSession();这句话实际执行的是:
@Overridepublic SqlSession openSession() { return new DefaultSqlSession(config, new SimpleExecutor());}获取 mapper 实现
UserMapper userMapper = sqlSession.getMapper(UserMapper.class)这里获取 mapper,实际获取的是什么呢?
实际上获取到的是一个代理。
mybatis 将我们的接口,和实际 xml 中的 sql 二者通过动态代理结合,让我们调用 xml 中的 sql 和使用接口方法一样自然。
获取代理
getMapper 实际上是一个动态代理。
@Override@SuppressWarnings("all")public T getMapper(Class clazz) { MapperProxy proxy = new MapperProxy(clazz, this); return (T) Proxy.newProxyInstance(this.getClass().getClassLoader(), new Class[]{clazz}, proxy);}动态代理的实现
MapperProxy 的实现如下:
public class MapperProxy implements InvocationHandler { /** * 类信息 * * @since 0.0.1 */ private final Class clazz; /** * sql session * * @since 0.0.1 */ private final SqlSession sqlSession; public MapperProxy(Class clazz, SqlSession sqlSession) { this.clazz = clazz; this.sqlSession = sqlSession; } @Override public Object invoke(Object proxy, Method method, Object[] args) throws Throwable { MapperMethod mapperMethod = this.sqlSession.getConfig() .getMapperMethod(clazz, method.getName()); if (mapperMethod != null) { return this.sqlSession.selectOne(mapperMethod, args); } return method.invoke(proxy, args); }}代理了什么?
当我们执行 userMapper.selectById(1L) 时,实际执行的是什么?
实际执行的是 sqlSession.selectOne(mapperMethod, args)
代理实现
selectOne 是比较核心的内容了。
整体实现
整体如下
public T query(final Config config, MapperMethod method, Object[] args) { try(Connection connection = config.getConnection(); PreparedStatement preparedStatement = connection.prepareStatement(method.getSql());) { // 2. 处理参数 parameterHandle(preparedStatement, args); // 3. 执行方法 preparedStatement.execute(); // 4. 处理结果 final Class resultType = method.getResultType(); ResultSet resultSet = preparedStatement.getResultSet(); ResultHandler resultHandler = new ResultHandler(resultType); Object result = resultHandler.buildResult(resultSet); return (T) result; } catch (SQLException ex) { throw new MybatisException(ex); }}我们获取到 xml 中的 sql,然后构建 jdbc 中大家比较熟悉的 PreparedStatement。
然后对出参和入参进行处理,最后返回结果。
入参设置
public void setParams(final Object[] objects) { try { for(int i = 0; i < objects.length; i++) { Object value = objects[i]; // 目标类型,这个后期可以根据 jdbcType 获取 // jdbc 下标从1开始 statement.setObject(i+1, value); } } catch (SQLException throwables) { throw new MybatisException(throwables); }}针对我们非常简单的例子:
select * from user where id = ?那就是直接把入参中的 1L 设置到占位符 ? 即可。
出参处理
这里主要用到反射,将查询结果和 javaBean 做一一映射。
/** * 构建结果 * @param resultSet 结果集合 * @return 结果 * @since 0.0.1 */public Object buildResult(final ResultSet resultSet) { try { // 基本类型,非 java 对象,直接返回即可。 // 可以进行抽象 Object instance = resultType.newInstance(); // 结果大小的判断 // 为空直接返回,大于1则报错 if(resultSet.next()) { List fieldList = ClassUtil.getAllFieldList(resultType); for(Field field : fieldList) { Object value = getResult(field, resultSet); ReflectFieldUtil.setValue(field, instance, value); } // 返回设置值后的结果 return instance; } return null; } catch (InstantiationException | IllegalAccessException | SQLException e) { throw new MybatisException(e); }}到这里,一个简易版的 myabtis 就可以跑起来了。
当然这里还有很多的不足之处,我们后续都会一一优化。

完整代码地址
为了便于学习,完整版本代码以开源:
https://github.com/houbb/mybatis[1]
References
[1] https://github.com/houbb/mybatis: https://github.com/houbb/mybatis/tree/release_0.0.1


 被折叠的 条评论
为什么被折叠?
被折叠的 条评论
为什么被折叠?
 到【灌水乐园】发言


