


Kubernetes v1.24 之前的版本直接集成了 Docker Engine 的一个组件,名为 dockershim [用于调用Docker]。 这种特殊的直接整合不再是 Kubernetes 的一部分 (这次删除被作为 v1.20 发行版本的一部分宣布)。 这意味Kubernetes从版本1.24开始就弃用Docker作为容器运行时,取而代之的是更加轻量级的Containerd。
containerd可用作 Linux 和 Windows 的守护进程。它管理其主机系统的完整容器生命周期,从图像传输和存储到容器执行和监督,再到低级存储到网络附件等等。
1 Containerd 介绍
1.1、Containerd的由来
【Docker名噪一时,捐出runC】2013年docker公司在推出docker产品后,由于其对全球技术产生了一定的影响力,Google公司明显感觉到自己公司内部所使用的Brog系统江湖地位受到的威胁,希望Docker公司能够与自己联合打造一款开源的容器运行时作为Docker核心依赖,但Docker公司拒绝了;接着Google公司联合RedHat、IBM等公司说服Docker公司把其容器核心技术libcontainer捐给OCI(Open Container Intiative),并更名为runC。
【CNCF成立,kubernetes被迫开源】为了进一步遏制Docker在未来技术市场影响力,避免在容器市场上Docker一家独大,Google公司带领RedHat、IBM等成立了CNCF(Cloud Native Computing Fundation)基金会,即云原生计算基金会。CNCF的目标很明确,既然在容器应用领域无法与Docker相抗衡,那就做Google更有经验的技术市场——大规模容器编排应用场景。Google公司把自己内部使用的Brog系统开源——Kubernetes,也就是我们今天所说的云原生技术生态。
【Docker妥协,贡献出Containerd】2016年Docker公司推出了Docker Swarm,意在一统Docker生态,让Docker既可以实现容器应用管理,也可以实现大规模容器编排,经过近1年左右时间的市场验证后,发现在容器编排方面无法独立抗衡kubernetes,所以Docker公司于2017年正式宣布原生支持Kubernetes。至此,Docker在大规模容器编排应用市场败下阵来,但是Docker依然不甘心失败,把Docker核心依赖Containerd捐给了CNCF,依此说明Docker依旧是一个PaaS平台。
【k8s宣布不支持Docker,Containerd成为CRI主角】2020年CNCF基金会宣布Kubernetes 1.20版本将不再仅支持Docker容器管理工具,此事的起因主要也与Docker捐给CNCF基金会的Containerd有关,早期为了实现Kubernetes能够使用Docker实现容器管理,专门在Kubernetes组件中集成一个shim技术,用来将Kubernetes 容器运行时接口(CRI,Container Runntime Interface)调用翻译成Docker的API,这样就可以很好地使用Docker了。但是随着Kubernetes在全球技术市场的广泛应用,有更多的容器管理工具的出现,它们都想能够借助于Kubernetes被用户所使用,所以就提出标准化容器运行时接口,只要适配了这个接口就可以集成到Kubernetes生态当中,所以Kubernetes取消了对shim的维护,并且由于Containerd技术的成功,可以实现无缝对接Kubernetes,所以接下来Kubernetes容器运行时的主角是Containerd。
1.2、Containerd概念
早在2016年3月,Docker 1.11的Docker Engine里就包含了containerd,而现在则是把containerd从Docker Engine里彻底剥离出来,作为一个独立的开源项目独立发展,目标是提供一个更加开放、稳定的容器运行基础设施。
和原先包含在Docker Engine里containerd相比,独立的containerd将具有更多的功能,可以涵盖整个容器运行时管理的所有需求。另外独立之后containerd的特性演进可以和Docker Engine分开,专注容器运行时管理,可以更稳定。
Containerd是一个工业标准的容器运行时,重点是它简洁,健壮,便携,在Linux和window上可以作为一个守护进程运行,它可以管理主机系统上容器的完整的生命周期:镜像传输和存储,容器的执行和监控,低级别的存储和网络。
每个containerd只负责一台机器,Pull镜像,对容器的操作(启动、停止等),网络,存储都是由containerd完成。具体运行容器由runC负责,实际上只要是符合OCI规范的容器都可以支持。
Containerd和docker不同,containerd重点是集成在大规模的系统中,例如kubernetes、Swarm、Mesos等【对于容器编排服务来说,运行时只需要使用containerd+runC,更加轻量,容易管理。】。Containerd 被设计成嵌入到一个更大的系统中,而不是直接由开发人员或终端用户使用。
Containerd的特点:
简洁的基于 gRPC 的 API 和 client library。
完整的 OCI 支持(runtime 和 image spec)。
同时具备稳定性和高性能的定义良好的容器核心功能。
一个解耦的系统(让 image、filesystem、runtime 解耦合),实现插件式的扩展和重用。
Containerd的作用:
管理容器的生命周期(从创建容器到销毁容器)。
拉取/推送容器镜像。
存储管理(管理镜像及容器数据的存储)。
调用 runC 运行容器(与 runC 等容器运行时交互)。
管理容器网络接口及网络。
使用 bucketbench 对 Docker、crio 和 Containerd 的性能测试结果,包括启动、停止和删除容器,以比较它们所耗的时间,可以发现Containerd 在各个方面都表现良好,总体性能优于 Docker 和 crio。
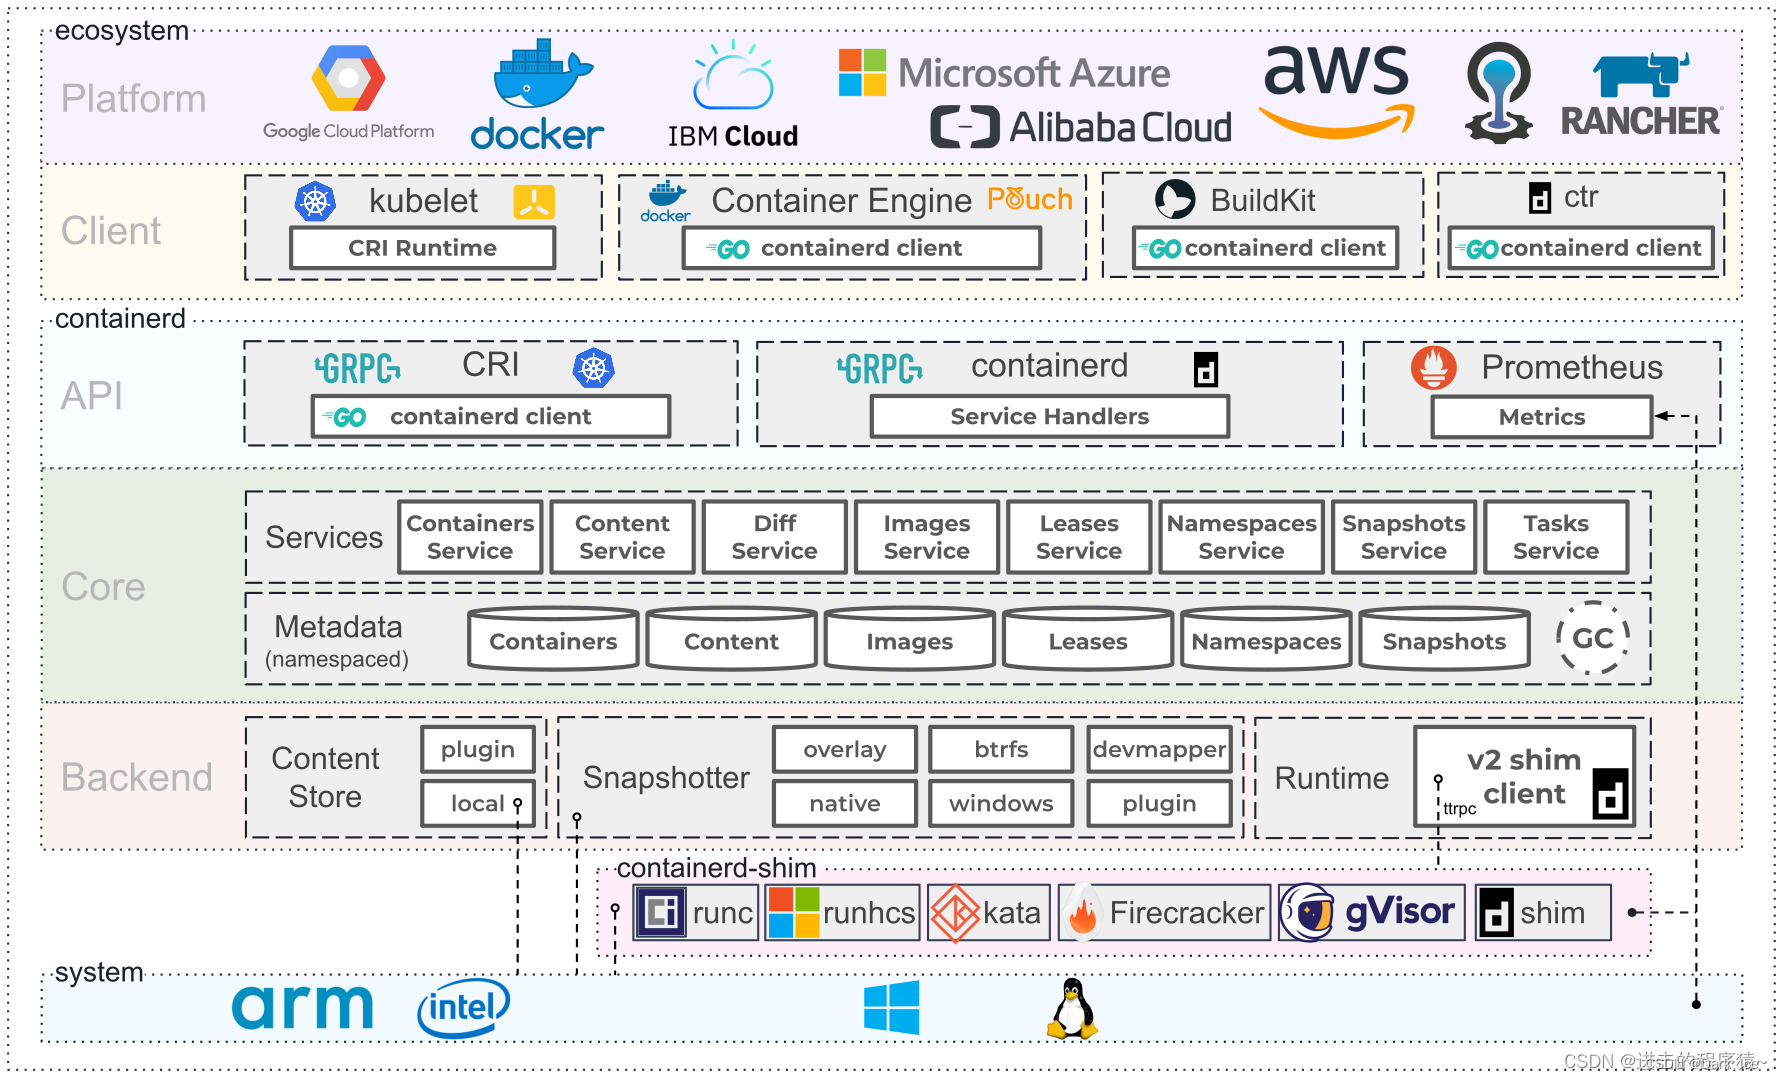
1.3、Containerd架构
Containerd 采用标准的 C/S 架构:服务端通过 GRPC 协议提供稳定的 API;客户端通过调用服务端的 API 进行高级的操作。
为了实现解耦,Containerd 将不同的职责划分给不同的组件,每个组件就相当于一个子系统(subsystem)。连接不同子系统的组件被称为模块。
Containerd 被分为三个大块: Storage 、 Metadata 和 Runtime。
Containerd 两大子系统为:
Bundle : 在 Containerd 中,Bundle 包含了配置、元数据和根文件系统数据,你可以理解为 容器的文件系统。而 Bundle 子系统允许用户从镜像中提取和打包 Bundles。
Runtime : Runtime 子系统用来执行 Bundles,比如创建容器。其中,每一个子系统的行为都由一个或多个模块协作完成(架构图中的 Core 部分)。
1.4、几个概念区分
containerd 是一个高级容器运行时,又名容器管理器。简单来说,它是一个守护进程,在单个主机上管理完整的容器生命周期:创建、启动、停止容器、拉取和存储镜像、配置挂载、网络等。
ctr 是作为 containerd 项目的一部分提供的命令行客户端。该ctr界面 [显然] 与 Docker CLI不兼容,乍一看,可能看起来不太用户友好。因为它的主要受众是测试守护进程的容器开发人员。ctr + containerd比docker + dockerd更接近实际的容器。
nerdctl 是一个相对较新的containerd命令行客户端。与ctr不同,nerdctl的目标是用户友好和docker兼容。在某种程度上,nerdctl + containerd可以无缝地替代docker + dockerd。
crictl 是一个命令行客户端,用于 [kubernetes] CRI兼容的容器运行时。引入 Kubernetes 容器运行时接口 (CRI)以使 Kubernetes 容器运行时不可知。Kubernetes节点代理kubelet实现了 CRI客户端 API,可以使用任何实现 CRI 服务器 API的容器运行时来管理其节点上的容器和 Pod。
2 Containerd 安装
2.1 Yum 方式安装
2.1.1 获取 Yum 源
# 获取阿里云YUW源
$ wget-o /etc/yum.repos.d/docker-ce.repo https://mirrors.aliyun.com/docker-ce/linux/centos/docker-ce.repo

# 查看Yum源中的Containerd软件
$ yum list | grep containerd
containerd.io.x86_64                     1.6.9-3.1.el7                docker
2.1.2 使用 Yum 命令安装
# 安装Containerd.io软件,即可安装Containerd
yum install -y containerd.io
2.1.3 验证安装及启动服务
# 使用rpm -qa命令查看是否安装
$ rpm-qa | grep containerd
containerd.io-1.6.9-3.1.el7.x86_64
# 使用containerd服务启动及开机自启动
systemctl enable --now containerd
# systemctl enable containerd
# systemctl start containerd
# 查看 Containerd 服务启动状态
$ systemctl status containerd.service
● containerd.service - containerd container runtime
Loaded: loaded (/usr/lib/systemd/system/containerd.service; disabled; vendor preset: disabled)
Active: active (running) since Tue 2022-11-2222:45:06 CST; 3 months 0 days ago # 此行第二列及第三列表示其正在运行状态
Docs: https://containerd.io
Main PID: 590 (containerd)
Tasks: 17
Memory: 65.1M
CGroup: /system.slice/containerd.service
└─590 /usr/bin/containerd
[......]2.1.4 验证可用性
# 安装Containerd时ctr命令亦可使用,ctr命令主要用于管理容器及容器镜像等。
# 使用ctr命令查看containerd客户端及服务演相关信息。
$ ctr version
Client:
Version: 1.6.9
Revision: 1c90a442489720eec95342e1789ee8a5e1b9536f
Go version: go1.18.7
Server:
Version: 1.6.9
Revision: 1c90a442489720eec95342e1789ee8a5e1b9536f
UUID: 959685ab-9bd6-4dce-96a3-d059b70a63c12.2 二进制方式安装
Containerd有两种安装包:
第一种是 containerd-[version],这种包用于单机测试没问题,不包含runC,需要提前安装。
第二种是 cri-containerd-cni-[version],包含runC和Kubernetes里的所需要的相关文件。Kubernetes集群里需要用到此包。虽然包含runC,但是依赖系统中的seccomp (安全计算模式,是一种限制容器调用系统资源的模式。)
2.2.1 获取安装包
Containerd官网:https://containerd.io/
Containerd官方安装步骤:https://github.com/containerd/containerd/blob/main/docs/getting-started.md
下载好相应的安装部署包 [ 所有安装包都可在github上进行下载 ] 如下:
# 下载Containerd安装包
wget https://github.com/containerd/containerd/releases/download/v1.6.8/cri-containerd-1.6.8-linux-amd64.tar.gz
2.2.2 安装并测试可用性
2.2.2.1 Containerd
二进制安装不用这么麻烦,官网看到直接解压缩到根目录就行了$ tar -zxf cri-containerd-cni-1.6.8-linux-amd64.tar.gz -C /
# 查看已经获取的安装包
$ ls
cri-containerd-1.6.8-linux-amd64.tar.gz
# 解压已经下载的软件包
$ tar-zxvf cri-containerd-1.6.8-linux-amd64.tar.gz
# 查看解压后的目录
$ ls-l
total 89880
-rw-r--r--1 root root 92034038 Aug 9 2022 cri-containerd-1.6.8-linux-amd64.tar.gz
drwxr-xr-x 3 root root 40 Feb 2222:46 etc
drwxr-xr-x 3 root root 24 Feb 2222:46 opt
drwxr-xr-x 3 root root 19 Aug 9 2022 usr
# 查看etc目录,主要为containerd服务管理配置文件及cni虚拟网卡配置文件
$ ls-lR etc/
etc/:
total 4
-rw-r--r--1 root root 57 Aug 9 2022 crictl.yaml
drwxr-xr-x 3 root root 20 Aug 9 2022 systemd
etc/systemd:
total 0
drwxr-xr-x 2 root root 32 Aug 9 2022 system
etc/systemd/system:
total 4
-rw-r--r--1 root root 1270 Aug 9 2022 containerd.service
# 查看opt目录,主要为GCC环境中使用containerd配置文件及cni插件
$ ls-lR opt/
opt/:
total 0
drwxr-xr-x 3 root root 21 Aug 9 2022 containerd
opt/containerd:
total 0
drwxr-xr-x 3 root root 32 Aug 9 2022 cluster
opt/containerd/cluster:
total 4
drwxr-xr-x 3 root root 75 Aug 9 2022 gce
-rw-r--r--1 root root 28 Aug 9 2022 version
opt/containerd/cluster/gce:
total 20
drwxr-xr-x 2 root root 42 Aug 9 2022 cloud-init
-rw-r--r--1 root root 491 Aug 9 2022 cni.template
-rwxr-xr-x1 root root 9370 Aug 9 2022 configure.sh
-rw-r--r--1 root root 1173 Aug 9 2022 env
opt/containerd/cluster/gce/cloud-init:
total 16
-rw-r--r--1 root root 6255 Aug 9 2022 master.yaml
-rw-r--r--1 root root 6149 Aug 9 2022node.yaml
# 查看usr目录,主要为containerd运行时文件,包含runC
$ ls-lR usr/
usr/:
total 0
drwxr-xr-x 4 root root 29 Aug 9 2022 local
usr/local:
total 0
drwxr-xr-x 2 root root 193 Aug 9 2022 bin
drwxr-xr-x 2 root root 18 Aug 9 2022 sbin
usr/local/bin:
total 229676
-rwxr-xr-x1 root root 59608896 Aug 9 2022 containerd
-rwxr-xr-x1 root root 7389184 Aug 9 2022 containerd-shim
-rwxr-xr-x1 root root 9555968 Aug 9 2022 containerd-shim-runc-v1
-rwxr-xr-x1 root root 9580544 Aug 9 2022 containerd-shim-runc-v2
-rwxr-xr-x1 root root 25739552 Aug 9 2022 containerd-stress
-rwxr-xr-x1 root root 33114367 Aug 9 2022 crictl
-rwxr-xr-x1 root root 34326986 Aug 9 2022 critest
-rwxr-xr-x1 root root 25586864 Aug 9 2022 ctd-decoder
-rwxr-xr-x1 root root 30277472 Aug 9 2022 ctr
usr/local/sbin:
total 14180
-rwxr-xr-x1 root root 14518072 Aug 9 2022 runc2.2.2.2 查看Containerd 安装位置
# 查看containerd.service文件,了解containerd文件保存位置
$ cat etc/systemd/system/containerd.service
# Copyright The containerd Authors.
#
# Licensed under the Apache License, Version 2.0 (the "License");
# you may not use this file except in compliance with the License.
# You may obtain a copy of the License at
#
# http://www.apache.org/licenses/LICENSE-2.0
#
# Unless required by applicable law or agreed to in writing, software
# distributed under the License is distributed on an "AS IS" BASIS,
# WITHOUT WARRANTIES OR CONDITIONS OF ANY KIND, either express or implied.
# See the License for the specific language governing permissions and
# limitations under the License.
[Unit]
Description=containerd container runtime
Documentation=https://containerd.io
After=network.target local-fs.target
[Service]
ExecStartPre=-/sbin/modprobe overlay
ExecStart=/usr/local/bin/containerd # 查看此位置,把containerd二进制文件放置于此处即可完成安装
Type=notify
Delegate=yes
KillMode=process
Restart=always
RestartSec=5
# Having non-zero Limit*s causes performance problems due to accounting overhead
# in the kernel. We recommend using cgroups to do container-local accounting.
LimitNPROC=infinity
LimitCORE=infinity
LimitNOFILE=infinity
# Comment TasksMax if your systemd version does not supports it.
# Only systemd 226 and above support this version.
TasksMax=infinity
OOMScoreAdjust=-999
[Install]
WantedBy=multi-user.target2.2.2.3 复制 containerd 运行时文件至系统
# 查看主机/usr/local/bin目录,。里面没有任何内容。
$ ls /usr/local/bin/
# 查看解压后usr/local/bin目录,里面包含containerd运行时文件
$ ls usr/local/bin/
containerd containerd-shim-runc-v1 containerd-stress critest ctr
containerd-shim containerd-shim-runc-v2 crictl ctd-decoder
# 复制containerd文件至/usr/local/bin目录中,本次可仅复制containerd一个文件也可复制全部文件。
$ cp usr/local/bin/containerd /usr/local/bin/
$ ls-l /usr/local/bin/containerd2.2.2.4 添加containerd.service文件至系统
# 查看解压后的etc/system目录
$ ls etc/systemd/system/
containerd.service
# 复制containerd股务管理配置文件至/usr/lib/systemd/system/目录中
$ cp etc/systemd/system/containerd.service /usr/lib/systemd/system/containerd.service
# 查看复制后结果
$ ls-l /usr/lib/systemd/system/containerd.service2.2.2.5 查看containerd 使用帮助
$ containerd--help
NAME:
containerd -
__ _ __
_________ ____ / /_____ _(_)___ ___ _________/ /
/ ___/ __ \/ __ \/ __/ __ `/ / __ \/ _ \/ ___/ __ /
/ /__/ /_/ / / / / /_/ /_/ / / / / / __/ / / /_/ /
\___/\____/_/ /_/\__/\__,_/_/_/ /_/\___/_/ \__,_/
high performance container runtime
USAGE:
containerd [global options] command [command options] [arguments...]
VERSION:
v1.6.8
DESCRIPTION:
containerd is a high performance container runtime whose daemon can be started
by using this command. If none of the *config*, *publish*, or *help* commands
are specified, the default action of the **containerd** command is to start the
containerd daemon in the foreground.
A default configuration is used if no TOML configuration is specified or located
at the default file location. The *containerd config* command can be used to
generate the default configuration for containerd. The output of that command
can be used and modified as necessary as a custom configuration.
COMMANDS:
config information on the containerd config
publish binary to publish events to containerd
oci-hook provides a base for OCI runtime hooks to allow arguments to be injected.
help, h Shows a list of commands or help for one command
GLOBAL OPTIONS:
--config value, -c value path to the configuration file (default: "/etc/containerd/config.toml")
--log-level value, -l value set the logging level [trace, debug, info, warn, error, fatal, panic]
--address value, -a value address for containerd's GRPC server
--root value containerd root directory
--state value containerd state directory
--help, -h show help
--version, -v print the version2.2.2.6 生成containerd模块配置文件
2.2.2.6.1 生成默认模块配置文件
Containerd的式认配置文件为/etc/containerd/config.toml,可以使用containerd config default > /etc/containerd/config.toml合合创建一份模块配著文件
# 创建配置文件目录
$ mkdir-pv /etc/containerd
# 生成配置文件
$ containerd config default > /etc/containerd/config.toml
# 查看配置文件
$ cat /etc/containerd/config.toml
disabled_plugins = []
imports = []
oom_score =0
plugin_dir =""
required_plugins = []
root ="/var/lib/containerd"# Containerd 运行相关的状态所在的目录
state ="/run/containerd"
temp =""
version =2
[grpc]
address ="/run/containerd/containerd.sock"
gid =0
max_recv_message_size =16777216
max_send_message_size =16777216
tcp_address =""
tcp_tls_ca =""
tcp_tls_cert =""
tcp_tls_key =""
uid =0
# Containerd 的插件
[plugins]
[plugins."io.containerd.grpc.v1.cri"]
[......]
sandbox_image ="k8s.gcr.io/pause:3.6"# 由于网络原因,此处需要替换 dragonzw/pause-amd64:3.6
[......]2.2.2.6.2 替换默认模块配置文件
但上述配置文件后期改动的地方较多,K8s 环境使用的配置文件并配置好镜像加速器。
$ vim /etc/containerd/config.toml
      sandbox_image ="dragonzw/pause-amd64:3.6"
    [plugins.cri.registry.mirrors."harbor.ks.com"] # 此处添加了本地容器镜像仓库Harbor,作为本地容器镜像仓库
      endpoint = [
            "http://harbor.ks.com"
        ]
2.2.2.7 启动Containerd 服务并设置开机自启动
$ systemctl enable --now containerd
# systemctl enable containerd
# systemctl start containerd
# 查看Containerd服务状态
$ systemctl status containerd
● containerd.service - containerd container runtime
Loaded: loaded (/usr/lib/systemd/system/containerd.service; enabled; vendor preset: disabled)
Active: active (running) since Wed 2023-02-2223:27:53 CST; 17s ago
Docs: https://containerd.io
Process: 9739ExecStartPre=/sbin/modprobe overlay (code=exited, status=0/SUCCESS)
Main PID: 9741 (containerd)
Tasks: 11
Memory: 26.1M
CGroup: /system.slice/containerd.service
└─9741 /usr/local/bin/containerd
[......]2.2.2.8 复制ctr命令至系统
cp usr/local/bin/ctr /usr/bin2.2.2.9 查看已安装containerd服务版本
$ ctr version
Client:
Version: v1.6.8
Revision: 9cd3357b7fd7218e4aec3eae239db1f68a5a6ec6
Go version: go1.17.13
Server:
Version: v1.6.8
Revision: 9cd3357b7fd7218e4aec3eae239db1f68a5a6ec6
UUID: c42e46cd-4a10-4ea1-94b6-a79299cf1178
# 至此,containerd安装完成。Containerd 用来做容器管理的,例如容器的生命周期管理,容器的镜像,容器的相关网络配置
runC 用来真正运行容器的
2.2.2.10 安装 runC
由于二进制也中提供的runC默认需要系统中安装seccomp支持。需要单独安装,且不同版本runC对seccomp版本要求一致,所以建议单独下载runC二进制包进行安装,里面包含了seccomp模块支持。
2.2.2.10.1 获取 runC
# 使用 wget 下载
wget https://github.com/opencontainers/runc/releases/download/v1.1.4/runc.amd642.2.2.10.2 安装runC并验证安装结果
# 查看已经下载文件
$ ls-l runc.amd64
# 安装runC
$ mv runc.amd64 /usr/sbin/runc
# 为runC添加可执行权限
$ chmod+x /usr/sbin/runc
# 使用runC命令验证是否安装成功
$ runc-v
runc version 1.1.4
commit: v1.1.4-0-g5fd4c4d1
spec: 1.0.2-dev
go: go1.17.10
libseccomp: 2.5.42.2.2.11 安装cni插件和cni工具包
$ mkdir-p /home/cni-plugins
$ wget https://github.com/containernetworking/plugins/releases/download/v1.0.1/cni-plugins-linux-amd64-v1.0.1.tgz
$ tar-zxvf cni-plugins-linux-amd64-v1.0.1.tgz -C /home/cni-plugins
$ ls /home/cni-plugins/
bandwidth dhcp host-device ipvlan macvlan ptp static vlan
bridge firewall host-local loopback portmap sbr tuning vrf
# 该二进制文件是静态构建的,可以在任何 Linux 发行版上运行
# cni工具1.1.2兼容cni插件1.0.0
$ mkdir-p /home/cni-tools
$ wget https://github.com/containernetworking/cni/archive/refs/tags/v1.1.2.tar.gz
$ tar-xzvf cni-1.1.2.tar.gz -C /home/cni-tools # --strip-components=1 3 Containerd 容器镜像管理
ctr是作为 containerd 项目的一部分提供的命令行客户端。
该ctr界面 [显然] 与 Docker CLI不兼容,,可能看起来不太用户友好。显然,它的主要受众是测试守护进程的容器开发人员。但是,由于它最接近实际的 containerd API,因此它可以作为一种很好的探索手段 --- 通过检查可用命令,可以大致了解 containerd 可以做什么和不可以做什么。
3.1 Containerd 容器镜像管理命令
docker使用docker images命令管理镜像
单机containerd使用ctr images命令管理境像,containerd 本身的CLI
Kubernetes 中 containerd使用crictl images合令管理提像,Kubernetes社区的专用CLI工具
# 获取命令帮助
$ ctr--help
NAME:
ctr -
__
_____/ /______
/ ___/ __/ ___/
/ /__/ /_/ /
\___/\__/_/
containerd CLI
USAGE:
ctr [global options] command [command options] [arguments...]
VERSION:
v1.6.8
DESCRIPTION:
ctr is an unsupported debug and administrative client for interacting
with the containerd daemon. Because it is unsupported, the commands,
options, and operations are not guaranteed to be backward compatible or
stable from release to release of the containerd project.
COMMANDS:
plugins, plugin provides information about containerd plugins
version print the client and server versions
containers, c, container manage containers
content manage content
events, event display containerd events
images, image, i manage images
leases manage leases
namespaces, namespace, ns manage namespaces
pprof provide golang pprof outputs for containerd
run run a container
snapshots, snapshot manage snapshots
tasks, t, task manage tasks
install install a new package
oci OCI tools
shim interact with a shim directly
help, h Shows a list of commands or help for one command
GLOBAL OPTIONS:
--debug enable debug output in logs
--address value, -a value address for containerd's GRPC server (default: "/run/containerd/containerd.sock") [$CONTAINERD_ADDRESS]
--timeout value total timeout for ctr commands (default: 0s)
--connect-timeout value timeout for connecting to containerd (default: 0s)
--namespace value, -n value namespace to use with commands (default: "default") [$CONTAINERD_NAMESPACE]
--help, -h show help
--version, -v print the version3.2 查看镜像
$ ctr images ls# ctr images list
REF TYPE DIGEST SIZE PLATFORMS LABELS
3.3 下载镜像
containerd支持oci标准的提像,所以可以直接使用Docker官方或Dockerfile构建的镜像
# 拉取镜像 拉取镜像,完全合格的参考似乎是必需的,所以不能忽略镜像仓库或标签部分。
$ ctr images pull --all-platforms docker.io/library/nginx:alpine
# --all-platforms 指定所有平台镜像
# --platform 指定系统平台
# 查看系统的架构
$ uname-a
Linux k8s-master 3.10.0-1160.71.1.el7.x86_64 #1 SMP Tue Jun 28 15:37:28 UTC 2022 x86_64 x86_64 x86_64 GNU/Linux
# 如果不指定,默认就是当前系统的架构来拉取
$ ctr images pull --platform linux/amd64 docker.io/library/nginx:latest
说明:ctr命令pull镜像时,不能直接把领像名字写成"nginx:alpine"
# 查看已经下载容器镜像
$ ctr images ls
REF TYPE DIGEST SIZE PLATFORMS LABELS
docker.io/library/nginx:alpine application/vnd.docker.distribution.manifest.list.v2+json sha256:6f94b7f4208b5d5391246c83a96246ca204f15eaf7e636cefda4e6348c8f6101 15.9 MiB linux/386,linux/amd64,linux/arm/v6,linux/arm/v7,linux/arm64/v8,linux/ppc64le,linux/s390x -
docker.io/library/nginx:latest application/vnd.docker.distribution.manifest.list.v2+json sha256:6650513efd1d27c1f8a5351cbd33edf85cc7e0d9d0fcb4ffb23d8fa89b601ba8 54.3 MiB linux/386,linux/amd64,linux/arm/v5,linux/arm/v7,linux/arm64/v8,linux/mips64le,linux/ppc64le,linux/s390x -REF | TYPE | DIGEST | SIZE | PLATFORMS | LABELS |
docker.io/library/nginx:alpine | application/vnd.docker.distribution.manifest.list.v2+json | 6f94b7f4208b5d5391246c83a96246ca204f15eaf7e636cefda4e6348c8f6101 | 15.9 MiB | linux/386,linux/amd64,linux/arm/v6,linux/arm/v7,linux/arm64/v8,linux/ppc64le,linux/s390x | - |
# 指定平台下载容器镜像
$ ctr images pull --platform linux/amd64 docker.io/library/nginx:latest
3.4 镜像挂载
方便查看镜像中包含的内容。
# 把已下载的容器镜像挂载至当前文件系统
$ ctr images mount docker.io/library/nginx:alpine /mnt
sha256:9ca6be4cd63171f17f0a5e2ea28d5361a299672f41bd65223e7eac7d3d57e76d
/mnt
# 查看挂载内容
$ ls /mnt
bin dev docker-entrypoint.d docker-entrypoint.sh etc home lib media mnt opt proc root run sbin srv sys tmp usr var
# 卸载
$ umount /mnt
# ctr images unmount /mnt3.5 镜像导出
# 把容器镜像导出
$ ctr image export--all-platforms nginx.img docker.io/library/nginx:alpine
说明:--all-platforms,导出所有平台镜像,本版本为1.6版本,1.4版本不需要添加此选项。
# 查看已经导出容器镜像
$ ls-lh nginx.img
-rw-r--r--1 root root 105M Feb 2300:57 nginx.img
3.6 镜像删除
# 删除指定容器镜像
$ ctr image rm docker.io/library/nginx:alpine
# 再次查看容器镜像
$ ctr images ls# ctr images list
REF TYPE DIGEST SIZE PLATFORMS LABELS3.7 镜像导入
# 导入容器镜像
$ ctr image import nginx.img
unpacking docker.io/library/nginx:alpine (sha256:6f94b7f4208b5d5391246c83a96246ca204f15eaf7e636cefda4e6348c8f6101)...done
$ ctr image ls
REF TYPE DIGEST SIZE PLATFORMS LABELS
docker.io/library/nginx:alpine application/vnd.docker.distribution.manifest.list.v2+json sha256:6f94b7f4208b5d5391246c83a96246ca204f15eaf7e636cefda4e6348c8f6101 15.9 MiB linux/386,linux/amd64,linux/arm/v6,linux/arm/v7,linux/arm64/v8,linux/ppc64le,linux/s390x -3.8 修改镜像Tag
$ ctr image tag docker.io/library/nginx:alpine nginx:alpine
nginx:alpine
$ ctr image tag docker.io/library/nginx:alpine harbor.kubesphere.com/library/nginx:alpine
harbor.kubesphere.com/library/nginx:alpine
说明:把docker.io/library/nginx:alpine修改为nginx:alpine
# 查看修改后的容器镜像
$ ctr image ls
REF TYPE DIGEST SIZE PLATFORMS LABELS
docker.io/library/nginx:alpine application/vnd.docker.distribution.manifest.list.v2+json sha256:6f94b7f4208b5d5391246c83a96246ca204f15eaf7e636cefda4e6348c8f6101 15.9 MiB linux/386,linux/amd64,linux/arm/v6,linux/arm/v7,linux/arm64/v8,linux/ppc64le,linux/s390x -
nginx:alpine application/vnd.docker.distribution.manifest.list.v2+json sha256:6f94b7f4208b5d5391246c83a96246ca204f15eaf7e636cefda4e6348c8f6101 15.9 MiB linux/386,linux/amd64,linux/arm/v6,linux/arm/v7,linux/arm64/v8,linux/ppc64le,linux/s390x
# 修改后对容器镜像做检查对比
$ ctr images check
REF TYPE DIGEST STATUS SIZE UNPACKED
docker.io/library/nginx:alpine application/vnd.docker.distribution.manifest.list.v2+json sha256:6f94b7f4208b5d5391246c83a96246ca204f15eaf7e636cefda4e6348c8f6101 complete (8/8) 15.9 MiB/15.9 MiB true
nginx:alpine application/vnd.docker.distribution.manifest.list.v2+json sha256:6f94b7f4208b5d5391246c83a96246ca204f15eaf7e636cefda4e6348c8f6101 complete (8/8) 15.9 MiB/15.9 MiB true3.9 镜像对比
# 镜像对比
$ ctr images check
3.10 配置镜像加速
3.10.1 修改config.toml 配置文件
$ vim /etc/containerd/config.toml
[plugins."io.containerd.grpc.v1.cri".registry]
config_path ="/etc/containerd/certs.d" # 镜像地址配置文件
[plugins."io.containerd.grpc.v1.cri".registry.auths]
[plugins."io.containerd.grpc.v1.cri".registry.configs]
[plugins."io.containerd.grpc.v1.cri".registry.headers]
[plugins."io.containerd.grpc.v1.cri".registry.mirrors]3.10.2 创建相应的目录
mkdir-pv /etc/containerd/certs.d3.10.3 配置加速
mkdir-pv /etc/containerd/certs.d/docker.io
cat > /etc/containerd/certs.d/docker.io/hosts.toml << EOF
server ="https://docker.io"
[host."https://po13h3y1.mirror.aliyuncs.com"]
  capabilities = ["pull", "resolve"]
EOF
3.10.4 重启Containerd
systemctl restart containerd4 Containerd 容器管理
4.1 获取命令帮助
4.1.1 获取 ctr 命令帮助
$ ctr--help
NAME:
ctr -
__
_____/ /______
/ ___/ __/ ___/
/ /__/ /_/ /
\___/\__/_/
containerd CLI
USAGE:
ctr [global options] command [command options] [arguments...]
VERSION:
v1.6.8
DESCRIPTION:
ctr is an unsupported debug and administrative client for interacting
with the containerd daemon. Because it is unsupported, the commands,
options, and operations are not guaranteed to be backward compatible or
stable from release to release of the containerd project.
COMMANDS:
plugins, plugin provides information about containerd plugins
version print the client and server versions
containers, c, container manage containers
content manage content
events, event display containerd events
images, image, i manage images
leases manage leases
namespaces, namespace, ns manage namespaces
pprof provide golang pprof outputs for containerd
run run a container
snapshots, snapshot manage snapshots
tasks, t, task manage tasks
install install a new package
oci OCI tools
shim interact with a shim directly
help, h Shows a list of commands or help for one command
GLOBAL OPTIONS:
--debug enable debug output in logs
--address value, -a value address for containerd's GRPC server (default: "/run/containerd/containerd.sock") [$CONTAINERD_ADDRESS]
--timeout value total timeout for ctr commands (default: 0s)
--connect-timeout value timeout for connecting to containerd (default: 0s)
--namespace value, -n value namespace to use with commands (default: "default") [$CONTAINERD_NAMESPACE]
--help, -h show help
--version, -v print the version4.1.2 获取创建静态容器命令帮助
$ ctr container --help
NAME:
ctr containers - manage containers
USAGE:
ctr containers command [command options] [arguments...]
COMMANDS:
create create container
delete, del, remove, rm delete one or more existing containers
info get info about a container
list, ls list containers
label set and clear labels for a container
checkpoint checkpoint a container
restore restore a container from checkpoint
OPTIONS:
--help, -h show help说明:
使用 "ctr container create"命令创建容器后,容器并没有处于运行状态,其只是一个静态的容器。这个container对象只是包含了运行一个容器所需的资源及配置的数据结构,例如:namespaces,rootfs和容器的配置信息都已经初始化成功了,只是用户进程 (本案例说为nginx) 还没有启动。需要使用"ctr tasks”命令才能获取一个动态容器。
4.1.3 获取动态容器命令帮助
$ ctr run --help
NAME:
ctr run - run a container
USAGE:
ctr run [command options] [flags] Image|RootFS ID [COMMAND] [ARG...]
OPTIONS:
--rm remove the container after running
--null-io send all IO to /dev/null
--log-uri value log uri
--detach, -d detach from the task after it has started execution
--fifo-dir value directory used for storing IO FIFOs
--cgroup value cgroup path (To disable use of cgroup, set to "" explicitly)
--platform value run image for specific platform
--cni enable cni networking for the container
--runc-binary value specify runc-compatible binary
--runc-root value specify runc-compatible root
--runc-systemd-cgroup start runc with systemd cgroup manager
--uidmap container-uid:host-uid:length run inside a user namespace with the specified UID mapping range; specified with the format container-uid:host-uid:length
--gidmap container-gid:host-gid:length run inside a user namespace with the specified GID mapping range; specified with the format container-gid:host-gid:length
--remap-labels provide the user namespace ID remapping to the snapshotter via label options; requires snapshotter support
--cpus value set the CFS cpu quota (default: 0)
--cpu-shares value set the cpu shares (default: 1024)
--snapshotter value snapshotter name. Empty value stands for the default value. [$CONTAINERD_SNAPSHOTTER]
--snapshotter-label value labels added to the new snapshot for this container.
--config value, -c value path to the runtime-specific spec config file
--cwd value specify the working directory of the process
--env value specify additional container environment variables (e.g. FOO=bar)
--env-file value specify additional container environment variables in a file(e.g. FOO=bar, one per line)
--label value specify additional labels (e.g. foo=bar)
--mount value specify additional container mount (e.g. type=bind,src=/tmp,dst=/host,options=rbind:ro)
--net-host enable host networking for the container
--privileged run privileged container
--read-only set the containers filesystem as readonly
--runtime value runtime name (default: "io.containerd.runc.v2")
--runtime-config-path value optional runtime config path
--tty, -t allocate a TTY for the container
--with-ns value specify existing Linux namespaces to join at container runtime (format '<nstype>:<path>')
--pid-file value file path to write the task's pid
--gpus value add gpus to the container
--allow-new-privs turn off OCI spec's NoNewPrivileges feature flag
--memory-limit value memory limit (in bytes) for the container (default: 0)
--device value file path to a device to add to the container; or a path to a directory tree of devices to add to the container
--cap-add value add Linux capabilities (Set capabilities with 'CAP_' prefix)
--cap-drop value drop Linux capabilities (Set capabilities with 'CAP_' prefix)
--seccomp enable the default seccomp profile
--seccomp-profile value file path to custom seccomp profile. seccomp must be set to true, before using seccomp-profile
--apparmor-default-profile value enable AppArmor with the default profile with the specified name, e.g. "cri-containerd.apparmor.d"
--apparmor-profile value enable AppArmor with an existing custom profile
--rdt-class value name of the RDT class to associate the container with. Specifies a Class of Service (CLOS) for cache and memory bandwidth management.
--rootfs use custom rootfs that is not managed by containerd snapshotter
--no-pivot disable use of pivot-root (linux only)
--cpu-quota value Limit CPU CFS quota (default: -1)
--cpu-period value Limit CPU CFS period (default: 0)
--rootfs-propagation value set the propagation of the container rootfs说明:
使用"ctr run"命令可以创建一个静态容器并使其运行。一步到位运行容器。
4.2 查看容器
container 表示静态容器,可用 c 缩写代表container
$ ctr container ls
CONTAINER IMAGE RUNTIME
# 或者
$ ctr c ls
CONTAINER IMAGE RUNTIME4.3 查看任务
task 表示容器里跑的进程,可用 t 缩写代表task
$ ctr task ls
TASK PID STATUS
# 或者
$ ctr t ls
TASK PID STATUS4.4 创建静态容器
# 创建[静态]容器
# ctr containers create [command options] [flags] Image|RootFS CONTAINER [COMMAND] [ARG...]
$ ctr container create docker.io/library/nginx:alpine nginx1
# 一定要有镜像,才能创建容器
# 查看[静态]容器列表
$ ctr container ls
CONTAINER IMAGE RUNTIME
nginx1 docker.io/library/nginx:alpine io.containerd.runc.v2
# 查看容器的详细信息显示
$ ctr container info nginx14.5 静态容器启动为动态容器
# 复制containerd连接runc垫片工具至系统
# 若没有这个垫片就会使得静态容器启动为动态容器报错失败
$ ls usr/local/bin/
containerd containerd-shim-runc-v1 containerd-stress critest ctr
containerd-shim containerd-shim-runc-v2 crictl ctd-decoder
$ cp usr/local/bin/containerd-shim-runc-v2 /usr/bin
# 启动[动态]容器 创建容器和任务子命令分离
# 启动task,即表示在容器中运行了进程,即为动态容器
# -d 后台运行
$ ctr task start-d nginx1
/docker-entrypoint.sh: /docker-entrypoint.d/ is not empty, will attempt to perform configuration
/docker-entrypoint.sh: Looking for shell scripts in /docker-entrypoint.d/
/docker-entrypoint.sh: Launching /docker-entrypoint.d/10-listen-on-ipv6-by-default.sh
10-listen-on-ipv6-by-default.sh: info: Getting the checksum of /etc/nginx/conf.d/default.conf
# 查看动态容器列表
$ ctr task ls
TASK PID STATUS
nginx1 12920 RUNNING
# 直接运行一个动态容器[容器的IP就是宿主机的IP]
# ctr运行命令实际上是ctr容器创建 + ctr任务启动的快捷方式
$ ctr run -d--net-host docker.io/library/nginx:alpine nginx2
说明:-d表示daemon或者后台的意思,否则会卡住终端
# 查看容器所在宿主机的进程,是以宿主机进程的方式存在的
$ ctr task ls
TASK PID STATUS
nginx1 12920 RUNNING
# 查看容器的进程(都是物理机的进程)
$ ctr task ps nginx1
PID INFO
12920 -
12956 -
12957 -
12958 -
12959 -
# 在物理机上查看进程
$ ps-ef | grep nginx
root 12890 1 003:11 ? 00:00:00 /usr/local/bin/containerd-shim-runc-v2 -namespace default -id nginx1 -address /run/containerd/containerd.sock
root 12920 12890 003:11 ? 00:00:00 nginx: master process nginx -g daemon off;
101 12956 12920 003:11 ? 00:00:00 nginx: worker process
101 12957 12920 003:11 ? 00:00:00 nginx: worker process
101 12958 12920 003:11 ? 00:00:00 nginx: worker process
101 12959 12920 003:11 ? 00:00:00 nginx: worker process4.6 进入到容器操作
$ ctr task exec --exec-id1 nginx1 /bin/sh
# 直接在换行中输入命令即可,就可以操作容器
# 查看网卡信息
ifconfig
lo Link encap:Local Loopback
inet addr:127.0.0.1 Mask:255.0.0.0
inet6 addr: ::1/128 Scope:Host
UP LOOPBACK RUNNING MTU:65536 Metric:1
RX packets:0 errors:0 dropped:0 overruns:0 frame:0
TX packets:0 errors:0 dropped:0 overruns:0 carrier:0
collisions:0 txqueuelen:1000
RX bytes:0 (0.0 B) TX bytes:0 (0.0 B)
# 访问本地提供的Web服务
curl http://127.0.0.1
% Total % Received % Xferd Average Speed Time Time Time Current
Dload Upload Total Spent Left Speed
0 0 0 0 0 0 0 0--:--:-- --:--:-- --:--:-- 0<!DOCTYPE html>
<html>
<head>
<title>Welcome to nginx!</title>
<style>
html { color-scheme: light dark; }
body { width: 35em; margin: 0 auto;
font-family: Tahoma, Verdana, Arial, sans-serif; }
</style>
</head>
<body>
<h1>Welcome to nginx!</h1>
<p>If you see this page, the nginx web server is successfully installed and
working. Further configuration is required.</p>
<p>For online documentation and support please refer to
<a href="http://nginx.org/">nginx.org</a>.<br/>
Commercial support is available at
<a href="http://nginx.com/">nginx.com</a>.</p>
<p><em>Thank you for using nginx.</em></p>
</body>
</html>
100 615 100 615 0 0 272k 0--:--:-- --:--:-- --:--:-- 300k
# 为容器中运行的网站添加网站文件
echo"hello ksnginx" > /usr/share/nginx/html/index.html
# 在容器里访问Web服务
curl http://127.0.0.1
% Total % Received % Xferd Average Speed Time Time Time Current
Dload Upload Total Spent Left Speed
100 14 100 14 0 0 20497 0--:--:-- --:--:-- --:--:-- 14000
hello ksnginx
# 退出容器
exit说明:
为exec进程设定一个id,可以随意能入,只要保证唯一即可,也可使用$RANDOM变量。
4.7 直接运行一个动态容器
$ ctr run -d--net-host docker.io/library/nginx:alpine nginx2
说明:
-d 代表 dameon,后台运行
--net-host 代表容器的IP就是宿主机的IP(相当于 docker 里的 host 类型网络)
# 查看已经运行的容器
$ ctr container ls
CONTAINER IMAGE RUNTIME
nginx2 docker.io/library/nginx:alpine io.containerd.runc.v2
# 查看已经运行容器中的进程,即task
$ ctr task ls
TASK PID STATUS
nginx2 15648 RUNNING
# 进入容器
$ ctr task exec --exec-id1 nginx2 /bin/sh
# 可以查看到获取的是宿主机的网络命名空间的信息
ifconfig
docker0 Link encap:Ethernet HWaddr 02:42:FE:D2:0A:E2
inet addr:172.17.0.1 Bcast:172.17.255.255 Mask:255.255.0.0
UP BROADCAST MULTICAST MTU:1500 Metric:1
RX packets:0 errors:0 dropped:0 overruns:0 frame:0
TX packets:0 errors:0 dropped:0 overruns:0 carrier:0
collisions:0 txqueuelen:0
RX bytes:0 (0.0 B) TX bytes:0 (0.0 B)
ens33 Link encap:Ethernet HWaddr 00:0C:29:60:A9:17
inet addr:10.0.0.30 Bcast:10.0.0.255 Mask:255.255.255.0
inet6 addr: fe80::2ee1:c8f5:d4ec:224f/64 Scope:Link
UP BROADCAST RUNNING MULTICAST MTU:1500 Metric:1
RX packets:802384 errors:0 dropped:0 overruns:0 frame:0
TX packets:405698 errors:0 dropped:0 overruns:0 carrier:0
collisions:0 txqueuelen:1000
RX bytes:763172724 (727.8 MiB) TX bytes:26556125 (25.3 MiB)
lo Link encap:Local Loopback
inet addr:127.0.0.1 Mask:255.0.0.0
inet6 addr: ::1/128 Scope:Host
UP LOOPBACK RUNNING MTU:65536 Metric:1
RX packets:192 errors:0 dropped:0 overruns:0 frame:0
TX packets:192 errors:0 dropped:0 overruns:0 carrier:0
collisions:0 txqueuelen:1000
RX bytes:16320 (15.9 KiB) TX bytes:16320 (15.9 KiB)
# 为容器中运行的网站添加网站文件
echo"hello containerd page" > /usr/share/nginx/html/index.html
# 退出容器
exit
# 在宿主机上访问网站
$ curl http://127.0.0.1
hello containerd page4.8 暂停容器
# 查看容器状态
$ ctr tasks ls
TASK PID STATUS
nginx1 12920 RUNNING
# 暂停容器: 是暂停了用户进程在容器中的运行
$ ctr tasks pause nginx1
# 再次查看容器状态,看到其状态是PAUSED,表示停止
$ ctr tasks ls
TASK PID STATUS
nginx1 12920 PAUSED4.9 恢复容器
# 使用resume命令恢复容器
$ ctr tasks resume nginx1
# 查看恢复后的状态
$ ctr tasks ls
TASK PID STATUS
nginx1 12920 RUNNING4.10 停止容器
$ ctr tasks --help
NAME:
ctr tasks - manage tasks
USAGE:
ctr tasks command [command options] [arguments...]
COMMANDS:
attach attach to the IO of a running container
checkpoint checkpoint a container
delete, del, remove, rm delete one or more tasks
exec execute additional processes in an existing container
list, ls list tasks
kill signal a container (default: SIGTERM)
pause pause an existing container
ps list processes for container
resume resume a paused container
start start a container that has been created
metrics, metric get a single data point of metrics for a task with the built-in Linux runtime
OPTIONS:
--help, -h show help
# 使用 kill 命令停止容器中运行的进程,即为停止容器
$ ctr tasks kill nginx2
# 查看容器停止状态:
$ ctr tasks ls
TASK PID STATUS
nginx2 15648 STOPPED4.11 删除容器
# 删除动态容器[必须先停止task或者先删除task]
$ ctr task delete nginx2
# 查看静态容器,确认其还在系统中
$ ctr container ls
CONTAINER IMAGE RUNTIME
nginx2 docker.io/library/nginx:alpine io.containerd.runc.v2
# 删除静态容器
$ ctr container delete nginx25 Containerd 使用私有容器镜像仓库Harbor
无
6 Containerd NameSpace 管理
containerd 中 namespace 的作用为:隔离运行的容器,可以实现运行多个容器。
# 查看NameSpace帮助命令
$ ctr namespace --help
NAME:
ctr namespaces - manage namespaces
USAGE:
ctr namespaces command [command options] [arguments...]
COMMANDS:
create, c create a new namespace
list, ls list namespaces
remove, rm remove one or more namespaces
label set and clear labels for a namespace
OPTIONS:
--help, -h show help
# 创建命名空间
$ ctr namespace create testns
# 查看命名空间
$ ctr namespace ls
NAME LABELS
default
testns
# 在命名空间中进行镜像,容器等相关操作
# --namespace value, -n value namespace to use with commands (default: "default") [$CONTAINERD_NAMESPACE
$ ctr--namespace testns images pull docker.io/library/nginx:latest
$ ctr--namespace testns images ls
$ ctr--namespace testns container create docker.io/library/nginx:latest
$ ctr--namespace testns container ls
# 删除命名空间
# 前提需要将该命名空间的镜像,容器等信息删除,即可删除命名空间
$ ctr namespace rm"testns"7 Containerd Network 管理
默认Containerd管理的容器仅有lo网络,无法访问容器之外的网络,可以为其添加网络插件,使用容器可以连接外网,CNI(Container Network Interface)
cni-plugins插件和cni工具包已经部署完毕。
# cni插件目录
$ ls /home/cni-plugins/
bandwidth bridge dhcp firewall host-device host-local ipvlan loopback macvlan portmap ptp sbr static tuning vlan vrf
# cni工具包目录
$ ls /home/cni-tools/
cni-1.1.2
# cni工具1.1.2兼容cni插件1.0.0
下面先开始准备容器网络配置文件,用于为容器提供网关、IP地址等。
cat <<-'EOF' > /etc/cni/net.d/10-mynet.conf
{
"cniVersion": "1.0.0",
"name": "mynet",
"type": "bridge",
"bridge": "cni0",
"isGateway": true,
"ipMasq": true,
"ipam": {
"type": "host-local",
"subnet": "10.66.0.0/16",
"routes": [
{
"dst": "0.0.0.0/0"
}
]
}
}
EOF
cat <<-'EOF' > /etc/cni/net.d/99-loopback.conf
{
"cniVerion": "1.0.0",
"name": "lo",
"type": "loopback"
}
EOF
生成cni网络
# 获取epel源
$ wget-O /etc/yum.repos.d/epel.repo http://mirrors.aliyun.com/repo/epel-7.repo
#安装jq [ jq是一个'出色'的'针对-->JSON处理器'的命令行 ]
$ yum-y install jq
# 进入cni工具目录
$ cd /home/cni-tools/cni-1.1.2
# 执行脚本文件,基于/etc/cni/net.d/目录中的*.conf配置文件生成容器网络
# CNI_PATH是cni插件安装的目录
$ cp-av scripts/* .
$ CNI_PATH=/home/cni-plugins ./priv-net-run.sh echo"Hello World"
# cni插件和cni工具包版本要兼容,否则可能会报错如下:
mynet : error executing ADD: {
"code": 1,
"msg": "incompatible CNI versions",
"details": "config is \"1.0.0\", plugin supports [\"0.1.0\" \"0.2.0\" \"0.3.0\" \"0.3.1\" \"0.4.0\"]"
}
# 安装成功后,在宿主机上查看是否生成容器网络名为cni0的网桥
$ ip addr show
1: lo: <LOOPBACK,UP,LOWER_UP> mtu 65536 qdisc noqueue state UNKNOWN group default qlen 1000
link/loopback 00:00:00:00:00:00 brd 00:00:00:00:00:00
inet 127.0.0.1/8 scope host lo
valid_lft forever preferred_lft forever
inet6 ::1/128 scope host
valid_lft forever preferred_lft forever
[......]
7: cni0: <NO-CARRIER,BROADCAST,MULTICAST,UP> mtu 1500 qdisc noqueue state DOWN group default qlen 1000
link/ether 6a:32:bc:eb:0f:23 brd ff:ff:ff:ff:ff:ff
inet 10.66.0.1/16 brd 10.66.255.255 scope global cni0
valid_lft forever preferred_lft forever
inet6 fe80::6832:bcff:feeb:f23/64 scope link
valid_lft forever preferred_lft forever
创建容器
$ ctr images pull docker.io/library/busybox:latest
$ ctr run -d docker.io/library/busybox:latest busybox
$ ctr tasks exec --exec-id$RANDOM-t busybox sh
/ # ip addr show
1: lo: <LOOPBACK,UP,LOWER_UP> mtu 65536 qdisc noqueue qlen 1000
link/loopback 00:00:00:00:00:00 brd 00:00:00:00:00:00
inet 127.0.0.1/8 scope host lo
valid_lft forever preferred_lft forever
inet6 ::1/128 scope host
valid_lft forever preferred_lft forever
#获取容器进程ID及其网络命名空间
$ pid=$(ctr tasks ls | grep busybox | awk '{print $2}') && echo$pid
39287
$ netnspath=/proc/$pid/ns/net && echo$netnspath
/proc/39287/ns/net
# 进入目录为指定容器添加网络配置
$ cd /home/cni-tools/cni-1.1.2/scripts/
$ CNI_PATH=/home/cni-plugins ./exec-plugins.sh add $pid$netnspath
验证容器网络于宿主机网络的互访功能
# 验证
# 进入容器确认是否添加网卡信息
$ ctr tasks exec --exec-id$RANDOM-t busybox sh
/ # ip addr show
1: lo: <LOOPBACK,UP,LOWER_UP> mtu 65536 qdisc noqueue qlen 1000
link/loopback 00:00:00:00:00:00 brd 00:00:00:00:00:00
inet 127.0.0.1/8 scope host lo
valid_lft forever preferred_lft forever
inet6 ::1/128 scope host
valid_lft forever preferred_lft forever
2: eth0@if9: <BROADCAST,MULTICAST,UP,LOWER_UP,M-DOWN> mtu 1500 qdisc noqueue
link/ether 1e:8c:80:51:fc:be brd ff:ff:ff:ff:ff:ff
inet 10.66.0.3/16 brd 10.66.255.255 scope global eth0
valid_lft forever preferred_lft forever
inet6 fe80::1c8c:80ff:fe51:fcbe/64 scope link
valid_lft forever preferred_lft forever
# 在容器中ping容器宿主机IP地址
/ # ping -c 2 10.0.0.30
PING 10.0.0.30 (10.0.0.30): 56 data bytes
64 bytes from 10.0.0.30: seq=0ttl=64time=0.280 ms
64 bytes from 10.0.0.30: seq=1ttl=64time=0.286 ms
---10.0.0.30 ping statistics ---
2 packets transmitted, 2 packets received, 0% packet loss
round-trip min/avg/max =0.280/0.283/0.286 ms
# 在容器中开启httpd服务
/ # echo "containerd net web test" > /tmp/index.html
/ # httpd -h /tmp
/ # wget -O- -q 127.0.0.1
containerd net web test
/ # exit
#在宿主机访问容器提供的httpd服务
$ curl10.66.0.3
containerd net web test8 Containerd 容器数据持久化存储
实现把宿主机目录挂载至Containerd容器中,实现容器数据持久化存储。
# 创建一个静态容器,实现宿主机目录与容器挂载,src=/tmp 为宿主机目录 dst=/hostdir 为容器中目录
$ ctr container create docker.io/library/busybox:latest busybox2 --mounttype=bind,src=/tmp,dst=/hostdir,options=rbind:rw
# 运行用户进程
$ ctr tasks start-d busybox2 bash
$ ctr task ls
TASK PID STATUS
busybox 18898 RUNNING
busybox2 24238 RUNNING
# 进入容器,查看是否挂载成功
$ ctr tasks exec --exec-id$RANDOM-t busybox2 sh
/ # ls /hostdir/
ks-script-GSRMK8 vmware-root_6389-1958486695
systemd-private-cc74dd8802f0428490924757e690c750-chronyd.service-9TDICh vmware-root_6511-1689719547
vmware-root_6359-1949639453 yum.log
# 向容器中挂载目录中添加文件
/ # echo "hello world" > /hostdir/test.txt
/ # ls /hostdir/
ks-script-GSRMK8 vmware-root_6389-1958486695
systemd-private-cc74dd8802f0428490924757e690c750-chronyd.service-9TDICh vmware-root_6511-1689719547
test.txt yum.log
vmware-root_6359-1949639453
# 在宿主机上查看被容器挂载的目录中是否添加了新的文件,已添加表明被容器挂载成功,并可以读写此目录中内容。
$ cat /tmp/test.txt
hello world9 与其他Containerd容器共享命名空间
无
10 Docker 集成 Containerd 实现管理管理
目前Containerd主要任务还在于解决容器运行时的问题,对于其周边生态还不完善,所以有时需要借助:Docker结合Containerd来实现Docker完整的功能应用。
Docker 安装部署脚本:
# 安装Docker脚本
$ vim install_docker.sh
#!/bin/bash
# step 1: 安装必要的一些系统工具
echo-e"==> 安装必要的系统工具"
sudo yum install -y yum-utils device-mapper-persistent-data lvm2
# Step 2: 添加软件源信息
echo-e"==> 添加软件源信息"
sudo yum-config-manager --add-repo https://mirrors.aliyun.com/docker-ce/linux/centos/docker-ce.repo
# Step 3
echo-e"==> 修改配置文件"
sudosed-i's+download.docker.com+mirrors.aliyun.com/docker-ce+' /etc/yum.repos.d/docker-ce.repo
# Step 4: 更新并安装Docker-CE
echo-e"==> 安装更新Docker"
sudo yum makecache fast
sudo yum -y install docker-ce-20.10.7 docker-ce-cli-20.10.7 containerd.io-1.4.6
# Step 5: 配置加速器以及docker参数
echo-e"==> 配置加速器以及docker参数"
sudomkdir-p /etc/docker
# 配置多个镜像加速地址
sudotee /etc/docker/daemon.json <<-'EOF'
{
  "registry-mirrors": ["https://po13h3y1.mirror.aliyuncs.com","http://hub-mirror.c.163.com","https://mirror.ccs.tencentyun.com","http://f1361db2.m.daocloud.io"],
  "exec-opts": ["native.cgroupdriver=systemd"],
  "log-driver": "json-file",
  "log-opts": {
    "max-size": "100m"
  },
  "storage-driver": "overlay2"
}
EOF
# Step 6: 加载服务
echo-e"==> 加载服务"
sudo systemctl daemon-reload
sudo systemctl restart docker
sudo systemctl enable docker
# 查看Docker服务信息
echo-e"==> 查看Docker服务信息"
docker info
Docker运行的容器默认在moby命名空间下。
# 安装docker
$ yum-y install docker
# 启动docker
$ systemctl enable --now dockerDocker 运行的容器默认在moby命名空间下。
# 下载nginx容器镜像
$ docker pull nginx:latest
# 运行nginx容器
$ docker run -it-d--name nginx-docker nginx:latest
# 查看Docker容器进程
$ dockerps
CONTAINER ID IMAGE COMMAND CREATED STATUS PORTS NAMES
2dc3a6364d0e nginx:latest "/docker-entrypoin..." 6 seconds ago Up 3 seconds 80/tcp nginx-docker
# 查看ctr命令下的namespace,发现多了一个moby命名空间。moby即为docker使用的命名空间。
$ ctr namespace ls
NAME LABELS
default
moby
# 查看moby命名空间下的容器和任务
$ ctr--namespace moby container ls
$ ctr--namespace moby tasks ls


 1390
1390

 被折叠的 条评论
为什么被折叠?
被折叠的 条评论
为什么被折叠?
 到【灌水乐园】发言


