


MyBatisPlus

MyBatis-Plus (opens new window)(简称 MP)是一个 MyBatis (opens new window) 的增强工具,在 MyBatis 的基础上只做增强不做改变,为简化开发、提高效率而生。
一、使用前准备
1.准备表结构和数据
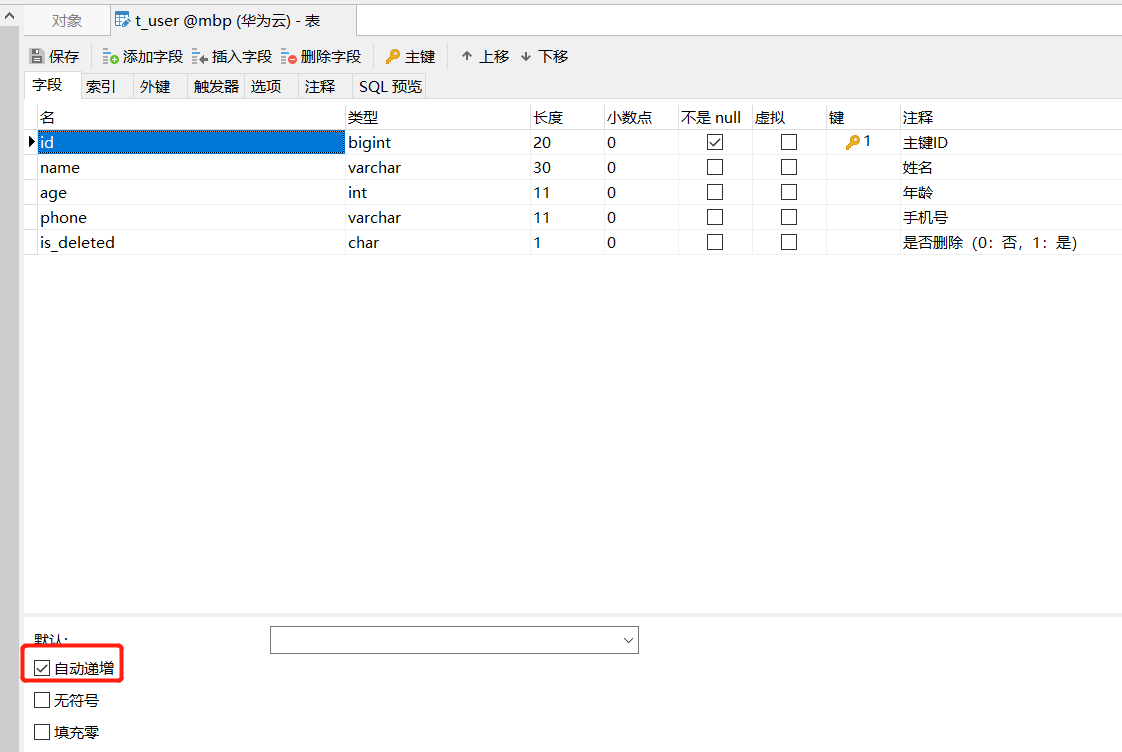
准备如下的表结构
DROP TABLE IF EXISTS `t_user`;

CREATE TABLE `t_user`  (
  `id` bigint(20) NOT NULL AUTO_INCREMENT COMMENT '主键ID',
  `name` varchar(30) CHARACTER SET utf8mb4 COLLATE utf8mb4_bin NULL DEFAULT NULL COMMENT '姓名',
  `age` int(11) NULL DEFAULT NULL COMMENT '年龄',
  `phone` varchar(11) CHARACTER SET utf8mb4 COLLATE utf8mb4_bin NULL DEFAULT NULL COMMENT '手机号',
  `is_deleted` char(1) CHARACTER SET utf8mb4 COLLATE utf8mb4_bin NULL DEFAULT '0' COMMENT '是否删除(0:否,1:是)',
  PRIMARY KEY (`id`) USING BTREE
) ENGINE = InnoDB AUTO_INCREMENT = 1 CHARACTER SET = utf8mb4 COLLATE = utf8mb4_bin ROW_FORMAT = Dynamic;
2. 创建项目
创建一个SpringBoot项目,然后引入相关的依赖,首先是父依赖
    <parent>
        <groupId>org.springframework.boot</groupId>
        <artifactId>spring-boot-starter-parent</artifactId>
        <version>2.6.7</version>
        <relativePath/> <!-- lookup parent from repository -->
    </parent>
    <groupId>com.sissie</groupId>
    <artifactId>MyBatisxDemo</artifactId>
    <version>0.0.1-SNAPSHOT</version>
    <name>MyBatisxDemo</name>
    <description>Demo project for Spring Boot</description>
    <properties>
        <java.version>1.8</java.version>
    </properties>
使用到的依赖
<!-- spring-boot-starter-web 的依赖 -->
        <dependency>
            <groupId>org.springframework.boot</groupId>
            <artifactId>spring-boot-starter-web</artifactId>
        </dependency>

        <dependency>
            <groupId>org.springframework.boot</groupId>
            <artifactId>spring-boot-starter-test</artifactId>
            <scope>test</scope>
        </dependency>
        <!-- 引入MyBatisPlus的依赖 -->
        <dependency>
            <groupId>com.baomidou</groupId>
            <artifactId>mybatis-plus-boot-starter</artifactId>
            <version>3.5.1</version>
        </dependency>
        <!-- 数据库使用MySQL数据库 -->
        <dependency>
            <groupId>mysql</groupId>
            <artifactId>mysql-connector-java</artifactId>
        </dependency>
        <!-- 数据库连接池 Druid -->
        <dependency>
            <groupId>com.alibaba</groupId>
            <artifactId>druid</artifactId>
            <version>1.1.14</version>
        </dependency>
        <!-- lombok依赖 -->
        <dependency>
            <groupId>org.projectlombok</groupId>
            <artifactId>lombok</artifactId>
        </dependency>
3.配置信息
1、需要在application.properties(或yml文件中)中配置数据源的相关信息
spring.datasource.driverClassName=com.mysql.cj.jdbc.Driver
spring.datasource.url=jdbc:mysql://localhost:3306/mbp?serverTimezone=UTC&useUnicode=true&characterEncoding=utf-8&useSSL=true
spring.datasource.username=root
spring.datasource.password=123456

spring.datasource.type=com.alibaba.druid.pool.DruidDataSource
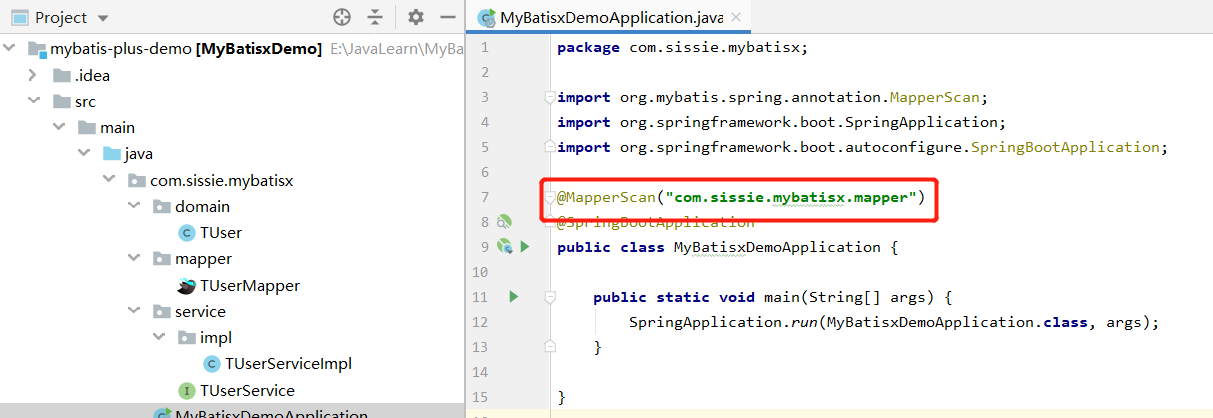
2、在SpringBoot项目的启动类上配置Mapper接口的扫描路径
4.添加实体
添加user的实体类
@TableName(value ="t_user")
@Data
public class TUser extends Model<TUser> {
    private static final long serialVersionUID = 1L;

    /**
     * 主键ID
     */
    @TableId
    private Long id;

    private String name;

    private Integer age;

    private String phone;

    /**
     * 是否删除 0 正常 1删除
     */
    private String isDeleted;
}
5.创建Mapper接口
在MyBatisPlus中的Mapper接口需要继承BaseMapper
/**
 * MyBatisPlus中的Mapper接口继承自BaseMapper
 */
public interface TUserMapper extends BaseMapper<TUser> {
}
6.测试操作
完成对TUser表中数据的查询操作
@SpringBootTest
class MpDemo01ApplicationTests {

    @Autowired
    private UserMapper userMapper;

    @Test
    void queryUser() {
        List<User> users = userMapper.selectList(null);
        for (User user : users) {
            System.out.println(user);
        }
    }

}
为方便看日志,可指定日志的实现StdOutImpl来处理
# 指定日志输出
mybatis-plus.configuration.log-impl=org.apache.ibatis.logging.stdout.StdOutImpl

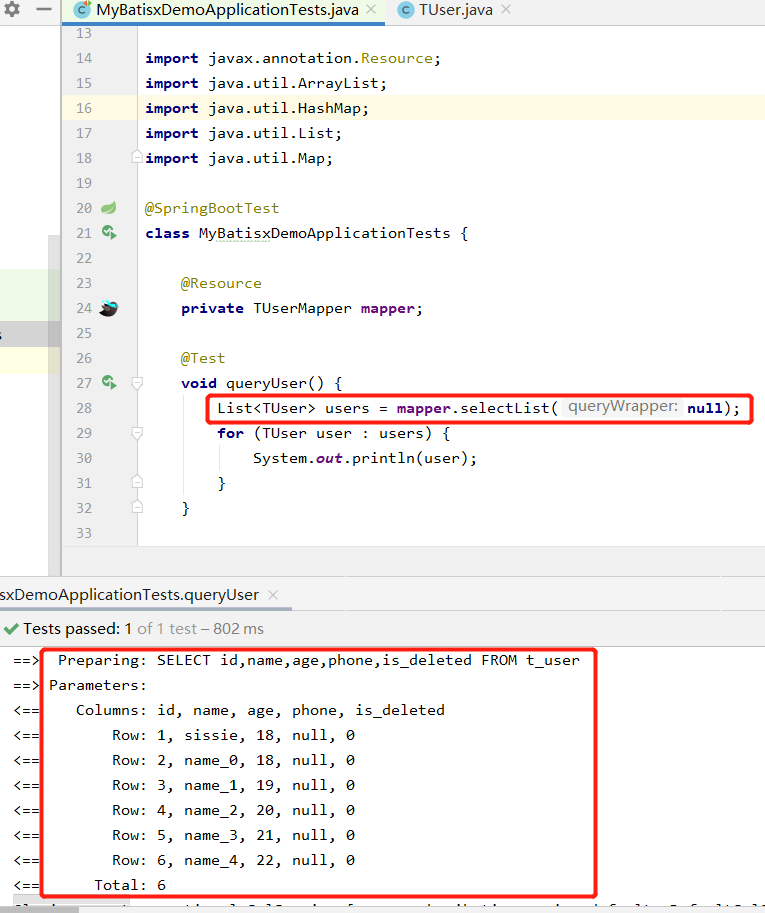
然后操作数据库的时候就可以看到对应的日志信息了:
二、CRUD操作
1.插入用户
插入用户的操作,在MyBatisPlus中给我们提供一个insert()方法来实现。
    /**
     * 添加用户信息
     */
    @Test
    void addUser() {
        TUser user = new TUser();
        user.setName("xiaoming");
        user.setAge(18);
        user.setPhone("18700000000");
        int i = mapper.insert(user);
        System.out.println("i = " + i);
    }
插入成功后生成的id是一长串数字:

PS. 在MyBatisPlus中插入数据的时候,如果id为空,默认会通过雪花算法来生成id
2.更新用户
MyBatisPlus中的更新操作。
    /**
     * 更新用户信息
     */
    @Test
    void updateUserById() {
        TUser user = new TUser();
        user.setId(1632283941839532034L);
        user.setAge(22);
        int i = mapper.updateById(user);
        System.out.println("i = " + i);
    }
3.删除用户
删除用户的方法在MyBatisPLUS中提供的有多个
3.1 根据id删除
    /**
     * 根据id删除
     */
    @Test
    void deleteUserById() {
        mapper.deleteById(1632283941839532034L);
    }
执行语句和结果:

3.2 批量删除
    /**
     * 批量删除
     */
    @Test
    void deleteBathUser() {
        int i = mapper.deleteBatchIds(Arrays.asList(1L, 2L, 3L));
        System.out.println("受影响的行数:" + i);
    }
执行语句和结果:

3.3 通过Map删除
根据 columnMap 条件,删除记录
    /**
     * 根据 columnMap 条件,删除记录
     */
    @Test
    void deleteMapUser() {
        Map<String,Object> map = new HashMap<>();
        map.put("age",18);
        map.put("name","xiaoming");
        int i = mapper.deleteByMap(map);
        System.out.println("受影响的行数:" + i);
    }
执行语句和结果:


4.查询操作
4.1 根据id查询
根据id来查询单条记录
    @Test
    void queryUserById() {
        TUser user = mapper.selectById(4l);
        System.out.println(user);
    }
执行语句和结果:

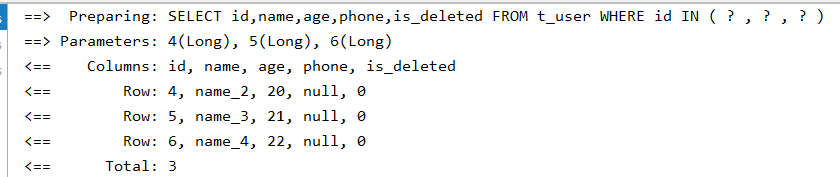
4.2 根据id批量查询
通过类似于SQL语句中的in关键字来实现多id的查询
    @Test
    void queryUserByBatchId() {
        List<TUser> users = mapper.selectBatchIds(Arrays.asList(4l, 5l, 6l));
        users.forEach(System.out::println);
    }
执行语句和结果:
4.3 通过Map查询
把需要查询的字段条件封装到一个Map中来查询
    @Test
    void queryUserByMap() {
        Map<String,Object> map = new HashMap<>();
        map.put("age",22);
        map.put("name","name_4");
        List<TUser> users = mapper.selectByMap(map);
        users.forEach(System.out::println);
    }
执行语句和结果:

4.4 查询所有数据
通过selectList方法来查询所有的数据
    /**
     * 查询用户信息
     */
    @Test
    void queryUser() {
        List<TUser> users = mapper.selectList(null);
        for (TUser user : users) {
            System.out.println(user);
        }
    }
三、CRUD接口
官网地址:https://baomidou.com/pages/49cc81/#service-crud-%E6%8E%A5%E5%8F%A3
官网说明:
- 通用 Service CRUD 封装IService(opens new window)接口,进一步封装 CRUD 采用 get 查询单行 、remove 删除、 list 查询集合、 page 分页 前缀命名方式区分 Mapper 层避免混淆
- 泛型 T 为任意实体对象
- 建议如果存在自定义通用 Service 方法的可能,请创建自己的 IBaseService 继承 Mybatis-Plus 提供的基类
- 对象 Wrapper 为 条件构造器
在MyBatis-Plus中有一个接口 IService和其实现类 ServiceImpl,封装了常见的业务层逻辑
1.Service的使用
要使用CRUD的接口,那么自定义的Service接口需要继承IService接口。
/**
 * TUser对应的Service接口
 * 要使用MyBatisPlus的Service完成CRUD操作,得继承IService
 */
public interface TUserService extends IService<TUser> {

}
对应的Service实现得继承ServiceImpl同时指定mapper和实体对象。
/**
 * Service的实现类
 * 必须继承ServiceImpl 并且在泛型中指定 对应的Mapper和实体对象
 */
@Service
public class TUserServiceImpl extends ServiceImpl<TUserMapper, TUser> implements TUserService{

}
2.查询操作
通过Service中提供的count方法可以查询总的记录数、get方法,List方法等
    @Autowired
    private IUserService userService;

    @Test
    void getUserCount() {
        long count = userService.count();
        System.out.println("count = " + count);
    }
执行语句和结果:

get方法,List方法
    @Test
    void selectById() {
        TUser TUser = userService.getById(4L);
        System.out.println(TUser);
    }

    @Test
    void selectList() {
        List<TUser> list = userService.list();
        list.forEach(System.out::println);
    }
3.插入
在service中有2种常用插入的方法
3.1 单条插入
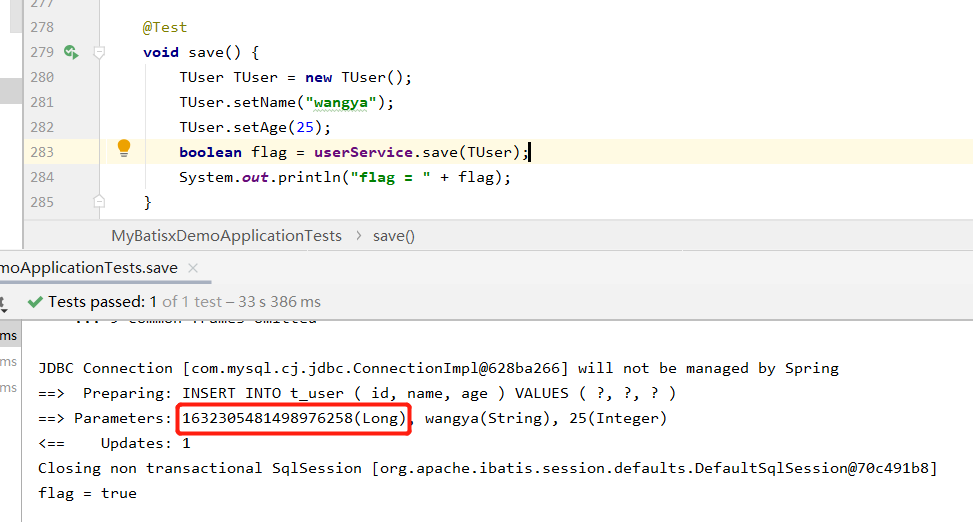
    @Test
    void save() {
        TUser TUser = new TUser();
        TUser.setName("wowo");
        TUser.setAge(18);
        boolean flag = userService.save(TUser);
        System.out.println("flag = " + flag);
    }
3.2 批量插入
    @Test
    void saveBatchUser() {
       List<TUser> list = new ArrayList<>();
        for (int i = 0; i < 5; i++) {
            TUser TUser = new TUser();
            TUser.setName("name_"+i);
            TUser.setAge(18+i);
            list.add(TUser);
        }
        // 批量插入
        boolean flag = userService.saveBatch(list);
        // batchSize:50:指定分批的条数
        // userService.saveBatch(list,50);
        System.out.println("flag = " + flag);
    }
ps. 不指定分批条数,默认1000条

四、常用注解
1.@TableName
MyBatis-Plus在确定操作的表时,由BaseMapper的泛型决定,即实体类型决定,且默认操作的表名和实体类型的类名一致
如果表名和我们的实体类的名称不一致的话,在执行相关操作的时候会抛出对应的异常。
这时可以通过@TableName来解决这个问题。
/**
 * @TableName 标识实体类对应的表名
 */
@TableName(value ="t_user")
@Data
public class TUser extends Model<TUser> {
    private static final long serialVersionUID = 1L;

    private Long id;

    private String name;

    private Integer age;

    private String phone;

    private String isDeleted;
}
如果实体类所对应的表都有固定的前缀,例如t_或tbl_ 此时,可以使用MyBatis-Plus提供的全局配置,为实体类所对应的表名设置默认的前缀,那么就不需要在每个实体类上通过@TableName标识实体类对应的表.
# 配置MyBatis-Plus操作表的默认前缀
mybatis-plus.global-config.db-config.table-prefix=t_
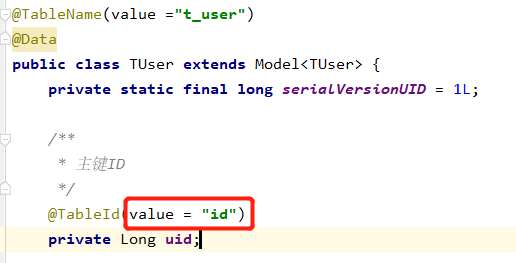
2.@TableId
通过@TableId注解来指定哪个属性为主键对应的属性,默认id就是,如果主键字段不是id,比如uid的话,可以在TUser实体的uid属性上添加@TableId即可。

@TableId中的value值在实体类中的字段和表结构的字段一致的情况下我们不用添加,但如果不一致,@TableId中的value我们需要设置表结构中的主键字段。
ps. 项目开发中尽可能让实体属性和表结构字段保持一致~~~~此处只是为了介绍value的用法
@TableId中还有一个比较重要的属性是Type。Type是用来定义主键的生成策略的。以下是官网截图
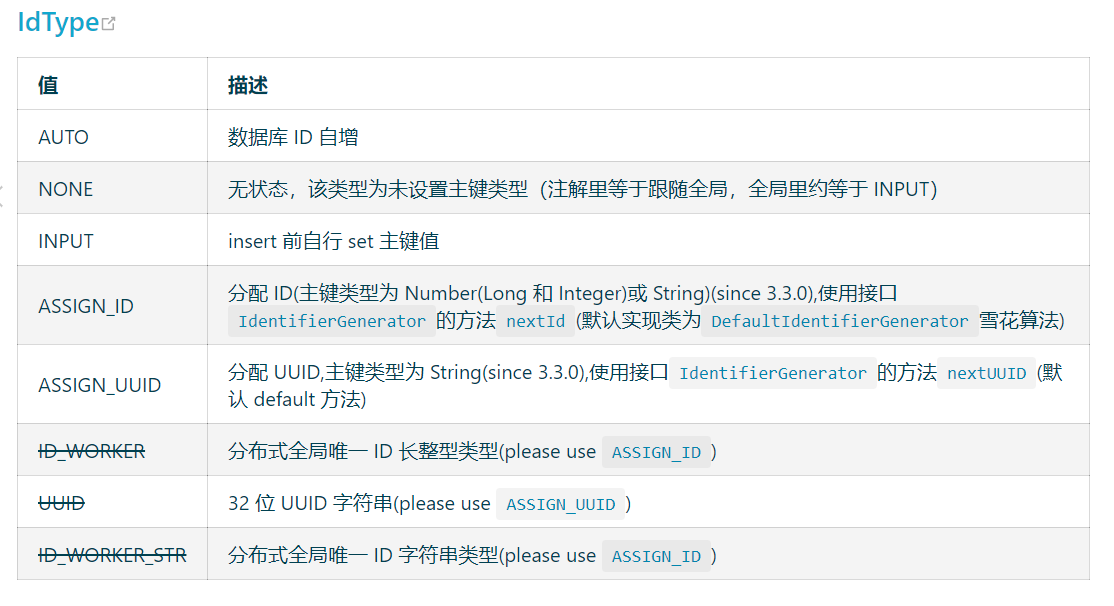
 /**
     * 主键ID
     */
    @TableId(type = IdType.AUTO)
    private Long id;
也可以在@TableId中配置,也可以在配置文件中统一配置全局的生成策略。
# 设置全局的id自增策略
mybatis-plus.global-config.db-config.id-type=auto
ps. 配置主键自增 需要在表结构中的主键字段要设置自动增长才行
另外,实体里的注解配置会覆盖全局配置


执行新增时,主键为雪花算法生成的值
3.@TableField
@TableField注解的作用是当实体类中的属性和表结构中的字段名称不一致的情况下来设置对应关系的。
不过,在MyBatis-Plus中针对实体中是userName而表结构中是user_name这种情况会自动完成驼峰命名法的转换。
ps. 项目开发中尽可能让实体属性和表结构字段保持一致~~~~(驼峰命名法转换除外)
@TableName(value ="t_user")
@Data
public class TUser extends Model<TUser> {
    private static final long serialVersionUID = 1L;

    /**
     * 主键ID
     */
    @TableId(type = IdType.ASSIGN_ID)
    private Long id;

    @TableField("username") // 表结构中的username属性和name属性对应
    private String name;

    private Integer age;

    private String phone;

    /**
     * 是否删除 0 正常 1删除
     */
    private String isDeleted;
}
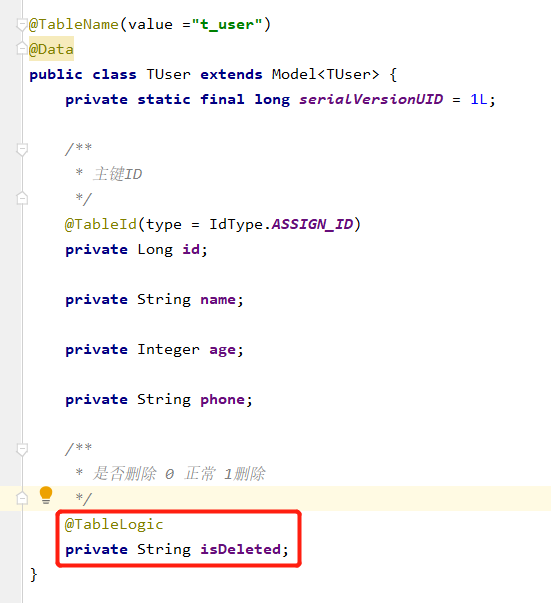
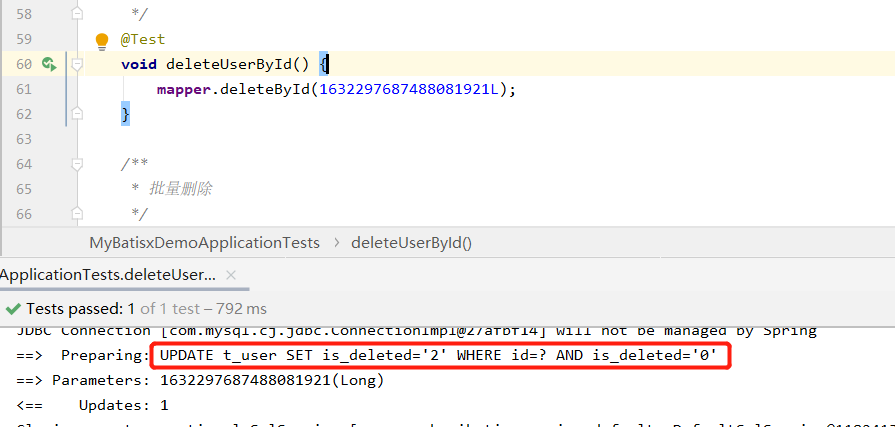
4.@TableLogic
@TableLogic是用来完成逻辑删除操作的
| 删除类型 | 描述 |
|---|---|
| 逻辑删除 | 假删除,将对应数据中代表是否被删除字段的状态修改为“被删除状态”,<br />之后在数据库中仍旧能看到此条数据记录 |
| 物理删除 | 真实删除,将对应数据从数据库中删除,之后查询不到此条被删除的数据 |
例如:表中is_deleted字段

对应的实体类中isDeleted属性
然后调用删除功能

可以看到调用了deleteById方法,但是真实执行的是Update方法,实现了逻辑删除的场景。
- 默认0:正常。1:删除。
- 加了逻辑删除注解后,查询和更新的WHERE条件里,也会自动加上“ is_deleted=‘0’ ”
当然也可以在属性文件中根据自定义删除参数
# 指定逻辑删除字段
mybatis-plus.global-config.db-config.logic-delete-field=is_deleted
# 指定删除标识
mybatis-plus.global-config.db-config.logic-delete-value=2
# 指定正常标识
mybatis-plus.global-config.db-config.logic-not-delete-value=0
配置后的效果:
五、条件构造器
当需要对单表的CURD做复杂条件处理的时候,可以借助Wrapper接口来处理,也就是通过条件构造器来处理。
1.Wrapper接口
Wrapper接口是条件构造的抽象类,是最顶级的类,对应的作用描述如下:
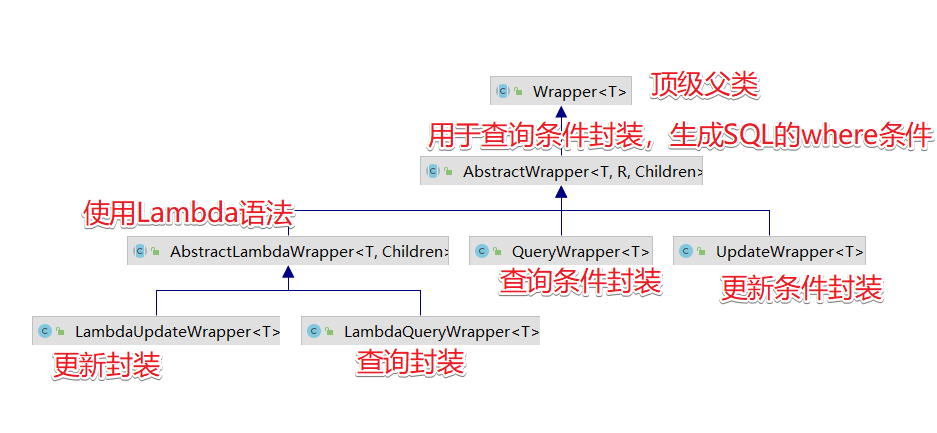
2.QueryWrapper
QueryWrapper的使用,针对where后的条件封装。
2.1 查询条件
    /**
     * 姓名包含o 年龄大于20 且手机号不为空的用户
     * select * from t_user where is_deleted='0' and name like '%o%' and age > 20 and phone is not null
     */
    @Test
    void queryAllUser() {
        QueryWrapper<TUser> wrapper = new QueryWrapper<>();
        wrapper.like("name","o")
                .gt("age",20)
                .isNull("phone");
        List<TUser> users = mapper.selectList(wrapper);
    }
2.2 排序条件
QueryWrapper也可以封装排序的条件
    /**
     * 排序:首先根据年龄升序,年龄相同的情况下根据id降序
     * SELECT id,name,age,phone,is_deleted FROM t_user WHERE is_deleted='0' ORDER BY age ASC,id DESC
     */
    @Test
    void queryAllUserByOrder() {
        QueryWrapper<TUser> wrapper = new QueryWrapper<>();
        wrapper.orderByAsc("age").orderByDesc("id");
        List<TUser> users = mapper.selectList(wrapper);
    }
2.3 删除条件
QueryWrapper也可以封装删除操作的条件
    /**
     * 删除年龄小20的记录
     * UPDATE t_user SET is_deleted='2' WHERE is_deleted='0' AND (age < 20)
     */
    @Test
    void deleteUser() {
        QueryWrapper<TUser> wrapper = new QueryWrapper<>();
        wrapper.lt("age",20);
        mapper.delete(wrapper);
    }
2.4 组合条件
在封装条件的时候支持同时有多个条件组合,类似于 and 和 or的操作。
示例一:
    /**
     * 查询出姓名中包含o 且年龄大于23 或者 电话为空的记录
     *
     * SELECT id,name AS userName,age,phone,is_deleted
     * FROM t_user
     * WHERE is_deleted=0 AND (name LIKE ? AND age > ? OR phone IS NULL)
     */
    @Test
    void queryUser1() {
        QueryWrapper<TUser> wrapper = new QueryWrapper<>();
        wrapper.and((item)->{
            item.like("name","o").gt("age",23);
        }).or((item)->{
            item.isNull("phone");
        });
        List<TUser> users = mapper.selectList(wrapper);
    }
2.5 查询特定的字段
查询特定的字段,这时可以通过select方法来处理
    /**
     * 查询出特定的字段列表
     * SELECT name,age FROM t_user WHERE is_deleted='0' AND ((name LIKE 'o') OR (age > 21))
     */
    @Test
    void queryUser4() {
        QueryWrapper<TUser> wrapper = new QueryWrapper<>();
        wrapper.and((item)->{
            item.like("name","o");
        }).or((item)->{
            item.gt("age",21);
        }).select("name","age");

        //selectMaps()返回Map集合列表,通常配合select()使用,避免User对象中没有被查询到的列值为null
        List<Map<String, Object>> maps = mapper.selectMaps(wrapper);
    }
2.6 实现子查询
单表查询中对子查询的需求实现如下:
    /**
     * 子查询
     * SELECT id,name,age,phone,is_deleted FROM t_user
     * WHERE is_deleted='0' AND (id IN (select id from t_user where id < 6 ))
     */
    @Test
    void queryUser5() {
        QueryWrapper<TUser> wrapper = new QueryWrapper<>();
        wrapper.inSql("id","select id from t_user where id < 6 ");

        List<Map<String, Object>> maps = mapper.selectMaps(wrapper);
    }
3.UpdateWrapper
当需要组装更新的字段数据的时候,可以通过UpdateWrapper来实现。
    /**
     * 更新用户wowo的age和电话信息
     * UPDATE t_user SET age=33,phone='18900022336' WHERE is_deleted='0' AND (name = 'wowo')
     */
    @Test
    void updateUser() {
        UpdateWrapper<TUser> wrapper = new UpdateWrapper<>();
        wrapper.set("age",33)
                .set("phone","18900022336") // set 是update中的 set 部分 后面的 eq是 where 条件
                .eq("name","wowo");
        mapper.update(null,wrapper);
    }
4.动态SQL
实际开发中,用户的查询条件都是动态的,需要根据不同的输入条件来动态的生成对应的SQL语句,在MyBatisPlus中的应用如下:
    @Test
    void queryUser2() {
        String name = "wowo";
        Integer age = 18;
        String phone = null;
        QueryWrapper<TUser> wrapper = new QueryWrapper<>();
        if(StringUtils.isNotBlank(name)){
            wrapper.eq("name",name);
        }
        if(age != null && age > 0){
            wrapper.eq("age",age);
        }
        if(StringUtils.isNotBlank(phone)){
            wrapper.eq("phone",phone);
        }
        List<TUser> users = mapper.selectList(wrapper);
    }
上面的代码是通过if来一个个判断的,其实相关的API有一个Condition参数
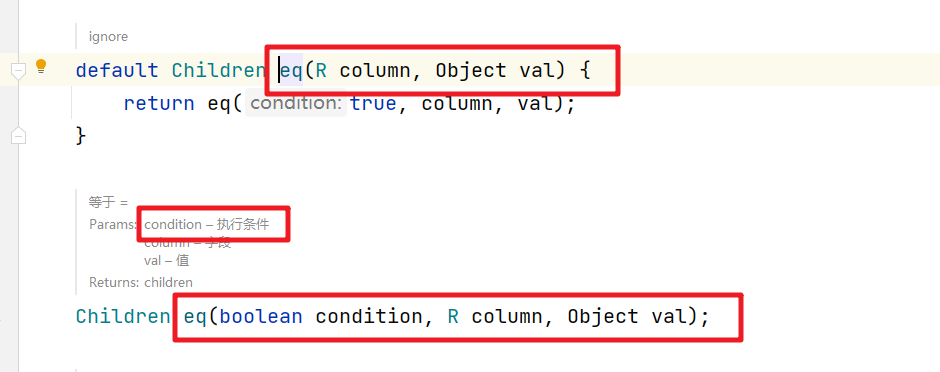
因此可以用这个参数来实现对应的动态SQL处理
    @Test
    void queryAllUser3() {
        String name = "wowo";
        Integer age = null;
        String phone = null;
        QueryWrapper<TUser> wrapper = new QueryWrapper<>();
        wrapper.eq(StringUtils.isNotBlank(name),"name",name)
                .eq(age != null && age > 0 , "age" ,age)
                .eq(StringUtils.isNotBlank(phone),"phone",phone);
        List<TUser> users = mapper.selectList(wrapper);
    }
六、分页插件
在MyBatisPlus中集成了分页插件,不需要单独的引入,只需要添加对应的配置类
package com.sissie.mybatisx.config;

import com.baomidou.mybatisplus.annotation.DbType;
import com.baomidou.mybatisplus.extension.plugins.MybatisPlusInterceptor;
import com.baomidou.mybatisplus.extension.plugins.inner.PaginationInnerInterceptor;
import org.mybatis.spring.annotation.MapperScan;
import org.springframework.context.annotation.Bean;
import org.springframework.context.annotation.Configuration;

@Configuration
@MapperScan("com.sissie.mybatisx.mapper")
public class MyBatisPlusConfig {

    /**
     * 新的分页插件,一缓和二缓遵循mybatis的规则,
     * 需要设置 MybatisConfiguration#useDeprecatedExecutor = false 避免缓存出现问题(该属性会在旧插件移除后一同移除)
     */
    @Bean
    public MybatisPlusInterceptor mybatisPlusInterceptor() {
        MybatisPlusInterceptor interceptor = new MybatisPlusInterceptor();
        //向Mybatis过滤器链中添加分页拦截器
        interceptor.addInnerInterceptor(new PaginationInnerInterceptor(DbType.MYSQL));
        //还可以添加i他的拦截器
        return interceptor;
    }

}
应用示例如下:
    @Test
    void queryAllUserPage() {
        Page<TUser> page = new Page<>(1,5);
        Page<TUser> userPage = mapper.selectPage(page,null);
        List<TUser> list = userPage.getRecords();
        list.forEach(System.out::println);
        System.out.println("userPage.getPages() = " + userPage.getPages());
        System.out.println("userPage.getTotal() = " + userPage.getTotal());
        System.out.println("userPage.getSize() = " + userPage.getSize());
        System.out.println("userPage.getCurrent() = " + userPage.getCurrent());
        System.out.println("userPage.hasNext() = " + userPage.hasNext());
        System.out.println("userPage.hasPrevious() = " + userPage.hasPrevious());

    }
结果如下:

七、代码生成器
官方文档提示
注意
适用版本:mybatis-plus-generator 3.5.1 及其以上版本,对历史版本不兼容!3.5.1 以下的请参考 代码生成器旧(https://baomidou.com/pages/d357af/)
添加依赖
        <dependency>
            <groupId>com.baomidou</groupId>
            <artifactId>mybatis-plus-generator</artifactId>
            <version>3.5.2</version>
        </dependency>

        <dependency>
            <groupId>org.freemarker</groupId>
            <artifactId>freemarker</artifactId>
        </dependency>
快速生成:
package com.sissie.mybatisx.config;

import com.baomidou.mybatisplus.generator.FastAutoGenerator;
import com.baomidou.mybatisplus.generator.config.OutputFile;
import com.baomidou.mybatisplus.generator.engine.FreemarkerTemplateEngine;

import java.util.Collections;

/**
 * 代码生成器
 */
public class MyFastAutoGenerator {
    public static void main(String[] args) {

        FastAutoGenerator.create("jdbc:mysql://127.0.0.1:3306/mbp?serverTimezone=UTC&useUnicode=true&characterEncoding=utf-8&useSSL=true"
                , "root", "123456")
                .globalConfig(builder -> {
                    builder.author("sissie") // 设置作者
                            //.enableSwagger() // 开启 swagger 模式
                            .fileOverride() // 覆盖已生成文件
                            .outputDir("E://JavaLearn"); // 指定输出目录
                })
                .packageConfig(builder -> {
                    builder.parent("com.sissie.mybatisx") // 设置父包名
                            .moduleName("mybatisx") // 设置父包模块名
                            .pathInfo(Collections.singletonMap(OutputFile.xml, "E://JavaLearn")); // 设置mapperXml生成路径
                })
                .strategyConfig(builder -> {
                    builder.addInclude("t_user"); // 设置需要生成的表名
                          //  .addTablePrefix("t_", "c_"); // 设置过滤表前缀
                })
                .templateEngine(new FreemarkerTemplateEngine()) // 使用Freemarker引擎模板,默认的是Velocity引擎模板
                .execute();

    }
}
执行以上main方法后,会生成最基本雏形。里面业务逻辑还需要自行填充。

可参照官方提供的示例:
https://baomidou.com/pages/779a6e/#%E4%BD%BF%E7%94%A8
八、MyBatis实用插件

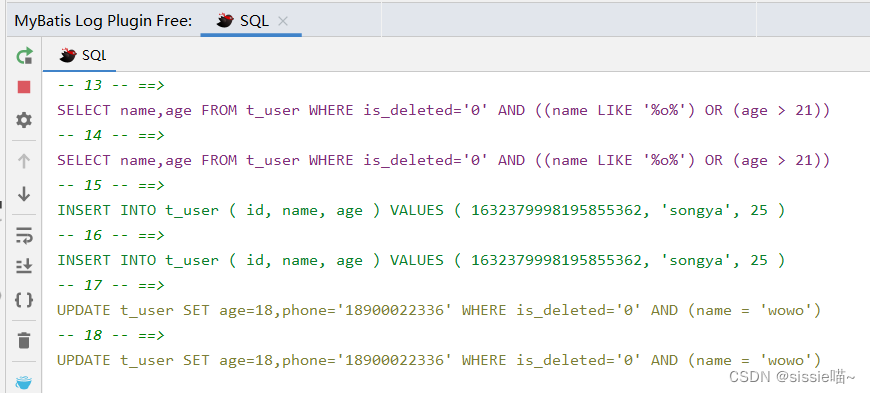
安装后,在控制台点右键选择【MyBatis Log Plugins】

这样在项目运行的时候,请求的原生sql会打印在控制台。方便调试sql语句
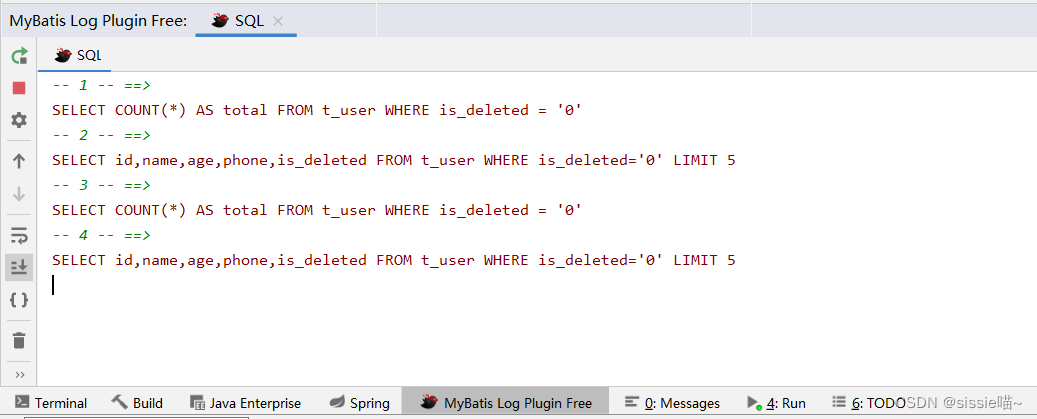
也可以设置 查询,新增,编辑,删除为不同颜色。使日志看起来更直观

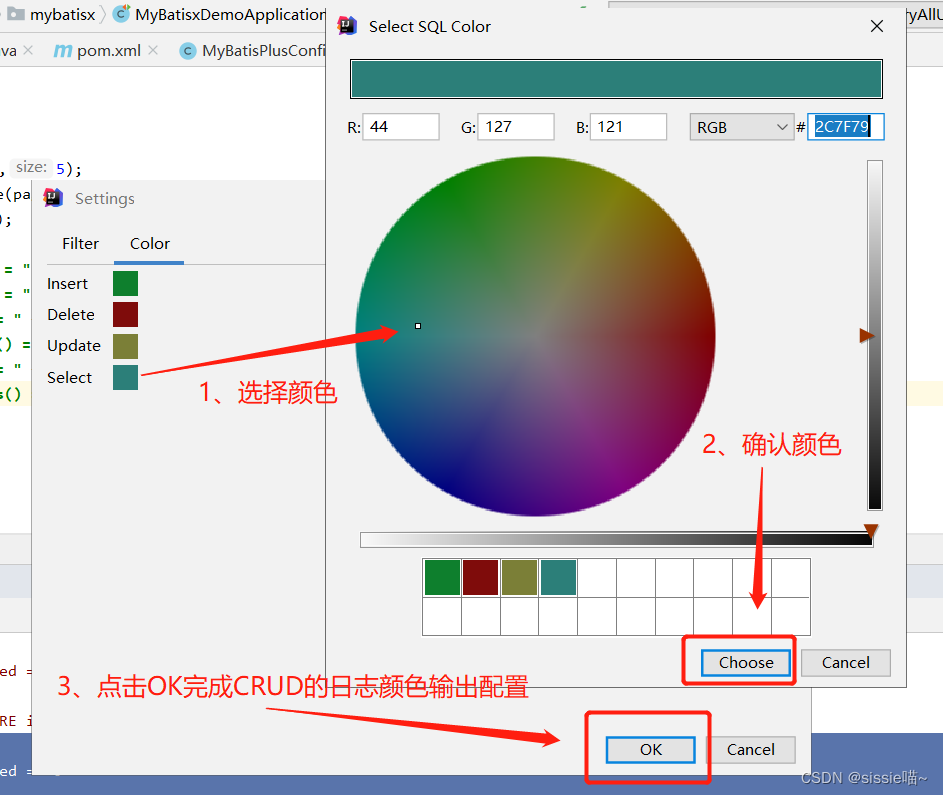
后面日志的输出就比较好区分了:


 484
484


 被折叠的 条评论
为什么被折叠?
被折叠的 条评论
为什么被折叠?
 到【灌水乐园】发言


