


同步增量
是否支持 递增(insert) 乱序插入 update(递增和乱序) delete(递增和乱序)
incrementing 支持 不支持 不支持 不支持
timestamp 支持 不支持 不支持 不支持
同步全量
是否支持 递增(insert) 乱序插入 update(递增和乱序) delete(递增和乱序)
bulk 支持 支持 支持 支持
参考文档
Oracle Database Source Connector for Confluent Cloud
https://docs.confluent.io/cloud/current/connectors/cc-oracle-db-source.html#step-4-set-up-the-connection
confluent 安装
https://docs.confluent.io/kafka-connect-jdbc/current/index.html
connect配置
https://docs.confluent.io/cloud/current/cp-component/connect-cloud-config.html#distributed-cluster
connect配置
https://docs.confluent.io/home/connect/configuring.html
https://docs.confluent.io/home/connect/userguide.html#connect-userguide-standalone-config
如何使用kafka连接器
https://docs.confluent.io/home/connect/userguide.html#installing-plugins
kafka connect 深度解读 JDBC Source Connector
https://www.confluent.io/blog/kafka-connect-deep-dive-jdbc-source-connector/?_ga=2.162825084.1340047639.1622427487-829789245.1622170112
kafka-connect 配置参数解释
https://docs.confluent.io/kafka-connect-jdbc/current/source-connector/source_config_options.html
query方式抓取数据
https://docs.confluent.io/kafka-connect-jdbc/current/source-connector/index.html#query-bulk-where-clause
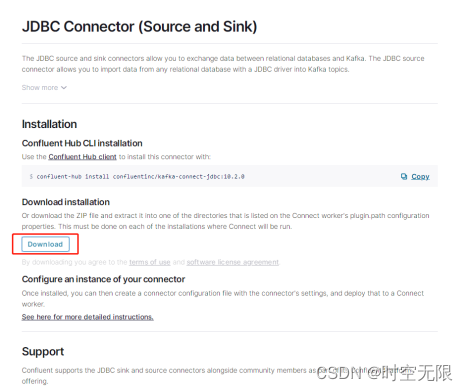
confluent 安装包下载地址
https://www.confluent.io/hub/confluentinc/kafka-connect-jdbc?_ga=2.95266012.1340047639.1622427487-829789245.1622170112
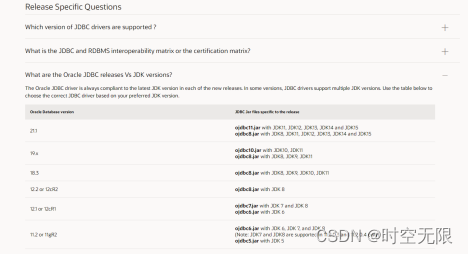
JDBC驱动下载地址
https://www.oracle.com/database/technologies/appdev/jdbc-downloads.html
ojdbc、oracle、jdk版本对应关系
https://www.oracle.com/database/technologies/faq-jdbc.html#01_02
oracle的版本如下图
Confluent Cloud 的 Kafka Connect Oracle 数据库源连接器可以获取 Oracle 数据库中现有数据的快照,然后监控和记录对该数据的所有后续行级更改。该连接器支持 Avro、JSON Schema、Protobuf 或 JSON(无模式)输出数据格式。每个表的所有事件都记录在单独的 Apache Kafka® 主题中。然后,应用程序和服务可以轻松使用这些事件。请注意,不会捕获已删除的记录。
1.oracle环境
1.1操作系统
cat /etc/redhat-release
CentOS Linux release 7.5.1804 (Core)
uname -a
Linux localhost.localdomain 3.10.0-862.el7.x86_64 #1 SMP Fri Apr 20 16:44:24 UTC 2018 x86_64 x86_64 x86_64 GNU/Linux
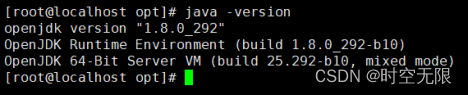
1.2 jdk版本

1.3 oracle版本
LINUX.X64_193000_db_home.zip #oracle 19c安装包
1.4关闭selinux和防火墙
sed -i 's#SELINUX=enforcing#SELINUX=disabled#g' /etc/selinux/config
systemctl disable firewalld
systemctl stop firewalld
2.oracle配置
2.1开启监听
切换到oracle用户
su - oracle
lsnrctl start

2.2修改监听地址为本机ip,默认为localhost

2.3创建测试用户
切换到oracle用户
su - oracle
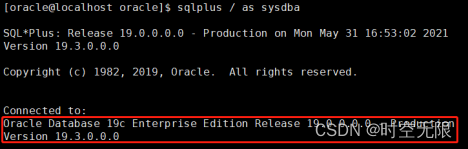
切换到oracle安装目录,登录oracle命令行
[oracle@localhost ~]$ cd /opt/oracle/
[oracle@localhost oracle]$ sqlplus / as sysdba
SQL*Plus: Release 19.0.0.0.0 - Production on Fri May 28 09:09:53 2021
Version 19.3.0.0.0
Copyright (c) 1982, 2019, Oracle. All rights reserved.

Connected to:
Oracle Database 19c Enterprise Edition Release 19.0.0.0.0 - Production
Version 19.3.0.0.0
SQL>
重启oracle
SQL> conn /as sysdba
Connected.
SQL> shutdown immediate;
Database closed.
Database dismounted.
ORACLE instance shut down.
SQL> startup;
ORACLE instance started.
Total System Global Area 1728050048 bytes
Fixed Size 8897408 bytes
Variable Size 402653184 bytes
Database Buffers 1308622848 bytes
Redo Buffers 7876608 bytes
Database mounted.
Database opened.
使用特权用户连接
SQL> conn / as sysdba
Connected.
SQL> create user test identified by test;
User created.
2.4为test用户授权
SQL> conn / as sysdba;
Connected.
SQL> grant create session to test;
Grant succeeded.
SQL> grant create table to test;
Grant succeeded.
SQL> grant unlimited tablespace to test;
Grant succeeded.
SQL> grant connect, resource to test;
Grant succeeded.
3.kafka环境准备
3.1操作系统
cat /etc/redhat-release
CentOS Linux release 7.5.1804 (Core)
uname -a
Linux localhost.localdomain 3.10.0-862.el7.x86_64 #1 SMP Fri Apr 20 16:44:24 UTC 2018 x86_64 x86_64 x86_64 GNU/Linux
3.2关闭selinux和防火墙
sed -i 's#SELINUX=enforcing#SELINUX=disabled#g' /etc/selinux/config
systemctl disable firewalld
systemctl stop firewalld
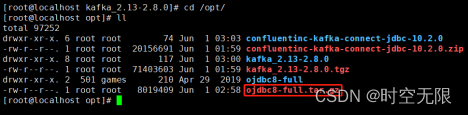
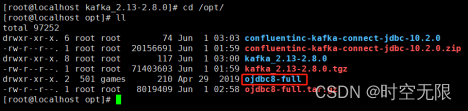
3.3准备安装包
jdk-16.0.1_linux-x64_bin.tar.gz 或者jdk1.8.0
kafka_2.13-2.8.0.tgz
OJDBC-Full.zip
confluentinc-kafka-connect-jdbc-10.2.0.zip
3.4安装jdk
yum -y install java
4.kafka配置
4.1安装kafka
下载kafka安装包
wget -P /opt/ https://mirrors.tuna.tsinghua.edu.cn/apache/kafka/2.8.0/kafka_2.13-2.8.0.tgz
或者
wget -P /opt/ https://www.apache.org/dyn/closer.cgi?path=/kafka/2.8.0/kafka_2.13-2.8.0.tgz

解压安装包
tar zxvf kafka_2.13-2.8.0.tgz -C /opt/

4.2后台启动zookeeper
cd /opt/kafka_2.13-2.8.0
bin/zookeeper-server-start.sh -daemon config/zookeeper.properties
查看端口是否启动
ss -ln|grep 2181
tcp LISTEN 0 50 :::2181 :::*

4.3后台启动kafka
cd /opt/kafka_2.13-2.8.0
bin/kafka-server-start.sh -daemon config/server.properties
ss -ln|grep 9092
tcp LISTEN 0 50 :::9092 :::*

4.4安装confluent
confluentinc-kafka-connect-jdbc-10.2.0.zip包下载地址
https://www.confluent.io/hub/confluentinc/kafka-connect-jdbc?_ga=2.95266012.1340047639.1622427487-829789245.1622170112
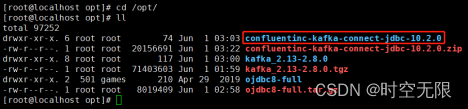
传confluentinc-kafka-connect-jdbc-10.2.0.zip包到/opt目录
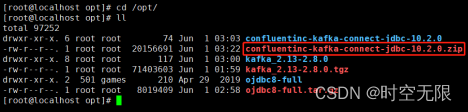
unzip confluentinc-kafka-connect-jdbc-10.2.0.zip.gz
4.5安装OJDBC
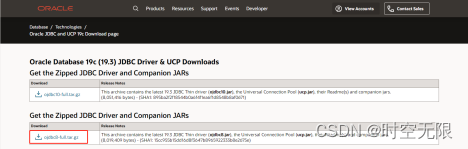
OJDBC包下载链接
https://www.oracle.com/database/technologies/appdev/jdbc-downloads.html

传OJDBC包到/opt
解压OJDBC包
tar zxvf ojdbc8-full.tar.gz
4.6复制OJDBC的jar包到kafka的libs目录
cp /opt/ojdbc8-full/* /opt/kafka_2.13-2.8.0/libs/
4.7复制OJDBC的jar包到confluent目录
cp /opt/ojdbc8-full/* /opt/confluentinc-kafka-connect-jdbc-10.2.0/lib/
4.8修改kafka配置
备份配置文件
cd /opt/kafka_2.13-2.8.0
cp config/connect-standalone.properties config/connect-standalone.properties.bak
编辑配置文件
cat >> config/connect-standalone.properties << EOF
bootstrap.servers=localhost:9092
key.converter=org.apache.kafka.connect.json.JsonConverter
value.converter=org.apache.kafka.connect.json.JsonConverter
key.converter.schemas.enable=true
value.converter.schemas.enable=true
offset.storage.file.filename=/tmp/connect.offsets
offset.flush.interval.ms=10000
#使用confluentinc-kafka-connect-jdbc-10.2.0.zip时时配置如下
plugin.path=/opt/confluentinc-kafka-connect-jdbc-10.2.0/lib/
EOF
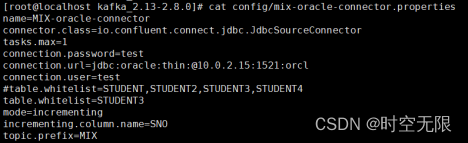
cat >> config/test-oracle-connector.properties << EOF
name=test-oracle-connector
connector.class=io.confluent.connect.jdbc.JdbcSourceConnector
tasks.max=1
connection.password=test
connection.url=jdbc:oracle:thin:@10.0.2.15:1521:orcl
connection.user=test
table.whitelist=TEST_USER
mode=incrementing
incrementing.column.name=ID
topic.prefix=test-oracle- #如果不指定topic.prefix这行配置,则默认使用大写的表名作为kafka的topic
EOF
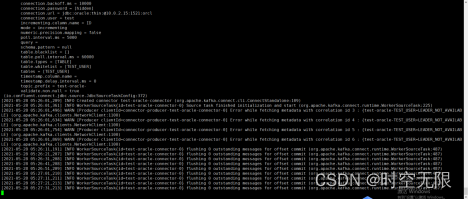
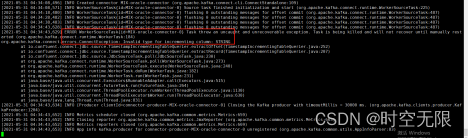
4.9独立模式启动connect
bin/connect-standalone.sh config/connect-standalone.properties config/test-oracle-connector.properties
输出图下图
4.10查看启动的connector

4.11查看connector状态
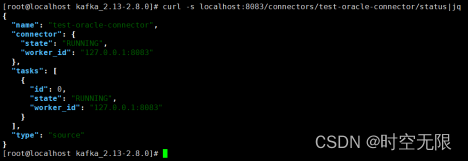
4.12查看connect配置
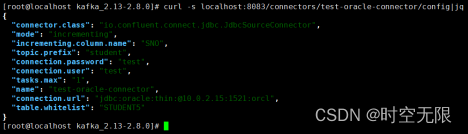
在独立模式下,连接器配置属性文件被添加为命令行参数。
5.测试
5.1创建测试表
SQL> conn test/test;
Connected.
SQL> create table test_user(id number(19) not null primary key, username varchar2(100),password varchar2(100),modified timestamp(0) default SYSTIMESTAMP not null);
Table created.
5.2创建自增序列,使主键自增
说明:这个不操作也可以同步数据成功。
SQL> create sequence test_user_seq start with 1 increment by 1;
Sequence created.
5.3创建触发器
说明:这个不操作也可以同步数据成功。
SQL> create or replace trigger test_user_seq_tr before insert or update on test_user for each row begin if inserting then select test_user_seq.NEXTVAL into :new.id from dual;end if;END;/
Trigger created.
5.4为时间列创建一个索引
说明:这个不操作也可以同步数据成功。
SQL> create index test_modified_index on test_user (modified);
Index created.
5.5oracle表中插入数据
如果test_user表的id列没有创建自增序列和触发器,插入数据的时候要加入id列,例如insert into test_user(id,username,password) values(‘1’,‘tom’,‘111’),否则会报错;
SQL> insert into test_user(username,password) values('tom','111');
1 row created.
SQL> insert into test_user(username,password) values('bob','222');
1 row created.
SQL> insert into test_user(username,password) values('jhon','333');
1 row created.
SQL> insert into test_user(username,password) values('rose','444');
1 row created.
SQL> insert into test_user (username,password) values('amy','555');
1 row created.
SQL> commit;
5.6查看是否生成topic
bin/kafka-topics.sh --list --zookeeper localhost:2181

5.7查看topic中是否已经有数据
bin/kafka-console-consumer.sh --bootstrap-server localhost:9092 --topic test-oracle-TEST_USER --from-beginning

6.配置参数解释
翻译自官网
https://docs.confluent.io/kafka-connect-jdbc/current/source-connector/source_config_options.html
要使用此连接器,请在connector.class配置属性中指定连接器类的名称。
connector.class=io.confluent.connect.jdbc.JdbcSourceConnector
特定于连接器的配置属性如下所述。
数据库
connection.url
JDBC 连接 URL。
例如:jdbc:oracle:thin:@localhost:1521:orclpdb1, jdbc:mysql://localhost/db_name,jdbc:sqlserver://localhost;instance=SQLEXPRESS;databaseName=db_name
类型:字符串
重要性:高
dependents:table.whitelist、table.blacklist
connection.user
jdbc连接用户
类型:字符串
默认值:空
重要性:高
connection.password
jdbc连接密码
类型:密码
默认值:空
重要性:高
connection.attempts
检索有效 JDBC 连接的最大尝试次数。必须是正整数。
类型:int
默认值:3
有效值:[1,…]
重要性:低
connection.backoff.ms
连接尝试之间的间隔时间(以毫秒为单位)。
类型:长
默认值:10000
重要性:低
table.whitelist
要包含在复制中的表的列表。如果指定,则table.blacklist可能不会设置。使用逗号分隔的列表来指定多个表(例如,)。table.whitelist: “User, Address, Email”
类型:列表
默认: ””
重要性:中等
table.blacklist
要从复制中排除的表列表。如果指定,则table.whitelist可能不会设置。使用逗号分隔的列表来指定多个表(例如,)。table.blacklist: “User, Address, Email”
类型:列表
默认: ””
重要性:中等
numeric.precision.mapping
是否尝试按精度将 NUMERIC 值映射到整数类型。此选项现已弃用。未来的版本可能会完全删除它。被numeric.mapping替代。
类型:布尔型
默认值:假
重要性:低
numeric.mapping
按精度映射 NUMERIC 值,并可选择缩放到整数或小数类型。
类型:字符串
默认值:空
有效值:[none、precision_only、best_fit、best_fit_eager_double]
none如果所有 NUMERIC 列都由 Connect 的 DECIMAL 逻辑类型表示,请使用。
使用best_fit如果数值列应基于列的精度和scale.This选项可能仍表示数值为连接DECIMAL,如果它不能被转换为原生型又不失精确地转换为连接的INT8,INT16,INT32,INT64或FLOAT64 . 例如,精度为 20 的 NUMERIC(20) 类型将无法在不溢出的情况下放入本机 INT64,因此将保留为 DECIMAL。
使用best_fit_eager_double如果,除了的性质best_fit如上所述,理想的是总投NUMERIC列带刻度到连接FLOAT64类型,尽管在准确性损失的可能性。
用于precision_only仅根据列的精度映射 NUMERIC 列,假设列的比例为 0。
该none选项是默认选项,但可能会导致 Avro 出现序列化问题,因为 Connect 的 DECIMAL 类型映射到其二进制表示。best_fit通常首选,因为它映射到最合适的原始类型。
重要性:低
模式
mode
每次轮询时更新表的模式。选项包括:
类型:字符串
默认: ””
有效值:[、批量、时间戳、增量、时间戳+增量]
批量:每次轮询时执行整个表的批量加载
递增:在每个表上使用严格递增的列来仅检测新行。请注意,这不会检测对现有行的修改或删除。
时间戳:使用时间戳(或类似时间戳)列来检测新的和修改的行。这假设列随着每次写入而更新,并且值是单调递增的,但不一定是唯一的。
时间戳+递增:使用两列,一个时间戳列检测新的和修改的行,一个严格递增的列提供一个全局唯一的更新 ID,这样每一行都可以分配一个唯一的流偏移量。
重要性:高
dependents:incrementing.column.name, timestamp.column.name,validate.non.null
incrementing.column.name
用于检测新行的严格递增列的名称。任何空值表示应通过查找自动递增列来自动检测该列。此列可能不可为空。
类型:字符串
默认: ””
重要性:中等
timestamp.column.name
一个或多个时间戳列的逗号分隔列表,用于使用 COALESCE SQL 函数检测新的或修改的行。每次轮询都会发现第一个非空时间戳值大于所看到的最大先前时间戳值的行。至少一列不能为空。
类型:字符串
默认: ””
重要性:中等
timestamp.initial
用于使用时间戳标准的初始查询的纪元时间戳。使用 -1 来使用当前时间。如果未指定,将检索所有数据。
类型:长
默认值:空
重要性:低
validate.non.null
默认情况下,JDBC 连接器将验证所有递增表和时间戳表是否为用作其 ID/时间戳的列设置了 NOT NULL。如果表没有,JDBC 连接器将无法启动。将此设置为 false 将禁用这些检查。
类型:布尔型
默认值:真
重要性:低
timestamp.column.name 指定时间戳列,可以是多个,用逗号隔开多个列,指定的列至少有一个不能为空。
topic.prefix 在表名前添加前缀,生成的topic为前缀加大写表名。如果不指定这个配置,自动生成的索引为表名(大写)。
poll.interval.ms 轮询每个表中新数据的频率(以毫秒为单位)。
类型:int
默认值:5000
重要性:高
连接器
table.types
默认情况下,JDBC 连接器只会从源数据库中检测类型为 TABLE 的表。此配置允许提取以逗号分隔的表类型列表。
类型:列表。
TABLE
VIEW
SYSTEM TABLE
GLOBAL TEMPORARY
LOCAL TEMPORARY
ALIAS
SYNONYM
在大多数情况下,只有 TABLE 或 VIEW 才有意义。
默认值:表格
重要性:低
poll.interval.ms
轮询每个表中新数据的频率(以毫秒为单位)。
类型:int
默认值:5000
重要性:高
batch.max.rows
轮询新数据时要包含在单个批次中的最大行数。此设置可用于限制连接器内部缓冲的数据量。
类型:int
默认值:100
重要性:低
table.poll.interval.ms
轮询新表或删除表的频率(以毫秒为单位),这可能会导致更新的任务配置开始轮询添加表中的数据或停止轮询删除表中的数据。
类型:长
默认值:60000
重要性:低
topic.prefix
表名前面的前缀以生成要发布数据的 Apache Kafka® 主题的名称,或者在自定义查询的情况下,是要发布到的主题的全名。
类型:字符串
重要性:高
timestamp.delay.interval.ms
在我们将其包含在结果中之前,出现具有特定时间戳的行后等待多长时间。您可以选择添加一些延迟以允许具有较早时间戳的事务完成。第一次执行将获取所有可用记录(即从时间戳 0 开始),直到当前时间减去延迟。每次后续执行都将获取从我们上次获取到当前时间减去延迟的数据。
类型:长
默认值:0
重要性:高
db.timezone
使用基于时间的条件进行查询时,连接器中使用的 JDBC 时区的名称。默认为 UTC。
类型:字符串
默认值:“UTC”
有效值:任何有效的 JDK 时区
重要性:中等
7.注意事项
7.1 oracle表中列空值问题
incrementing.column.name
incrementing.column.name 后的值必须是非空列,否则会报错
官网
https://docs.confluent.io/cloud/current/connectors/cc-oracle-db-source.html#step-4-set-up-the-connection


7.2 oracle表中列数据类型问题
为incrementing时
incrementing.column.name 后的列值的数据类型如果是varchar会报错,number类型正常

7.3 oracle表中的列没有设置主建自增问题
mode为incrementing时
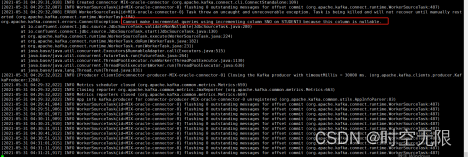
若没有设置主键自增,则会输出如图的警告值(只是第一次插入数据会报输出这个,往后不会再输出)


7.4 缺少ojdbc问题
kafka 安装目录下的libs文件夹或者confluentinc-kafka-connect-jdbc-10.2.0/lib/文件夹下,如果不加入ojdbc的jar包会报错如下


7.5 缺少插件问题
如果不指定plugin.path或者不安装confluentinc-kafka-connect-jdbc-10.2.0会报错

7.6 数据同步问题
如下所示,当指定incrementing模式,incrementing.column.name指定的表中的列可以不是主键列,也可以同步数据成功,但这列的值如果一样,只会同步一次。
针对于mode为incrementing的connector,只适用于insert类型的数据变化,是通过检测新增的ID大于之前读取的最大的ID来确定是否是要更新的数据。对于update和delete的数据在这种模式下无法检测更新。
建测试表,没设置主键
SQL> conn test/test;
SQL> create table student3(sno3 number(19) not null,sname varchar2(9) not null,ssex varchar2(3) not null,sbirthday date,sclass varchar2(5));
Table created.
启动connect进程
bin/connect-standalone.sh config/connect-standalone.properties config/test-oracle-connector.properties
创建connect
curl -X POST http://10.0.2.19:8083/connectors -H "Content-Type: application/json" -d '{
"name": "jdbc_source_oracle_03",
"config": {
"connector.class": "io.confluent.connect.jdbc.JdbcSourceConnector",
"connection.url": "jdbc:oracle:thin:@10.0.2.15:1521:orcl",
"connection.user": "test",
"connection.password": "test",
"topic.prefix": "DISTRIBUTED-",
"mode": "incrementing",
"incrementing.column.name": "SNO3",
"table.whitelist": "STUDENT3"
}}'
插入数据
SQL> insert into student3(sno3,sname,ssex,sbirthday,sclass) values(1,'匡明','男',to_date('1975-10-02','yyyy-mm-dd'),95031);
1 row created.
SQL> commit;
查看是否生成索引
插入三行数据(sno值都为2)
SQL> insert into student3(sno3,sname,ssex,sbirthday,sclass) values(2,'匡明','男',to_date('1975-10-02','yyyy-mm-dd'),95031);
1 row created.
SQL> commit;
Commit complete.
SQL> insert into student3(sno3,sname,ssex,sbirthday,sclass) values(2,'匡明','男',to_date('1975-10-02','yyyy-mm-dd'),95032);
1 row created.
SQL> commit;
Commit complete.
SQL> insert into student3(sno3,sname,ssex,sbirthday,sclass) values(2,'匡明','男',to_date('1975-10-02','yyyy-mm-dd'),95033);
1 row created.
SQL> commit;
Commit complete.
插入一行数据(sno3值为3)
SQL> insert into student3(sno3,sname,ssex,sbirthday,sclass) values(3,'匡明','男',to_date('1975-10-02','yyyy-mm-dd'),95031);
1 row created.
SQL> commit;
Commit complete.
由图可知,SNO3值相同的行只同步了一次。

8 分布式启动连接器
参考
https://docs.confluent.io/home/connect/configuring.html
独立模式和分布式模式连接器配置
https://docs.confluent.io/home/connect/userguide.html#connect-userguide-standalone-config #
在分布式模式下,连接器是使用 REST API 请求部署和管理的。要创建连接器,请启动工作程序,然后发出 REST 请求以创建连接器。许多受支持的连接器文档中都提供了 REST 请求示例。例如,请参阅基于Azure Blob 存储源连接器 REST 的示例以获取示例。
8.1 修改kafka配置
节点10.0.2.20配置
cat config/connect-distributed.properties
#bootstrap.servers=10.0.2.20:9092
bootstrap.servers=10.0.2.18:9092,10.0.2.19:9092,10.0.2.20:9092
group.id=connect-cluster
#group.id=1
key.converter=org.apache.kafka.connect.json.JsonConverter
value.converter=org.apache.kafka.connect.json.JsonConverter
key.converter.schemas.enable=false
value.converter.schemas.enable=false
internal.key.converter=org.apache.kafka.connect.json.JsonConverter
internal.value.converter=org.apache.kafka.connect.json.JsonConverter
internal.key.converter.schemas.enable=false
internal.value.converter.schemas.enable=false

offset.storage.topic=connect-offsets
offset.storage.replication.factor=3
offset.storage.partitions=3
config.storage.topic=connect-configs
config.storage.replication.factor=3
status.storage.topic=connect-status
status.storage.replication.factor=3
offset.flush.interval.ms=10000
rest.advertised.host.name=10.0.2.20 #注意这里配置成本机ip地址或者可以被其他节点访问的域名,如果不配置这行,使用REST API启动连接器的时候会报错,报错详情见注意事项
offset.storage.file.filename=/tmp/connect.offsets
plugin.path=/opt/confluentinc-kafka-connect-jdbc-10.2.0/lib/
节点10.0.2.19配置
cat config/connect-distributed.properties
#bootstrap.servers=10.0.2.20:9092
bootstrap.servers=10.0.2.18:9092,10.0.2.19:9092,10.0.2.20:9092
group.id=connect-cluster
#group.id=1
key.converter=org.apache.kafka.connect.json.JsonConverter
value.converter=org.apache.kafka.connect.json.JsonConverter
key.converter.schemas.enable=false
value.converter.schemas.enable=false
internal.key.converter=org.apache.kafka.connect.json.JsonConverter
internal.value.converter=org.apache.kafka.connect.json.JsonConverter
internal.key.converter.schemas.enable=false
internal.value.converter.schemas.enable=false

offset.storage.topic=connect-offsets
offset.storage.replication.factor=3
offset.storage.partitions=3
config.storage.topic=connect-configs
config.storage.replication.factor=3
status.storage.topic=connect-status
status.storage.replication.factor=3
offset.flush.interval.ms=10000
rest.advertised.host.name=10.0.2.19 #注意这里配置成本机ip地址或者可以被其他节点访问的域名,如果不配置这行,使用REST API启动连接器的时候会报错,报错详情见注意事项
offset.storage.file.filename=/tmp/connect.offsets
plugin.path=/opt/confluentinc-kafka-connect-jdbc-10.2.0/lib/
节点10.0.2.18配置
cat config/connect-distributed.properties
#bootstrap.servers=10.0.2.20:9092
bootstrap.servers=10.0.2.18:9092,10.0.2.19:9092,10.0.2.20:9092
group.id=connect-cluster
#group.id=1
key.converter=org.apache.kafka.connect.json.JsonConverter
value.converter=org.apache.kafka.connect.json.JsonConverter
key.converter.schemas.enable=false
value.converter.schemas.enable=false
internal.key.converter=org.apache.kafka.connect.json.JsonConverter
internal.value.converter=org.apache.kafka.connect.json.JsonConverter
internal.key.converter.schemas.enable=false
internal.value.converter.schemas.enable=false

offset.storage.topic=connect-offsets
offset.storage.replication.factor=3
offset.storage.partitions=3
config.storage.topic=connect-configs
config.storage.replication.factor=3
status.storage.topic=connect-status
status.storage.replication.factor=3
offset.flush.interval.ms=10000
rest.advertised.host.name=10.0.2.18 #注意这里配置成本机ip地址或者可以被其他节点访问的域名,如果不配置这行,使用REST API启动连接器的时候会报错,报错详情见注意事项
offset.storage.file.filename=/tmp/connect.offsets
plugin.path=/opt/confluentinc-kafka-connect-jdbc-10.2.0/lib/
8.2创建topic
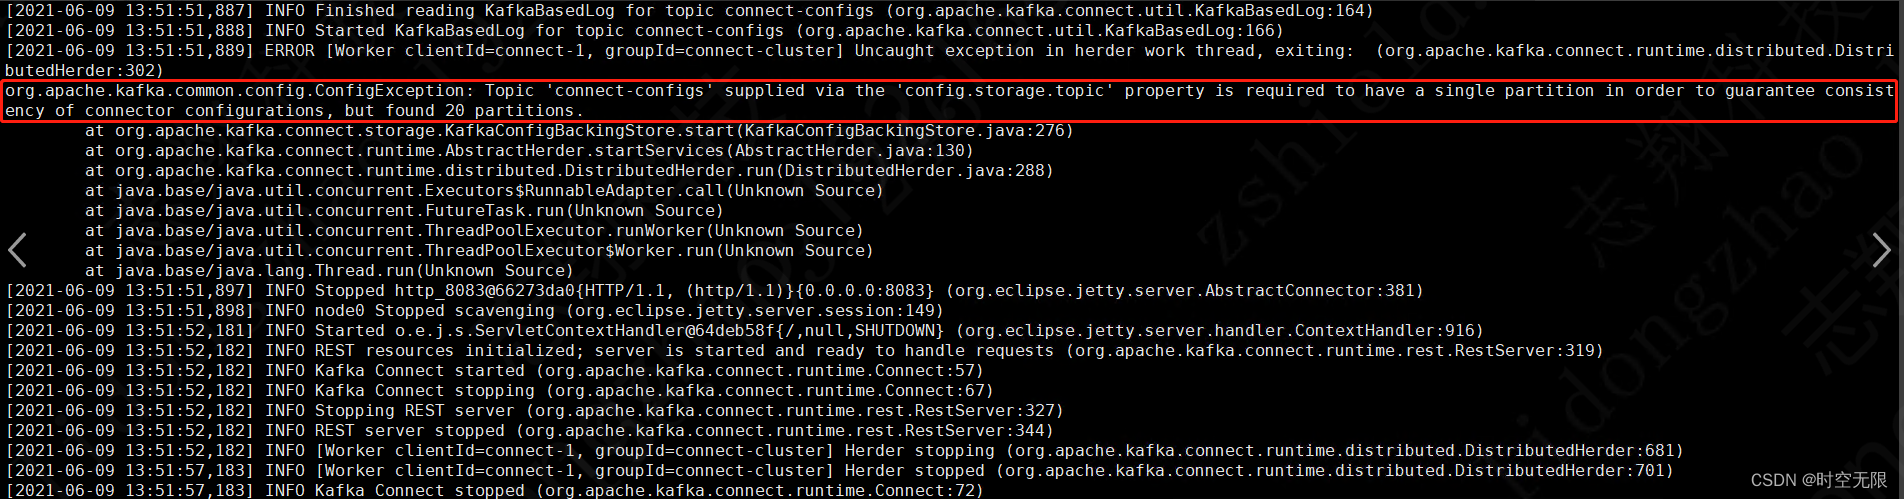
分布式方式启动connect需要手动创建3个topic,并且 connect-configs分区数只能是1,详情参考官网文档
http://kafka.apache.org/documentation/#connect 8.2
User Guide Running Kafka Connect
部分
切换到kafka安装目录
bin/kafka-topics.sh --create --zookeeper 10.0.2.18:2181 --topic connect-configs --replication-factor 3 --partitions 1 --config cleanup.policy=compact
bin/kafka-topics.sh --create --zookeeper 10.0.2.19:2181 --topic connect-offsets --replication-factor 3 --partitions 50 --config cleanup.policy=compact
bin/kafka-topics.sh --create --zookeeper localhost:2181 --topic connect-status --replication-factor 3 --partitions 10 --config cleanup.policy=compact
8.3启动
所有节点都操作
切换到kafka安装目录
bin/connect-distributed.sh config/connect-distributed.properties
8.4启动连接器
curl -X POST http://localhost:8083/connectors -H "Content-Type: application/json" -d '{
"name": "jdbc_source_oracle_01",
"config": {
"connector.class": "io.confluent.connect.jdbc.JdbcSourceConnector",
"connection.url": "jdbc:oracle:thin:@10.0.2.15:1521:orcl",
"connection.user": "test",
"connection.password": "test",
"topic.prefix": "distributed-",
"mode":"bulk",
"table.whitelist":"STUDENT5"
}
}'
8.5测试同步数据
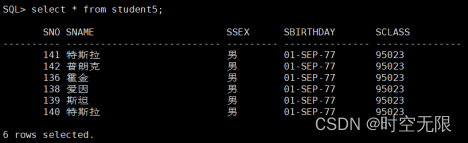
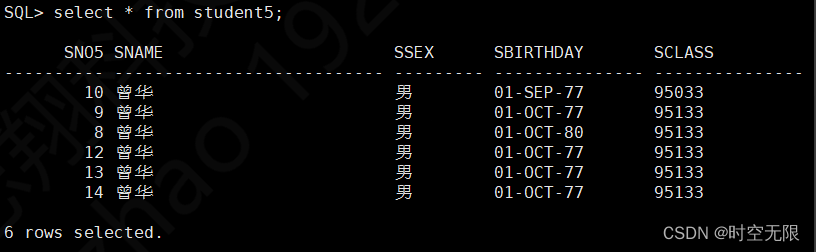
如图所示,oracle数据库student5表中有如下数据
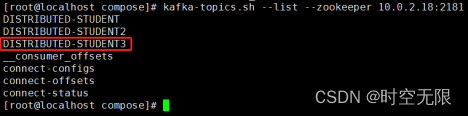
查看kafka是否生成索引
bin/kafka-topics.sh --list --zookeeper 10.0.2.20:2181

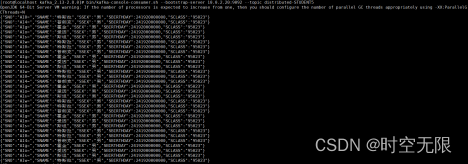
查看topic distributed-STUDENT5中数据
bin/kafka-console-consumer.sh --bootstrap-server 10.0.2.20:9092 --topic distributed-STUDENT5
8.6测试分布式分配任务
登录oracle数据库,切换到test用户,创建10个表
SQL> create table student(sno number(19) not null,sname varchar2(9) not null,ssex varchar2(3) not null,sbirthday date,sclass varchar2(5));
Table created.
SQL> create table student2(sno2 number(19) not null,sname varchar2(9) not null,ssex varchar2(3) not null,sbirthday date,sclass varchar2(5));
Table created.
SQL> create table student3(sno3 number(19) not null,sname varchar2(9) not null,ssex varchar2(3) not null,sbirthday date,sclass varchar2(5));
Table created.
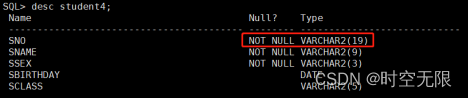
SQL> create table student4(sno4 number(19) not null,sname varchar2(9) not null,ssex varchar2(3) not null,sbirthday date,sclass varchar2(5));
Table created.
SQL> create table student5(sno5 number(19) not null,sname varchar2(9) not null,ssex varchar2(3) not null,sbirthday date,sclass varchar2(5));
Table created.
SQL> create table student6(sno6 number(19) not null,sname varchar2(9) not null,ssex varchar2(3) not null,sbirthday date,sclass varchar2(5));
Table created.
SQL> create table student7(sno7 number(19) not null,sname varchar2(9) not null,ssex varchar2(3) not null,sbirthday date,sclass varchar2(5));
Table created.
SQL> create table student8(sno8 number(19) not null,sname varchar2(9) not null,ssex varchar2(3) not null,sbirthday date,sclass varchar2(5));
Table created.
SQL> create table student9(sno9 number(19) not null,sname varchar2(9) not null,ssex varchar2(3) not null,sbirthday date,sclass varchar2(5));
Table created.
SQL> create table student10(sno10 number(19) not null,sname varchar2(9) not null,ssex varchar2(3) not null,sbirthday date,sclass varchar2(5));
Table created.
启动10个connect
#student1
curl -X POST http://localhost:8083/connectors -H "Content-Type: application/json" -d '{
"name": "jdbc_source_oracle_01",
"config": {
"connector.class": "io.confluent.connect.jdbc.JdbcSourceConnector",
"connection.url": "jdbc:oracle:thin:@10.0.2.15:1521:orcl",
"connection.user": "test",
"connection.password": "test",
"topic.prefix": "DISTRIBUTED-",
"mode": "incrementing",
"incrementing.column.name": "SNO2",
"table.whitelist": "STUDENT2"
}
}'
#student2
curl -X POST http://localhost:8083/connectors -H "Content-Type: application/json" -d '{
"name": "jdbc_source_oracle_02",
"config": {
"connector.class": "io.confluent.connect.jdbc.JdbcSourceConnector",
"connection.url": "jdbc:oracle:thin:@10.0.2.15:1521:orcl",
"connection.user": "test",
"connection.password": "test",
"topic.prefix": "DISTRIBUTED-",
"mode": "incrementing",
"incrementing.column.name": "SNO2",
"table.whitelist": "STUDENT2"
}
}'
#student3
curl -X POST http://localhost:8083/connectors -H "Content-Type: application/json" -d '{
"name": "jdbc_source_oracle_03",
"config": {
"connector.class": "io.confluent.connect.jdbc.JdbcSourceConnector",
"connection.url": "jdbc:oracle:thin:@10.0.2.15:1521:orcl",
"connection.user": "test",
"connection.password": "test",
"topic.prefix": "DISTRIBUTED-",
"mode": "incrementing",
"incrementing.column.name": "SNO3",
"table.whitelist": "STUDENT3"
}
}'
#student4
curl -X POST http://localhost:8083/connectors -H "Content-Type: application/json" -d '{
"name": "jdbc_source_oracle_04",
"config": {
"connector.class": "io.confluent.connect.jdbc.JdbcSourceConnector",
"connection.url": "jdbc:oracle:thin:@10.0.2.15:1521:orcl",
"connection.user": "test",
"connection.password": "test",
"topic.prefix": "DISTRIBUTED-",
"mode": "incrementing",
"incrementing.column.name": "SNO4",
"table.whitelist": "STUDENT4"
}
}'
#student5
curl -X POST http://localhost:8083/connectors -H "Content-Type: application/json" -d '{
"name": "jdbc_source_oracle_05",
"config": {
"connector.class": "io.confluent.connect.jdbc.JdbcSourceConnector",
"connection.url": "jdbc:oracle:thin:@10.0.2.15:1521:orcl",
"connection.user": "test",
"connection.password": "test",
"topic.prefix": "DISTRIBUTED-",
"mode": "incrementing",
"incrementing.column.name": "SNO5",
"table.whitelist": "STUDENT5"
}
}'
#student6
curl -X POST http://localhost:8083/connectors -H "Content-Type: application/json" -d '{
"name": "jdbc_source_oracle_06",
"config": {
"connector.class": "io.confluent.connect.jdbc.JdbcSourceConnector",
"connection.url": "jdbc:oracle:thin:@10.0.2.15:1521:orcl",
"connection.user": "test",
"connection.password": "test",
"topic.prefix": "DISTRIBUTED-",
"mode": "incrementing",
"incrementing.column.name": "SNO6",
"table.whitelist": "STUDENT6"
}
}'
#student7
curl -X POST http://localhost:8083/connectors -H "Content-Type: application/json" -d '{
"name": "jdbc_source_oracle_07",
"config": {
"connector.class": "io.confluent.connect.jdbc.JdbcSourceConnector",
"connection.url": "jdbc:oracle:thin:@10.0.2.15:1521:orcl",
"connection.user": "test",
"connection.password": "test",
"topic.prefix": "DISTRIBUTED-",
"mode": "incrementing",
"incrementing.column.name": "SNO7",
"table.whitelist": "STUDENT7"
}
}'
#student8
curl -X POST http://localhost:8083/connectors -H "Content-Type: application/json" -d '{
"name": "jdbc_source_oracle_08",
"config": {
"connector.class": "io.confluent.connect.jdbc.JdbcSourceConnector",
"connection.url": "jdbc:oracle:thin:@10.0.2.15:1521:orcl",
"connection.user": "test",
"connection.password": "test",
"topic.prefix": "DISTRIBUTED-",
"mode": "incrementing",
"incrementing.column.name": "SNO8",
"table.whitelist": "STUDENT8"
}
}'
#student9
curl -X POST http://localhost:8083/connectors -H "Content-Type: application/json" -d '{
"name": "jdbc_source_oracle_09",
"config": {
"connector.class": "io.confluent.connect.jdbc.JdbcSourceConnector",
"connection.url": "jdbc:oracle:thin:@10.0.2.15:1521:orcl",
"connection.user": "test",
"connection.password": "test",
"topic.prefix": "DISTRIBUTED-",
"mode": "incrementing",
"incrementing.column.name": "SNO9",
"table.whitelist": "STUDENT9"
}
}'
#sstudent10
curl -X POST http://localhost:8083/connectors -H "Content-Type: application/json" -d '{
"name": "jdbc_source_oracle_10",
"config": {
"connector.class": "io.confluent.connect.jdbc.JdbcSourceConnector",
"connection.url": "jdbc:oracle:thin:@10.0.2.15:1521:orcl",
"connection.user": "test",
"connection.password": "test",
"topic.prefix": "DISTRIBUTED-",
"mode": "incrementing",
"incrementing.column.name": "SNO10",
"table.whitelist": "STUDENT10"
}
}'
查看connect
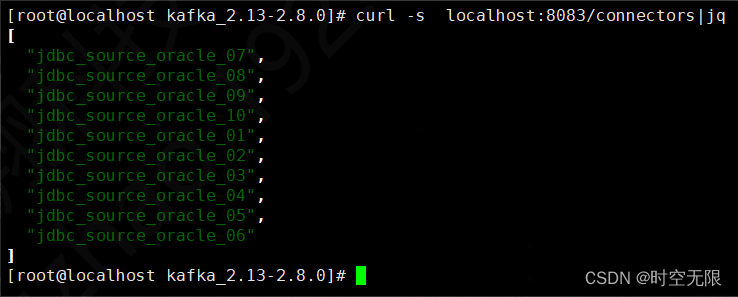
查看各个connect分配情况
节点1分配到了 03 04 06 05

节点2分配到了 09 01 08 10

节点3分配到了 07 02

停止节点1,节点1上的connect被分配到了剩余的两个节点


现在停止其中两个节点,发现任务都分配到了剩余的一个节点上

8.7 query方式抓取数据
参考文档
https://docs.confluent.io/kafka-connect-jdbc/current/source-connector/index.html#query-bulk-where-clause
8.7.1 incrementing模式下使用query
curl -X POST http://localhost:8083/connectors -H "Content-Type: application/json" -d '{
"name": "jdbc_source_oracle_06_query",
"config": {
"connector.class": "io.confluent.connect.jdbc.JdbcSourceConnector",
"connection.url": "jdbc:oracle:thin:@10.0.2.15:1521:orcl",
"connection.user": "test",
"connection.password": "test",
"topic.prefix": "DISTRIBUTED-query",
"mode": "incrementing",
"incrementing.column.name": "SNO6",
"query": "SELECT SNO6,SCLASS FROM STUDENT6"
}
}'
oracle插入数据
SQL> insert into student6(sno6,sname,ssex,sbirthday,sclass) values(16,'匡明','男',to_date('1975-10-08','yyyy-mm-dd'),95032);
1 row created.
SQL> commit;
Commit complete.
验证

删除连接器
curl -X DELETE http://10.0.2.20:8083/connectors/jdbc_source_oracle_06_query
8.7.2 incrementing模式下使用query注意事项
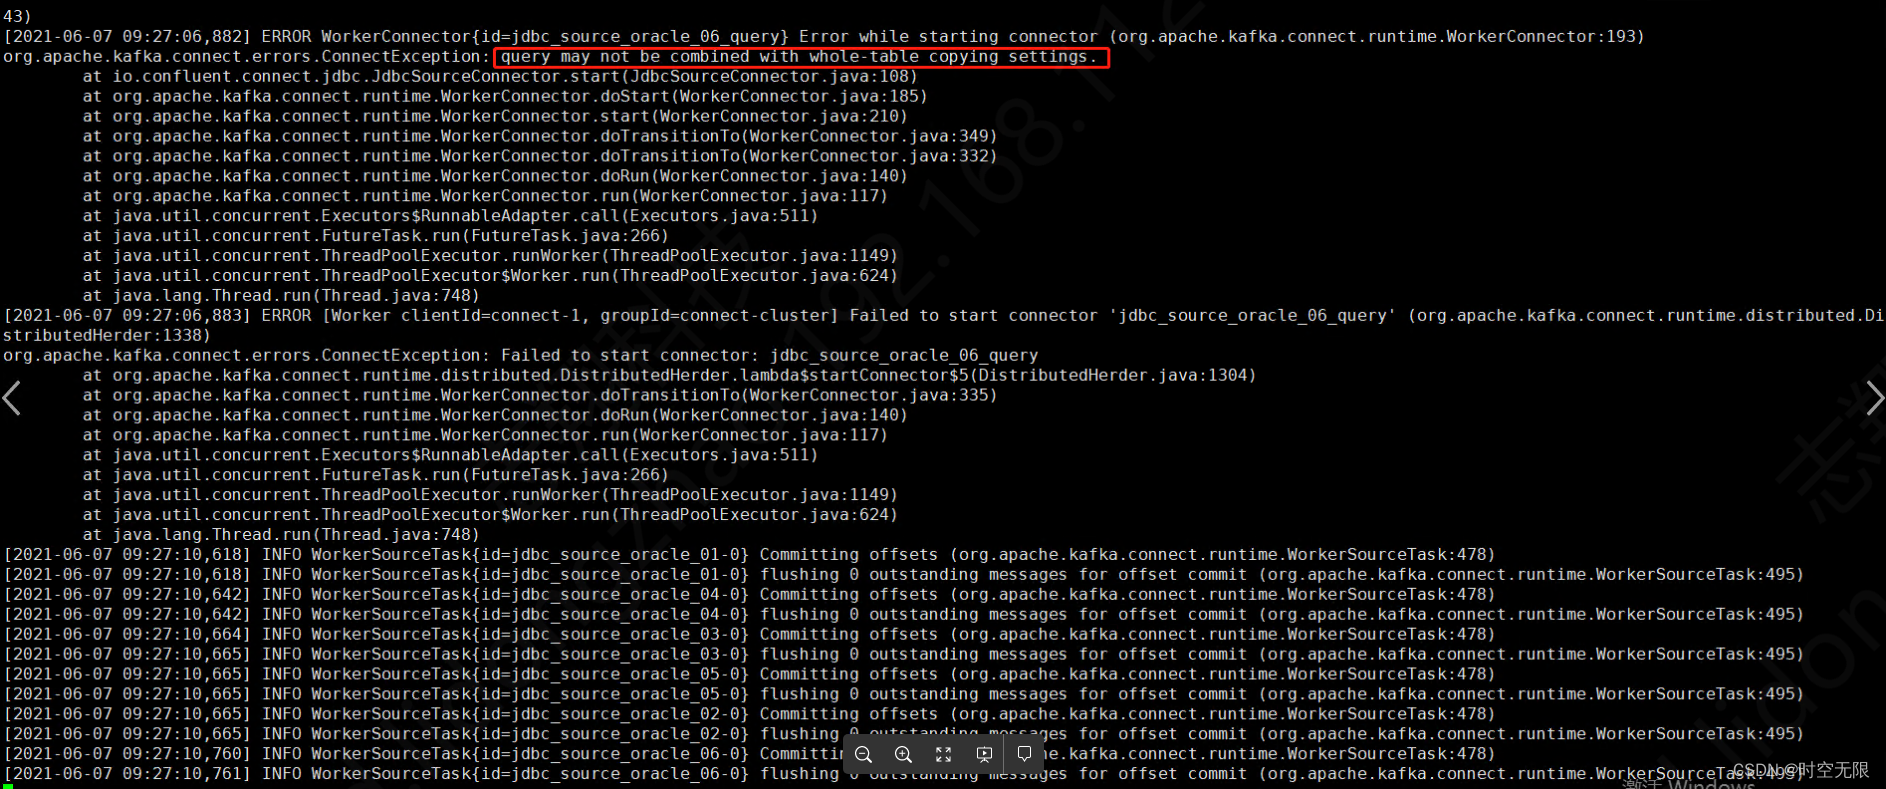
1、注意事项:查询语句select 的列中必须包含 incrementing.column.name 指定的列,否则会报错。
创建一个连接器
curl -X POST http://10.0.2.20:8083/connectors -H "Content-Type: application/json" -d '{
"name": "jdbc_source_oracle_06_query",
"config": {
"connector.class": "io.confluent.connect.jdbc.JdbcSourceConnector",
"connection.url": "jdbc:oracle:thin:@10.0.2.15:1521:orcl",
"connection.user": "test",
"connection.password": "test",
"topic.prefix": "DISTRIBUTED-query",
"mode": "incrementing",
"incrementing.column.name": "SNO6",
"table.whitelist": "STUDENT6",
"query": "SELECT SNAME,SCLASS FROM STUDENT6" #select 语句中不包含incrementing.column.name指定的SNO6列
}
}'
查看connect日志输出

删除连接器
curl -X DELETE http://10.0.2.20:8083/connectors/jdbc_source_oracle_06_query
2、注意事项:使用query的时候不能指定表白名单配置,否则会报错,报错如下图
创建一个连接器
curl -X POST http://10.0.2.20:8083/connectors -H "Content-Type: application/json" -d '{
"name": "jdbc_source_oracle_06_query",
"config": {
"connector.class": "io.confluent.connect.jdbc.JdbcSourceConnector",
"connection.url": "jdbc:oracle:thin:@10.0.2.15:1521:orcl",
"connection.user": "test",
"connection.password": "test",
"topic.prefix": "DISTRIBUTED-query",
"mode": "incrementing",
"incrementing.column.name": "SNO6",
"table.whitelist": "STUDENT6",  #指定表白名单
"query": "SELECT SNO6,SNAME,SCLASS FROM STUDENT6"
}
}'
查看connect日志输出
删除连接器
curl -X DELETE http://10.0.2.20:8083/connectors/jdbc_source_oracle_06_query
8.7.3 timestamp模式下使用query
curl -X POST http://10.0.2.20:8083/connectors -H "Content-Type: application/json" -d '{
"name": "jdbc_source_oracle_06_query",
"config": {
"connector.class": "io.confluent.connect.jdbc.JdbcSourceConnector",
"connection.url": "jdbc:oracle:thin:@10.0.2.15:1521:orcl",
"connection.user": "test",
"connection.password": "test",
"topic.prefix": "DISTRIBUTED-query",
"mode": "timestamp",
"timestamp.column.name": "SBIRTHDAY",
"query": "SELECT SBIRTHDAY,SNAME,SCLASS FROM STUDENT6"
}
}'
oracle插入数据
SQL> insert into student6(sno6,sname,ssex,sbirthday,sclass) values(16,'匡明','男',to_date('1975-10-10','yyyy-mm-dd'),95032);
1 row created.
SQL> commit;
Commit complete.
验证

8.7.4 timestamp模式下使用query注意事项
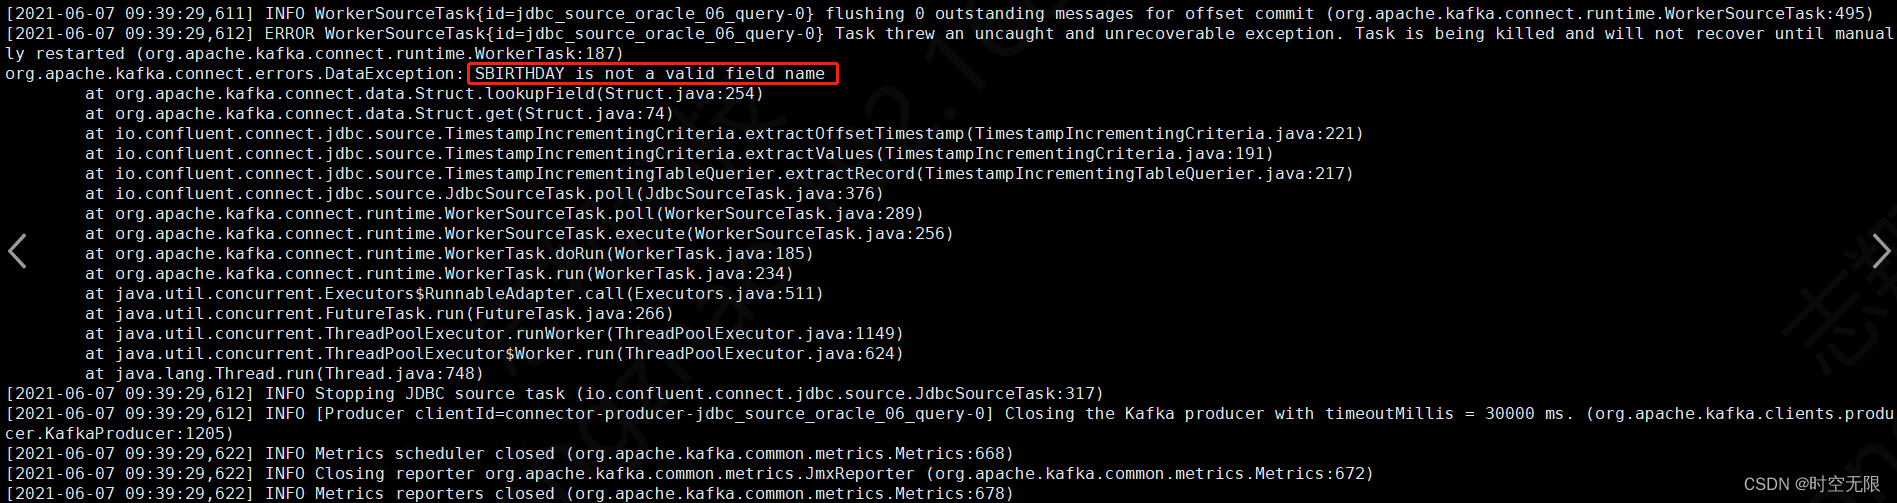
1、注意事项:查询语句select 的列中必须包含 timestamp.column.name 指定的列,否则会报错
curl -X POST http://10.0.2.20:8083/connectors -H "Content-Type: application/json" -d '{
"name": "jdbc_source_oracle_06_query",
"config": {
"connector.class": "io.confluent.connect.jdbc.JdbcSourceConnector",
"connection.url": "jdbc:oracle:thin:@10.0.2.15:1521:orcl",
"connection.user": "test",
"connection.password": "test",
"topic.prefix": "DISTRIBUTED-query",
"mode": "timestamp",
"timestamp.column.name": "SBIRTHDAY",
"query": "SELECT SNAME,SCLASS FROM STUDENT6"
}
}'
查看connect日志输出
8.7.5 bulk模式使用query注意事项
使用bulk+query模式同步oracle表数据,只能将query定义的sql语句查询出来的数据同步到kafka,没被查询到的数据无法同步到kafka。
oracle中数据

使用查询语句select * from student2 where trunc(SBIRTHDAY)>=trunc(sysdate - 20/1440);能查出的数据

现在使用bulk+query方式建立连接器
curl -X POST http://localhost:8083/connectors -H "Content-Type: application/json" -d '{
"name": "jdbc_02",
"config": {
"connector.class": "io.confluent.connect.jdbc.JdbcSourceConnector",
"connection.url": "jdbc:oracle:thin:@10.0.2.15:1521:orcl",
"connection.user": "test",
"connection.password": "test",
"topic.prefix": "YC-STUDENT2",
"mode": "bulk",
"db.timezone": "UTC",
"query": "select * from student2 where trunc(SBIRTHDAY)>=trunc(sysdate - 20/1440)"
}
}'
由图可知,kafka中的数据只有用query中sql语句查出来的那一条,并没有全表的数据。

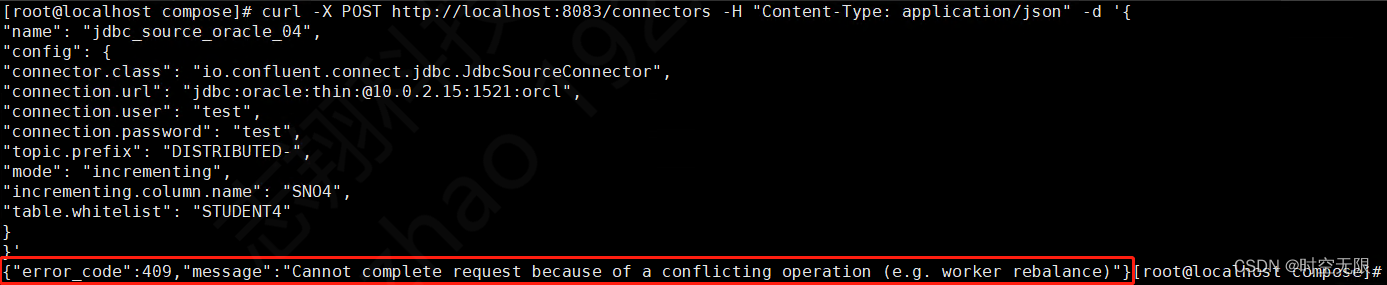
8.8分布式配置注意事项
如果connect-distributed.properties配置文件中不指定rest.advertised.host.name配置或者将其指定为localhost,那么集群中的每个工作人员将只能在您使用 REST 接口时与其自身联系。如果工作人员恰好是连接集群的领导者,那么该命令将起作用,但如果不是,那么您将得到以下信息:在使用rest API创建连接器时会报错
{“error_code”:409,“message”:“Cannot complete request because of a conflicting operation (e.g. worker rebalance)”}
参考链接
https://rmoff.net/2019/11/22/common-mistakes-made-when-configuring-multiple-kafka-connect-workers/
connect-configs的topic分区数要求设置为1,否则在启动connect的时候会报错,如下图
8.9 数据同步测试
前提:启动connect。
8.9.1 测试incrementing模式乱序插入数据是否可以同步
建表
SQL> create table student5(sno5 number(19) not null,sname varchar2(9) not null,ssex varchar2(3) not null,sbirthday date,sclass varchar2(5));
Table created.
创建incrementing模式连接器
curl -X POST http://localhost:8083/connectors -H "Content-Type: application/json" -d '{
"name": "STUDENT5",
"config": {
"connector.class": "io.confluent.connect.jdbc.JdbcSourceConnector",
"connection.url": "jdbc:oracle:thin:@10.0.2.15:1521:orcl",
"connection.user": "test",
"connection.password": "test",
"topic.prefix": "noarchivelog-",
"mode": "incrementing",
"incrementing.column.name": "SNO5",
"table.whitelist": "STUDENT5"
}
}'
插入数据(SNO5为10)
SQL> insert into student5(sno5,sname,ssex,sbirthday,sclass) values(10,'曾华','男',to_date('1977-09-01','yyyy-mm-dd'),95033);
1 row created.
SQL> commit;
Commit complete.
查看kafka是否有数据

再插入几条数据(SNO5列的值都比上次更新的数据的SNO5的值小)
SQL> insert into student5(sno5,sname,ssex,sbirthday,sclass) values(9,'曾华','男',to_date('1977-10-01','yyyy-mm-dd'),95133);
1 row created.
SQL> commit;
Commit complete.
SQL> insert into student5(sno5,sname,ssex,sbirthday,sclass) values(8,'曾华','男',to_date('1980-10-01','yyyy-mm-dd'),95133);
1 row created.
SQL> commit;
Commit complete.
查看kafka数据是否更新
可以发现,数据并没有更新

插入数据(SNO5列的值都比上次更新的数据的SNO5的值大)
SQL> insert into student5(sno5,sname,ssex,sbirthday,sclass) values(12,'曾华','男',to_date('1977-10-01','yyyy-mm-dd'),95133);
1 row created.
SQL> insert into student5(sno5,sname,ssex,sbirthday,sclass) values(13,'曾华','男',to_date('1977-10-01','yyyy-mm-dd'),95133);
1 row created.
SQL> insert into student5(sno5,sname,ssex,sbirthday,sclass) values(14,'曾华','男',to_date('1977-10-01','yyyy-mm-dd'),95133);
1 row created.
SQL> commit;
Commit complete.
查看kafka数据是否更新
可以发现,数据更新成功。

8.9.2 测试incrementing模式update更改数据是否可以同步
沿用8.9.1的测试数据和连接器。
updat更新表数据
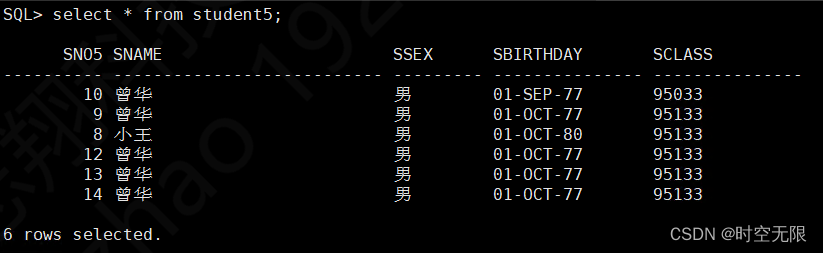
SQL> UPDATE student5 SET SNAME='小王' WHERE SNO5='8';
1 row updated.
SQL> COMMIT;
Commit complete.
查看kafka数据是否更新
可以发现,数据并没有更新。

8.9.3 测试incrementing模式delete更改数据是否可以同步
沿用8.9.2的测试数据和连接器。
delete 删除表数据
SQL> delete from student5 where SNO5='14';
1 row deleted.
SQL> delete from student5 where SNO5='13';
1 row deleted.
SQL> delete from student5 where SNO5='12';
1 row deleted.
SQL> delete from student5 where SNO5='10';
1 row deleted.
SQL> commit;
Commit complete.
查看kafka数据是否更新
可以发现,数据并没有更新。

8.9.4 测试timestamp模式乱序插入数据是否可以同步
建表
SQL> create table student6(sno6 number(19) not null,sname varchar2(9) not null,ssex varchar2(3) not null,sbirthday date not null,sclass varchar2(5));
Table created.
创建timestamp模式连接器
curl -X POST http://localhost:8083/connectors -H "Content-Type: application/json" -d '{
"name": "STUDENT6",
"config": {
"connector.class": "io.confluent.connect.jdbc.JdbcSourceConnector",
"connection.url": "jdbc:oracle:thin:@10.0.2.15:1521:orcl",
"connection.user": "test",
"connection.password": "test",
"topic.prefix": "noarchivelog-",
"mode": "timestamp",
"timestamp.column.name": "SBIRTHDAY",
"table.whitelist": "STUDENT6"
}
}'
插入数据
SQL> insert into student6(sno6,sname,ssex,sbirthday,sclass) values(1,'曾华','男',to_date('1970-09-01','yyyy-mm-dd'),95033);
1 row created.
SQL> commit;
Commit complete.
查看kafka数据是否更新
可以发现,数据更新成功。

插入数据(sbirthday列的值都比上次更新的数据的SBIRTHDAY值小)
SQL> insert into student6(sno6,sname,ssex,sbirthday,sclass) values(2,'曾华','男',to_date('1969-09-01','yyyy-mm-dd'),95033);
1 row created.
SQL> commit;
Commit complete.
SQL> insert into student6(sno6,sname,ssex,sbirthday,sclass) values(2,'曾华','男',to_date('1969-01-01','yyyy-mm-dd'),95033);
1 row created.
SQL> commit;
Commit complete.
SQL> insert into student6(sno6,sname,ssex,sbirthday,sclass) values(2,'曾华','男',to_date('1968-06-01','yyyy-mm-dd'),95033);
1 row created.
SQL> commit;
Commit complete.
查看kafka数据是否更新
可以发现,数据并没有更新。

插入数据(sbirthday列的值都比上次更新的数据的SBIRTHDAY值大)
SQL> insert into student6(sno6,sname,ssex,sbirthday,sclass) values(2,'曾华','男',to_date('1971-06-01','yyyy-mm-dd'),95033);
1 row created.
SQL> commit;
Commit complete.
SQL> insert into student6(sno6,sname,ssex,sbirthday,sclass) values(2,'曾华','男',to_date('1971-09-01','yyyy-mm-dd'),95033);
1 row created.
SQL> commit;
Commit complete.
SQL> insert into student6(sno6,sname,ssex,sbirthday,sclass) values(2,'曾华','男',to_date('1971-10-01','yyyy-mm-dd'),95033);
1 row created.
SQL> commit;
Commit complete.
查看kafka数据是否更新
可以发现,数据更新成功。

8.9.4 测试timestamp模式update更新数据是否可以同步
沿用8.9.3的数据和连接器
SQL> update student6 set SNAME='匡明' where SNO6='1';
1 row updated.
SQL> commit;
Commit complete.
查看kafka数据是否更新
可以发现,数据并没有更新。

8.9.5 测试timestamp模式delete删除数据是否可以同步
沿用8.9.4的数据和连接器
SQL> delete student6 where SNO6='2';
6 rows deleted.
SQL> COMMIT;
Commit complete.
查看kafka数据是否更新
可以发现,数据并没有更新。

8.9.6测试incrementing模式自增列数据同步
create table test_user(id number(19) not null primary key, username varchar2(100),password varchar2(100),modified timestamp(0) default SYSTIMESTAMP not null);
create sequence test_user_seq start with 1 increment by 1;
create or replace trigger test_user_seq_tr
before insert or update on test_user for each row
begin
if inserting then
select test_user_seq.NEXTVAL into :new.id from dual;
end if;
END;
/
create index test_modified_index on test_user (modified);
创建incrementing连接器
curl -X POST http://localhost:8083/connectors -H "Content-Type: application/json" -d '{
"name": "TEST_USER",
"config": {
"connector.class": "io.confluent.connect.jdbc.JdbcSourceConnector",
"connection.url": "jdbc:oracle:thin:@10.0.2.15:1521:orcl",
"connection.user": "test",
"connection.password": "test",
"topic.prefix": "test-",
"mode": "incrementing",
"incrementing.column.name": "ID",
"table.whitelist": "TEST_USER"
}
}'
插入数据
SQL>insert into test_user(username,password) values('tom','111');
查看kafka数据是否更新
可以发现,数据更新成功。

update更新数据
SQL> update test_user SET PASSWORD='100' WHERE USERNAME='tom';
1 row updated.
SQL> commit;
Commit complete.
SQL> update test_user SET PASSWORD='110' WHERE ID='3';
1 row updated.
SQL> COMMIT;
Commit complete.
删除数据
SQL> DELETE FROM TEST_USER WHERE USERNAME='tom';
1 row deleted.
SQL> commit;
Commit complete.
查看kafka数据是否更新
可以发现,数据并没有更新。


 517
517


 被折叠的 条评论
为什么被折叠?
被折叠的 条评论
为什么被折叠?
 到【灌水乐园】发言


