


什么是 Easysearch
Elasticsearch 是一个基于 Apache Lucene 的开源分布式搜索和分析引擎,它被广泛应用于全文搜索、结构化搜索和分析等多种场景中。作为 Elasticsearch 的国产化替代方案,Easysearch 不仅保持了与原生 Elasticsearch 的高度兼容性,还在功能、性能、稳定性和扩展性方面进行了全面提升。对于开发团队来说,从 Elasticsearch 切换到 Easysearch 不需要做任何业务代码的调整,确保了无缝衔接和平滑迁移。
Easysearch 是基于 Elasticsearch 7.10.2 开源版本二次开发,所以支持 Elasticsearch 原始的 Query DSL 语法,基本的 SQL 语法,并且兼容现有 Elasticsearch 的 SDK,使得应用无需修改代码即可进行迁移。其平滑的迁移特性,如基于网关的无缝跨版本迁移与升级,提供了随时安全回退的能力。
在之前的文章中,我们已经介绍了 Easysearch 的搭建 和 可视化工具的使用,今天我们将探讨 Easysearch 集群的基本概念和常用的 API。
Easysearch 集群的核心概念
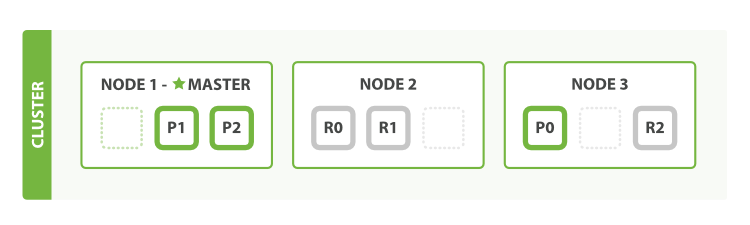
Easysearch 集群由以下几个核心概念构成:
- 节点(Node):集群中的单个服务器,负责存储数据并参与集群的索引和搜索功能。
- 集群(Cluster):由一个或多个节点组成,拥有唯一的集群名,协同完成数据索引和查询任务。
- 索引(Index):存储相关数据的容器,类似于关系数据库中的数据库,一个索引包含多个文档。
- 文档(Document):索引中的基本数据单位,相当于关系数据库中的行。
- 字段(Field):文档中的一个属性,相当于数据库中的列。
- 分片(Shard):为了提高性能和扩展性,索引可以被分割成多个分片,每个分片是索引的一个部分。
- 副本(Replica):分片的副本,用于提高数据的可靠性和在节点出现故障时的可用性。
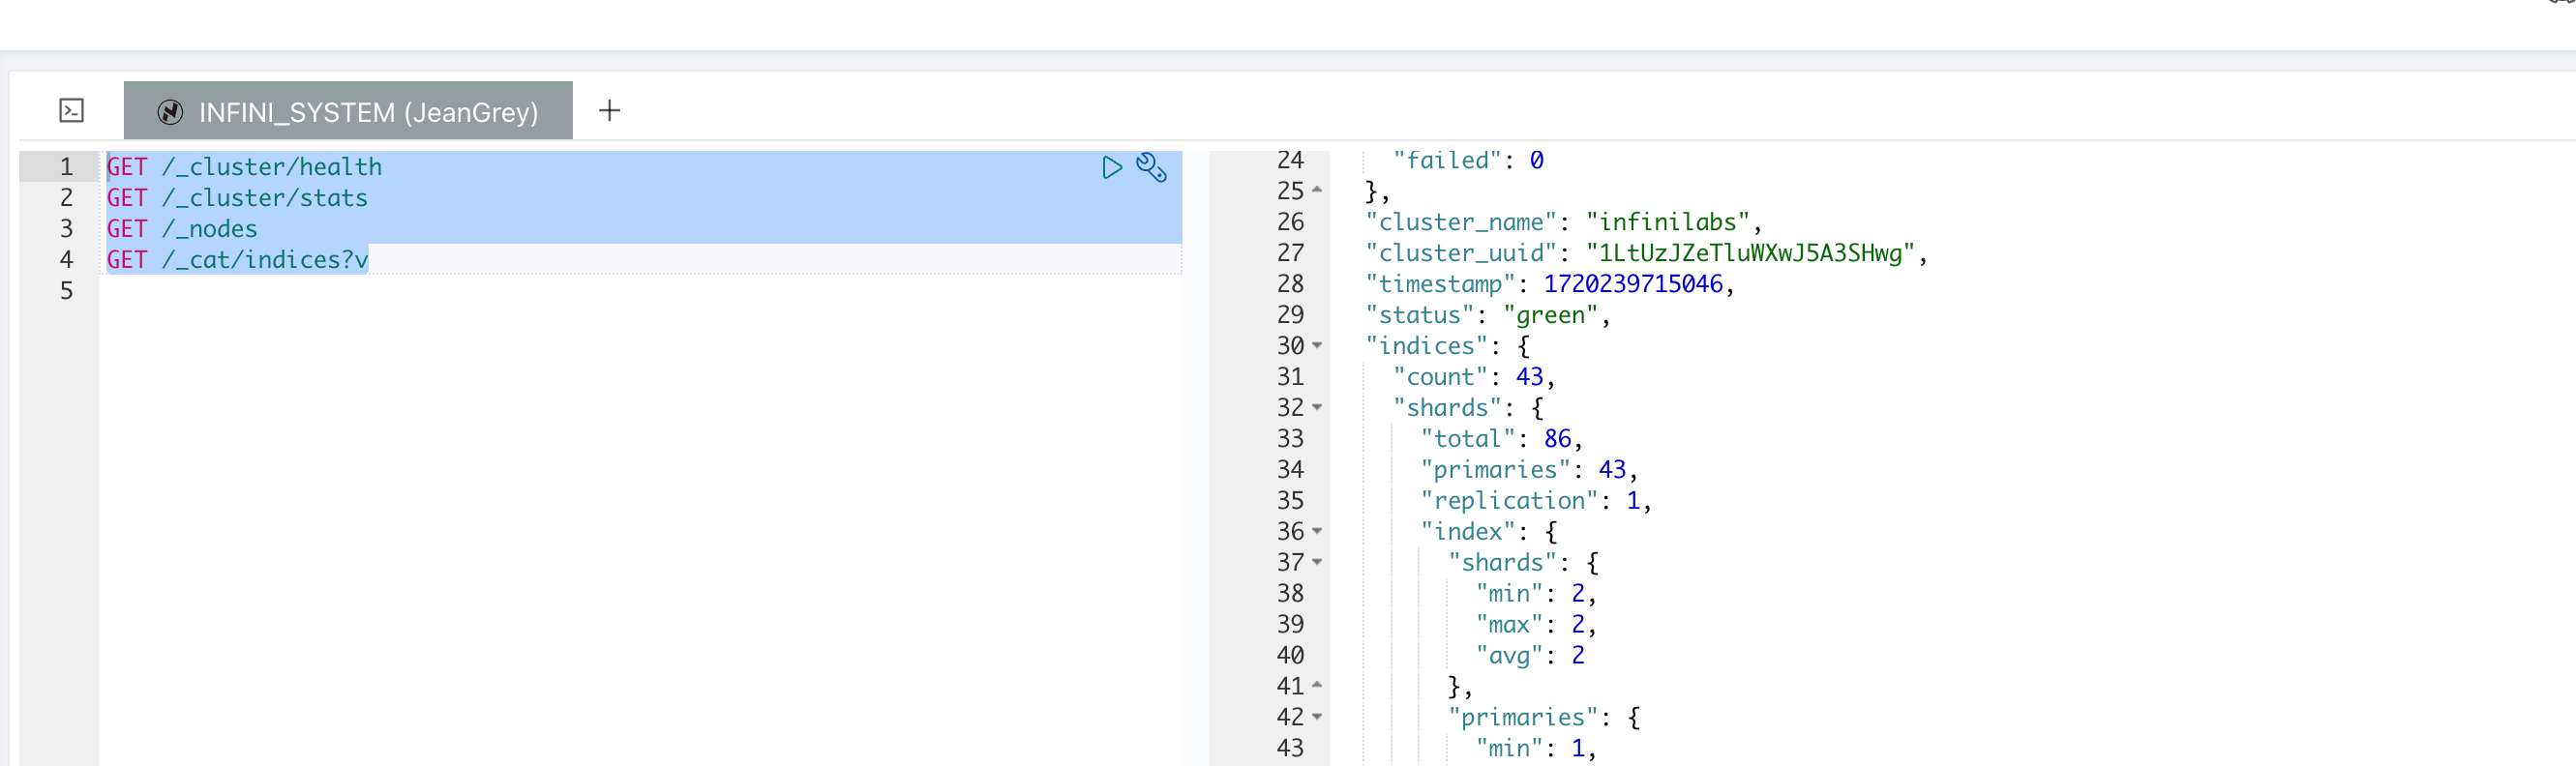
通过多个 API,例如 _cluster/health 和 _cluster/stats,用户可以轻松查看集群的健康状态和详细信息,这些信息对于维护和优化 Easysearch 集群至关重要。
无论是在性能的提升,还是在功能的兼容性方面,Easysearch 都为用户提供了一个强大的搜索引擎平台,让从 Elasticsearch 到 Easysearch 的迁移变得无缝且高效。掌握其核心概念和 API 的使用,将帮助开发者更好地利用这些工具来构建和优化他们的搜索解决方案。
查看集群信息
在 Easysearch 中,可以通过多个 API 来查看集群的各种信息,包括集群的健康状况、节点信息和索引状态。以下是一些常用的查看集群信息的 API 和示例:
查看集群健康状况
_cluster/health API 可以查看集群的健康状态,包括集群是否处于正常状态、节点数量、分片状态等。
示例响应:
查看集群状态
_cluster/stats API 可以查看集群的详细状态,包括索引、节点、分片等信息。
示例响应:
查看节点信息
_nodes API 可以查看集群中节点的详细信息,包括节点角色、IP 地址、内存使用情况等。
示例响应:
查看索引状态
_cat/indices API 可以查看集群中所有索引的状态,包括文档数、存储大小、分片数等信息。
示例响应:
这些 API 可以帮助你全面了解 Easysearch 集群的状态和健康状况,从而更好地管理和维护集群。
增删改查操作
在 Easysearch 中,增删改查操作是管理数据和索引的基本功能。以下是如何使用这些操作的详细示例。
创建索引
创建一个新的索引,并指定分片和副本的数量:
删除索引
删除一个不再需要的索引:
添加文档
通过 POST 或 PUT 请求向索引中添加文档:
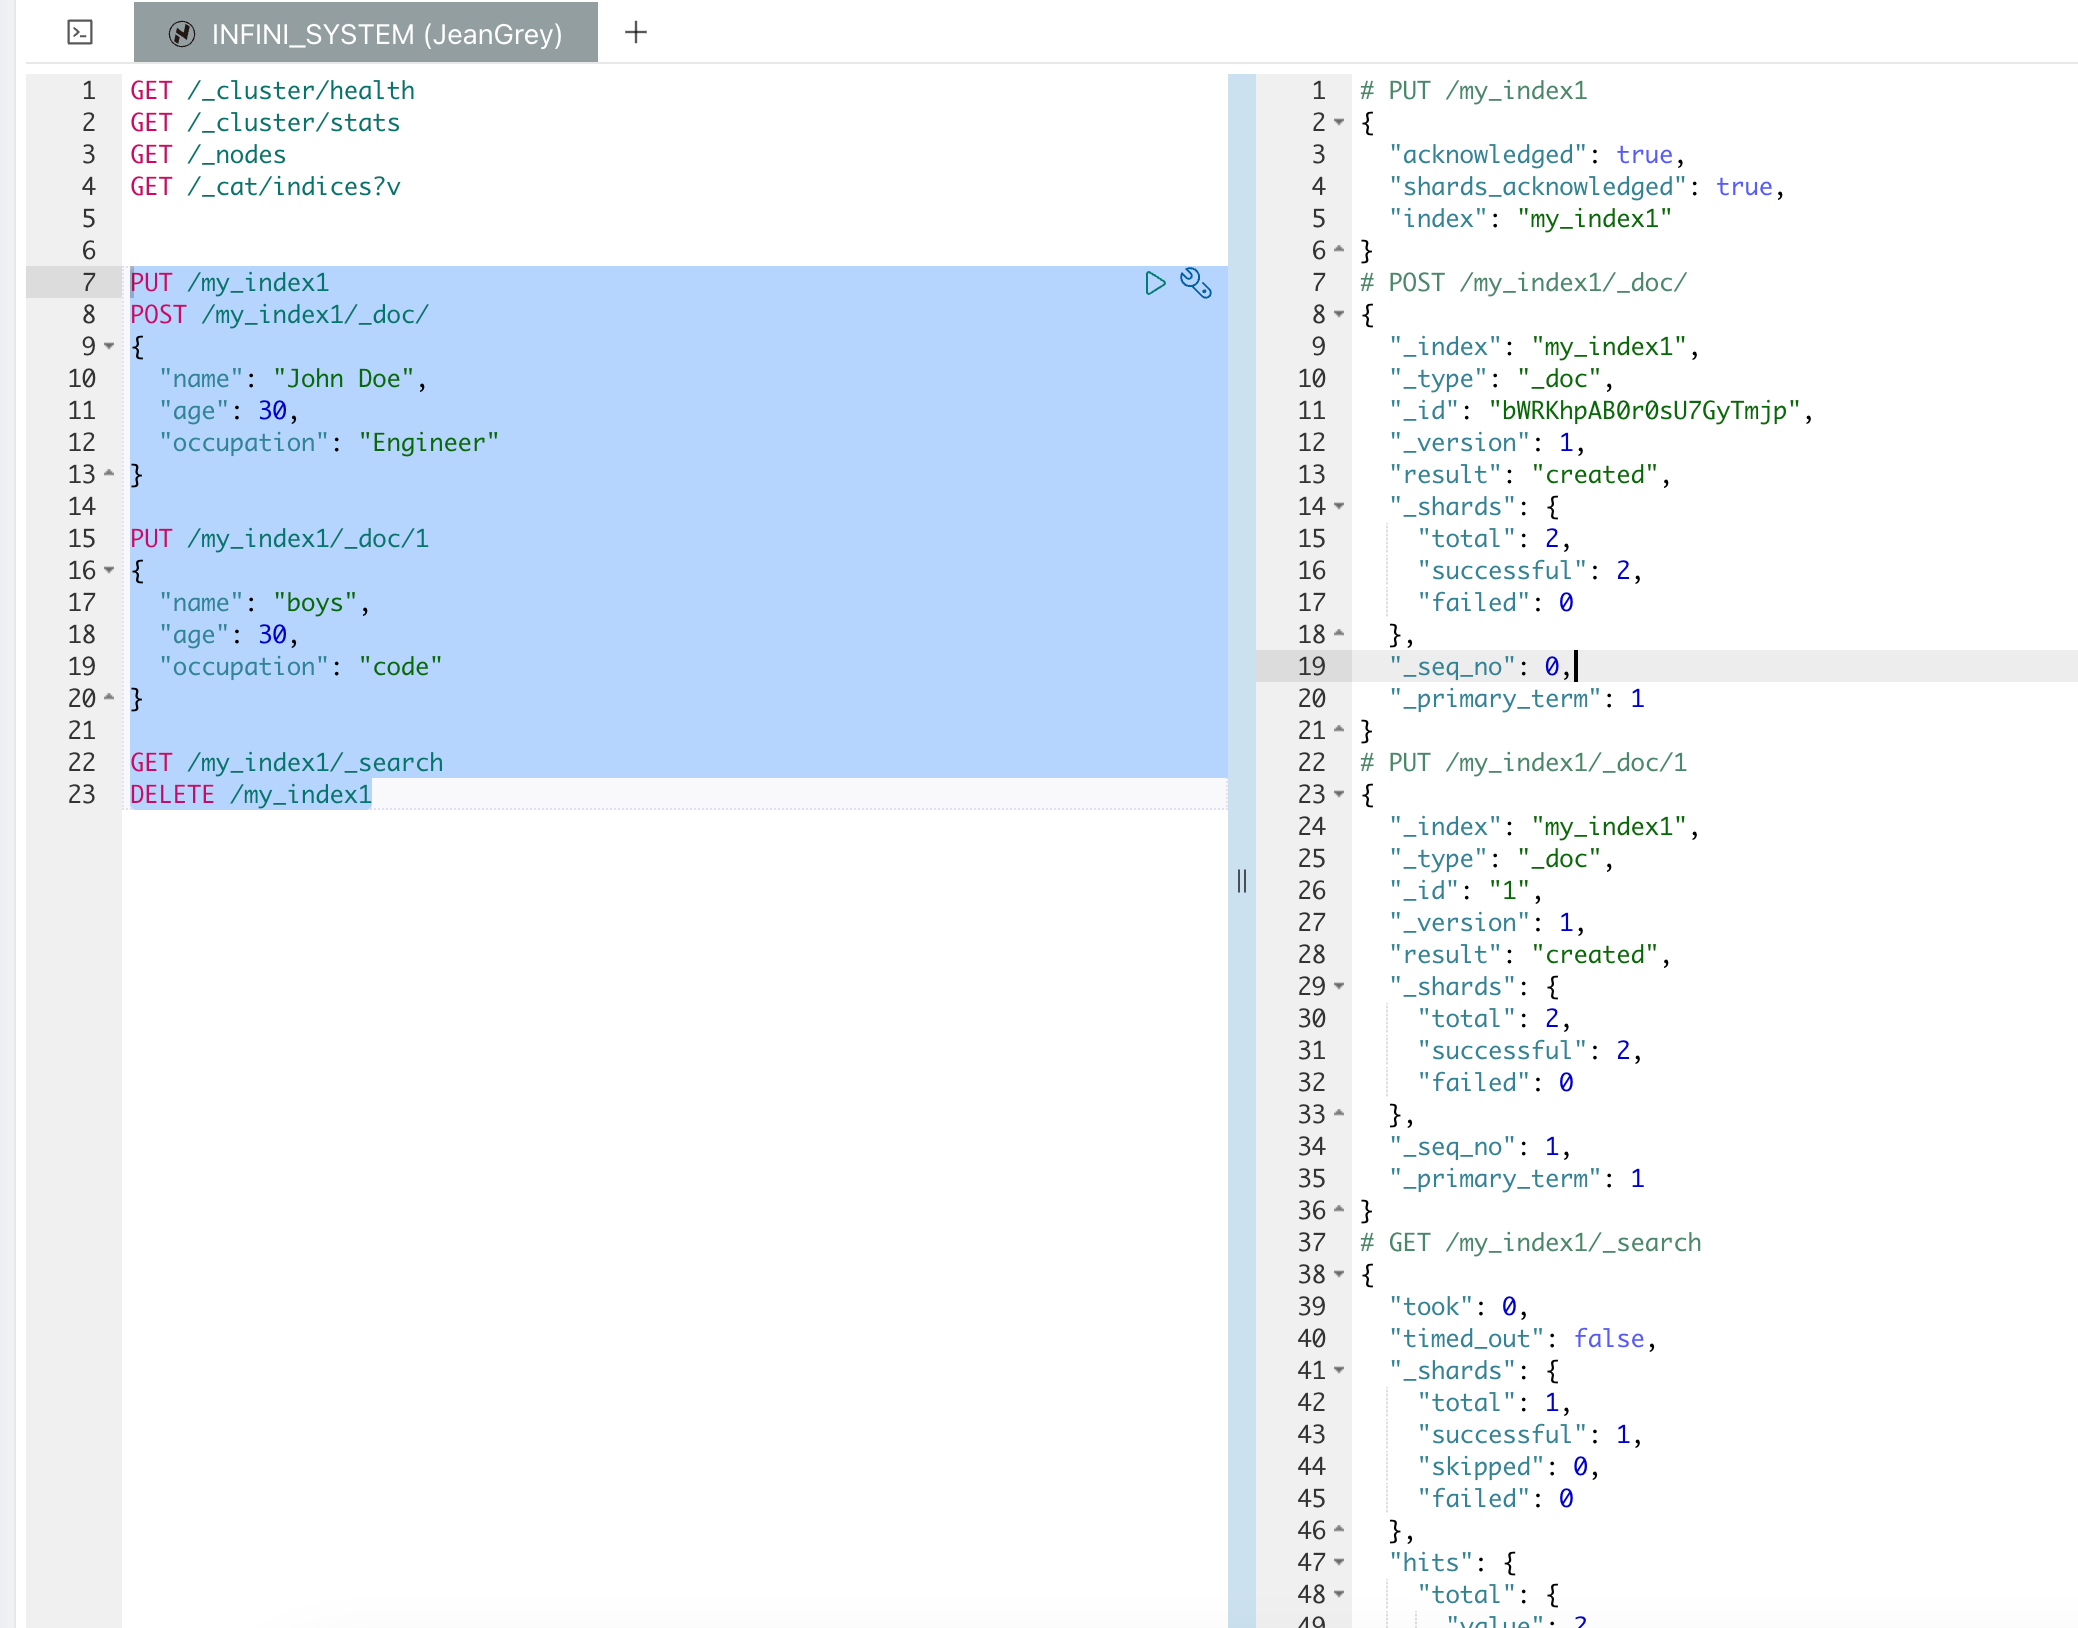
POST 和 PUT 方法用于不同的操作,尽管它们都可以用于添加或更新文档,但它们的行为有所不同。
POST /my_index/_doc/1 方法用于创建或替换一个文档。如果指定的文档 ID 已经存在,POST 请求将更新整个文档(不会合并字段)。如果文档 ID 不存在,它将创建一个新的文档。
PUT /my_index/_doc/1 方法通常用于创建一个新的文档,或者完全替换一个已存在的文档。与 POST 类似,如果指定的文档 ID 已经存在,PUT 请求将替换整个文档。
1.使用场景:
POST:更适合用于添加或部分更新文档,即使文档 ID 已经存在。PUT:更适合用于创建或完全替换文档。
2.ID 自动生成:
POST请求可以不提供文档 ID,此时 Easysearch 会自动生成一个文档 ID。PUT请求必须提供文档 ID,如果未提供,则会返回错误。
3.部分更新:
POST请求可以用于部分更新(通过_updateAPI)。PUT请求用于完全替换文档,不支持部分更新。
如果文档 ID 已经存在,POST 和 PUT 都会覆盖整个文档,并且效果是一样的。但是,通常 POST 用于提交数据,而 PUT 用于上传和替换资源。
1.使用 POST 方法添加或更新文档:
2.使用 PUT 方法添加或更新文档:
在这两个示例中,结果都是在索引 my_index 中创建或更新文档 ID 为 1 的文档。无论使用 POST 还是 PUT,如果文档 ID 已存在,都会覆盖原有的文档内容。
新建文档
使用 _create 方法新建文档,如果文档已经存在则返回错误:
如果尝试新建已存在的文档,将会出现如下错误:
获取文档
通过 ID 获取文档的详细信息:
更新文档
更新文档的特定字段,保留原有字段:
删除文档
通过 ID 删除指定的文档:
查询所有文档
查询索引中的所有文档:
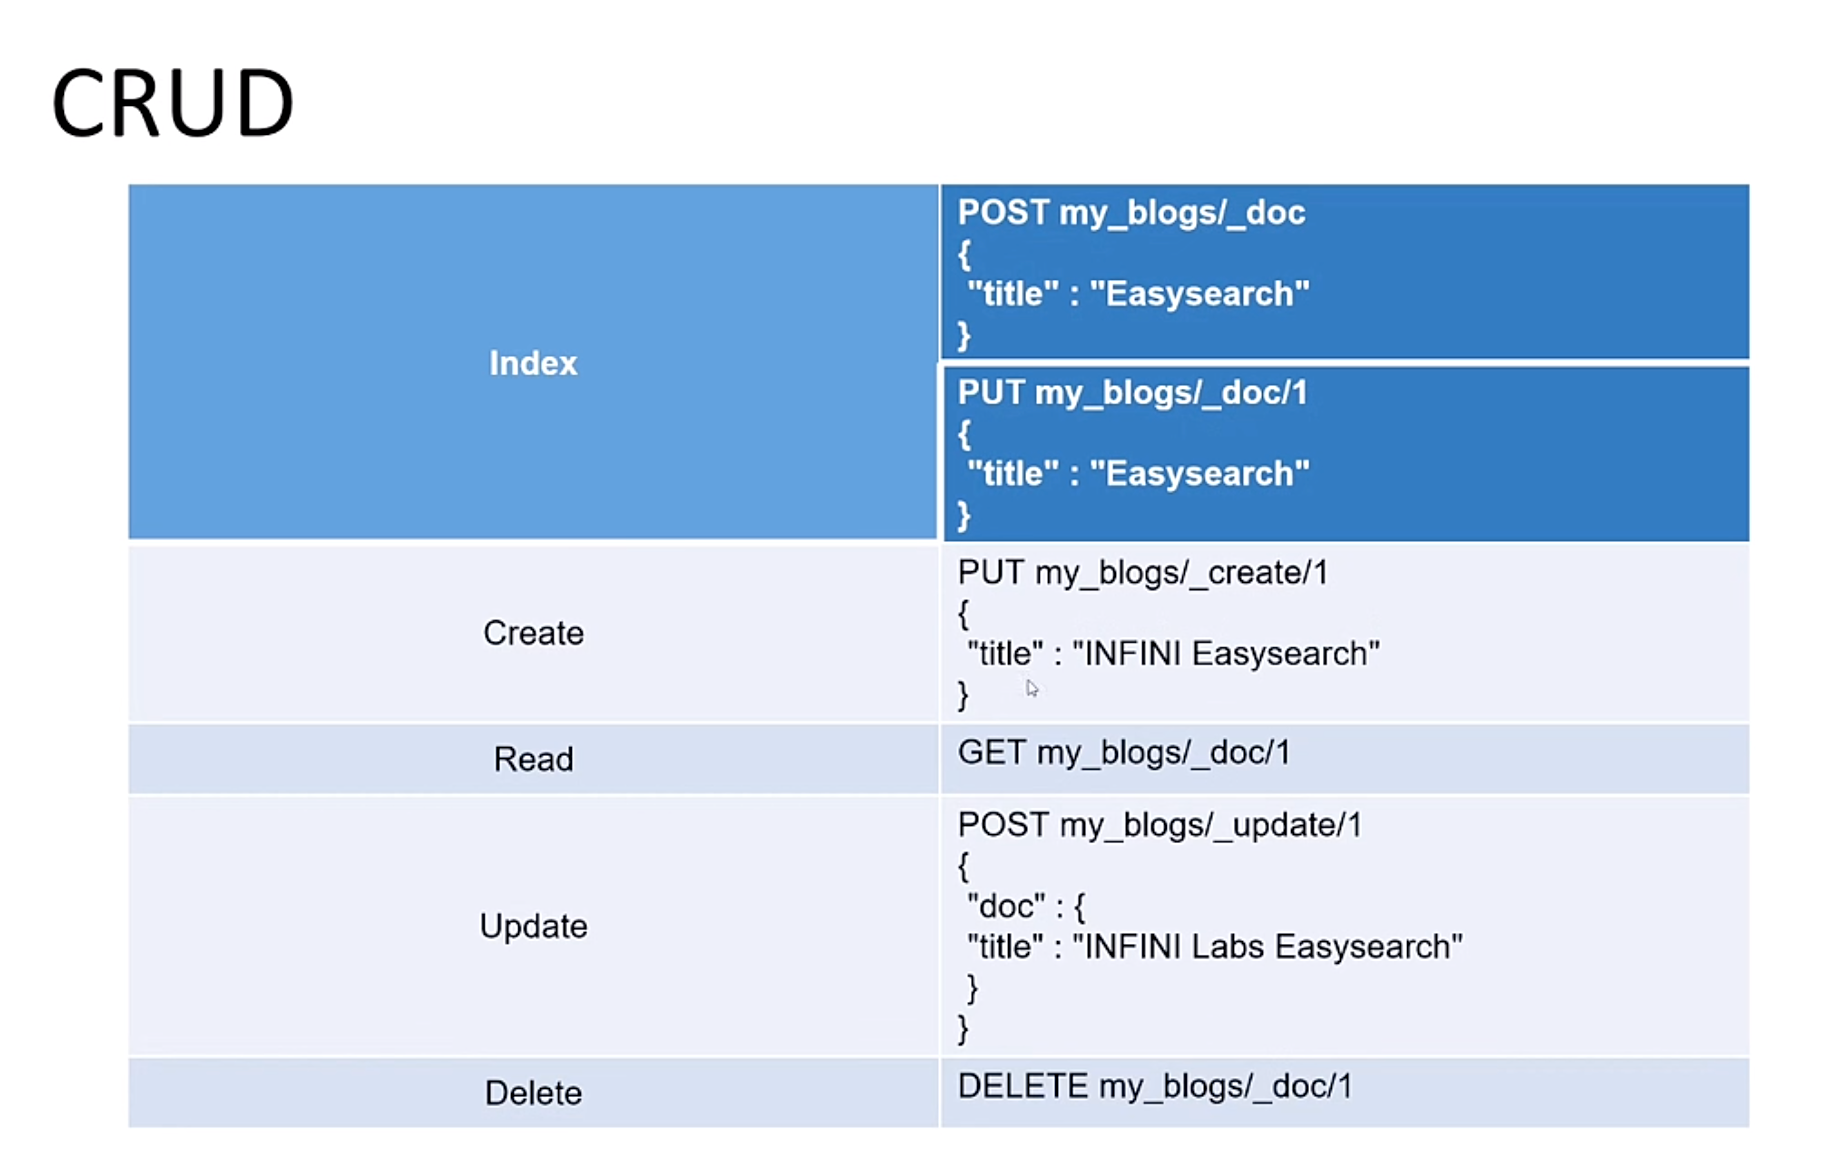
这个是 《老杨玩搜索》中总结的图,可以作为“小抄”来记忆:
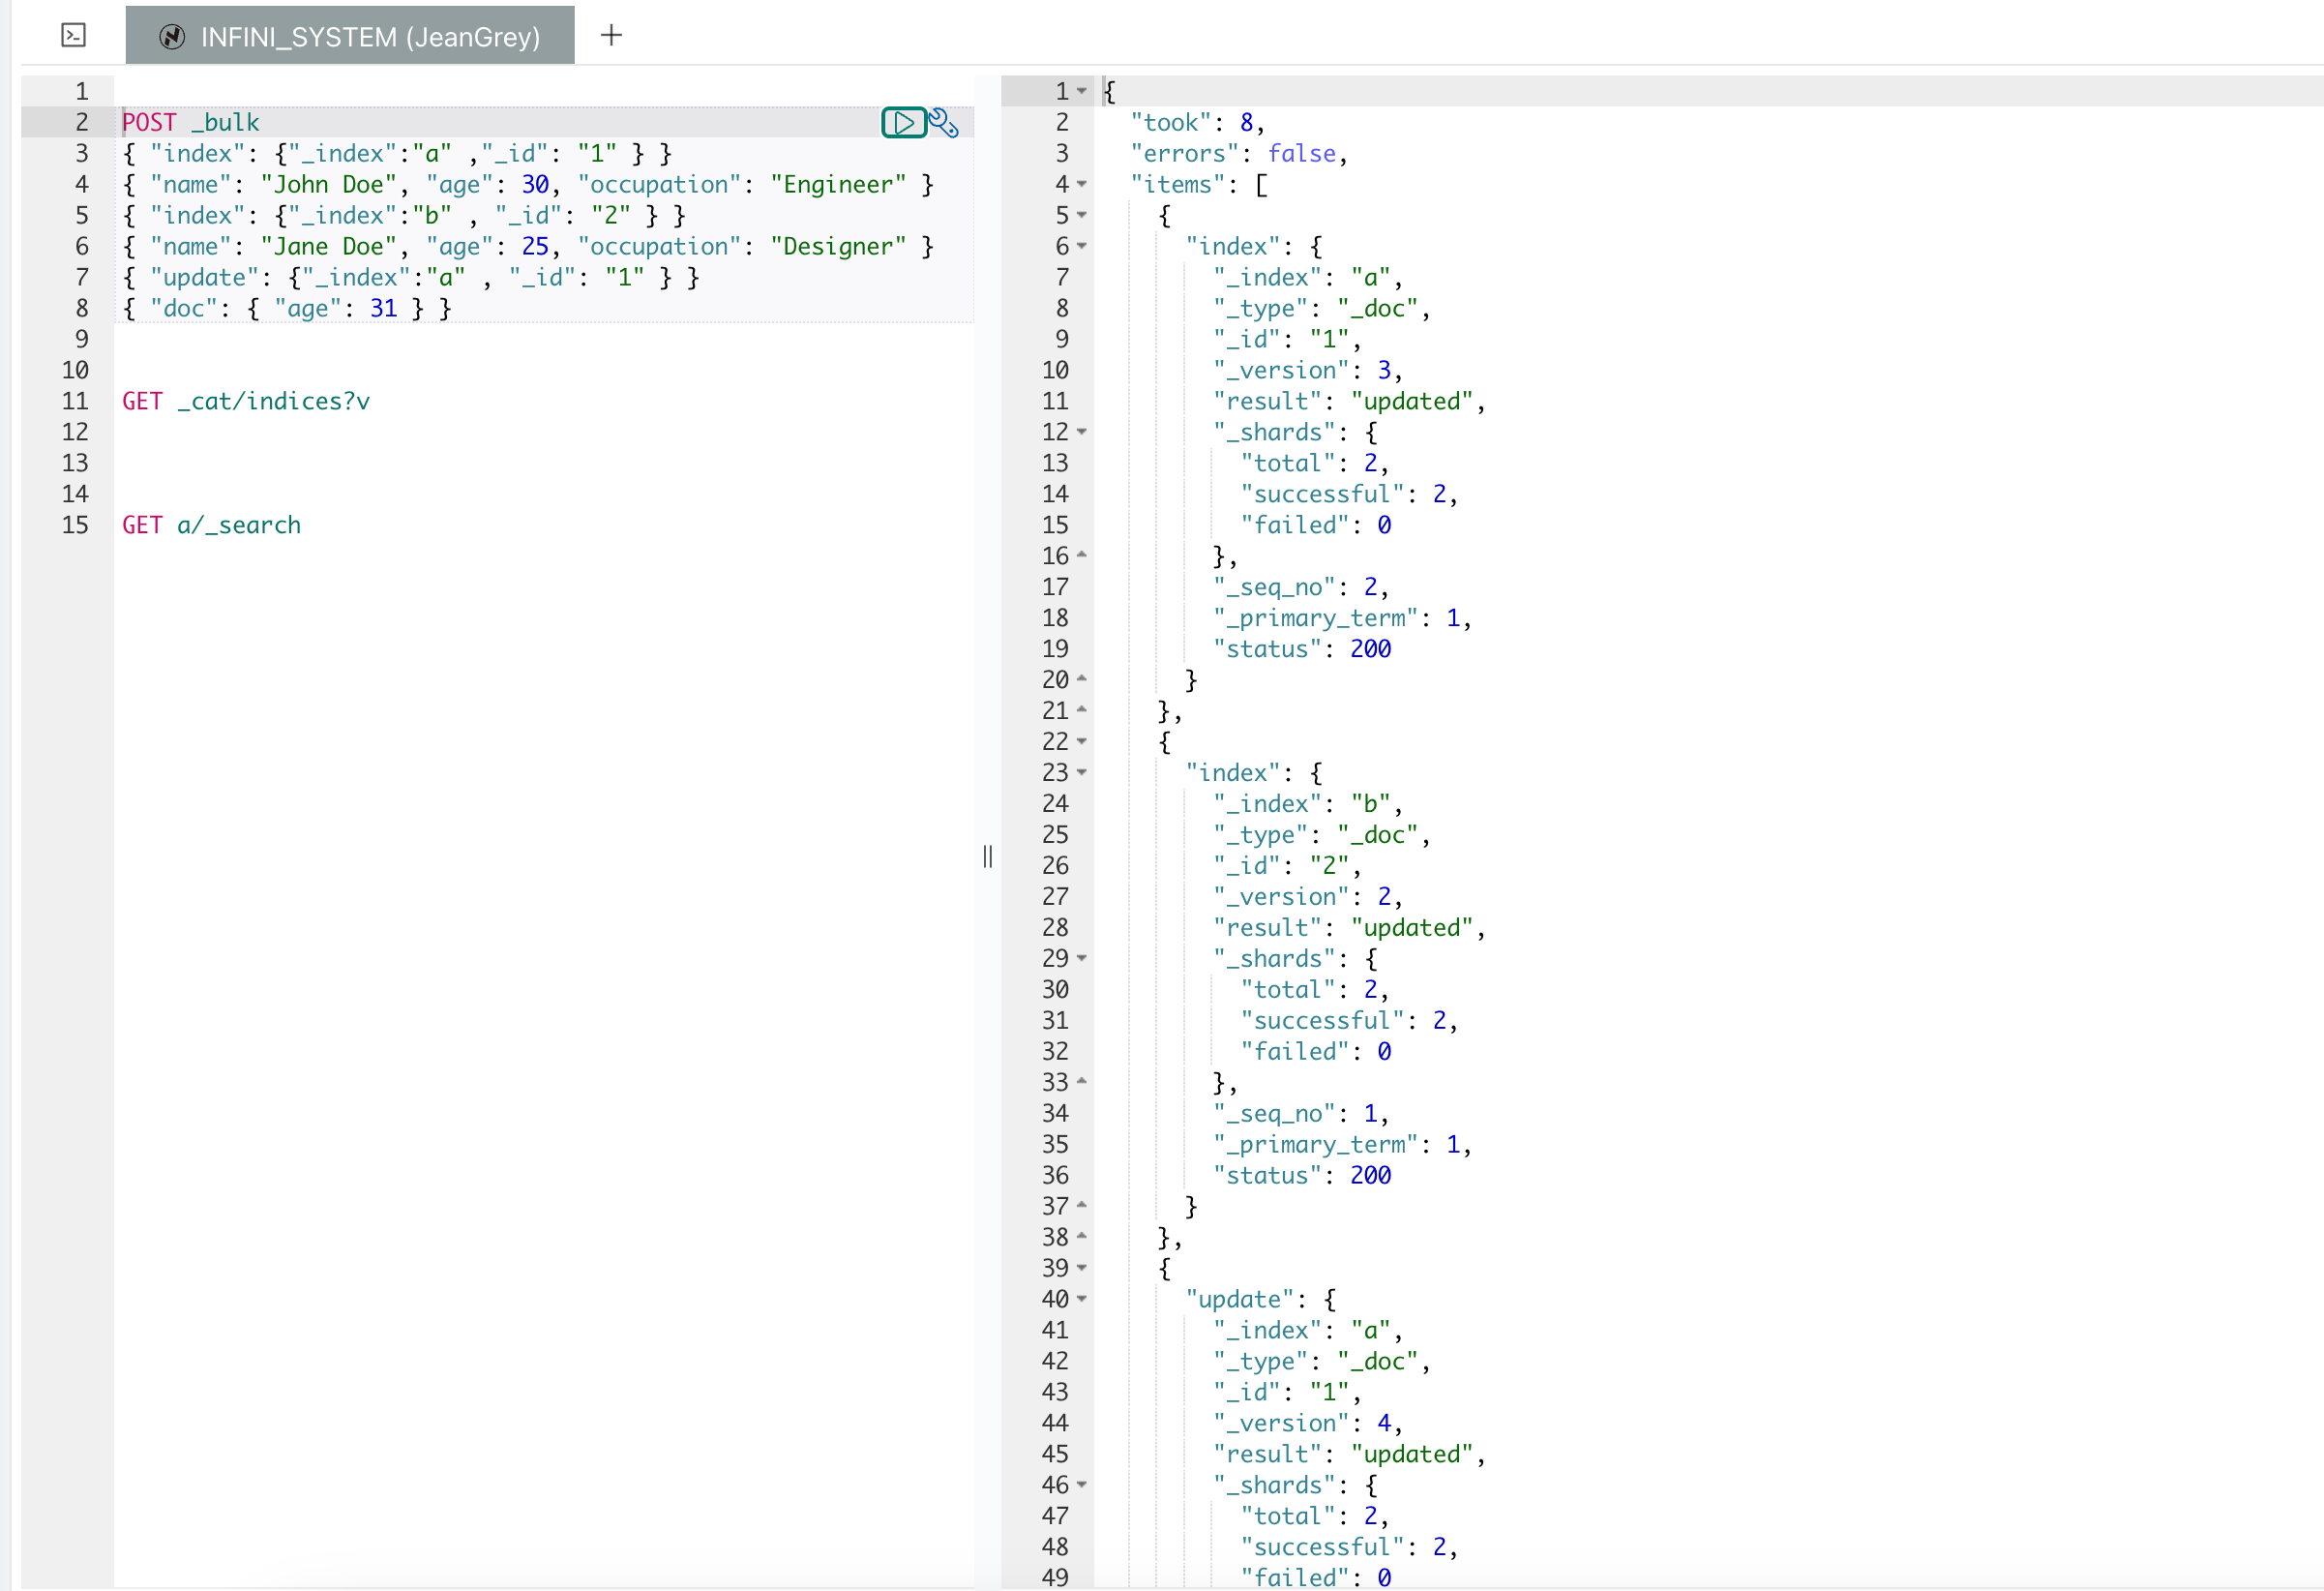
批量操作 (\_bulk API)
_bulk API 用于在一次请求中执行多个索引、删除和更新操作,这对于批量处理大规模数据非常有用,可以显著提高性能和效率。以下是 _bulk API 的基本使用示例:
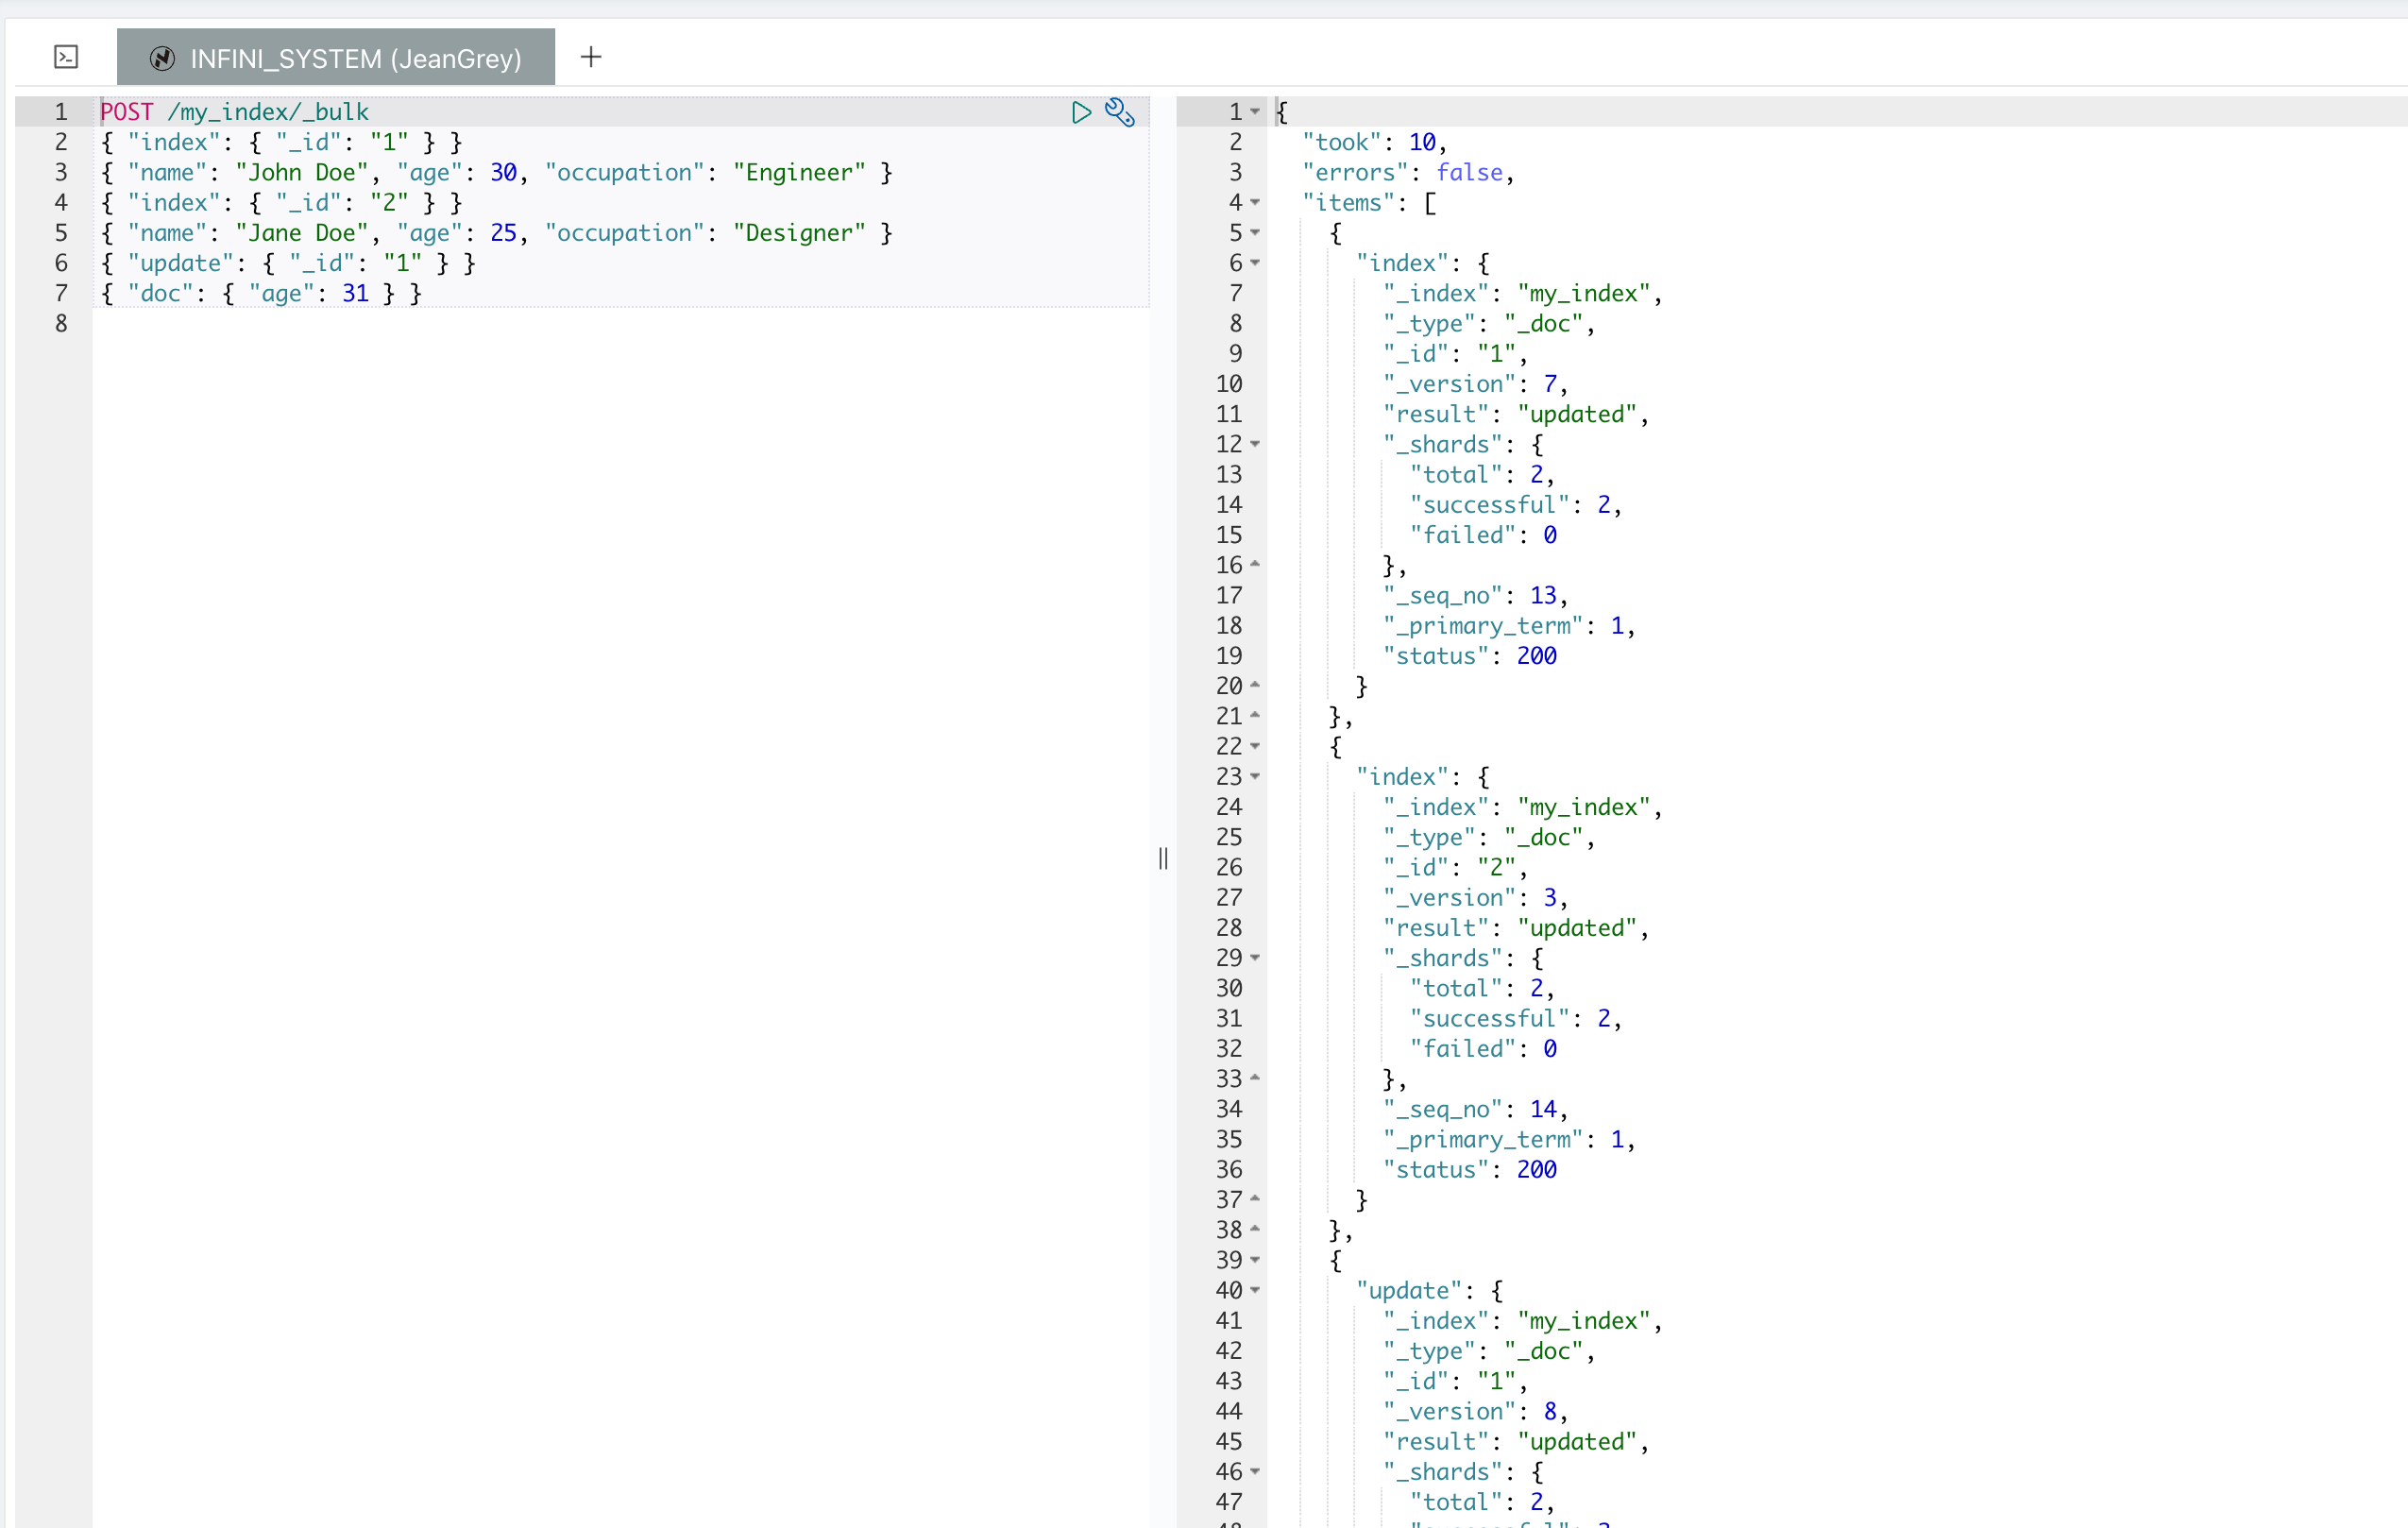
_bulk API 的请求体由多个操作和文档组成。每个操作行包含一个动作描述行和一个可选的源文档行。动作描述行指明了操作的类型(例如,index、create、delete、update)以及操作的元数据。源文档行则包含了实际的数据。
每个操作之间需要用换行符分隔,并且请求体最后必须以换行符结尾。
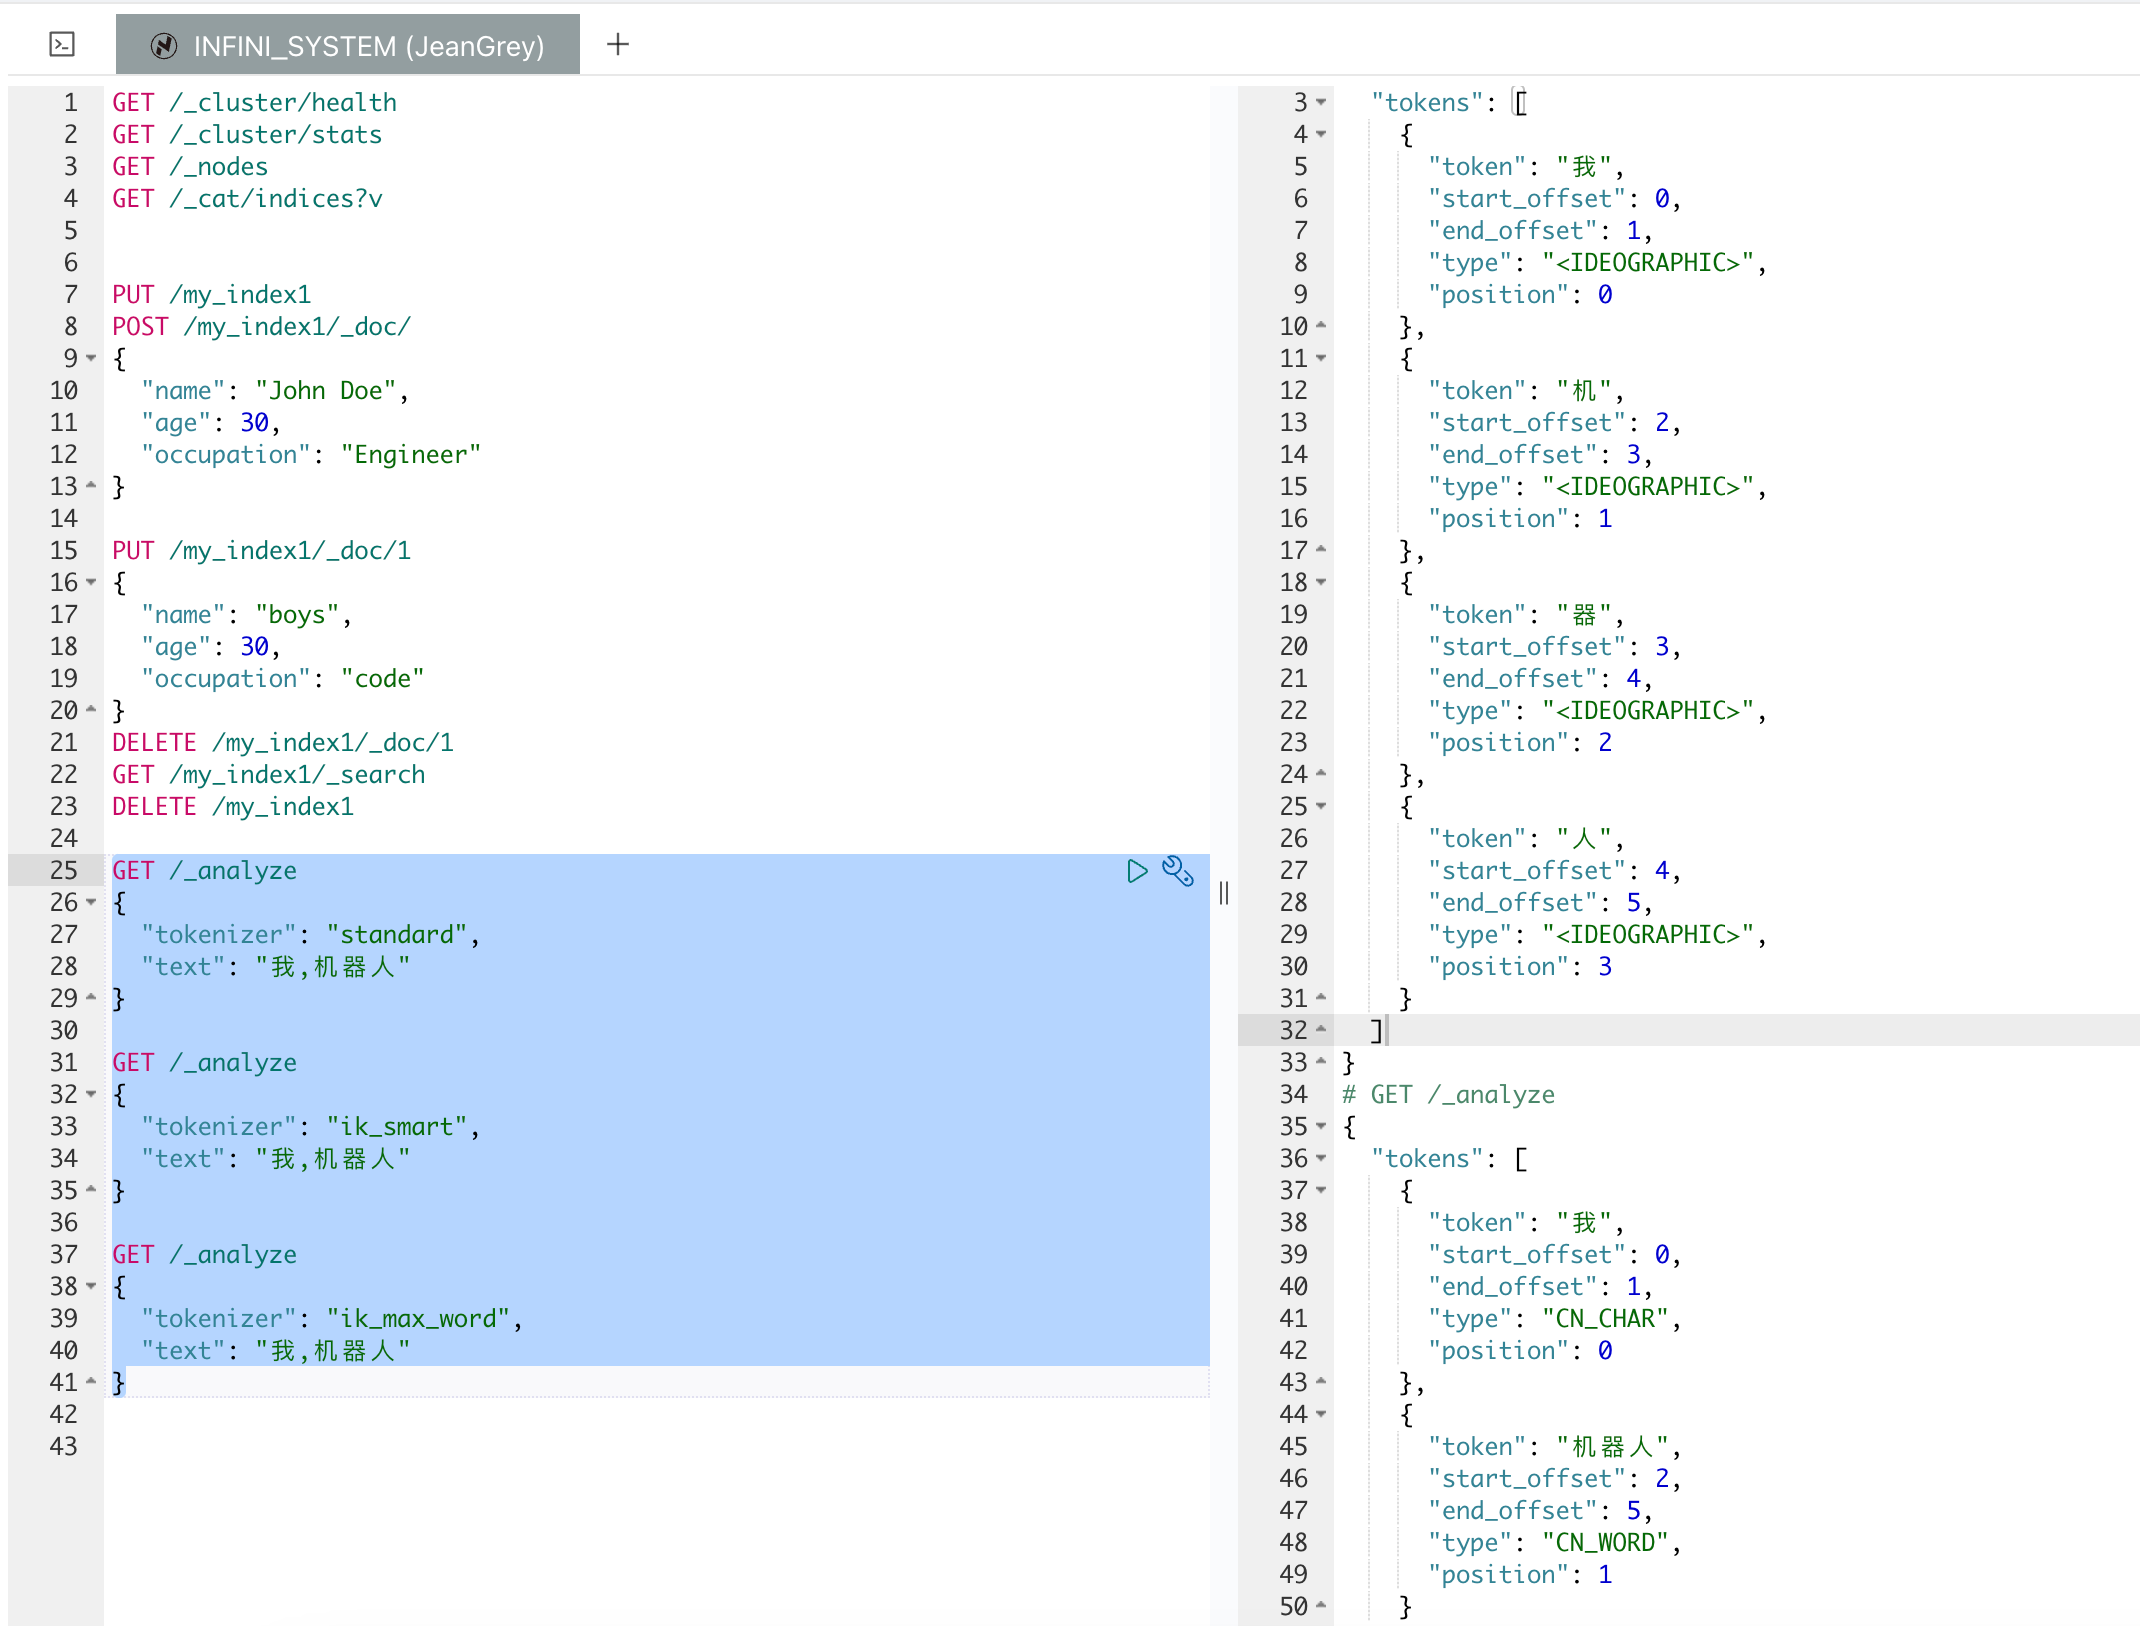
分词器
在 Easysearch 中,分词器(Analyzer)用于将文本分解为词项(terms),是全文搜索和文本分析的基础。分词器通常由字符过滤器(Character Filters)、分词器(Tokenizer)和词项过滤器(Token Filters)组成。以下是关于分词器的详细介绍:
1.字符过滤器(Character Filters):在分词之前对文本进行预处理。例如,去除 HTML 标签,替换字符等。
2.分词器(Tokenizer):将文本分解为词项(tokens)。这是分词过程的核心。
3.词项过滤器(Token Filters):对词项进行处理,如小写化、去除停用词、词干提取等。

只有 text 字段支持全文检索,返回的结果根据相似度打分,我们一起看下
.POST /index/\_mapping
- 这个部分表示要向名为
index的索引添加或更新映射设置。
2.“properties”
properties定义了索引中文档的字段结构。在这个例子中,定义了一个名为content的字段。
3.“content”
- 定义了名为
content的字段。
4.“type”: “text”
type 字段指定 content 字段的数据类型为 text。text 类型适用于需要分词和全文搜索的字段。
5.“analyzer”: “ik_max_word”
analyzer 字段指定索引时使用的分词器为ik_max_word。ik_max_word 是 IK 分词器中的一种,它会尽可能多地将文本分解为更多的词项。
6.“search_analyzer”: “ik_smart”
search_analyzer 字段指定搜索时使用的分词器为ik_smart。ik_smart 是 IK 分词器中的另一种,它会更智能地进行分词,以提高搜索的准确性。
当然,在设置这个 mapping 的时候可以使用同样的分词器,也可以使用不同的分词器。这里介绍下 IK 分词器:
- IK 分词器是一种中文分词器,适用于中文文本的分词。IK 分词器有两种分词模式:
ik_max_word和ik_smart。
ik_max_word:将文本尽可能多地切分成词项,适用于需要更高召回率的场景。ik_smart:进行最智能的分词,适用于需要更高精度的搜索场景。
这个 DSL 的设置意味着,在向这个索引添加或更新文档时,content 字段的文本会使用ik_max_word 分词器进行分词处理,以确保文本被尽可能多地切分成词项。而在搜索时,content 字段的文本会使用ik_smart 分词器进行分词处理,以提高搜索的准确性和相关性。
以下是关于 standard,ik_smart,ik_max_word 这几个分词器的对比:
结果如下:
如果使用了不存在的分词器会出现这个错误。
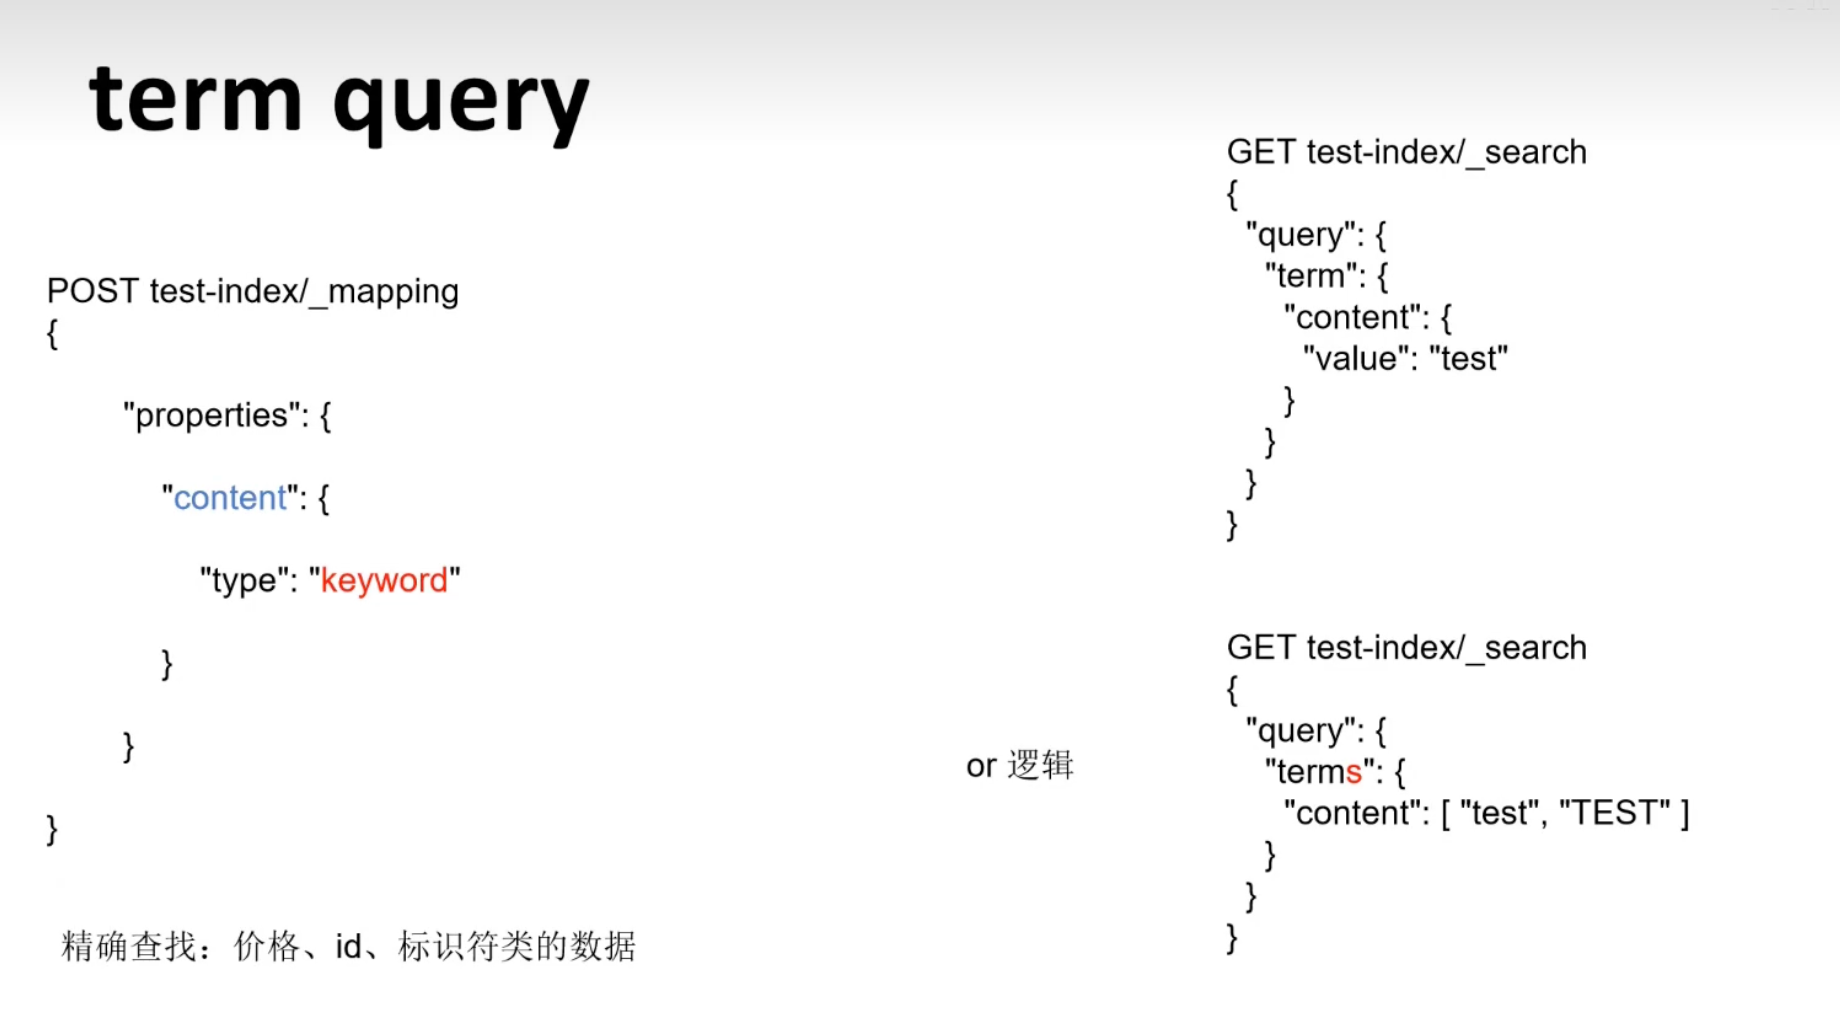
精确搜索/正则表达式搜索/通配符
在 Easysearch 中,精确搜索、正则表达式搜索和通配符搜索是三种不同的搜索方式,各有其应用场景和特点:
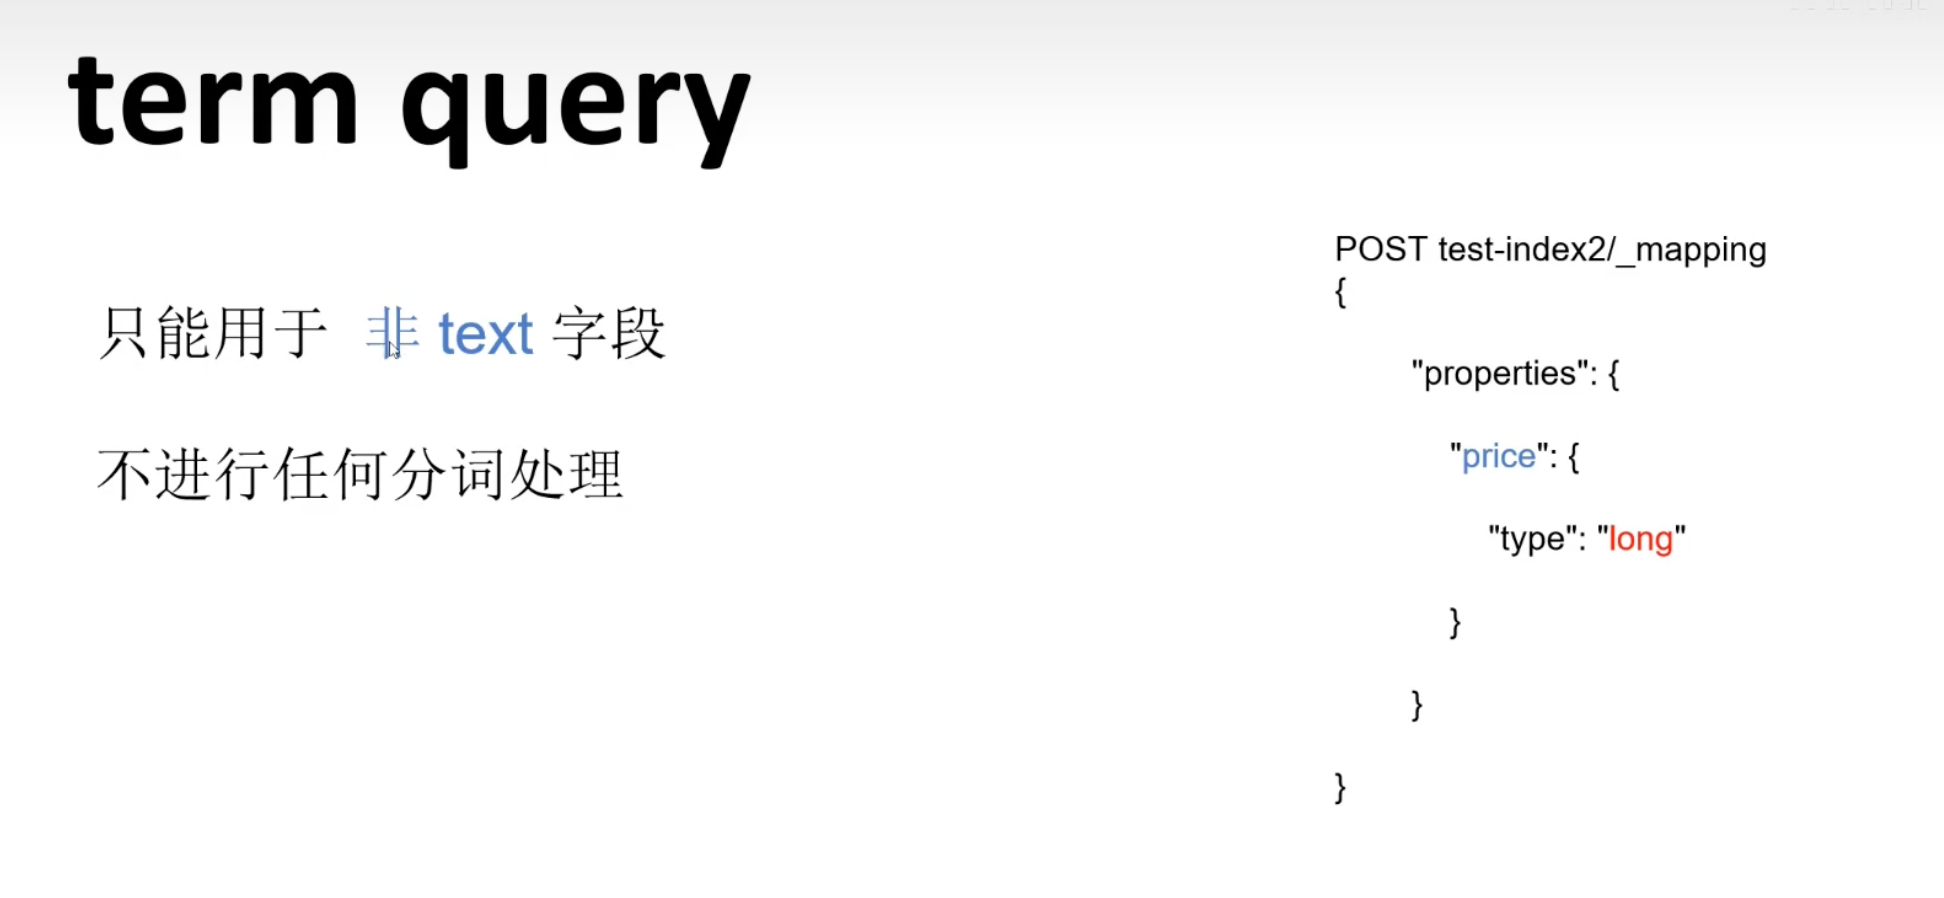
1.精确搜索 (Term Query):
- 精确搜索用于查找与搜索词完全匹配的文档。
- 不进行分词处理,通常用于关键字、ID、标签等字段的精确匹配。
- 适用于结构化数据或不需要分词的字段(如数字、日期、布尔值等)。
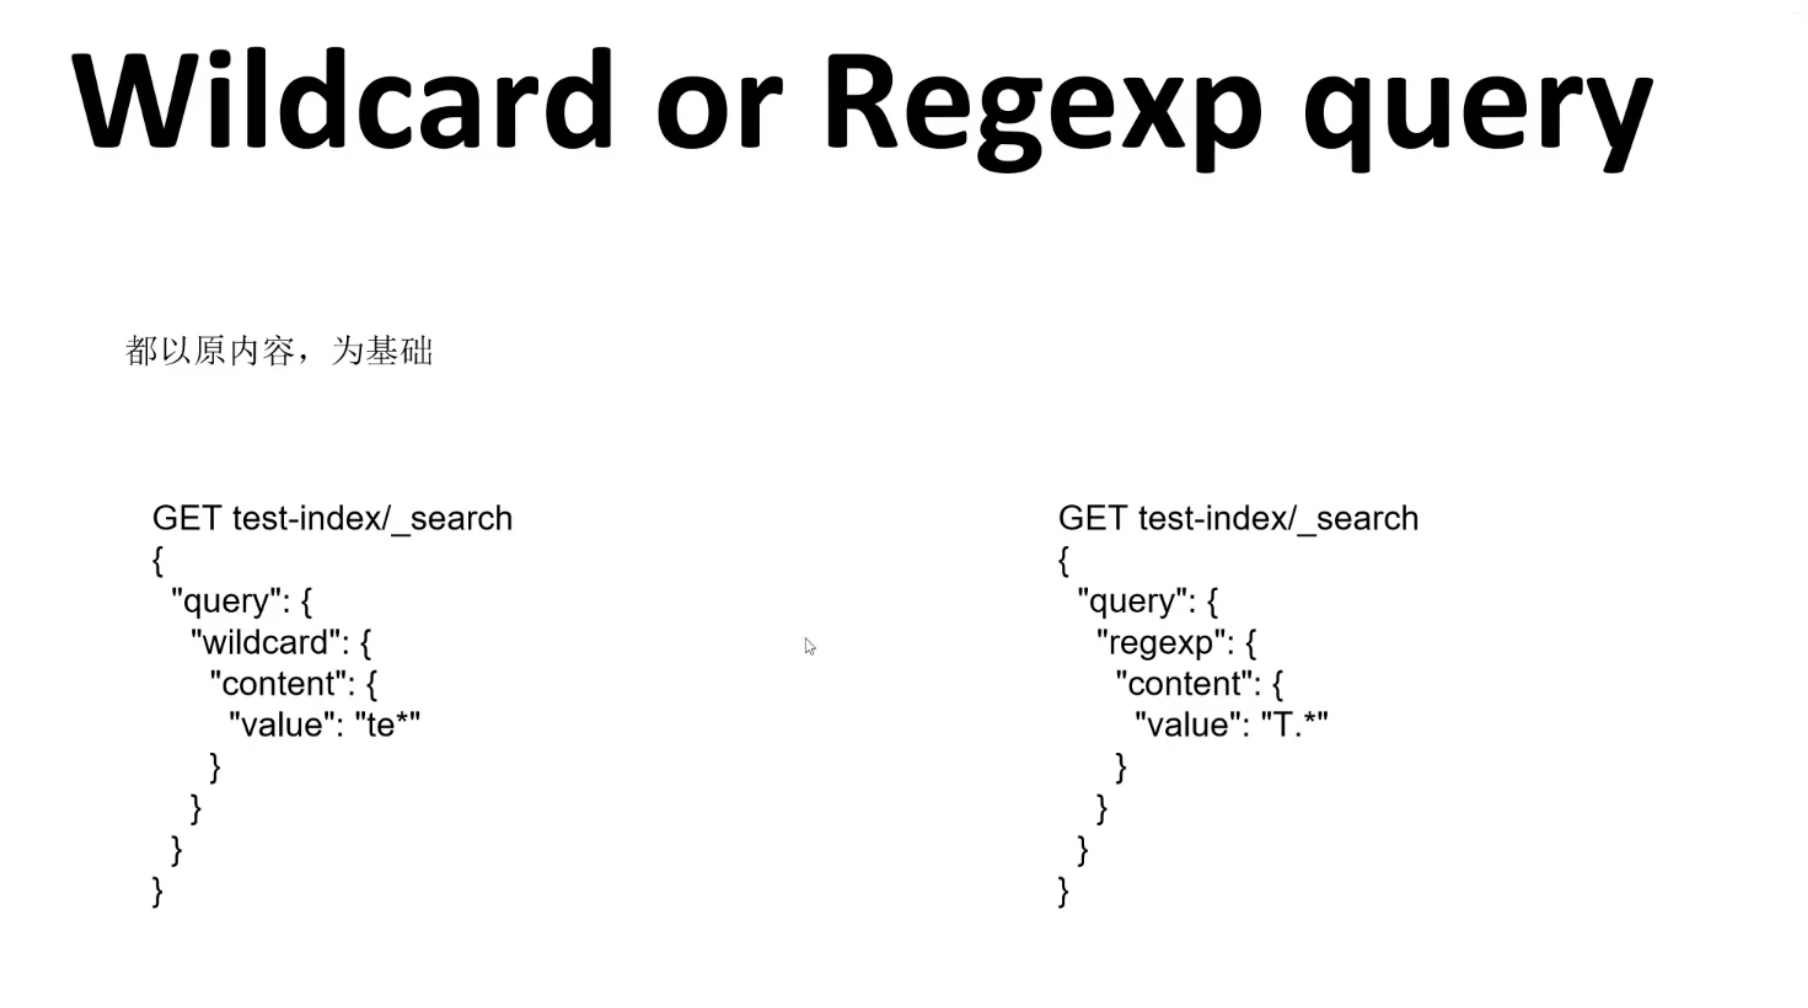
2.正则表达式搜索 (Regexp Query):
- 正则表达式搜索用于基于正则表达式模式匹配的文档搜索。
- 支持复杂的字符串匹配模式,但性能可能较低,特别是当数据量较大时。
- 适用于需要灵活且复杂匹配条件的搜索。
3.通配符搜索 (Wildcard Query):
- 通配符搜索用于通过通配符模式匹配文档。
- 支持 ?(匹配单个字符)和 \*(匹配零个或多个字符)。
- 性能相对较差,因为通配符搜索可能需要扫描大量数据。
- 精确搜索:用于需要绝对匹配特定词语或不需要分词的字段。例如,查找特定用户 ID 或状态。
- 正则表达式搜索:用于需要复杂字符串模式匹配的场景,但要谨慎使用,避免性能问题。
- 通配符搜索:用于简单模式匹配,但同样需要注意性能影响,尽量避免在大数据集上频繁使用。
接下来看这个例子,我们将使用批量导入数据,然后进行几种不同类型的查询,包括精确查询、通配符查询和正则表达式查询。
1.精确查询:查询状态为 “active” 的用户。
2.通配符查询:查询 bio 字段中包含 “John” 开头的词。
3.正则表达式查询:查询用户名以 “john” 开头的用户
通过这些例子,你可以看到如何在 Easysearch 中使用批量导入数据,然后使用各种查询方法来检索特定条件的数据。这些查询方法可以帮助你高效地搜索和分析数据,以满足不同的业务需求。
这里同样是 《老杨玩搜索》中总结的“小抄”来方便记忆:
多字段查询
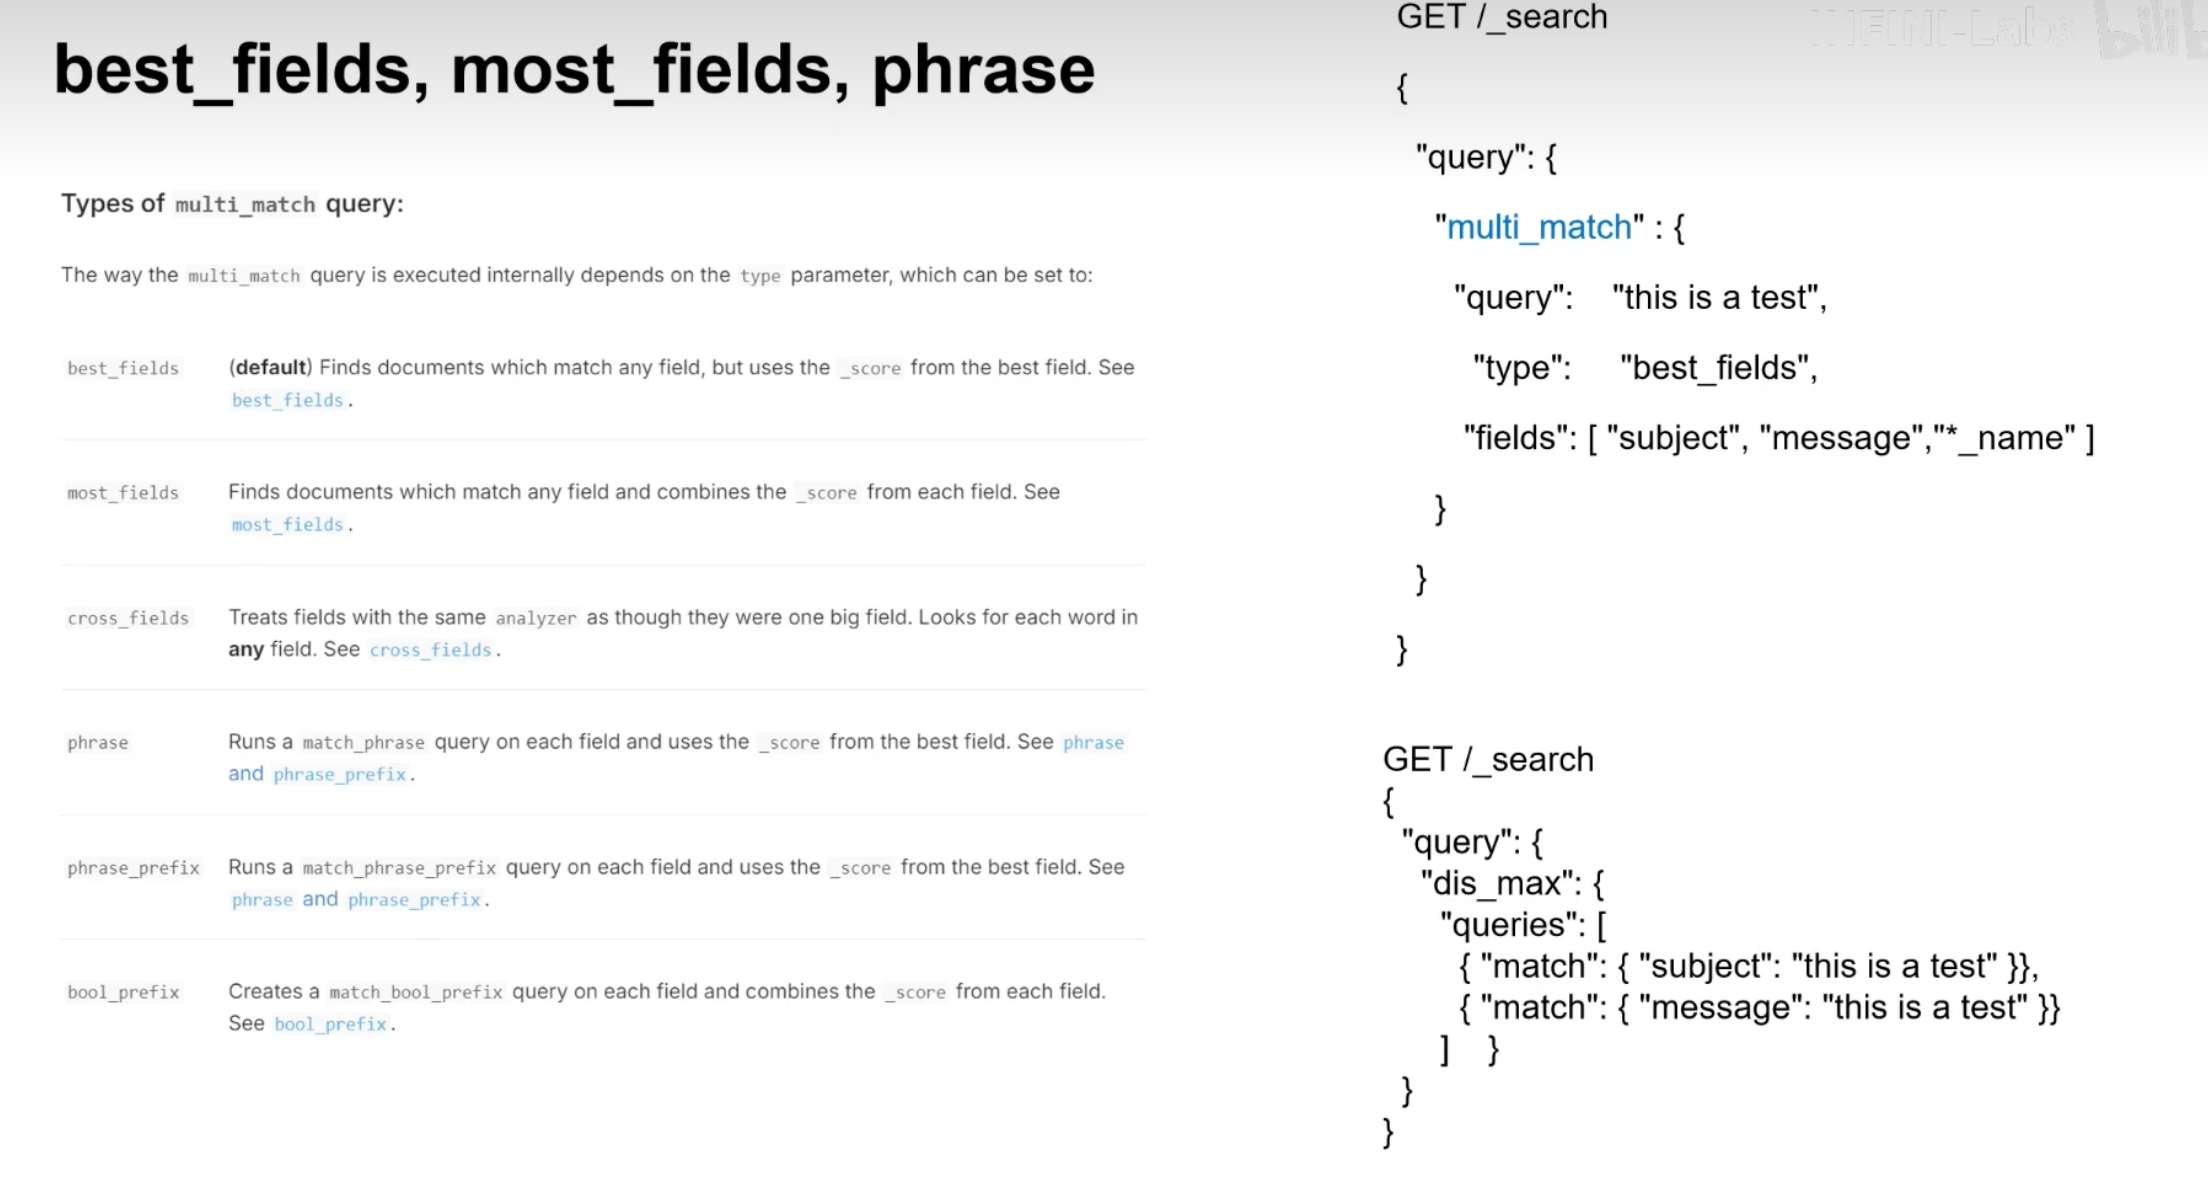
在 Easysearch 中,多字段查询允许您在多个字段上同时执行搜索,以获取更精确的结果。最常用的多字段查询类型是 multi_match 查询。multi_match 查询是 match 查询的扩展,能够在多个字段中搜索指定的关键词。
multi_match 查询支持多种匹配模式,如 best_fields、most_fields、cross_fields、phrase 和 phrase_prefix。以下是各模式的简要介绍:
- best_fields:默认模式,选择匹配度最高的字段。
- most_fields:计算每个字段的匹配度,然后将匹配度相加。
- cross_fields:将多个字段视为一个字段进行匹配,适用于分析文本被分散到多个字段的情况。
- phrase:短语匹配,确保词项顺序与查询相同。
- phrase_prefix:短语前缀匹配,允许词项的部分匹配。
我们先导入一些示例数据到一个索引 documents 中:
我们将使用 multi_match 查询在 title 和 content 字段中同时搜索关键词。
1.基本 multi_match 查询:
2.指定匹配模式为 best_fields:
3.指定匹配模式为 most_fields:
4.使用 cross_fields 模式:
5.短语匹配 (phrase):
6.短语前缀匹配 (phrase_prefix):
- query:要搜索的关键词或短语。
- fields:要搜索的字段列表,可以包含一个或多个字段。
- type:指定匹配模式,默认为 best_fields。
使用 multi_match 查询,您可以在多个字段上同时执行搜索,获得更精确和全面的结果。通过指定不同的匹配模式,您可以调整查询行为以满足特定的搜索需求。无论是基本关键词匹配、短语匹配还是跨字段匹配,multi_match 查询都提供了强大的功能来处理复杂的搜索场景。
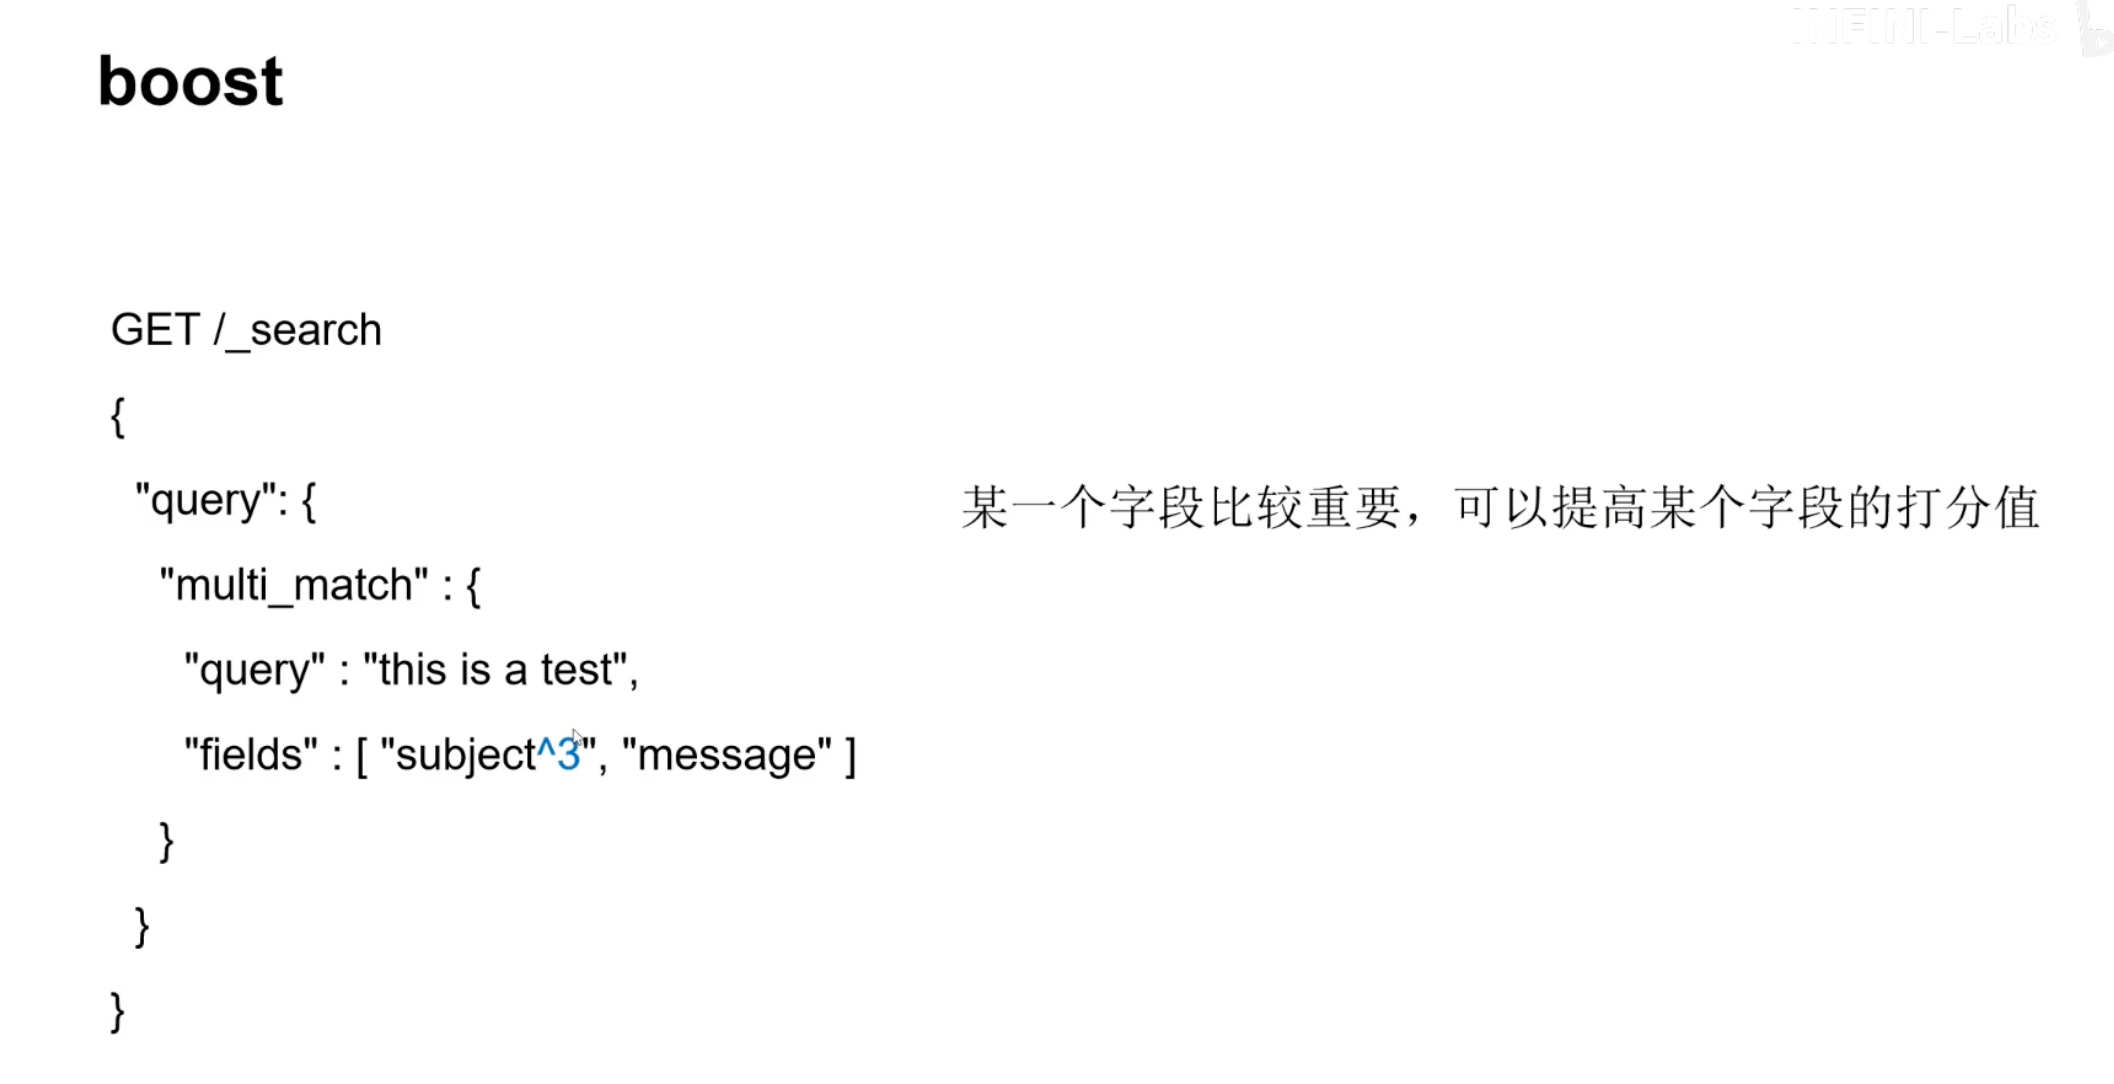
除此之外,还可以使用 boost 参数用于调整特定字段的权重,从而影响搜索结果的相关性评分。multi_match 查询支持为不同字段设置不同的 boost 值,以便在搜索结果中优先显示某些字段的匹配项。
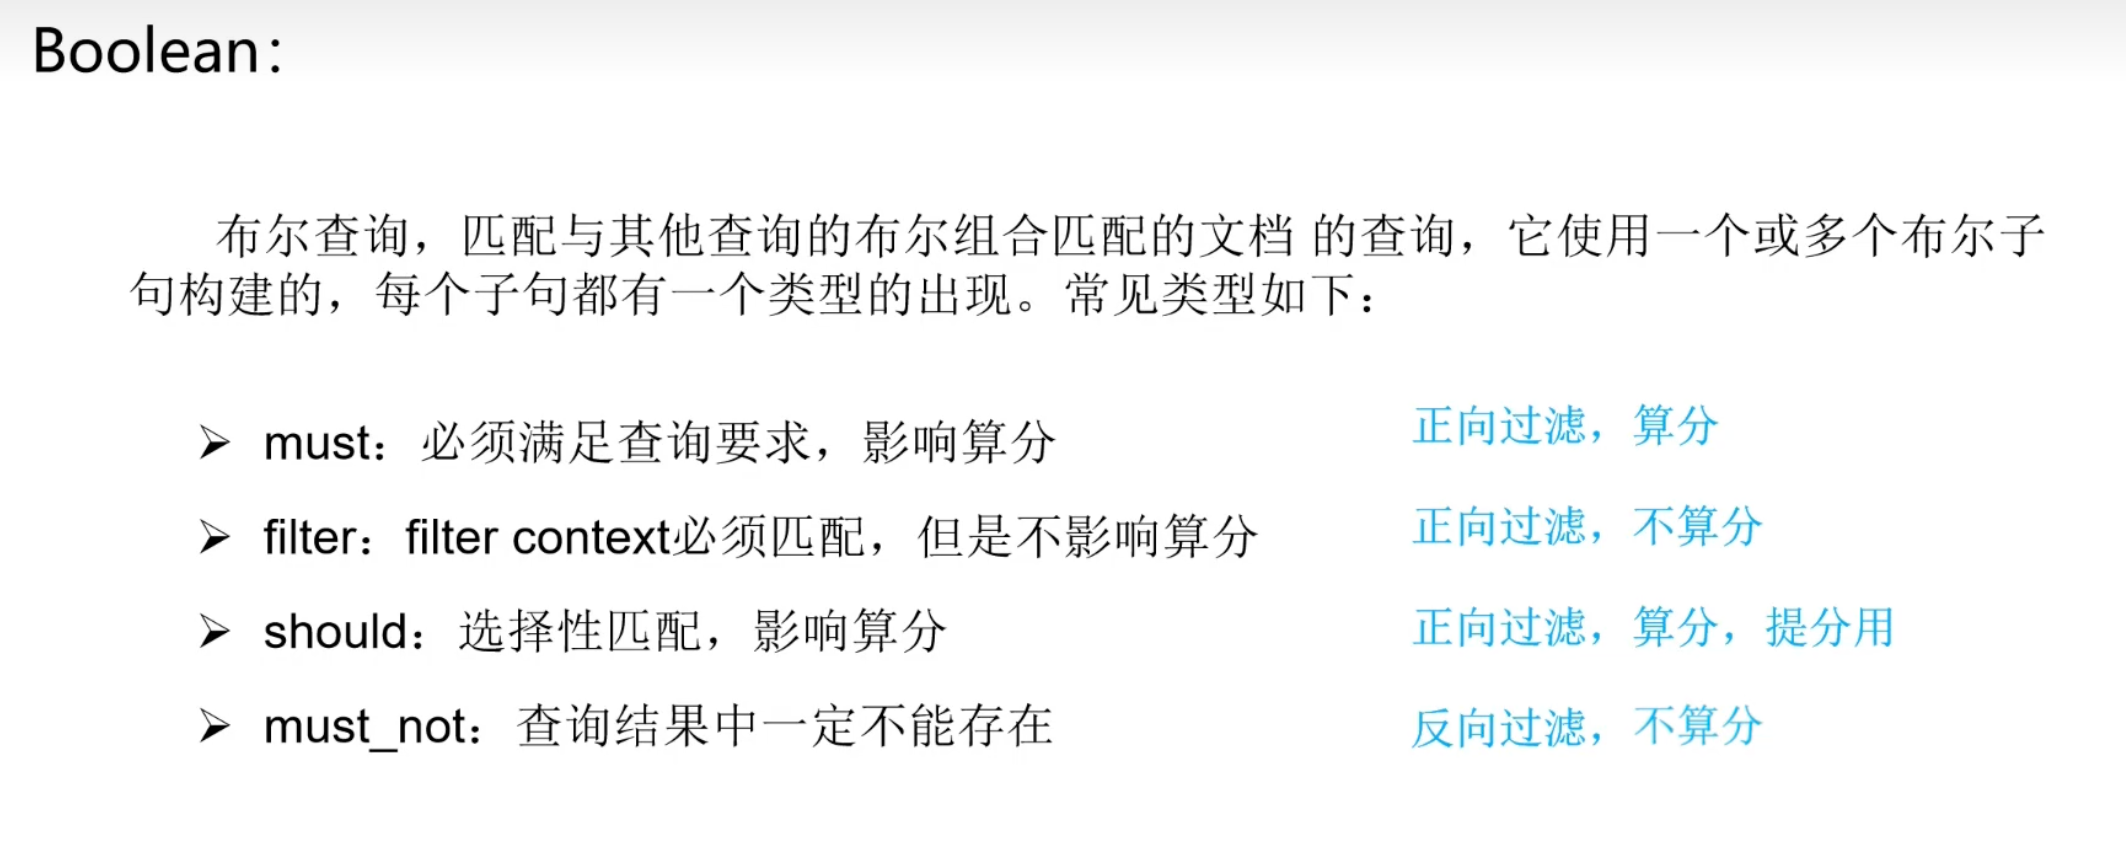
布尔查询
布尔查询是 Easysearch 中非常强大且灵活的一种查询方式,它允许用户通过组合多个查询条件来实现复杂的搜索需求。布尔查询使用 bool 查询类型,可以包含以下几种子句:must、filter、must_not 和 should。每种子句都有其特定的用途和语义。
1.must:
- 包含在
must数组中的查询条件必须匹配,类似于逻辑上的 AND 操作。 - 如果有多个条件,所有条件都必须满足,文档才会被包含在结果集中。
2.filter:
- 包含在
filter数组中的查询条件必须匹配,但它不会影响评分。 filter子句通常用于对性能要求较高的过滤操作,因为它不计算相关性评分。
3.must_not:
- 包含在
must_not数组中的查询条件必须不匹配,类似于逻辑上的 NOT 操作。 - 如果有任何一个条件匹配,文档就会被排除在结果集之外。
4.should:
- 包含在
should数组中的查询条件至少匹配一个。 - 如果布尔查询中没有
must子句,则至少要匹配一个should子句。 should子句在计算相关性评分时也有影响。
5.minimum_should_match:
- 指定
should子句中至少需要满足的条件数量。
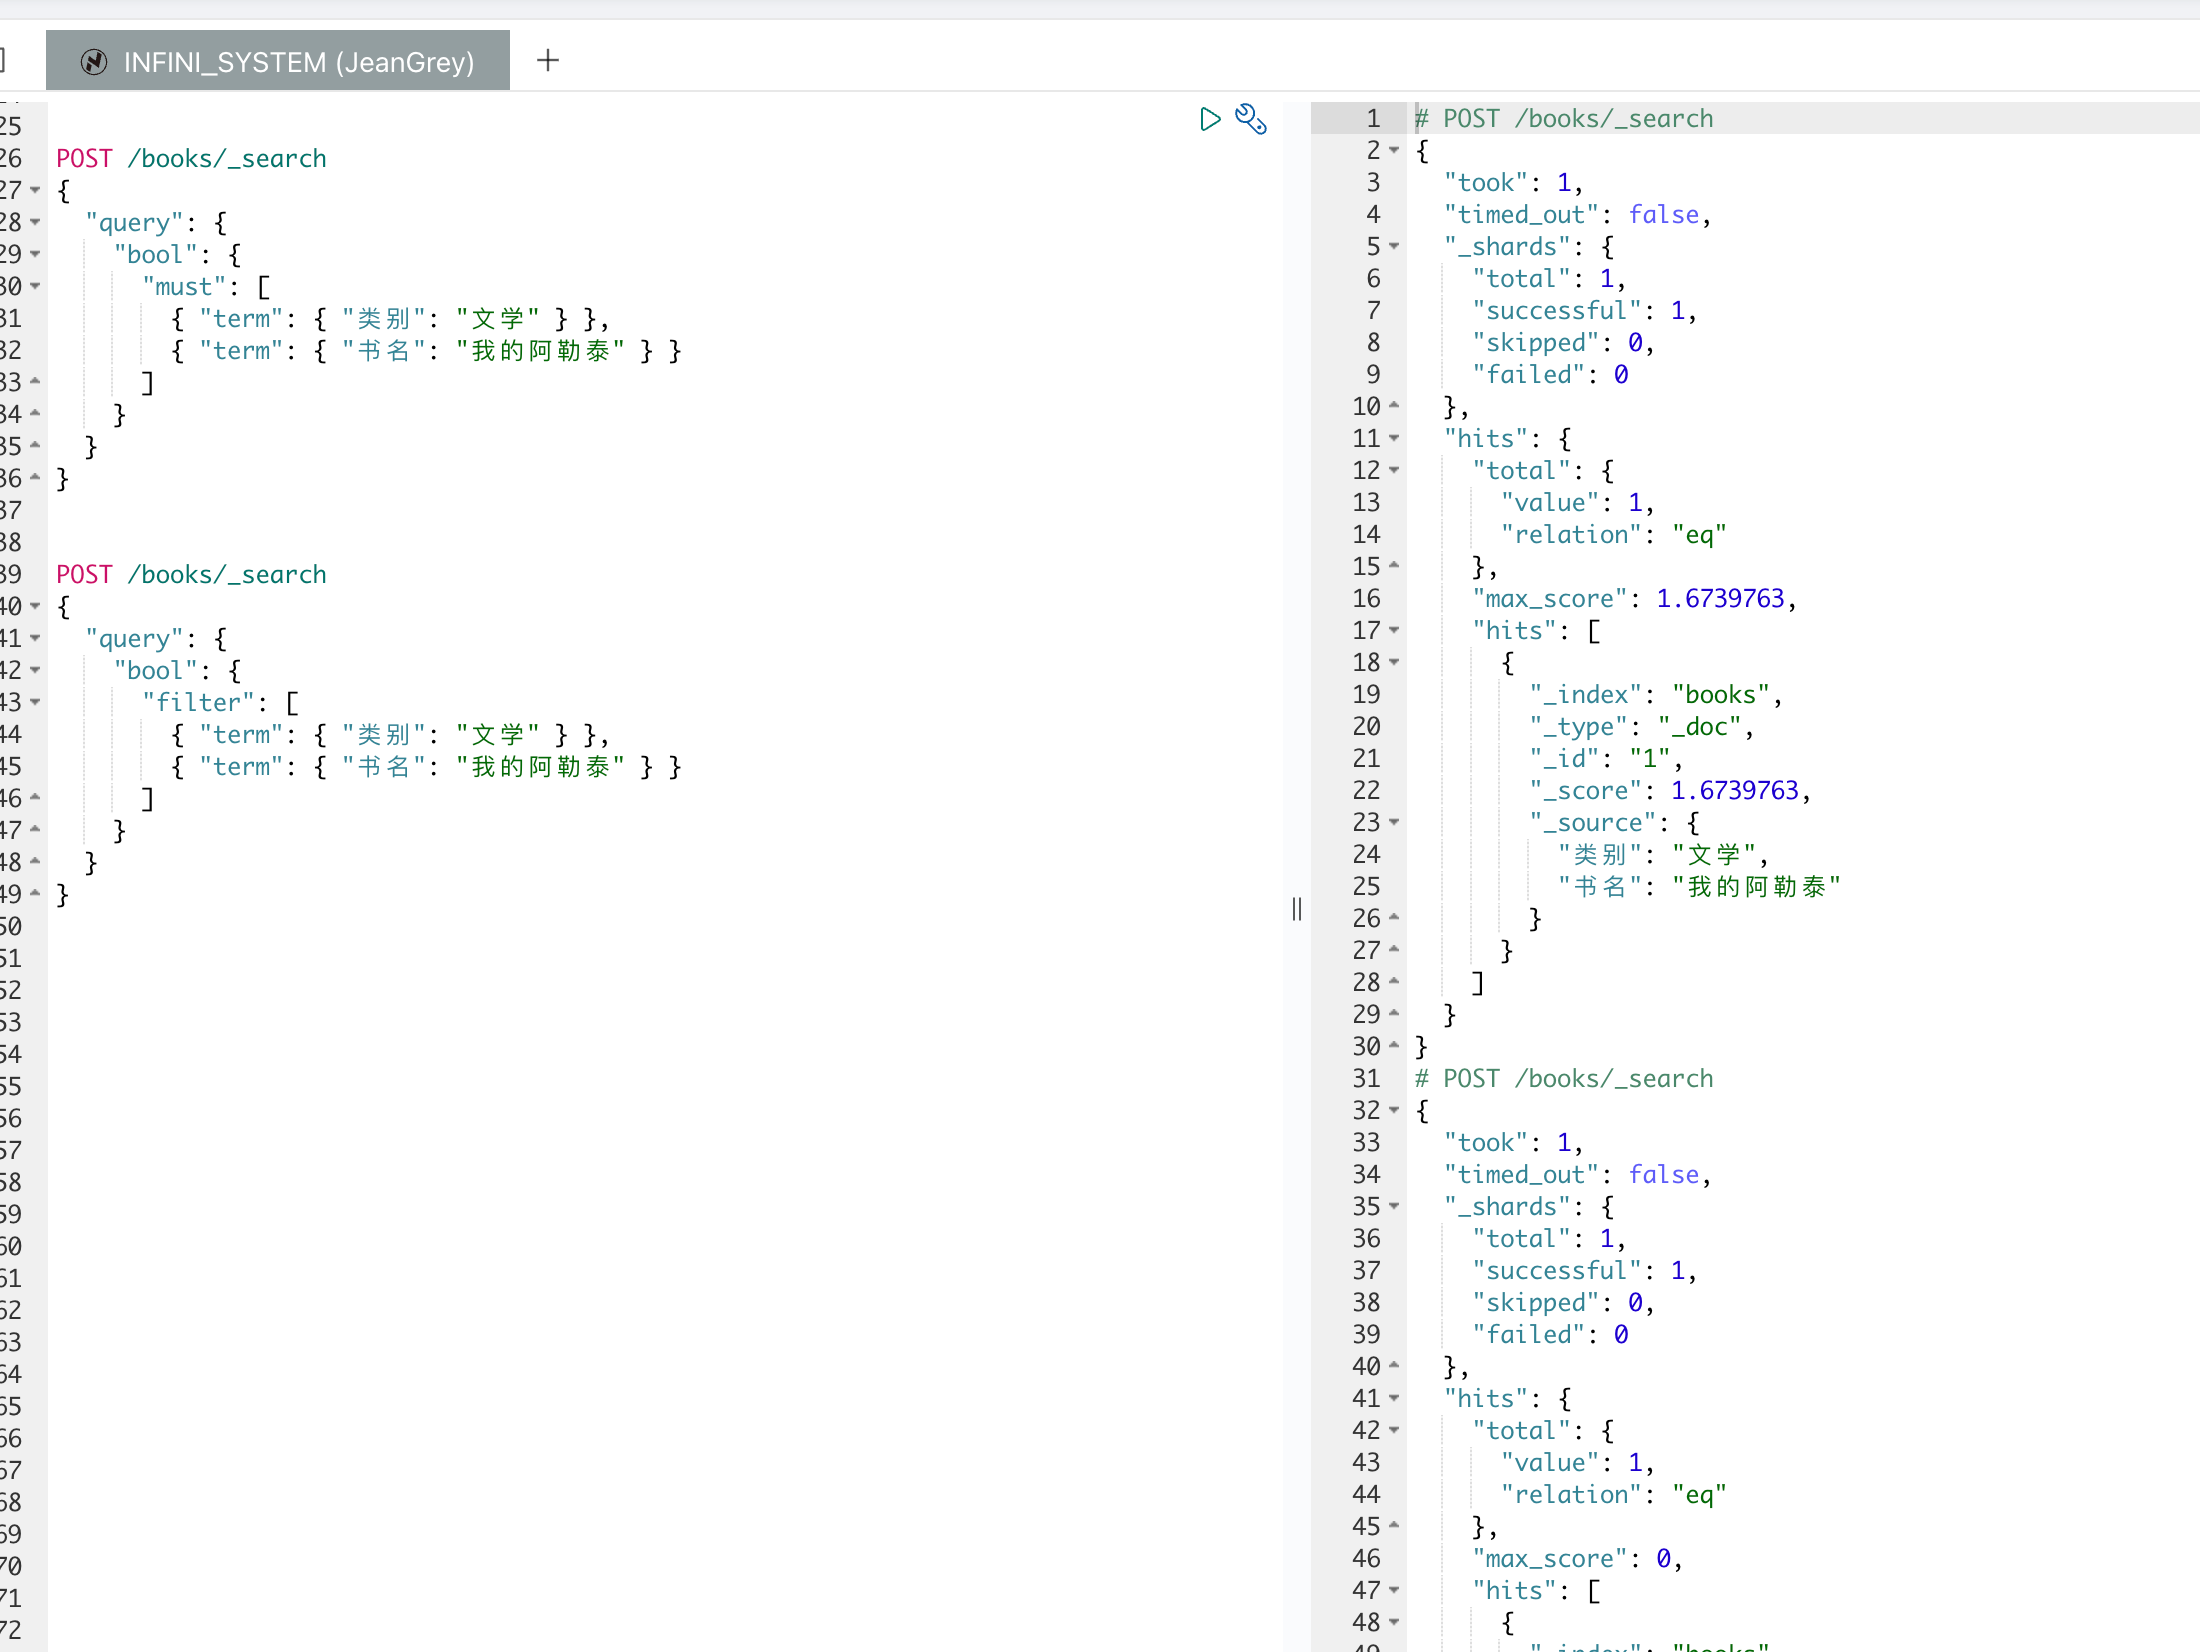
首先,我们需要创建一个名为 books 的索引,并定义它的映射(mappings)。映射用于指定每个字段的数据类型。在这个例子中,类别和书名字段都被定义为 keyword 类型,这是因为我们需要进行精确匹配查询。
接下来,我们使用批量操作(bulk API)将一些示例数据导入到 books 索引中。这些数据包括不同类别的书籍。
现在,我们使用布尔查询来搜索类别为“文学”并且书名为“我的阿勒泰”的文档。这里使用的是 must子句,表示查询结果必须满足所有条件。
我们还可以使用 filter 子句来执行相同的查询。filter 子句用于过滤文档,且不会影响文档的相关性评分。这在不需要计算相关性评分时可以提高查询性能。
当我们执行上述查询时,期望返回的结果是 books 索引中类别为“文学”且书名为“我的阿勒泰”的文档。无论是使用 must 还是 filter 子句,结果应该都是:
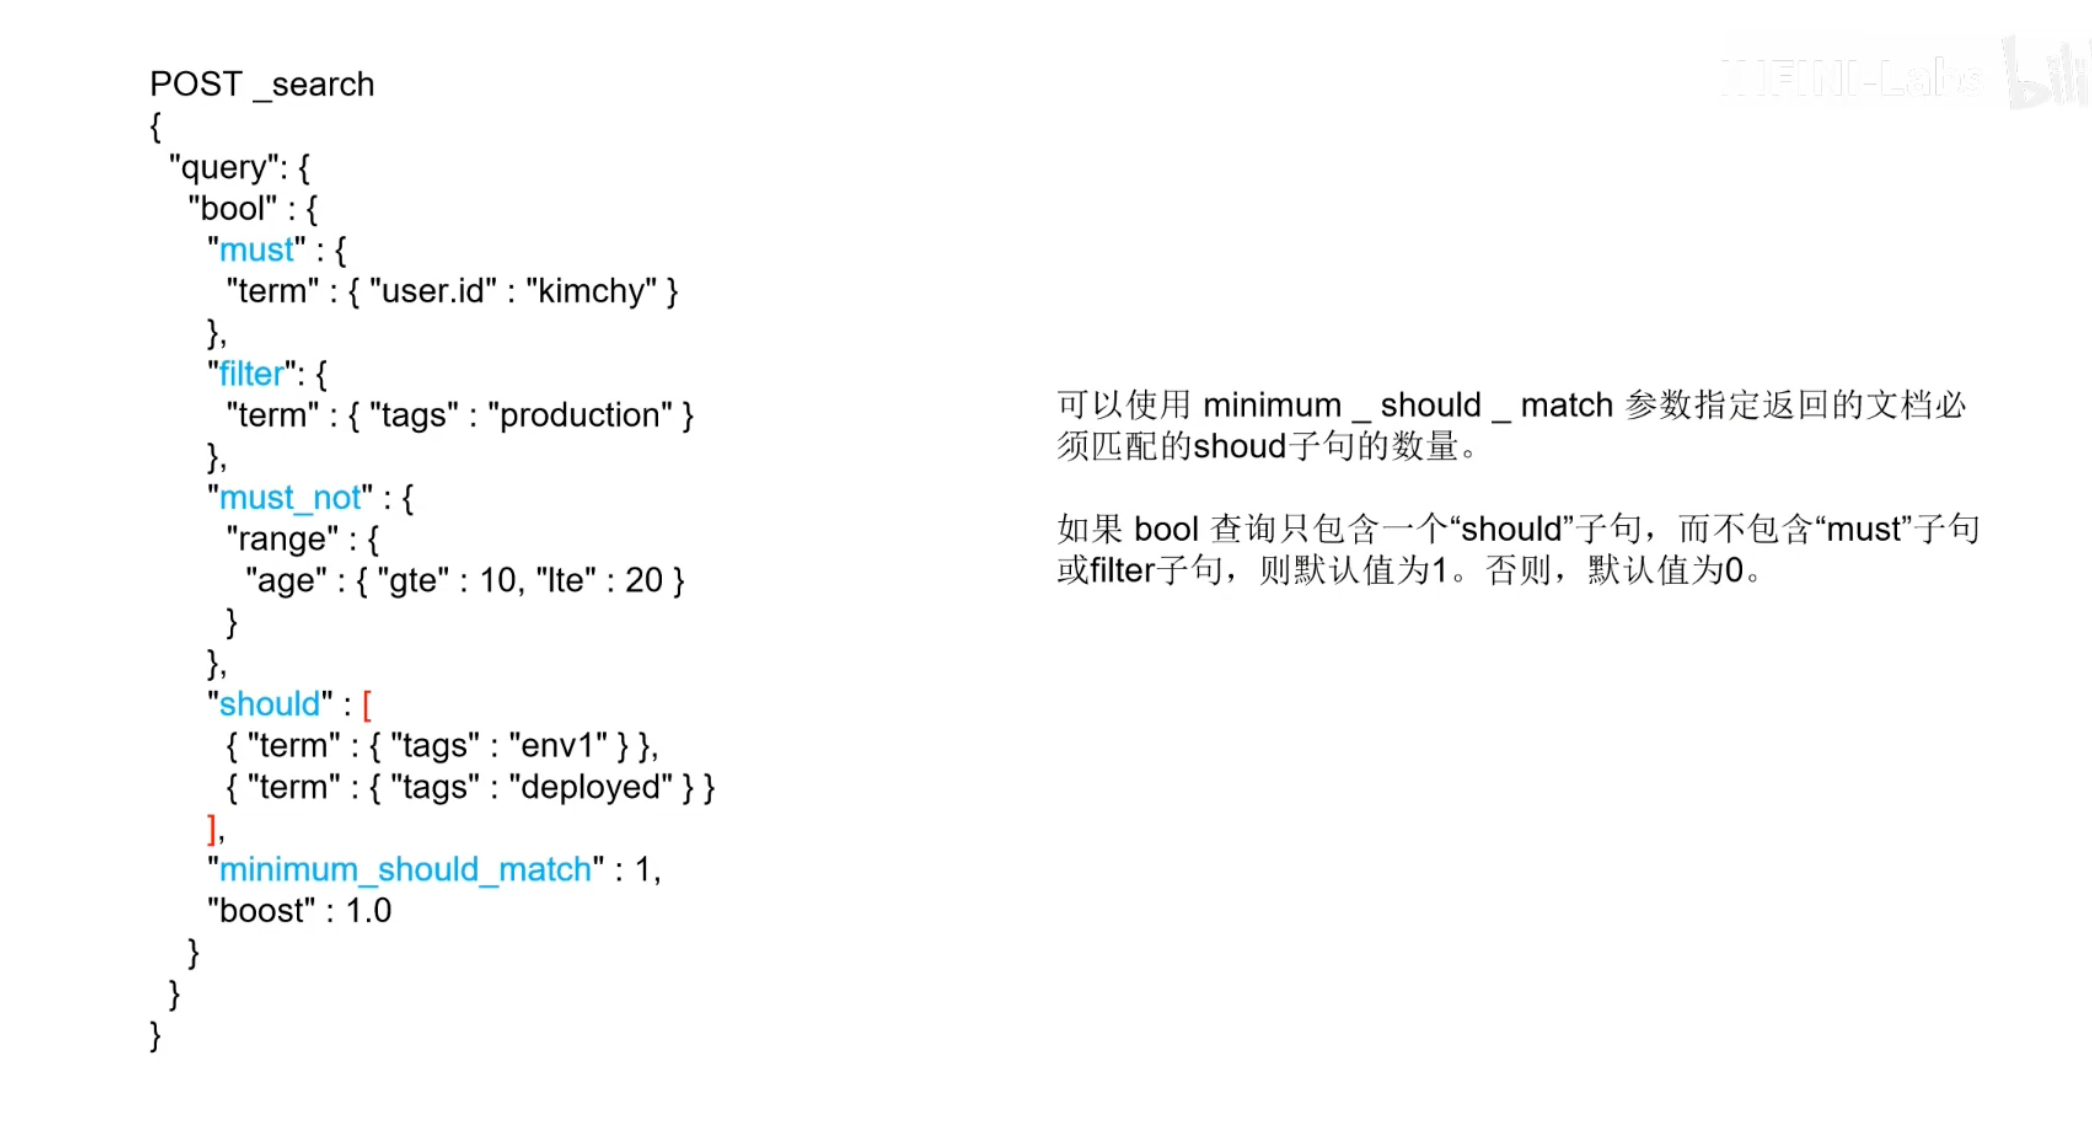
must子句:必须匹配的条件,文档必须包含user.id为kimchy。filter子句:过滤条件,文档必须包含tags为production,但不会影响评分。must_not子句:不匹配的条件,文档的age字段不能在 10 到 20 之间。should子句:可选匹配条件,至少需要匹配一个should子句中的条件。这里要求tags字段匹配env1或deployed。minimum_should_match:至少需要匹配一个 should 子句中的条件。boost:提升查询的整体评分。
为了展示这个 DSL ,我们需要创建一个索引并导入一些数据。假设我们要在 Easysearch 中创建一个索引 users ,并插入一些测试数据。
创建索引
批量导入数据
接下来执行布尔查询:
根据以上查询,预期返回的结果应该符合以下条件:
user.id必须是kimchy(由must子句决定)。tags必须包含production(由filter子句决定)。age字段不在 10 到 20 之间(由must_not子句决定)。tags字段中至少包含env1或deployed中的一个(由should子句和minimum_should_match参数决定)。
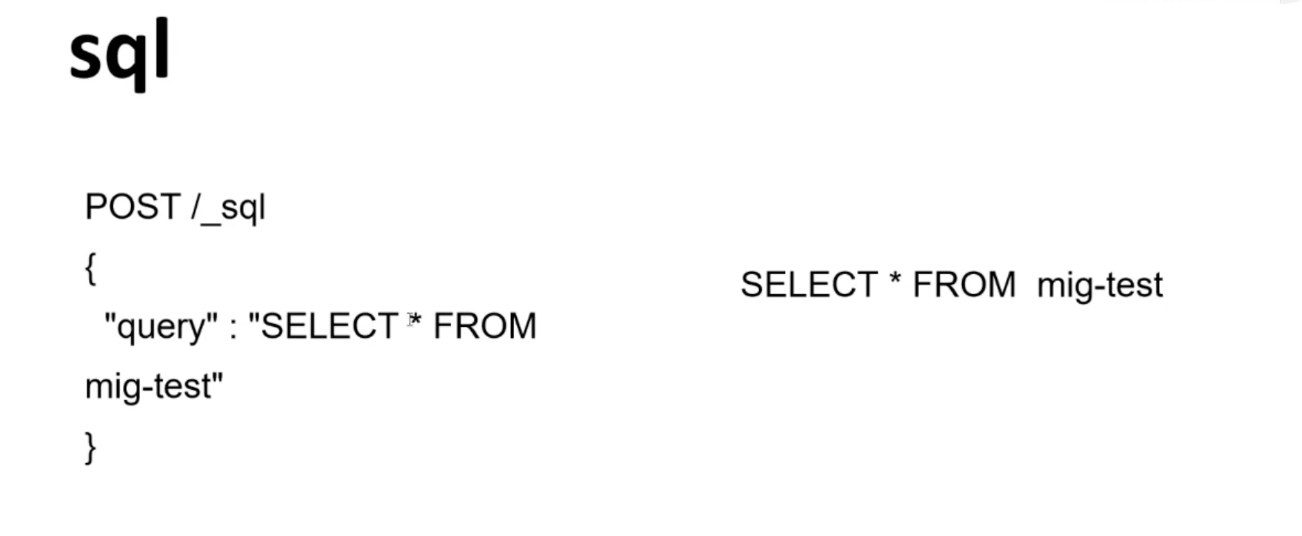
SQL 搜索
Easysearch 直接支持 SQL 查询,无需额外安装插件,同时兼容 Elasticsearch 的 SQL 调用方式,还可以直接编写原生 SQL 查询。
以下是一些测试 SQL 语句的示例:
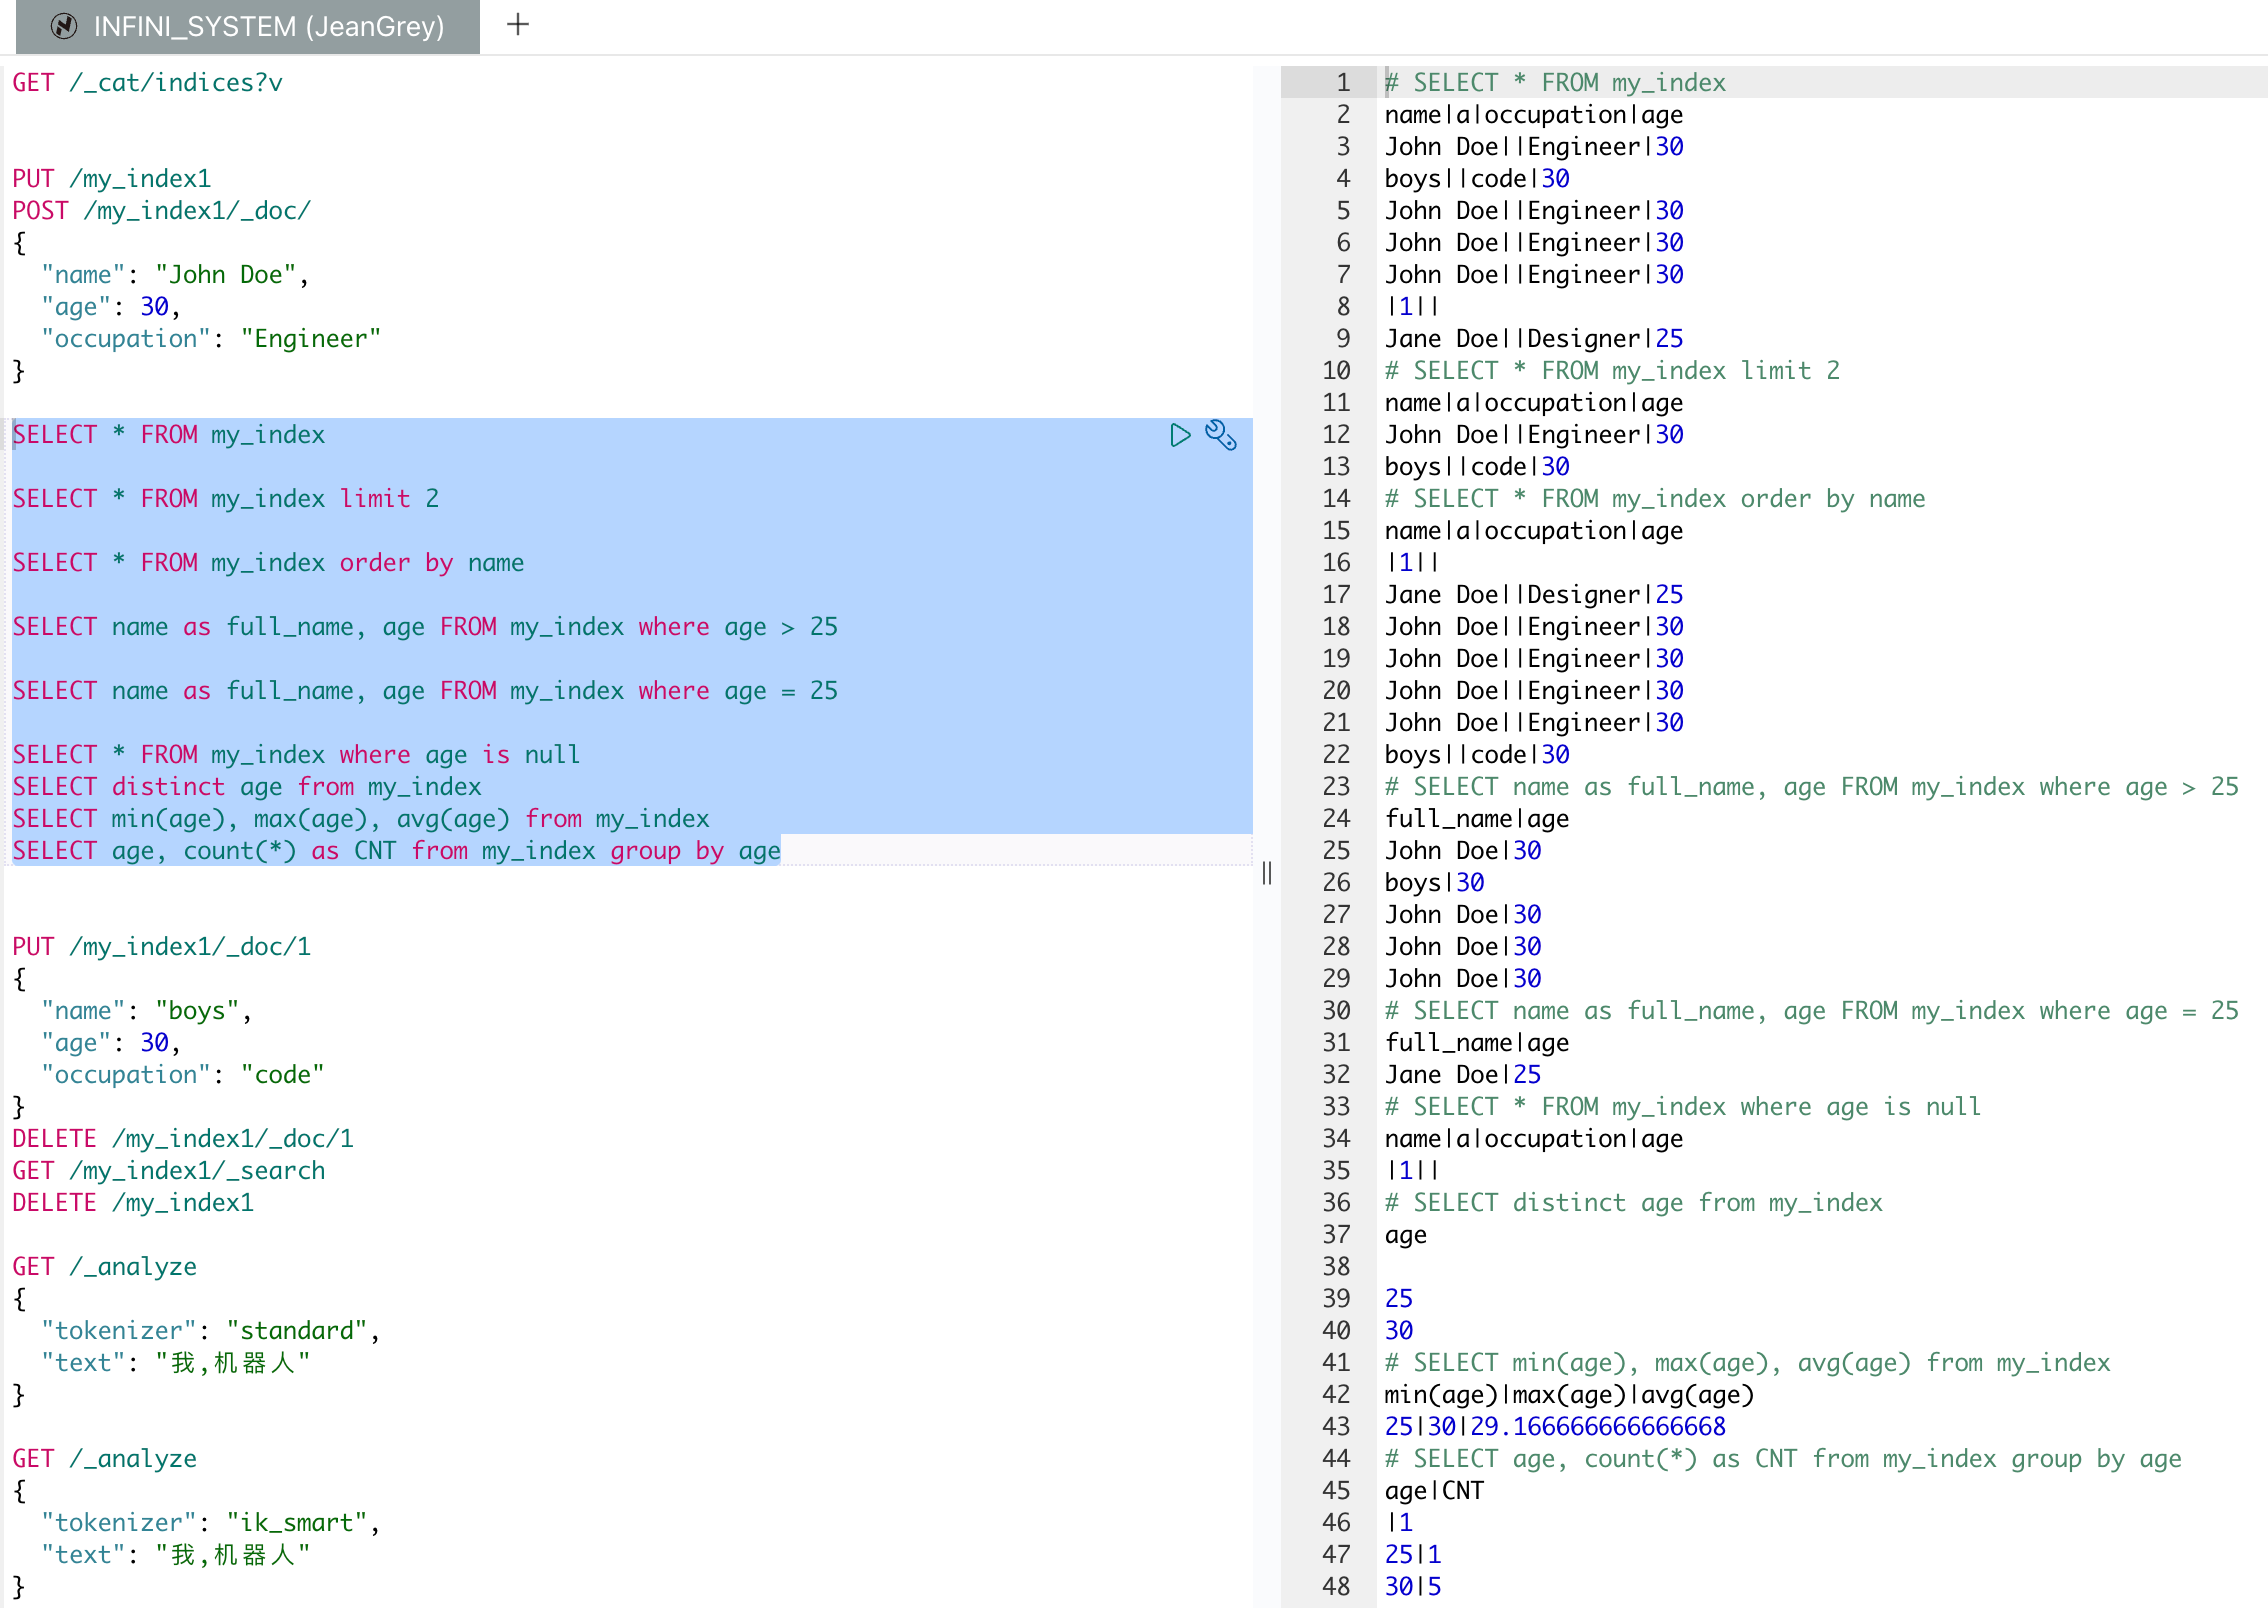
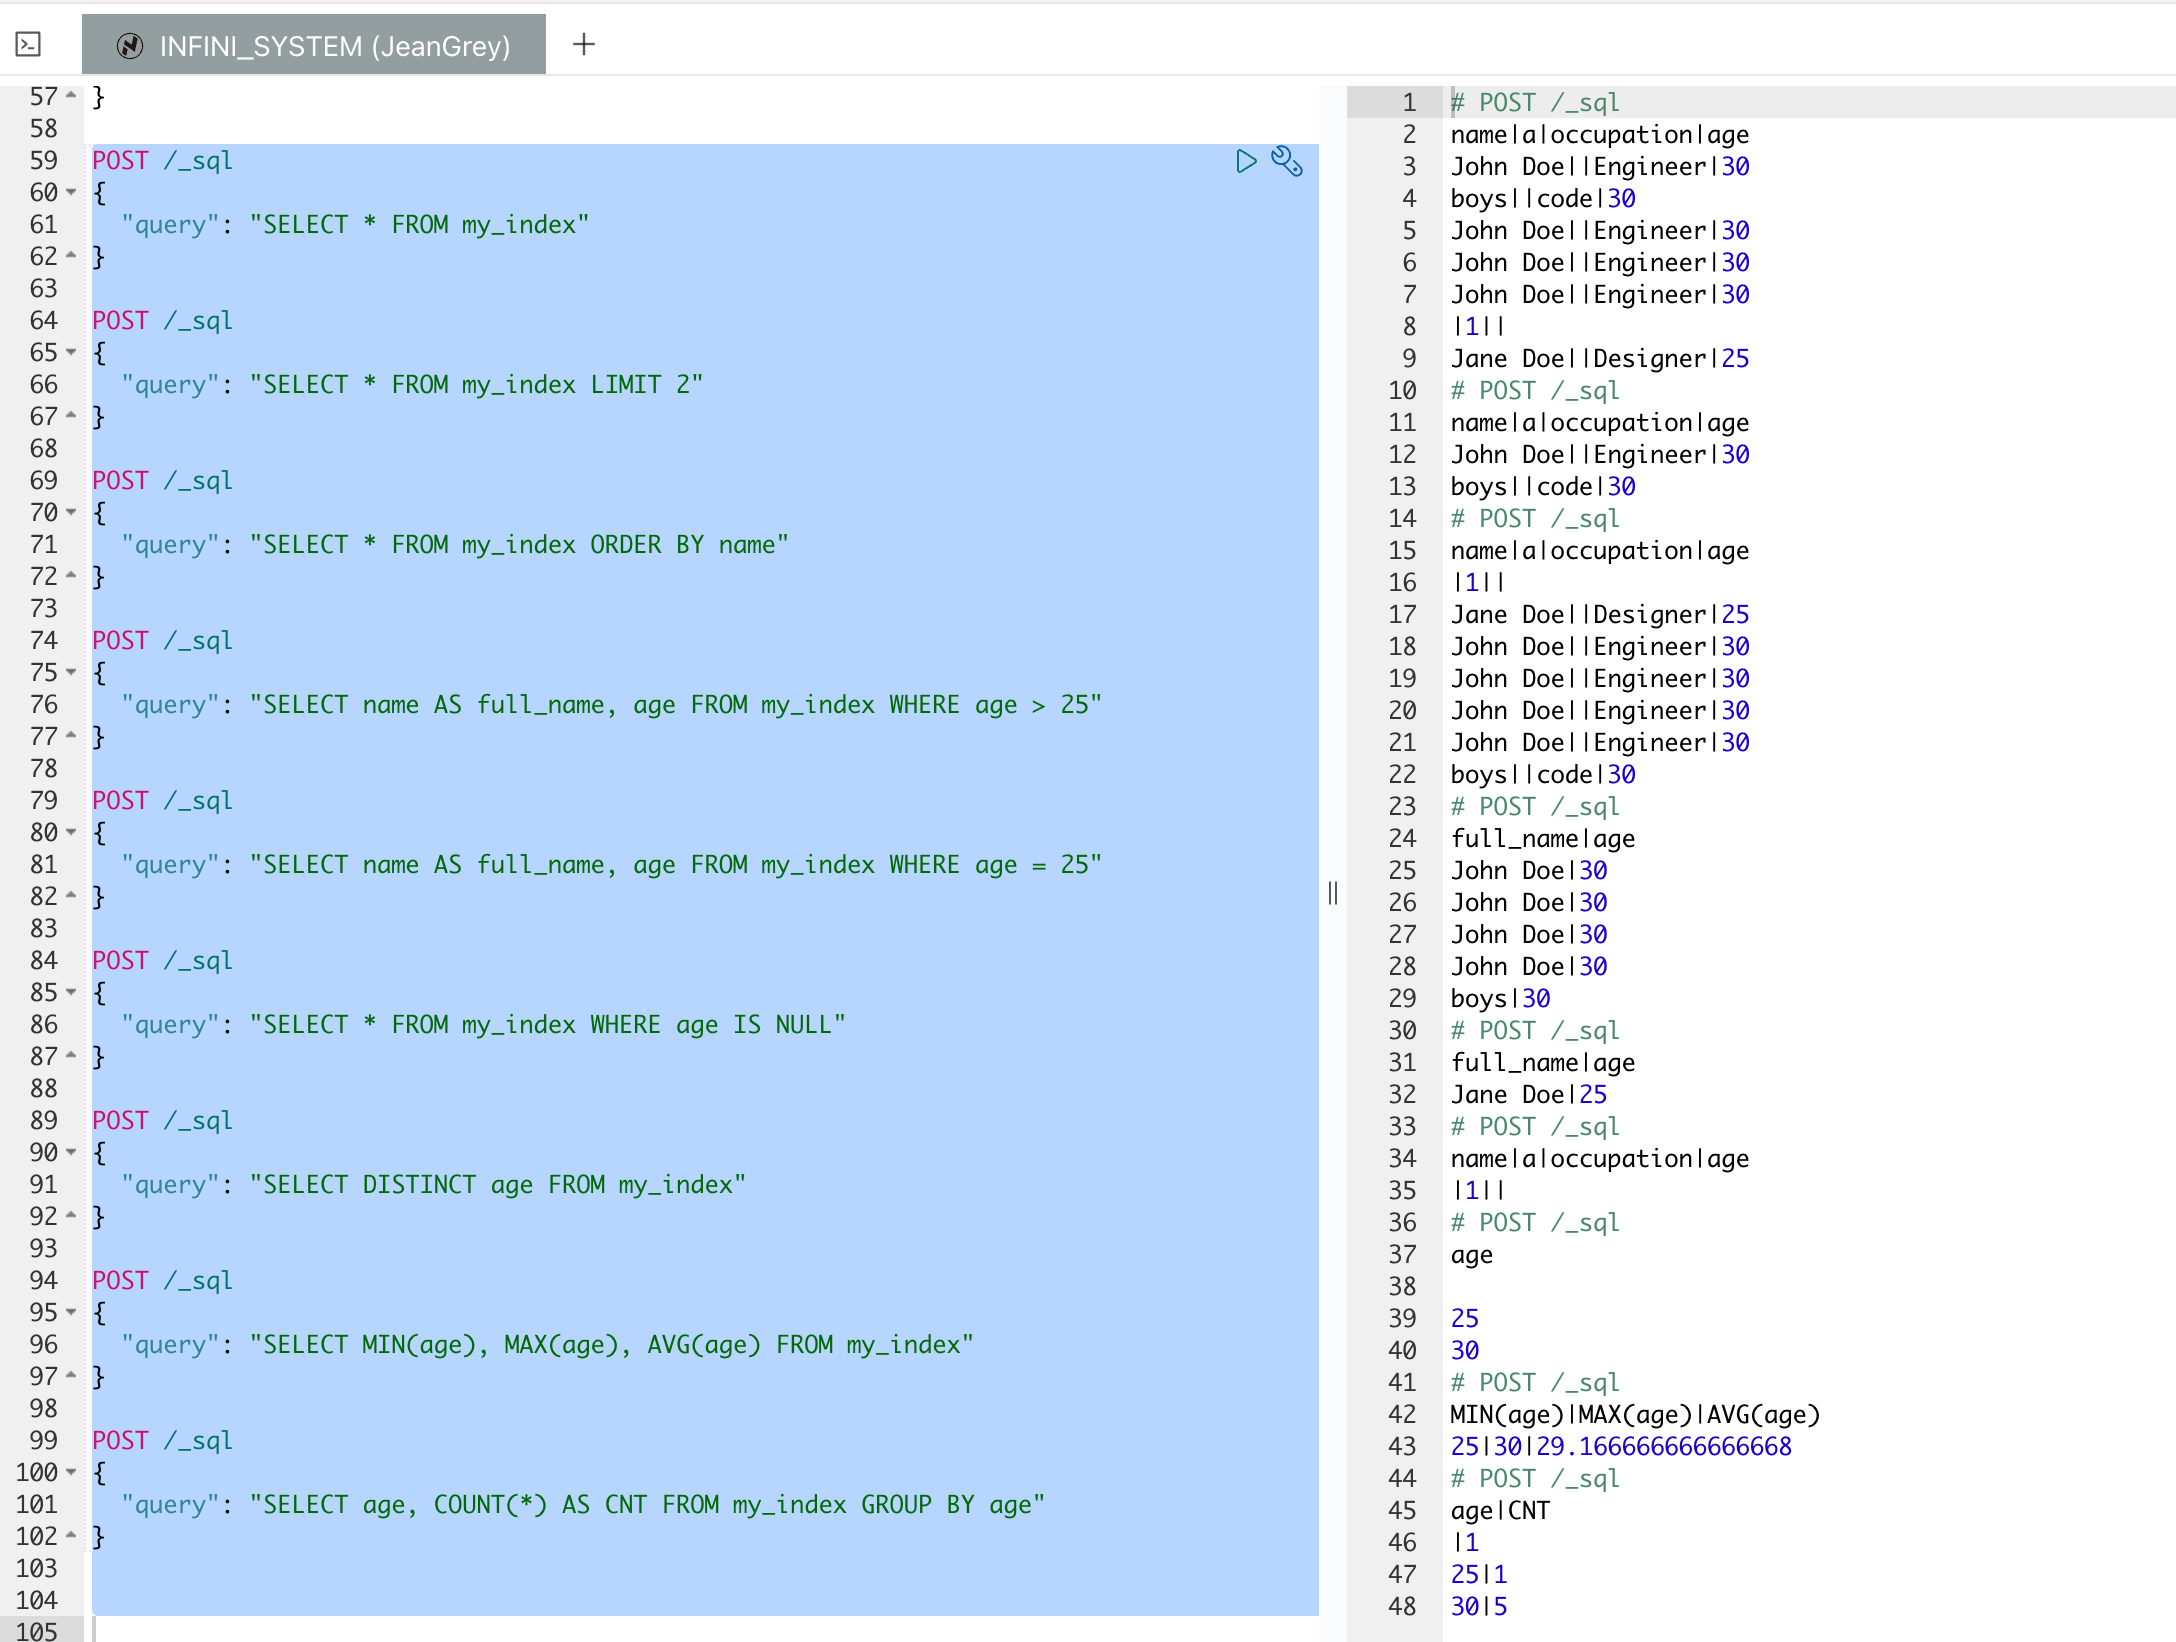
使用 Easysearch 执行 SQL 查询
Easysearch 提供了对直接使用 SQL 查询的支持。以下是如何在 Easysearch 中通过 POST 请求使用 _sql 端点进行查询的示例:
执行 SQL 查询非常简单,只需通过 POST 请求发送 SQL 查询即可。以下是一个示例:
你也可以规定返回 JSON 格式:
和 Elasticsearch 一样,Easysearch 允许你通过 POST 请求直接在集群上运行 SQL 查询,并返回查询结果。以下是一些常见的 SQL 查询示例及其对应的 POST 请求:
1.查询所有文档:
2.限制返回文档数:
3.按字段排序:
4.筛选条件查询:
5.精确值查询:
6.查询空值:
7.查询唯一值:
8.聚合函数查询:
9.分组统计:
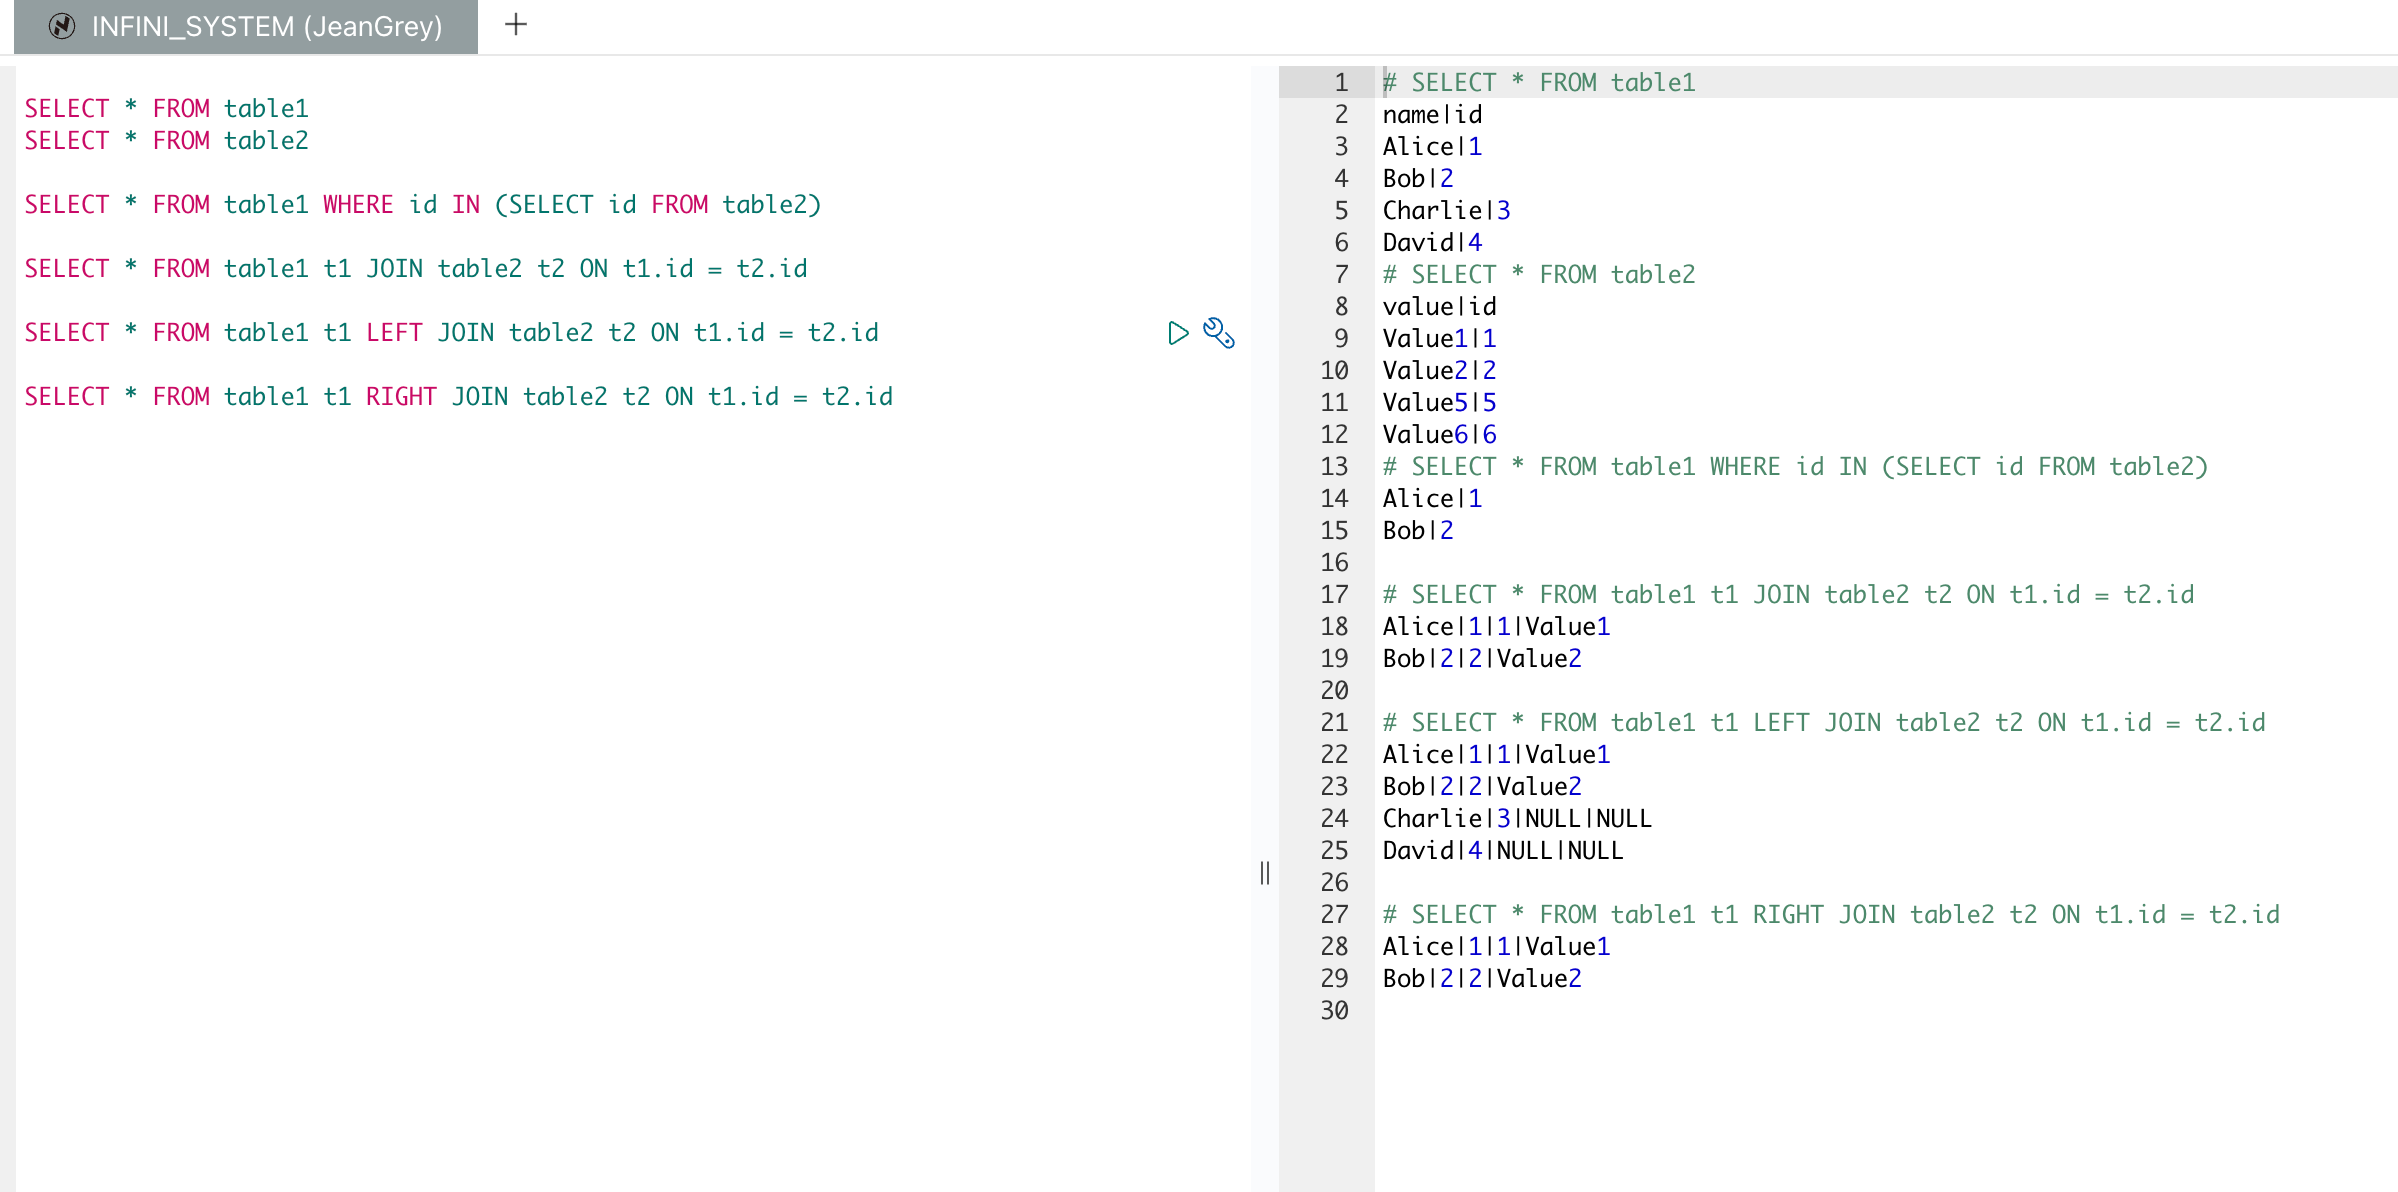
多表操作的 SQL 语句
以下是多表操作的 SQL 语句及其解释:
1.子查询:
这个查询从 table1 中选择所有字段的记录,其中这些记录的 id 在 table2 表中也存在。
2.内连接:
这个查询进行内连接,从 table1 和 table2 中选择所有字段的记录,前提是 table1 和 table2 中 id 相等。
3.左连接:
这个查询进行左连接,从 table1 和 table2 中选择所有字段的记录,即使 table2 中没有匹配的记录,也会返回 table1 中的所有记录,未匹配到的部分会用 NULL 填充。
4.右连接:
这个查询进行右连接,从 table1 和 table2 中选择所有字段的记录,即使 table1 中没有匹配的记录,也会返回 table2 中的所有记录,未匹配到的部分会用 NULL 填充。
假设我们有两个索引 table1 和 table2,对应于 SQL 中的两个表。
创建索引 table1:
创建索引 table2:
导入数据到 table1:
导入数据到 table2:
导入数据后,可以使用 SQL 来执行这些查询:
1.子查询:
2.内连接:
3.左连接:
4.右连接:
效果如下:
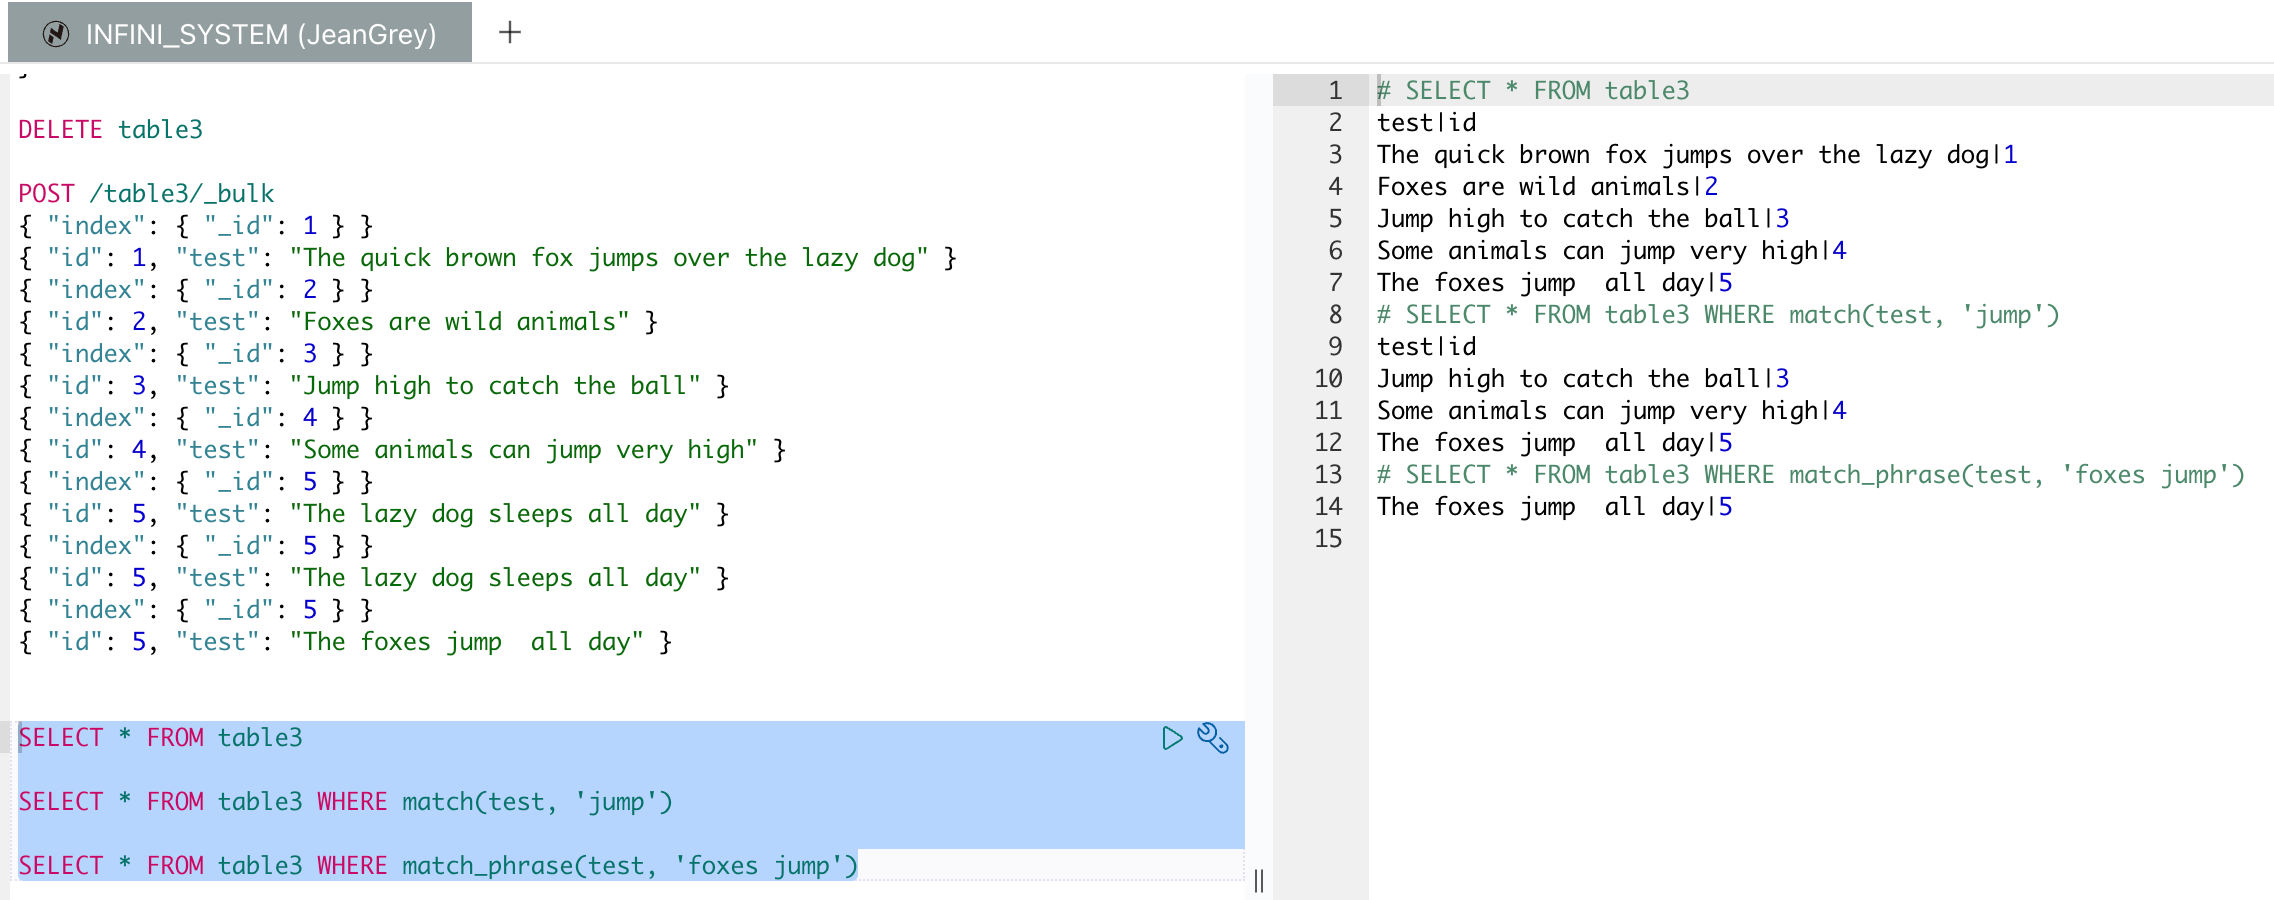
SQL 全文检索
match 和 match_phrase 是 Easysearch 中用于全文搜索的查询类型,它们在处理文本匹配方面有不同的用途:
1.match 查询:
match查询用于对文档进行全文搜索。- 它将搜索关键词进行分词,并对这些分词后的词项进行搜索。
- 适用于查询单个或多个字段,可以进行布尔操作(如 “AND”, “OR”)。
- 例如,搜索 “Easysearch is powerful” 会被分词为 "Easysearch ", “is”, “powerful” 三个词,然后对这三个词进行搜索,文档中包含这些词的都会被认为是匹配的。
2.match_phrase 查询:
match_phrase查询用于短语搜索。- 它要求搜索的短语必须在文档中出现且词的顺序相同,词之间的间隔也必须与查询中的短语相同。
- 适用于需要精确匹配短语的场景。
- 例如,搜索 “Easysearch is powerful” 时,只有包含这个确切短语的文档才会被认为是匹配的。
总结来说,match 更灵活,用于一般的关键词搜索,而 match_phrase 则用于需要精确匹配短语的搜索。
SQL 全文检索示例
我们先造一些数据,然后使用 SQL 来进行全文检索。
批量导入数据:
执行全文检索的 SQL 查询:
总结
随着数据量的不断增加,高效的数据搜索和分析变得尤为重要。Elasticsearch 以其强大的全文搜索能力和灵活的数据处理能力成为行业标准。Easysearch 作为 Elasticsearch 的优化版本,不仅继承了其强大的功能,还在性能和安全性上做了进一步的提升,为企业提供了一个高效、稳定且易于迁移的搜索引擎解决方案。通过深入了解这些技术和实践其应用,开发者和企业能够更好地利用这些工具来应对现代数据挑战,推动业务的持续发展和创新。
作者:韩旭,亚马逊云技术支持,亚马逊云科技技领云博主,目前专注于云计算开发和大数据领域。


 1764
1764

 被折叠的 条评论
为什么被折叠?
被折叠的 条评论
为什么被折叠?
 到【灌水乐园】发言


