


(一)基础知识
DAS,NAS和SAN都代表什么意思?
   直接连接存储(Direct Attached Storage,简称DAS),是通常放置在服务器机箱内部的驱动器,通常是SCSI连接。DAS驱动器也可以放置在外部机箱内,但是通过有限长度的SCSI电缆进行连接的。
   网络连接存储(Network Attached Storage,简称NAS)是单独连接到局域网上的设备,但是仅仅提供基于文件的存储。简单地说,NAS机器是专用的文件服务器,但是它没有运行应用程序的能力,而是分配它们所有的资源,用来文件共享。有时也称为“Filers”。
    存储区域网络(Storage Area Network ,简称SAN)通常用来指专用的**硬盘存储阵列**,通过光纤通道链路连接到不少主机上,这个光纤通道来自一个光纤通道交换机,该交换机可为所有的设备提供高速“Hub”功能。
(二)iscsi的概念
虚拟磁盘就是在本地电脑里面虚拟出一个远程电脑里面的磁盘。感觉像是在本机上的硬盘一样。其实他没在本机上。
网络虚拟磁盘iSISC可以加大网吧客户机硬盘容量,高速安全稳定.iSCSI Cake主要用于网吧共享硬盘服务。
客户端可以通过局域网连接服务器上的iSCSI Cake服务器,在本地虚拟出一块硬盘,以达到通过网络共享服务器硬盘的效果。网吧业主只需要在服务器上的iSCSI Cake里添加目录和安装游戏软件,客户端的本地虚拟硬盘里就有了相应的游戏软件,不需要到每台机器进行安装。
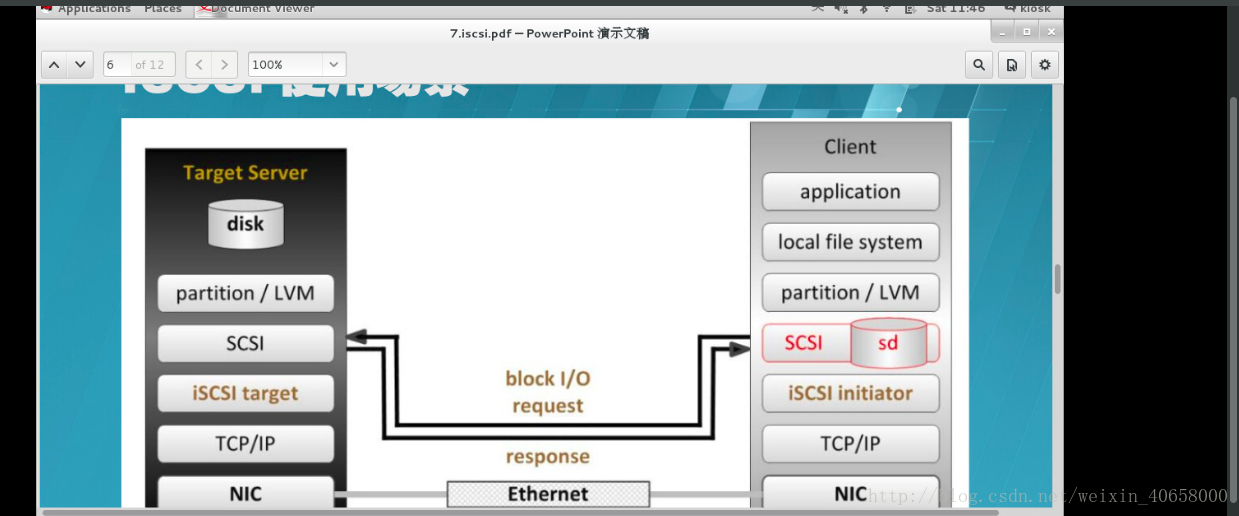
iSCSI( Internet Small Computer System Interface 互联网小型计算机系统接口)是由IBM 下属的两大研发机构一一加利福尼亚AImaden和以色列Haifa研究中心共同开发的,是一个供硬件设备使用的、可在IP协议上层运行的SCSI指令集,是一种开放的基于IP协议的工业技术标准。该协议可以用TCP/IP对SCSI指令进行封装,使得这些指令能够通过基于P网络进行传输,从而实现SCSI 和TCP/IP协议的连接。对于局域网环境中的用户来说,采用该标准只需要不多的投资就可以方便、快捷地对信息和数据进行交互式传输及管理。(三)iscsi的优势
在使用iscsi时,比NFS更加节省资源,时间,过程
图解iscsi:
(四)iscsi的配置
1)在server服务端上,先建立lvm设备(动态分配空间):
root@server ~]# fdisk /dev/vda
Welcome to fdisk (util-linux 2.23.2).

Changes will remain in memory only, until you decide to write them.
Be careful before using the write command.

Device does not contain a recognized partition table
Building a new DOS disklabel with disk identifier 0x60505aa3.

Command (m for help): p

Disk /dev/vda: 8589 MB, 8589934592 bytes, 16777216 sectors
Units = sectors of 1 * 512 = 512 bytes
Sector size (logical/physical): 512 bytes / 512 bytes
I/O size (minimum/optimal): 512 bytes / 512 bytes
Disk label type: dos
Disk identifier: 0x60505aa3

   Device Boot      Start         End      Blocks   Id  System

Command (m for help): n
Partition type:
   p   primary (0 primary, 0 extended, 4 free)
   e   extended
Select (default p):
Using default response p
Partition number (1-4, default 1):
First sector (2048-16777215, default 2048):
Using default value 2048
Last sector, +sectors or +size{K,M,G} (2048-16777215, default 16777215): +500M
Partition 1 of type Linux and of size 500 MiB is set

Command (m for help): p

Disk /dev/vda: 8589 MB, 8589934592 bytes, 16777216 sectors
Units = sectors of 1 * 512 = 512 bytes
Sector size (logical/physical): 512 bytes / 512 bytes
I/O size (minimum/optimal): 512 bytes / 512 bytes
Disk label type: dos
Disk identifier: 0x60505aa3

   Device Boot      Start         End      Blocks   Id  System
/dev/vda1            2048     1026047      512000   83  Linux

Command (m for help): t
Selected partition 1
Hex code (type L to list all codes): 8e
Changed type of partition 'Linux' to 'Linux LVM'

Command (m for help): p

Disk /dev/vda: 8589 MB, 8589934592 bytes, 16777216 sectors
Units = sectors of 1 * 512 = 512 bytes
Sector size (logical/physical): 512 bytes / 512 bytes
I/O size (minimum/optimal): 512 bytes / 512 bytes
Disk label type: dos
Disk identifier: 0x60505aa3

   Device Boot      Start         End      Blocks   Id  System
/dev/vda1            2048     1026047      512000   8e  Linux LVM

Command (m for help): wq
The partition table has been altered!

Calling ioctl() to re-read partition table.
Syncing disks.
[root@server ~]# partprobe
[root@server ~]# pvcreate /dev/vda1
  Physical volume "/dev/vda1" successfully created
[root@server ~]# vgcreate iscsi_vg /dev/vda1
  Volume group "iscsi_vg" successfully created
[root@server ~]# vgdisplay
  --- Volume group ---
  VG Name               iscsi_vg
  System ID
  Format                lvm2
  Metadata Areas        1
  Metadata Sequence No  1
  VG Access             read/write
  VG Status             resizable
  MAX LV                0
  Cur LV                0
  Open LV               0
  Max PV                0
  Cur PV                1
  Act PV                1
  VG Size               496.00 MiB
  PE Size               4.00 MiB
  Total PE              124
  Alloc PE / Size       0 / 0
  Free  PE / Size       124 / 496.00 MiB
  VG UUID               AtkgEm-L3sg-EkWu-zNof-kurk-7ykw-AWv5nG

[root@server ~]# lvcreate -l 124 -n iscsi_lv0 iscsi_vg
  Logical volume "iscsi_lv0" created.
[root@server ~]# lvdisplay
  --- Logical volume ---
  LV Path                /dev/iscsi_vg/iscsi_lv0
  LV Name                iscsi_lv0
  VG Name                iscsi_vg
  LV UUID                odU0t7-bbVS-JJfS-WHX7-kRXN-dQP1-rI376c
  LV Write Access        read/write
  LV Creation host, time server, 2017-12-12 21:34:14 +0800
  LV Status              available
  # open                 0
  LV Size                496.00 MiB
  Current LE             124
  Segments               1
  Allocation             inherit
  Read ahead sectors     auto
  - currently set to     8192
  Block device           252:0
2 安装软件:
yum install targetcli.noarch ##安装iSCSI目标软件包
systemctl enable target.service ##开启target服务
在火墙上开启端口:

3 开启服务:

4进入iSCSI目标交互式配置模式
[root@server ~]# targetcli       ##进入iSCSI目标交互式配置模式
Warning: Could not load preferences file /root/.targetcli/prefs.bin.
targetcli shell version 2.1.fb34
Copyright 2011-2013 by Datera, Inc and others.
For help on commands, type 'help'.

/> ls
o- / ....................................................... [...]
  o- backstores ............................................ [...]
  | o- block ................................ [Storage Objects: 0]
  | o- fileio ............................... [Storage Objects: 0]
  | o- pscsi ................................ [Storage Objects: 0]
  | o- ramdisk .............................. [Storage Objects: 0]
  o- iscsi .......................................... [Targets: 0]
  o- loopback ....................................... [Targets: 0]
/> /backstores/block create server1storage /dev/vg0/iscsi_storage   ##和逻辑卷建立联系,把/dev/vg0/iscsi_storage用server1storage表示
Created block storage object server1storage using /dev/vg0/iscsi_storage.
/> /iscsi create iqn.2017-12.com.example:strage1        ##创建iqn服务的名称(每个发起端和目标需要唯一名称进行标识)
Created target iqn.2017-12.com.example:strage1.
Created TPG 1.
/> ls
o- / ....................................................... [...]
  o- backstores ............................................ [...]
  | o- block ................................ [Storage Objects: 1]
  | | o- server1storage  [/dev/vg0/iscsi_storage (996.0MiB) write-thru deactivated]
  | o- fileio ............................... [Storage Objects: 0]
  | o- pscsi ................................ [Storage Objects: 0]
  | o- ramdisk .............................. [Storage Objects: 0]
  o- iscsi .......................................... [Targets: 1]
  | o- iqn.2017-12.com.example:strage1 ................. [TPGs: 1]
  |   o- tpg1 ............................. [no-gen-acls, no-auth]
  |     o- acls ........................................ [ACLs: 0]
  |     o- luns ........................................ [LUNs: 0]
  |     o- portals .................................. [Portals: 0]
  o- loopback ....................................... [Targets: 0]
/> /iscsi/iqn.2017-12.com.example:strage1/tpg1/luns create /backstores/block/server1storage         ##加密(默认情况下,网络通信是至iSCSI目标上的端口3260/tcp的明文)
Created LUN 0.
/> /iscsi/iqn.2017-12.com.example:strage1/tpg1/acls create iqn.2017-12.com.example:server1storagekey
Created Node ACL for iqn.2017-12.com.example:server1storagekey
Created mapped LUN 0.
/> /iscsi/iqn.2017-12.com.example:strage1/tpg1/portals create 172.25.254.138
Using default IP port 3260
Created network portal 172.25.254.138:3260.
/> exit
Global pref auto_save_on_exit=true
Last 10 configs saved in /etc/target/backup.
Configuration saved to /etc/target/saveconfig.json
出现的问题:在创建portals时报错:

原因:因为已经存在了一个IP和端口,需要删除
解决:删除它

查看,没有了:
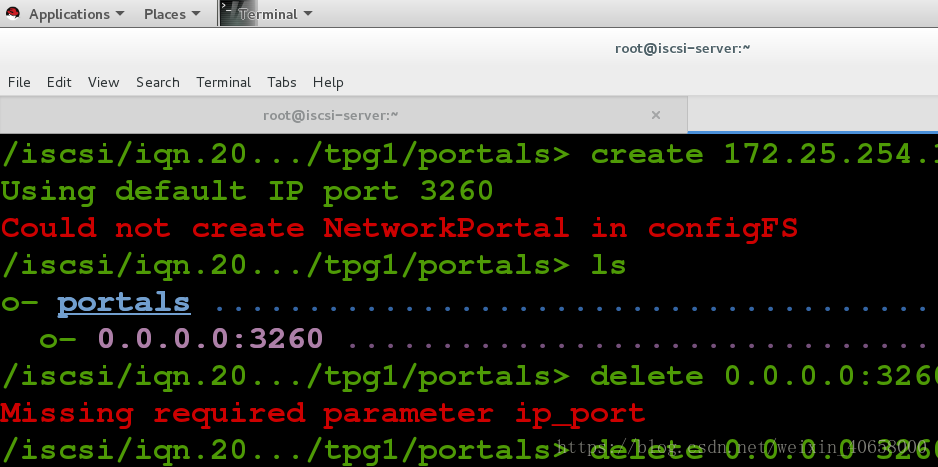
新建portals,成功:

这时在服务端就设置完成了。
5 我们在客户端设置:
安装软件:
1)

2)
vim /etc/iscsi/initiatorname.iscsi  ##进入配置文件
InitiatorName=iqn.2017-12.com.example:server1storagekey ##钥匙
systemctl restart iscsi ##重启服务

iscsiadm -m discovery -t st -p 172.25.254.138 ##识别查询设备
iscsiadm -m node -T iqn.2017-12.com.example:strage1 -p 172.25.254.138 -l ##远程连接存储块
mkfs.xfs /dev/sda   ##格式化硬盘
mount /dev/sda /mnt/   ##挂载硬盘,进行远程存储。
这时我们就可以当作自己的硬盘使用了。我们可以在挂载目录里创建文件。


6实现自动化挂载:
在客户端:
vim /etc/fstab
10 UUID=2da90fa4-582e-4c16-863a-bd6d83587e8f /mnt xfs defaults,_netdev  0  0   ##尽量使用uuid挂载,因为在每次开机时,这个服务会发生漂移!!。
注意:一定是先启动网络再挂载。
7 删除iscsi设备:
1)在服务端:
[root@server ~]# targetcli
targetcli shell version 2.1.fb34
Copyright 2011-2013 by Datera, Inc and others.
For help on commands, type 'help'.

/> clearconfig confirm=True  ##确定删除。
All configuration cleared
/> exit
Global pref auto_save_on_exit=true
Last 10 configs saved in /etc/target/backup.
Configuration saved to /etc/target/saveconfig.json

2)在客户端:
在客户端删除:
iscsiadm -m node -T iqn.2017-12.com.example:strage1 -p 172.25.254.138 -u ##退出iSCSI目标,以暂时断开连接。
iscsiadm -m node -T iqn.2017-12.com.example:strage1 -p 172.25.254.138 -o delete ##删除iSCSI目标的本地记录,以永久断开连接。


 1164
1164


 被折叠的 条评论
为什么被折叠?
被折叠的 条评论
为什么被折叠?
 到【灌水乐园】发言


