


问题描述
我们现在项目都是集群部署通过nginx进行负载均衡,如果我们只是单点项目,就不需要考虑那么多直接用websocket就可以解决(百度一下很多),我们今天来解决下如果通过集群部署的情况下,如何实现集群模式下的websocket进行提醒前一个登录人,并进行挤掉他!
解决思路
利用redis进行topic队列+websocket结合起来
1.利用用户id为唯一topic,
2.前端每次登录时候先请求一个controller接口,java端通过用户唯一id为利用redis向topic进行websockt发送提醒,如果当前用户有人登录就会接到(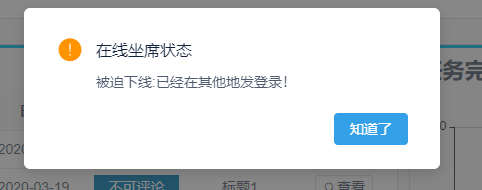 )提示!如果没有用户登录那就接不到这个提醒!
代码解释
1.controller接口代码,进行发送topic
/**
 * 登录调用此方法除掉当前登录人
 */
@RestController
@RequestMapping("/api/crm/allll")
public class CheckCenterController {
	@Autowired
    StringRedisTemplate redisTemplate;

	/**
	 * @return
	 * @Title: pushToWeb
	 * @Description: 推送数据接口
	 * @param userId 用户id
	 * @param message 发送给当前登录人提醒消息内容,可以自己直接定义
	 * @return
	 * @throws
	 */
	@RequestMapping("/socket/push")
	public Integer pushToWeb(String userId,String message) {
	String topic="TOPIC_"+userId;
	message="被迫下线:已经在其他地发登录!";
    redisTemplate.convertAndSend(topic, message);
    return 0;
	}

}
2.SpringUtils.java
@Component
public final class SpringUtils implements BeanFactoryPostProcessor {

    private static ConfigurableListableBeanFactory beanFactory; // Spring应用上下文环境

    @Override
    public void postProcessBeanFactory(ConfigurableListableBeanFactory beanFactory) throws BeansException {
        SpringUtils.beanFactory = beanFactory;
    }

    public static ConfigurableListableBeanFactory getBeanFactory() {
        return beanFactory;
    }

    /**
     * 获取对象
     *
     * @param name
     * @return Object 一个以所给名字注册的bean的实例
     * @throws org.springframework.beans.BeansException
     *
     */
    @SuppressWarnings("unchecked")
    public static <T> T getBean(String name) throws BeansException {
        return (T) getBeanFactory().getBean(name);
    }

    /**
     * 获取类型为requiredType的对象
     *
     * @param clz
     * @return
     * @throws org.springframework.beans.BeansException
     *
     */
    public static <T> T getBean(Class<T> clz) throws BeansException {
        T result = (T) getBeanFactory().getBean(clz);
        return result;
    }

    /**
     * 如果BeanFactory包含一个与所给名称匹配的bean定义,则返回true
     *
     * @param name
     * @return boolean
     */
    public static boolean containsBean(String name) {
        return getBeanFactory().containsBean(name);
    }

    /**
     * 判断以给定名字注册的bean定义是一个singleton还是一个prototype。 如果与给定名字相应的bean定义没有被找到,将会抛出一个异常(NoSuchBeanDefinitionException)
     *
     * @param name
     * @return boolean
     * @throws org.springframework.beans.factory.NoSuchBeanDefinitionException
     *
     */
    public static boolean isSingleton(String name) throws NoSuchBeanDefinitionException {
        return getBeanFactory().isSingleton(name);
    }

    /**
     * @param name
     * @return Class 注册对象的类型
     * @throws org.springframework.beans.factory.NoSuchBeanDefinitionException
     *
     */
    public static Class<?> getType(String name) throws NoSuchBeanDefinitionException {
        return getBeanFactory().getType(name);
    }

    /**
     * 如果给定的bean名字在bean定义中有别名,则返回这些别名
     *
     * @param name
     * @return
     * @throws org.springframework.beans.factory.NoSuchBeanDefinitionException
     *
     */
    public static String[] getAliases(String name) throws NoSuchBeanDefinitionException {
        return getBeanFactory().getAliases(name);
    }

}
3.消息订阅监听类
/**
 *  描述:消息订阅监听类
 */
public class SubscribeListener implements MessageListener {

	private static final Logger LOG = LoggerFactory.getLogger(SubscribeListener.class);

    private Session session;
    public Session getSession() {   return session;  }
    public void setSession(Session session) {
        this.session = session;
    }

    /**
     * 接收发布者的消息
     */
    @Override
    public void onMessage(Message message, byte[] pattern) {
        String msg = new String(message.getBody());
        LOG.info(new String(pattern) + "主题发布a:" + msg);
        if (null != session && session.isOpen()) {
            try {
                session.getBasicRemote().sendText(msg);
            } catch (IOException e) {
                e.printStackTrace();
            }
        }
    }
}
4.注册redis监听容器
@Configuration //相当于xml中的beans
public class RedisConfig {

	private static final Logger LOG = LoggerFactory.getLogger(RedisConfig.class);
    /**
     * 需要手动注册RedisMessageListenerContainer加入IOC容器
     * @author luchunfeng
     * @return
     */
    @Bean
    public RedisMessageListenerContainer redisMessageListenerContainer(RedisConnectionFactory connectionFactory) {
        RedisMessageListenerContainer container = new RedisMessageListenerContainer();
        container.setConnectionFactory(connectionFactory);
        //订阅了一个叫chat 的通道
        container.addMessageListener(new MessageListener(){
            @Override
            public void onMessage(Message message, byte[] pattern) {
                String msg = new String(message.getBody());
                LOG.info(new String(pattern) + "主题发布:" + msg);
            }
        }, new PatternTopic("TOPIC"));
        return container;
    }

}
5.开启WebSocket支持
/**
* 开启WebSocket支持
*
* @author
* @create 2019-12-05 13:52
**/
@Configuration
public class WebSocketConfig {

	/**
	 * @Title: serverEndpointExporter
	 * @Description: 启动加载开启WebSocket
	 * @return
	 * @throws
	 */
	@Bean
	public ServerEndpointExporter serverEndpointExporter() {
	return new ServerEndpointExporter();
	}

}
6.websocket端点
/**
 * @ServerEndpoint 注解是一个类层次的注解,它的功能主要是将目前的类定义成一个websocket服务器端,
 * 注解的值将被用于监听用户连接的终端访问URL地址,客户端可以通过这个URL来连接到WebSocket服务器端
 * 使用springboot的唯一区别是要@Component声明下,而使用独立容器是由容器自己管理websocket的,但在springboot中连容器都是spring管理的。
 * 虽然@Component默认是单例模式的,但springboot还是会为每个websocket连接初始化一个bean,所以可以用一个静态set保存起来。
 */
@Component
@ServerEndpoint("/api/websocket/{userId}")
public class WebSocketServer {
	private static final Logger LOG = LoggerFactory.getLogger(WebSocketServer.class);

    /**
     * 因为@ServerEndpoint不支持注入,所以使用SpringUtils获取IOC实例
     */
    private RedisMessageListenerContainer redisMessageListenerContainer = SpringUtils.getBean(RedisMessageListenerContainer.class);

    //静态变量,用来记录当前在线连接数。应该把它设计成线程安全的。
     private static  AtomicInteger onlineCount=new AtomicInteger(0);
     //concurrent包的线程安全Set,用来存放每个客户端对应的webSocket对象。若要实现服务端与单一客户端通信的话,可以使用Map来存放,其中Key可以为用户标识
     private static CopyOnWriteArraySet<WebSocketServer> webSocketSet = new CopyOnWriteArraySet<WebSocketServer>();

     //与某个客户端的连接会话,需要通过它来给客户端发送数据
     private Session session;

     private SubscribeListener subscribeListener;


    /**
     * 连接建立成功调用的方法
     * @param session  可选的参数。session为与某个客户端的连接会话,需要通过它来给客户端发送数据
     */
    @OnOpen
    public void onOpen(Session session,@PathParam("userId") String userId){
        this.session = session;
        String topic="TOPIC_"+userId;
        webSocketSet.add(this);     //加入set中
        addOnlineCount();           //在线数加1
        LOG.info("TOPIC:"+topic+"有新连接加入!当前在线人数为" + getOnlineCount());
        subscribeListener = new SubscribeListener();
        subscribeListener.setSession(session);
        //设置订阅topic
        redisMessageListenerContainer.addMessageListener(subscribeListener, new ChannelTopic(topic));
    }

    /**
     * 连接关闭调用的方法
     */
    @OnClose
    public void onClose() throws IOException {
        webSocketSet.remove(this);  //从set中删除
        subOnlineCount();           //在线数减1
        redisMessageListenerContainer.removeMessageListener(subscribeListener);
        LOG.info("有一连接关闭!当前在线人数为" + getOnlineCount());
    }

    /**
     * 收到客户端消息后调用的方法
     * @param message 客户端发送过来的消息
     * @param session 可选的参数
     */
    @OnMessage
    public void onMessage(String message, Session session) {
    	LOG.info("来自客户端的消息:" + message);
        //群发消息
        for(WebSocketServer item: webSocketSet){
            try {
                item.sendMessage(message);
            } catch (IOException e) {
                e.printStackTrace();
                continue;
            }
        }
    }
    /**
     * 发生错误时调用
     * @param session
     * @param error
     */
    @OnError
    public void onError(Session session, Throwable error){
    	LOG.info("发生错误");
        error.printStackTrace();
    }

    /**
     * 这个方法与上面几个方法不一样。没有用注解,是根据自己需要添加的方法。
     * @param message
     * @throws IOException
     */
    public void sendMessage(String message) throws IOException {
        this.session.getBasicRemote().sendText(message);
    }

    public   int getOnlineCount() {
        return onlineCount.get();
    }

    public   void addOnlineCount() {
        WebSocketServer.onlineCount.getAndIncrement();
    }

    public   void subOnlineCount() {
        WebSocketServer.onlineCount.getAndDecrement();
    }

}
下面是vue前端代码
websock() {
      const t = this;
      if (typeof WebSocket == "undefined") {
        console.log("您的浏览器不支持WebSocket");
      } else {
        console.log("您的浏览器支持WebSocket");
        //实现化WebSocket对象,指定要连接的服务器地址与端口 建立连接
        var userId = localStorage.getItem("userId");
        socket = new WebSocket(`wss://域名/api/websocket/${userId}`);
        //打开事件
        socket.onopen = function() {
          console.log("Socket 已打开");
          // $("#start").val("Socket 已打开");
          //socket.send("这是来自客户端的消息" + location.href + new Date());
        };
        //获得消息事件
        socket.onmessage = function(msg) {
          if (msg.data != "连接成功") {
            t.tiptext = msg.data;
            socket.close();
            t.instance("warning");
          }
          console.log(msg.data);
          // $("#message").val(msg.data);
          //发现消息进入 开始处理前端触发逻辑
        };
        //关闭事件
        socket.onclose = function() {
          console.log("Socket已关闭");
          $("#close").val("Socket已关闭");
        };
        //发生了错误事件
        socket.onerror = function() {
          alert("Socket发生了错误");
          //此时可以尝试刷新页面
        };
        //离开页面时,关闭socket
        //jquery1.8中已经被废弃,3.0中已经移除
        // $(window).unload(function(){
        // socket.close();
        //});
      }
    },
到这里就结束了,上面代码也可以成为网页版客服消息推送,网页版页面聊天功能,那样需要在同一个topic下面进行发送聊天,然后在发送后面加上发送者姓名,就可以实现网页版聊天了,上面代码要搞懂,可以干很多东西,新闻推送,实时提醒等!上面代码是自己开发项目真实,同时也参考网上资料,进行整改,有什么不懂可以留言哦!


 1万+
1万+


 被折叠的 条评论
为什么被折叠?
被折叠的 条评论
为什么被折叠?
 到【灌水乐园】发言


