


目录
目录
前言
前面学了 Activity 现在趁热打铁,学下与它相似的 Fragment 。Fragment 是 Android3.0 引入的概念,主要用于解决 Android 碎片化的问题,更合理的使用屏幕空间。看 鸿洋_ 的博客,似乎还能体会到当初 Fragment 刚推出时的喜悦。
在 Android 官方文档 中,关于 Fragment 有这么一段描述:
A Fragment is a piece of an application's user interface or behavior that can be placed in an Activity.
碎片是应用程序的用户界面或行为的一部分,可以放在Activity中。
它出现的初衷是为了适应大屏幕的平板电脑,而如今普通手机 APP 也经常加入 Fragment ,我们可以使用 Fragment 将屏幕划分成几块,然后进行分组,进行一个模块化的管理,使得动态更新局部UI更加方便。这里举个 ListView 的栗子,我们也可以这样实现。(当然这种比较简单的,不是很有必要)

相关库包
在 Android 中,有几种 Fragment 类供我们选择,一个是系统内置的 android.app.Fragment(api28 已过时),另一个是 support-v4包下的 android.support.v4.app.Fragment。
v4包 是一兼容库包,它的出现是为了将库中提供的 API 向下兼容至 API 4。而随着内容的不断增加及安卓的版本迭代(目前Android 官方支持的最低系统版本为 4.0.1),v4兼容包 也不再支持那些久远的系统了(据谷歌 May 7, 2019 统计,4.0.3以下版本市场占有率仅为 0.3% ),而名字确被保留了下来。为此,安卓团队对 Android Support Library 进行了一次升级,推出 AndroidX 。
从 Android Studio 3.4.2 开始,新建的项目已经强制勾选使用 AndroidX 架构。
所以现在我们需要 import 的是 androidx.fragment.app.Fragment。
简单使用
静态加载
在 Android Studio 中新建一个 Empty Activity。
然后我们先新建一个 layout 作为 Fragment 的布局,里面的布局也很简单,只有一个 TextView 显示一句 “I'm Fragment.”(生怕别人不知道)
fragment.xml
<?xml version="1.0" encoding="utf-8"?>
<LinearLayout xmlns:android="http://schemas.android.com/apk/res/android"
    android:orientation="vertical" android:layout_width="match_parent"
    android:layout_height="match_parent"
    android:gravity="center">

    <TextView
        android:layout_width="wrap_content"
        android:layout_height="wrap_content"
        android:text="I'm Fragment."/>

</LinearLayout>
此外,我们需新建一个 Fragment类,并重写它的 onCreateView()方法
Test_Fragment.java
package com.example.test_fragment;

import android.os.Bundle;
import android.view.LayoutInflater;
import android.view.View;
import android.view.ViewGroup;

import androidx.annotation.NonNull;
import androidx.annotation.Nullable;
import androidx.fragment.app.Fragment;

public class Test_Fragment extends Fragment {

    @Nullable
    @Override
    public View onCreateView(@NonNull LayoutInflater inflater, @Nullable ViewGroup container, @Nullable Bundle savedInstanceState) {
        View view = inflater.inflate(R.layout.fragment,container,false);
        return view;
    }
}
最后,我们在 activity_main.xml 中添加以下内容
用于加载 Fragment 的 layout布局。
<!--需要注意:需显式指明Test_Fragment(加上包名)-->
<fragment
android:id="@+id/test_fragment"
android:name="com.example.test_fragment.Test_Fragment"
android:layout_width="match_parent"
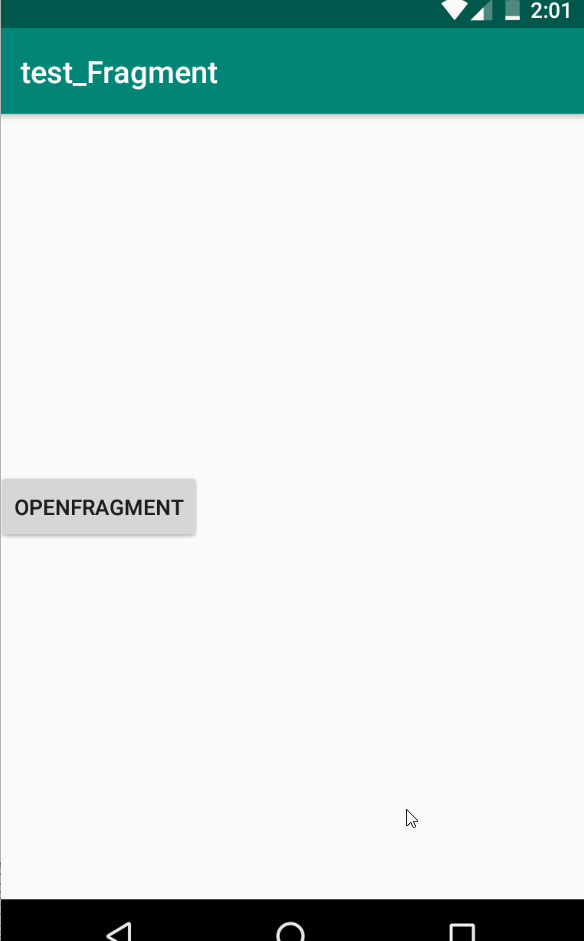
android:layout_height="match_parent"/>效果

动态添加
静态添加的效果符合我们的期待,但是该方法不够灵活,较难应用在实际项目开发中;为此我们可以使用动态加载的方法,在程序运行时将 Fragment 动态添加到 Activity 中。
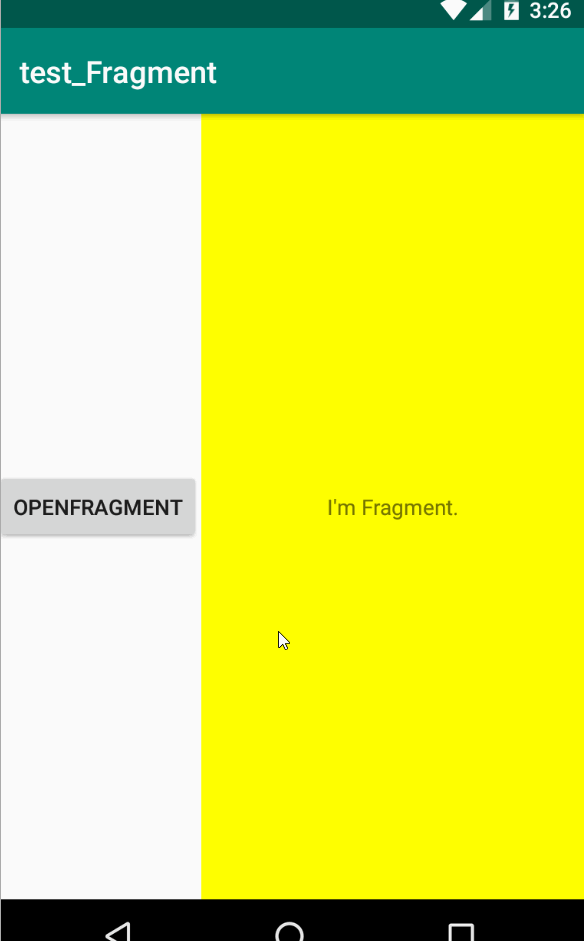
为了更明显的区分,我们在 fragment.xml 中增加 background 属性
<!-- yellow -->
android:background="#ffff00"
同时在 activity_main.xml 中,去掉 fragment 控件,增加 FrameLayout 和 Button
<?xml version="1.0" encoding="utf-8"?>
<LinearLayout xmlns:android="http://schemas.android.com/apk/res/android"
    xmlns:app="http://schemas.android.com/apk/res-auto"
    xmlns:tools="http://schemas.android.com/tools"
    android:layout_width="match_parent"
    android:layout_height="match_parent"
    tools:context=".MainActivity"
    android:gravity="center">

    <Button
        android:id="@+id/bt"
        android:layout_width="wrap_content"
        android:layout_height="wrap_content"
        android:text="OpenFragment"
        />
    <FrameLayout
        android:id="@+id/layout_fragment"
        android:layout_width="match_parent"
        android:layout_height="match_parent"
        />

</LinearLayout>
最后,回到 MainActivity.java
核心代码为 InitFragment()
package com.example.test_fragment;

import androidx.appcompat.app.AppCompatActivity;
import androidx.fragment.app.Fragment;
import androidx.fragment.app.FragmentManager;
import androidx.fragment.app.FragmentTransaction;

import android.os.Bundle;
import android.view.View;
import android.widget.Button;

public class MainActivity extends AppCompatActivity {

    Button mButton;

    @Override
    protected void onCreate(Bundle savedInstanceState) {
        super.onCreate(savedInstanceState);
        setContentView(R.layout.activity_main);

        mButton = findViewById(R.id.bt);

        mButton.setOnClickListener(new View.OnClickListener() {
            @Override
            public void onClick(View v) {
                InitFragment(new Test_Fragment());
            }
        });


    }

    private void InitFragment(Fragment fragment) {
        FragmentManager fragmentManager = getSupportFragmentManager();
        FragmentTransaction fragmentTransaction = fragmentManager.beginTransaction();
        fragmentTransaction.replace(R.id.layout_fragment,fragment);
        fragmentTransaction.commit();
    }
}
效果
总结一下动态添加碎片的步骤
- 创建 Fragment实例
- 获取 FragmentManageer
- 开启事务
- 向容器内添加 Fragment
- 提交事务
这些步骤都可以在 InitFragment()中找到对应的操作
ps:为什么需要使用事务呢?
FragmentTransaction:管理着 Fragment 所有的展示交互,还有 Fragment 的回滚事件。
该部分内容将在下文生命周期中展开。
Fragment 与Activity 通讯
组件获取
虽然 Fragment 是嵌入 Activity 中使用的,但是并没有明显的方式来实现 Fragment 与 Activity 的通信。
当我们想在 Fragment 中获取其 宿主Activity,可直接在 Fragment 中使用 getActivity()方法。
    @Override
    public void onStart() {

        Button mButton = getActivity().findViewById(R.id.bt);
        mButton.setText("成功获取ACtivity控件");

        super.onStart();
    }
效果

那么我们在 Activity 中如何获取 Fragment 实例呢?
FragmentManage 为我们提供了 findFragmentById()和 findFragmentByTag()方法专门用于获取 Fragment实例。
manager.findFragmentById ()
根据 ID 来找到对应的 Fragment 实例,主要用在静态添加 fragment 的布局中,因为 静态添加的 fragment 才会有 ID
在静态加载 demo 的基础上,我们在 activity_main.xml 中添加 Button,点击 Button 即获取 Fragment实例 ,再通过getView().findViewById(R.id.tx) 取得相应的控件。并修改控件显示文本为 “静态加载成功获取Fragment控件”
package com.example.test_fragment;

import androidx.appcompat.app.AppCompatActivity;
import androidx.fragment.app.Fragment;
import androidx.fragment.app.FragmentManager;
import androidx.fragment.app.FragmentTransaction;

import android.os.Bundle;
import android.util.Log;
import android.view.View;
import android.widget.Button;
import android.widget.TextView;

public class MainActivity extends AppCompatActivity {

    Button mButton;

    @Override
    protected void onCreate(Bundle savedInstanceState) {
        super.onCreate(savedInstanceState);
        setContentView(R.layout.activity_main);


        mButton = findViewById(R.id.bt);

        mButton.setOnClickListener(new View.OnClickListener() {
            @Override
            public void onClick(View v) {
                TextView textView = getSupportFragmentManager().findFragmentById(R.id.test_fragment).getView().findViewById(R.id.tx);
                textView.setText("静态加载成功获取Fragment控件");
            }
        });

    }
}
效果

manager.findFragmentByTag ()
根据 TAG 找到对应的 Fragment 实例,主要用于在 动态添加的 fragment 中,根据 TAG 来找到 fragment 实例
为此,我们需要在事务中添加 TAG,同时将 InitFragment() 移至onCreate()以免在 Button 点击事件中获取 Fragment实例 时为 null 。
package com.example.test_fragment;

import androidx.appcompat.app.AppCompatActivity;
import androidx.fragment.app.Fragment;
import androidx.fragment.app.FragmentManager;
import androidx.fragment.app.FragmentTransaction;

import android.os.Bundle;
import android.util.Log;
import android.view.View;
import android.widget.Button;
import android.widget.TextView;

public class MainActivity extends AppCompatActivity {

    Button mButton;

    @Override
    protected void onCreate(Bundle savedInstanceState) {
        super.onCreate(savedInstanceState);
        setContentView(R.layout.activity_main);


        mButton = findViewById(R.id.bt);

        InitFragment(new Test_Fragment());


        mButton.setOnClickListener(new View.OnClickListener() {
            @Override
            public void onClick(View v) {


                Test_Fragment fragment = (Test_Fragment)getSupportFragmentManager().findFragmentByTag("test");
                TextView textView = fragment.getView().findViewById(R.id.test_tx);

                textView.setText("成功获取Fragment实例");

            }
        });


    }

    private void InitFragment(Fragment fragment) {
        FragmentManager fragmentManager = getSupportFragmentManager();
        FragmentTransaction fragmentTransaction = fragmentManager.beginTransaction();
        fragmentTransaction.replace(R.id.layout_fragment,fragment,"test");
        fragmentTransaction.commit();

    }
}
效果
消息传递
可参考该博文:
Android:Activity与Fragment通信(99%)完美解决方案
这里暂时不展开,以后有时间再填坑。
生命周期
基本状态
管理 Fragment 生命周期与管理 Activity 生命周期很相似。和 Activity 一样,Fragment 也以三种状态存在:
- 已恢复
即运行状态,Fragment 在运行中的 Activity 中可见。
- 已暂停
另一个 Activity 位于前台并具有焦点,但此 Fragment 所在的 Activity 仍然可见(前台 Activity 部分透明,或未覆盖整个屏幕)。
- 已停止
Fragment 不可见。宿主 Activity 已停止,或 Fragment 已从 Activity 中移除,但已添加到返回栈。已停止的 Fragment 仍处于活动状态(系统会保留所有状态和成员信息)。不过,它对用户不再可见,并随 Activity 的终止而终止。
需要注意的是:
Fragment 有自己生命周期,但是其生命周期会受到其宿主Activity的影响。
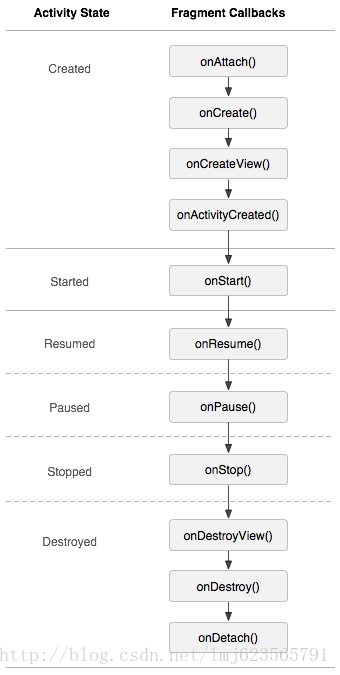
对于 Activity生命周期 与 Fragment生命周期 而言,二者最显著的差异是在其各自返回栈中的存储方式。
默认情况下,Activity 停止时会被放入由系统管理的 Activity 返回栈中(以便用户通过返回按钮回退到 Activity,详细介绍请参阅任务和返回栈)。不过,只有当您在移除 Fragment的事务 执行期间通过调用
addToBackStack()显式请求保存实例时,系统才会将 Fragment 放入由 宿主 Activity 管理的返回栈。Fragment 所在 Activity 的生命周期会直接影响 Fragment 的生命周期,其表现为,Activity 的每次生命周期回调都会引发每个Fragment的类似回调。
举个栗子:当 Activity 触发
onPause()时,Activity 中的每个 Fragment 也会触发onPause()。
这里放一张 Steve Pomeroy 描绘的 Android Activity / Fragment 生命周期图(可点击查看大图)

回调
Fragment 还有几个额外的生命周期回调,用于处理与 Activity 的唯一交互,从而执行构建和销毁 Fragment 界面等操作。它们分别是:
在片段已与 Activity 关联时进行调用(
Activity传递到此方法内)。调用它可创建与片段关联的视图层次结构。
当 Activity 的
onCreate()方法已返回时进行调用。在移除与片段关联的视图层次结构时进行调用。
在取消片段与 Activity 的关联时进行调用。
测试
该部分内容可结合 上图 Activity生命周期对Fragment生命周期的影响 食用
正常启动

按下bcak退出
(由于未使用 addToBackStack() 这里直接销毁)

其他测试案例暂时不写了,可先参考:
FragmentTransaction部分:
Fragment 的生命周期和 FragmentTransaction 的主要方法
待填坑。
-----------------------------------------------------------------2019-12-27 续......这是一条没有感情的分界线---------------------------------------------
进阶使用
如何在 Fragment 中增加 Menu 菜单栏
这里仅介绍最简单的一种做法~
- 添加menu文件:menu_test.xml
<?xml version="1.0" encoding="utf-8"?>
<menu xmlns:android="http://schemas.android.com/apk/res/android">
    <item
        android:id="@+id/menu_s"
        android:orderInCategory="1"
        android:title="粤S666"/>
    <item
        android:id="@+id/menu_n"
        android:orderInCategory="1"
        android:title="粤NB888"/>
</menu>- 在 Fragment 中重写 onCreateOptionsMenu() 方法,前提是已经已经标题栏了
    @Override
    public void onCreateOptionsMenu(Menu menu, MenuInflater inflater) {
        inflater.inflate(R.menu.menu_test,menu);
        super.onCreateOptionsMenu(menu, inflater);
}- 添加setHasOptionsMenu(true);
    @Override
    public void onCreate(@Nullable Bundle savedInstanceState) {
        super.onCreate(savedInstanceState);
        setHasOptionsMenu(true);
    }
演示一下:

好了,这样就完成啦,但是只能看不能点和个花瓶有什么区别??下面介绍点击事件。
- 如何添加 item 点击事件:重写onOptionsItemSelected()方法
    @Override
    public boolean onOptionsItemSelected(MenuItem item) {
        switch (item.getItemId()) {
            case R.id.menu_s:
                Toast.makeText(getActivity(),"粤S6",Toast.LENGTH_SHORT).show();
                return true;
            case R.id.menu_n:
                Toast.makeText(getActivity(),"粤N8",Toast.LENGTH_SHORT).show();
                return true;
            default:
                return super.onOptionsItemSelected(item);
        }
    }
再演示一下:

参考鸣谢
guolin - 总是听到有人说 AndroidX,到底什么是 AndroidX?
李苏哲 - Fragment 一:FragmentManager 和 FragmentTransaction 总结分析
老头儿 look_Future - ragment 的生命周期和 FragmentTransaction 的主要方法
防空洞 123 - Fragment 使用 findFragmentById 返回 null
pangrongxian - Activity 与 Fragment 通信方式
Steve Pomeroy - Complete Android Fragment & Activity Lifecycle


 7643
7643


 被折叠的 条评论
为什么被折叠?
被折叠的 条评论
为什么被折叠?
 到【灌水乐园】发言


