


pom.xml
<?xml version="1.0" encoding="UTF-8"?>
<project xmlns="http://maven.apache.org/POM/4.0.0" xmlns:xsi="http://www.w3.org/2001/XMLSchema-instance"
         xsi:schemaLocation="http://maven.apache.org/POM/4.0.0 https://maven.apache.org/xsd/maven-4.0.0.xsd">
    <modelVersion>4.0.0</modelVersion>
    <parent>
        <groupId>org.springframework.boot</groupId>
        <artifactId>spring-boot-starter-parent</artifactId>
        <version>2.1.11.RELEASE</version>
        <relativePath/> <!-- lookup parent from repository -->
    </parent>
    <groupId>com.gblfy</groupId>
    <artifactId>springboot-mybatis</artifactId>
    <version>0.0.1-SNAPSHOT</version>
    <name>springboot-mybatis</name>
    <description>Demo project for Spring Boot</description>

    <properties>
        <java.version>1.8</java.version>
    </properties>

    <dependencies>
        <!--SpringBoot mvc启动器-->
        <dependency>
            <groupId>org.springframework.boot</groupId>
            <artifactId>spring-boot-starter-web</artifactId>
        </dependency>
        <!--Mysql数据库驱动-->
        <dependency>
            <groupId>mysql</groupId>
            <artifactId>mysql-connector-java</artifactId>
            <version>5.1.28</version>
            <scope>runtime</scope>
        </dependency>
        <dependency>
            <groupId>org.mybatis.spring.boot</groupId>
            <artifactId>mybatis-spring-boot-starter</artifactId>
            <version>2.0.1</version>
        </dependency>
        <!--lombok 简化java代码-->
        <dependency>
            <groupId>org.projectlombok</groupId>
            <artifactId>lombok</artifactId>
            <version>1.18.10</version>
        </dependency>
        <!--druid连接池-->
        <dependency>
            <groupId>com.alibaba</groupId>
            <artifactId>druid-spring-boot-starter</artifactId>
            <version>1.1.10</version>
        </dependency>
        <!--SpringBoot test 启动器-->
        <dependency>
            <groupId>org.springframework.boot</groupId>
            <artifactId>spring-boot-starter-test</artifactId>
            <scope>test</scope>
        </dependency>
    </dependencies>

    <build>
        <plugins>
            <plugin>
                <groupId>org.springframework.boot</groupId>
                <artifactId>spring-boot-maven-plugin</artifactId>
            </plugin>
        </plugins>
        <resources>
            <resource>
                <directory>src/main/java</directory>
                <includes>
                    <include>**/*.xml</include>
                </includes>
            </resource>
            <resource>
                <directory>src/main/resources</directory>
            </resource>
        </resources>
    </build>

</project>
首先在 application.properties 中配置数据库基本信息,然后提供两个 DataSource 即可
spring.datasource.one.url=jdbc:mysql:///test01?useUnicode=true&characterEncoding=utf-8
spring.datasource.one.username=root
spring.datasource.one.password=root
spring.datasource.one.type=com.alibaba.druid.pool.DruidDataSource

spring.datasource.two.url=jdbc:mysql:///test02?useUnicode=true&characterEncoding=utf-8
spring.datasource.two.username=root
spring.datasource.two.password=root
spring.datasource.two.type=com.alibaba.druid.pool.DruidDataSource
然后再提供两个 DataSource,如下:
import com.alibaba.druid.spring.boot.autoconfigure.DruidDataSourceBuilder;
import org.springframework.boot.context.properties.ConfigurationProperties;
import org.springframework.context.annotation.Bean;
import org.springframework.context.annotation.Configuration;

import javax.sql.DataSource;

@Configuration
public class DataSourceConfig {
    @Bean
    @ConfigurationProperties(prefix = "spring.datasource.one")
    DataSource dsOne() {
        return DruidDataSourceBuilder.create().build();
    }
    @Bean
    @ConfigurationProperties(prefix = "spring.datasource.two")
    DataSource dsTwo() {
        return DruidDataSourceBuilder.create().build();
    }
}
MyBatis 配置
要提供两个 Bean,因此这里两个数据源我将在两个类中分开来配置,首先来看第一个数据源的配置:
mport org.apache.ibatis.session.SqlSessionFactory;
import org.mybatis.spring.SqlSessionFactoryBean;
import org.mybatis.spring.SqlSessionTemplate;
import org.mybatis.spring.annotation.MapperScan;
import org.springframework.context.annotation.Bean;
import org.springframework.context.annotation.Configuration;

import javax.annotation.Resource;
import javax.sql.DataSource;

@Configuration
@MapperScan(basePackages = "com.gblfy.springboot.mybatis.mapper1",sqlSessionFactoryRef = "sqlSessionFactory1",sqlSessionTemplateRef = "sqlSessionTemplate1")
public class MyBatisConfigOne {
    @Resource(name = "dsOne")
    DataSource dsOne;

    @Bean
    SqlSessionFactory sqlSessionFactory1() {
        SqlSessionFactory sessionFactory = null;
        try {
            SqlSessionFactoryBean bean = new SqlSessionFactoryBean();
            bean.setDataSource(dsOne);
            sessionFactory = bean.getObject();
        } catch (Exception e) {
            e.printStackTrace();
        }
        return sessionFactory;
    }
    @Bean
    SqlSessionTemplate sqlSessionTemplate1() {
        return new SqlSessionTemplate(sqlSessionFactory1());
    }
}
创建 MyBatisConfigOne 类,首先指明该类是一个配置类,配置类中要扫描的包是 org.javaboy.mybatis.mapper1 ,即该包下的 Mapper 接口将操作 dsOne 中的数据,对应的 SqlSessionFactory 和 SqlSessionTemplate 分别是 sqlSessionFactory1 和 sqlSessionTemplate1,在 MyBatisConfigOne 内部,分别提供 SqlSessionFactory 和 SqlSessionTemplate 即可, SqlSessionFactory 根据 dsOne 创建,然后再根据创建好的SqlSessionFactory 创建一个 SqlSessionTemplate。
这里配置完成后,依据这个配置,再来配置第二个数据源即可:
import org.apache.ibatis.session.SqlSessionFactory;
import org.mybatis.spring.SqlSessionFactoryBean;
import org.mybatis.spring.SqlSessionTemplate;
import org.mybatis.spring.annotation.MapperScan;
import org.springframework.context.annotation.Bean;
import org.springframework.context.annotation.Configuration;

import javax.annotation.Resource;
import javax.sql.DataSource;

@Configuration
@MapperScan(basePackages = "com.gblfy.springboot.mybatis.mapper2",sqlSessionFactoryRef = "sqlSessionFactory2",sqlSessionTemplateRef = "sqlSessionTemplate2")
public class MyBatisConfigTwo {
    @Resource(name = "dsTwo")
    DataSource dsTwo;

    @Bean
    SqlSessionFactory sqlSessionFactory2() {
        SqlSessionFactory sessionFactory = null;
        try {
            SqlSessionFactoryBean bean = new SqlSessionFactoryBean();
            bean.setDataSource(dsTwo);
            sessionFactory = bean.getObject();
        } catch (Exception e) {
            e.printStackTrace();
        }
        return sessionFactory;
    }

    @Bean
    SqlSessionTemplate sqlSessionTemplate2() {
        return new SqlSessionTemplate(sqlSessionFactory2());
    }
}
好了,这样 MyBatis 多数据源基本上就配置好了,接下来只需要在 org.javaboy.mybatis.mapper1 和 org.javaboy.mybatis.mapper2 包中提供不同的 Mapper,Service 中注入不同的 Mapper 就可以操作不同的数据源。
com.gblfy.springboot.mybatis.mapper1中的 mapper:
import com.gblfy.springboot.mybatis.entity.User;

import java.util.List;

public interface UserMapperOne{
    List<User> getAllUser();
}
对应的 XML 文件:
<?xml version="1.0" encoding="UTF-8" ?>
<!DOCTYPE mapper
        PUBLIC "-//mybatis.org//DTD Mapper 3.0//EN"
        "http://mybatis.org/dtd/mybatis-3-mapper.dtd">
<mapper namespace="com.gblfy.springboot.mybatis.mapper1.UserMapperOne">
    <select id="getAllUser" resultType="com.gblfy.springboot.mybatis.entity.User">
        select * from user;
    </select>
</mapper>
com.gblfy.springboot.mybatis.mapper2中的 mapper:
import com.gblfy.springboot.mybatis.entity.User;

import java.util.List;

public interface UserMapper {
    List<User> getAllUser();
}
对应的 XML 文件:
<?xml version="1.0" encoding="UTF-8" ?>
<!DOCTYPE mapper
        PUBLIC "-//mybatis.org//DTD Mapper 3.0//EN"
        "http://mybatis.org/dtd/mybatis-3-mapper.dtd">
<mapper namespace="com.gblfy.springboot.mybatis.mapper2.UserMapper">
    <select id="getAllUser" resultType="com.gblfy.springboot.mybatis.entity.User">
        select * from user;
    </select>
</mapper>
实体类:
import lombok.Data;

import java.io.Serializable;
import java.time.LocalDateTime;

@Data
public class User implements Serializable {

    //主键
    private Long id;
    //姓名
    private String name;
    //年龄
    private Integer age;
    //邮箱
    private String email;
    //创建时间
    private LocalDateTime createTime;
}
数据库脚本;
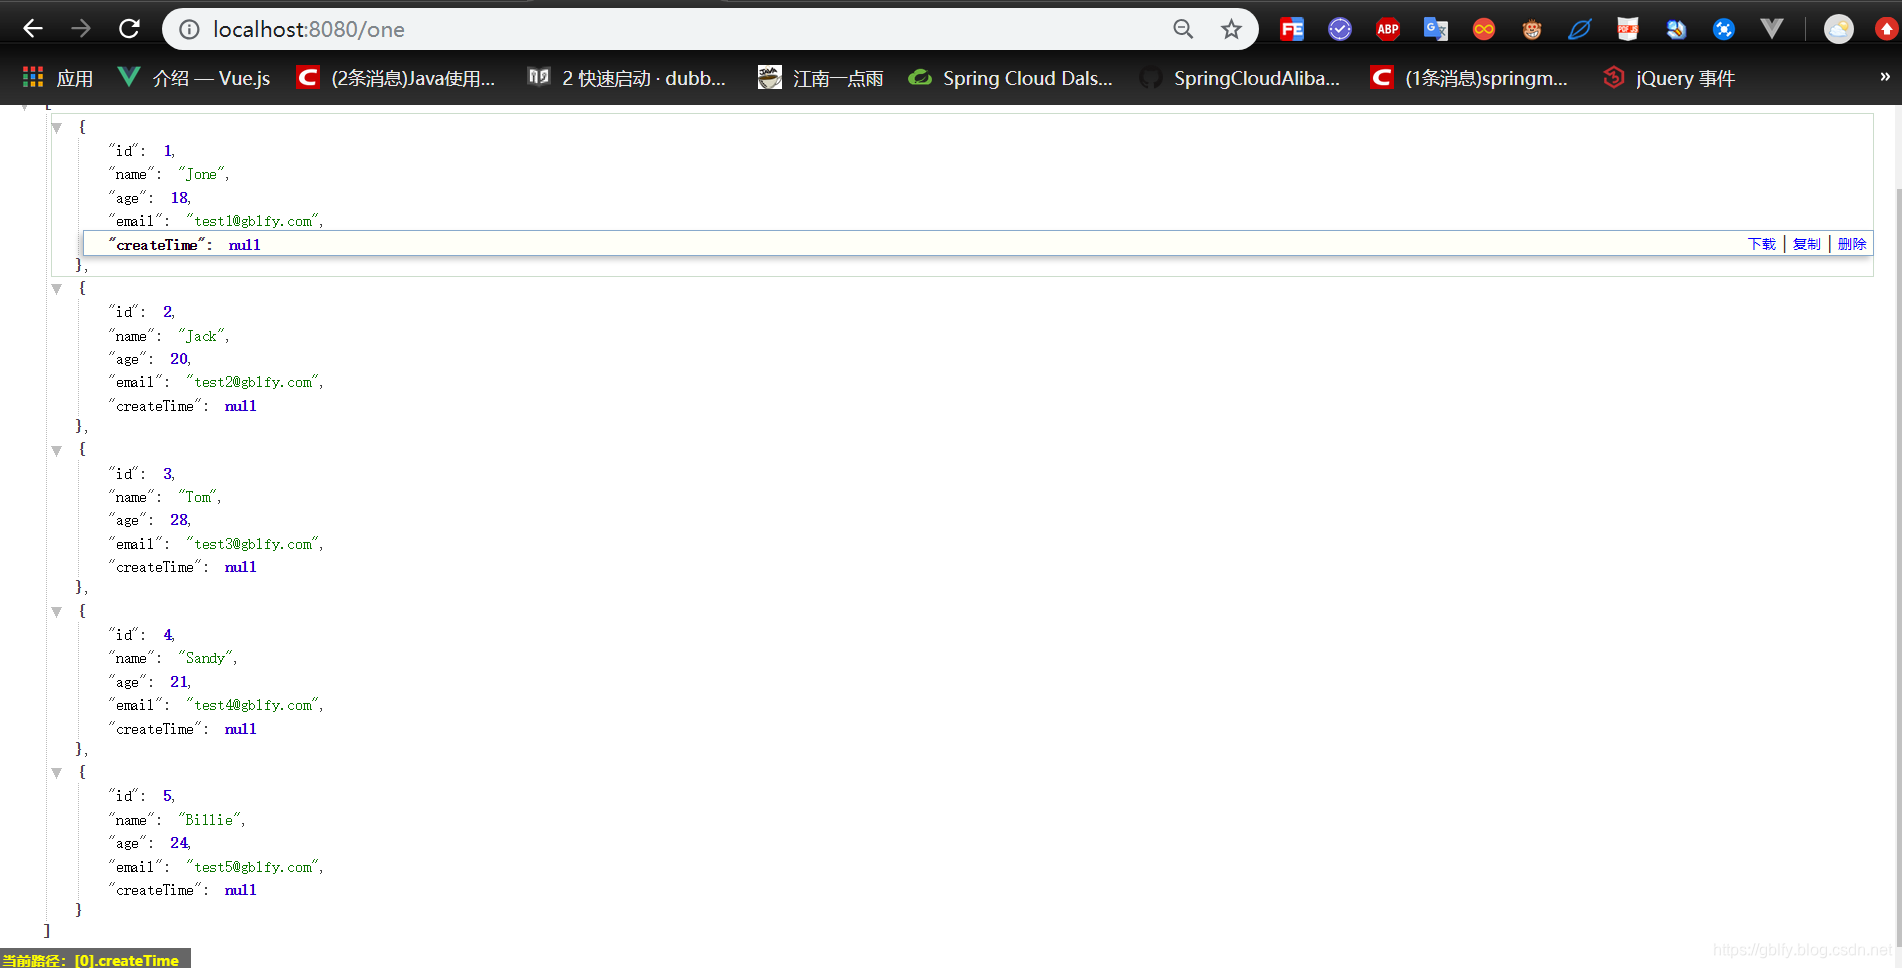
one
DROP TABLE IF EXISTS user;

CREATE TABLE user
(
	id BIGINT(20) NOT NULL COMMENT '主键ID',
	name VARCHAR(30) NULL DEFAULT NULL COMMENT '姓名',
	age INT(11) NULL DEFAULT NULL COMMENT '年龄',
	email VARCHAR(50) NULL DEFAULT NULL COMMENT '邮箱',
	create_time DATETIME DEFAULT NULL COMMENT '创建时间',
	PRIMARY KEY (id)
);

DELETE FROM user;

INSERT INTO user (id, name, age, email, create_time) VALUES
(1, 'Jone', 18, 'test1@gblfy.com','2019-01-11 14:20:20'),
(2, 'Jack', 20, 'test2@gblfy.com','2019-02-05 11:12:22'),
(3, 'Tom', 28, 'test3@gblfy.com','2019-02-14 08:31:16'),
(4, 'Sandy', 21, 'test4@gblfy.com','2019-01-14 09:15:15'),
(5, 'Billie', 24, 'test5@gblfy.com','2019-01-14 09:48:16');
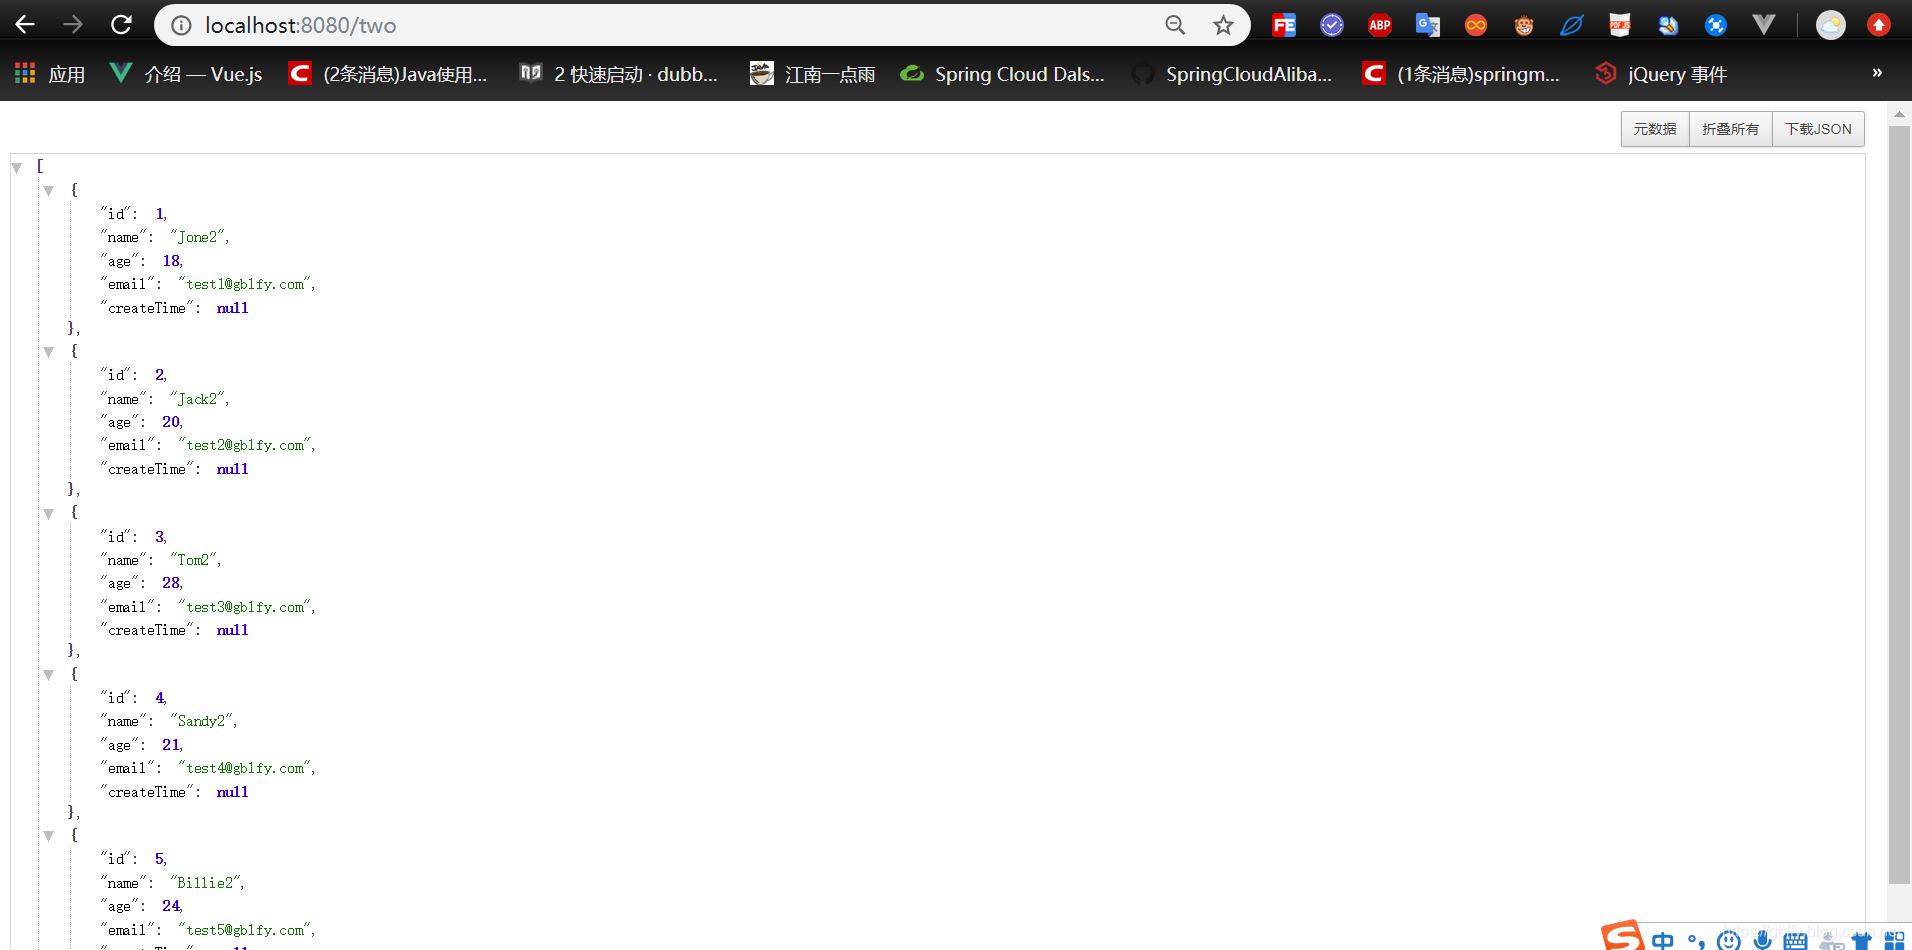
two
DROP TABLE IF EXISTS user;

CREATE TABLE user
(
	id BIGINT(20) NOT NULL COMMENT '主键ID',
	name VARCHAR(30) NULL DEFAULT NULL COMMENT '姓名',
	age INT(11) NULL DEFAULT NULL COMMENT '年龄',
	email VARCHAR(50) NULL DEFAULT NULL COMMENT '邮箱',
	create_time DATETIME DEFAULT NULL COMMENT '创建时间',
	PRIMARY KEY (id)
);

DELETE FROM user;

INSERT INTO user (id, name, age, email, create_time) VALUES
(1, 'Jone2', 18, 'test1@gblfy.com','2019-01-11 14:20:20'),
(2, 'Jack2', 20, 'test2@gblfy.com','2019-02-05 11:12:22'),
(3, 'Tom2', 28, 'test3@gblfy.com','2019-02-14 08:31:16'),
(4, 'Sandy2', 21, 'test4@gblfy.com','2019-01-14 09:15:15'),
(5, 'Billie2', 24, 'test5@gblfy.com','2019-01-14 09:48:16');
写一个测试controller
import com.gblfy.springboot.mybatis.entity.User;
import com.gblfy.springboot.mybatis.mapper1.UserMapperOne;
import com.gblfy.springboot.mybatis.mapper2.UserMapper;
import org.springframework.beans.factory.annotation.Autowired;
import org.springframework.web.bind.annotation.GetMapping;
import org.springframework.web.bind.annotation.RestController;

import java.util.List;

@RestController
public class PageController {

    @Autowired
    private UserMapperOne userMapperOne;
    @Autowired
    private UserMapper userMapper;


    @GetMapping("/one")
    public List<User> getOneList() {
        return userMapperOne.getAllUser();
    }

    @GetMapping("/two")
    public List<User> getTwoList() {
        return userMapper.getAllUser();
    }
}
启动项目:
依次访问
http://localhost:8080/one


 3673
3673


 被折叠的 条评论
为什么被折叠?
被折叠的 条评论
为什么被折叠?
 到【灌水乐园】发言


