


前言:
Spring Cloud Bus 将分布式的节点用轻量的消息代理连接起来。
它可以用于广播配置文件的更改或者服务之间的通讯,也可以用于监控。
本文要讲述的是用Spring Cloud Bus实现通知微服务架构的配置文件的更改。
一、准备工作
本文还是基于上一篇文章来实现。按照官方文档,我们只需要在配置文件中配置 spring-cloud-starter-bus-amqp ;这就是说我们需要装rabbitMq,点击rabbitmq官网下载也可用我的下载好的。至于怎么使用 rabbitmq,可以参考我的操作文档。
Erlang:
链接:https://pan.baidu.com/s/1JevmH4MyAII1tIjzfUKx_Q
提取码:h9g2
Rabbitmq:
链接:https://pan.baidu.com/s/1dbK7PL6FHD4qO2KY9qXigA
提取码:s2bo
Rabbitmq操作手册:
RabbitMQ基本概念(二):windows下安装
创建父工程并引入依赖:
<?xml version="1.0" encoding="UTF-8"?>
<project xmlns="http://maven.apache.org/POM/4.0.0" xmlns:xsi="http://www.w3.org/2001/XMLSchema-instance"
         xsi:schemaLocation="http://maven.apache.org/POM/4.0.0 http://maven.apache.org/xsd/maven-4.0.0.xsd">
    <modelVersion>4.0.0</modelVersion>
    <parent>
        <groupId>org.springframework.boot</groupId>
        <artifactId>spring-boot-starter-parent</artifactId>
        <version>2.0.3.RELEASE</version>
        <relativePath/>
    </parent>

    <modules>
        <module>config-server</module>
        <module>eureka-server</module>
        <module>config-client</module>
    </modules>

    <groupId>com.gblfy</groupId>
    <artifactId>sc-f-chapter8</artifactId>
    <version>0.0.1-SNAPSHOT</version>
    <packaging>pom</packaging>

    <name>sc-f-chapter8</name>
    <description>Demo project for Spring Boot</description>

    <properties>
        <project.build.sourceEncoding>UTF-8</project.build.sourceEncoding>
        <project.reporting.outputEncoding>UTF-8</project.reporting.outputEncoding>
        <java.version>1.8</java.version>
        <spring-cloud.version>Finchley.RELEASE</spring-cloud.version>
    </properties>

    <dependencies>
        <dependency>
            <groupId>org.springframework.boot</groupId>
            <artifactId>spring-boot-starter-test</artifactId>
            <scope>test</scope>
        </dependency>
    </dependencies>

    <dependencyManagement>
        <dependencies>
            <dependency>
                <groupId>org.springframework.cloud</groupId>
                <artifactId>spring-cloud-dependencies</artifactId>
                <version>${spring-cloud.version}</version>
                <type>pom</type>
                <scope>import</scope>
            </dependency>
        </dependencies>
    </dependencyManagement>

    <build>
        <plugins>
            <plugin>
                <groupId>org.springframework.boot</groupId>
                <artifactId>spring-boot-maven-plugin</artifactId>
            </plugin>
        </plugins>
    </build>

</project>
二、改造config-client
第1步:在pom文件加上spring-cloud-starter-bus-amqp起步依赖,如下:
        <dependency>
            <groupId>org.springframework.cloud</groupId>
            <artifactId>spring-cloud-starter-bus-amqp</artifactId>
        </dependency>
        <dependency>
            <groupId>org.springframework.boot</groupId>
            <artifactId>spring-boot-starter-actuator</artifactId>
        </dependency>
第2步:在配置文件bootstrap.yml中加上RabbitMq的配置+打开自动刷新
| RabbitMq的地址 | localhost |
|---|---|
| 用户名 | guest |
| 密码 | guest |
| 端口 | 5672 |
包括RabbitMq的地址,用户名、密码、端口。并需要加上spring.cloud.bus的三个配置,具体如下:
eureka:
  client:
    service-url:
      defaultZone: http://localhost:8761/eureka
server:
  port: 8881
spring:
  application:
    name: config-client
  cloud:
    config:
      discovery:
        enabled: true
        service-id: CONFIG-SERVER
      profile: dev
    bus:
      enabled: true
      trace:
        enabled: false
  rabbitmq:
    host: localhost
    username: guest
    password: guest
    port: 5672
#打开自动刷新
management:
 endpoints:
   web:
     exposure:
       include: bus-refresh
第3步:ConfigClientApplication启动类代码如下:
@SpringBootApplication
@EnableEurekaClient
@EnableDiscoveryClient
public class ConfigClientApplication {

    public static void main(String[] args) {
        SpringApplication.run(ConfigClientApplication.class, args);
    }

//    测试链接:curl -v -X POST "http://localhost:8882/actuator/bus-refresh"
//    在命令行执行以上命令即可
}
第4步:在配置类GirlConfig上面添加@RefreshScope注解
@Data
@Component
@ConfigurationProperties(prefix = "girl")
@RefreshScope
public class GirlConfig {

    private String name;

    private Integer age;
}
第5步:web访问类GirlController
@RestController
@RequestMapping("/girl")
public class GirlController {

    @Autowired
    private GirlConfig girlConfig;

    @GetMapping("/info")
    public String getGirlInfo() {
        return "name:" + girlConfig.getName() + ",age:" + girlConfig.getAge();
    }
}
第6步:依次启动
- eureka-server
- config-server
- 启动两个config-client实例
- 端口为:8881、8882
访问http://localhost:8881/girl/info 或者http://localhost:8882/girl/info
浏览器显示:
name:yuxin age:1
第7步:这时我们登录远程代码仓库将girl.name的值和girl.age的值分别修改为yuxin2,age2( 即改变配置文件name和age的值)。
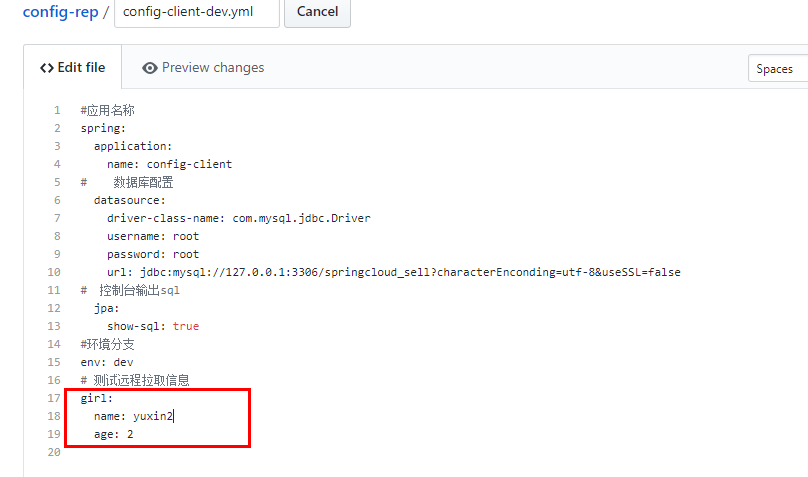
如果是传统的做法,需要重启服务,才能达到配置文件的更新。
第8步:我们只需要发送post请求:http://localhost:8881/actuator/bus-refresh或者http://localhost:8882/actuator/bus-refresh

温馨提示:
- 在测试之前请先把config-server和config-client的控制台清空
- 通过postman或者命令窗口的方式进行http请求
- 你会发现config-client会重新读取配置文件
第9步:这时我们再访问:http://localhost:8881/girl/info或者http://localhost:8882/girl/info
- 浏览器显示:
name:yuxin2 age:2

三、此时的架构:
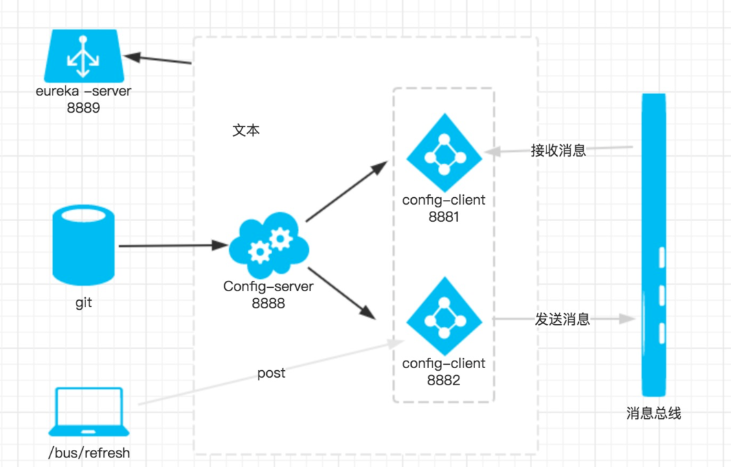
流程简述:
- 当git文件更改的时候
- 通过pc端用post 向端口为8882的config-client发送请求/bus/refresh/
- 客户端8882接收到请求从Server端更新配置并且发送给Spring Cloud Bus
- Spring Cloud bus接到消息并通知给其它客户端
- 其它客户端接收到通知,请求Server端获取最新配置
- 全部客户端均获取到最新的配置,从而使整个微服务集群都达到更新配置文件。
架构演进优化:
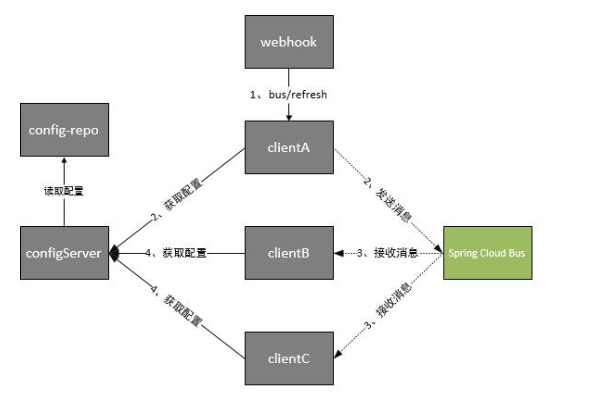
根据此图我们可以看出利用Spring Cloud Bus做配置更新的步骤:
1.提交代码触发post给客户端A发送bus/refresh
2. 客户端A接收到请求从Server端更新配置并且发送给Spring Cloud Bus
3. Spring Cloud bus接到消息并通知给其它客户端
4. 其它客户端接收到通知,请求Server端获取最新配置
5. 全部客户端均获取到最新的配置,从而使整个微服务集群都达到更新配置文件。
本文源码下载:
dev分支(最新企业实战版本):
https://github.com/gb-heima/springcloud-practical-column/tree/dev/sc-f-chapter8
master分支(入门版本):
https://github.com/gb-heima/springcloud-practical-column/tree/master/sc-f-chapter8


 1083
1083


 被折叠的 条评论
为什么被折叠?
被折叠的 条评论
为什么被折叠?
 到【灌水乐园】发言


