


文章目录
SpringBoot程序的启动类
每个SpringBoot都有一个主程序启动类,那么这个启动类到底完成了什么工作呢,这次直接从github上下载一下Spring的源码,跟着启动类的run方法,看看到底做了哪些事情。SpringBoot源码地址,https://github.com/spring-projects/spring-boot/tags 文章中使用的源码版本是Spring boot 2.7.4。不同的版本源码肯定有区别,但是大流程应该是基本一致的。除此之外如果想了解SpringBoot启动注解的作用,可以参考这个 从注解入手扒一扒SpringBoot的自动配置原理
SpringBoot程序的启动过程分析
一、程序启动类main中调用 SpringApplication.run
@SpringBootApplication
public class SmsWeatherReminderApplication {
    public static void main(String[] args) {
        SpringApplication.run(SmsWeatherReminderApplication.class, args);
    }

}
1.1 官方对SpringApplication这个类的说明
- 该类可用于从Java主方法引导和启动Spring应用程序。默认情况下,class将执行以下步骤来引导您的应用程序:
- 根据传入的启动类路径,创建适当的ApplicationContext实例
- 注册一个CommandLinePropertySource,将命令行参数作为Spring属性公开
- 初始化应用程序上下文容器,加载所有单例bean
- 触发所有的CommandLineRunner bean (可在程序启动后进行自定义操作)
- 在大多数情况下,从main方法直接运行静态的SpringApplication.run(Class, String[])方法就可以引导你的应用程序启动。
- 如果需要进一步配置,也可以先构建出 SpringApplication对象,进行自定义配置后,再运行其run方法来启动应用程序。
- SpringApplications可以从不同的源来读取bean,一般推荐使用一个@Configuration注解类来引导你的应用程序,但是也可以从下面这些源来读取
- AnnotatedBeanDefinitionReader 去加载的权限定类名
- XmlBeanDefinitionReader 去加载xml资源的路径
- GroovyBeanDefinitionReader 去加载groovy脚本
- ClassPathBeanDefinitionScanner 去扫描包地址
- 配置文件的属性也会被_SpringApplication读取,所以可以动态的设置SpringApplicatio的一些配置。例如:_
"spring.main.sources" - a CSV list增加其他sourcespring.main.web-application-type=none标识web程序类型spring.main.banner-mode=off关闭启动时的banner
二、SpringApplication的静态run方法
public class SpringApplication {

    //1、启动类调用该静态run方法,实际上调用了其重载的方法
    public static ConfigurableApplicationContext run(Class<?> primarySource, String... args) {
        return run(new Class<?>[] { primarySource }, args);
    }
    public static ConfigurableApplicationContext run(Class<?>[] primarySources, String[] args) {
        return new SpringApplication(primarySources).run(args);
    }
}
- 从main方法中传入应用启动类静态调用SpringApplication.run方法后其调用了重载方法,重载方法中调用了SpringApplication类的构造方法。根据传入的程序启动类构造了SpringApplication对象。
- 构造出SpringApplication对象后,调用了SpringApplication类的成员run方法
三、构造SpringApplication对象
//创建一个新的SpringApplication实例。
//应用程序上下文将从指定的启动类加载bean
//实例可以在调用run(String…)之前自定义
public SpringApplication(Class<?>... primarySources) {
this(null, primarySources);
}
public SpringApplication(ResourceLoader resourceLoader, Class<?>... primarySources) {
this.resourceLoader = resourceLoader;
Assert.notNull(primarySources, "PrimarySources must not be null");
//对项目的启动类作为class,进行了保存
this.primarySources = new LinkedHashSet<>(Arrays.asList(primarySources));
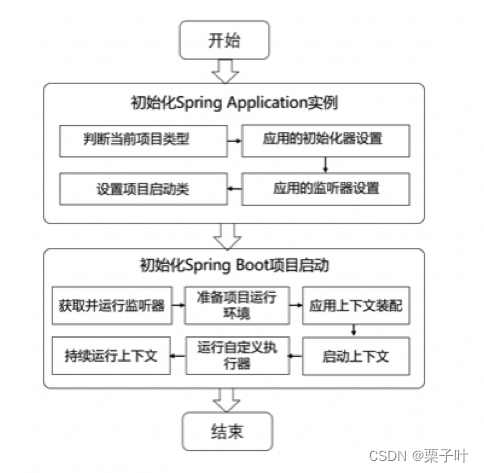
//第一步:
//判断项目是一个传统的Web应用(Spring5之前的MVC),还是REACTIVE应用(Spring5 开始出现的WebFlux交互式应用)
this.webApplicationType = WebApplicationType.deduceFromClasspath();
//第二步:
//使用SpringFactoriesLoader.loadFactoryNames 从jar的META-INF/spring.factories 中配置的注册器的实现
this.bootstrapRegistryInitializers = new ArrayList<>(
getSpringFactoriesInstances(BootstrapRegistryInitializer.class));
//第三步:jar的META-INF/spring.factories中查找初始化器并设置
setInitializers((Collection) getSpringFactoriesInstances(ApplicationContextInitializer.class));
//第四步 jar的META-INF/spring.factories中查找应用监听器并设置
setListeners((Collection) getSpringFactoriesInstances(ApplicationListener.class));
//第五步 设置查找main方法所在的类
this.mainApplicationClass = deduceMainApplicationClass();
}
3.1 第一步 判断web应用的应用类型
this.webApplicationType = WebApplicationType.deduceFromClasspath();
public enum WebApplicationType {
	//应用不是Web应用程序
	NONE,

    //应用是基于servlet的Web应用程序,启动内嵌的servlet应用服务
	SERVLET,

    //应用是一个基于REACTIVE的web应用,启动内嵌reactive应用服务
	REACTIVE;

	private static final String[] SERVLET_INDICATOR_CLASSES = { "javax.servlet.Servlet",
			"org.springframework.web.context.ConfigurableWebApplicationContext" };

	private static final String WEBMVC_INDICATOR_CLASS = "org.springframework.web.servlet.DispatcherServlet";

	private static final String WEBFLUX_INDICATOR_CLASS = "org.springframework.web.reactive.DispatcherHandler";

	private static final String JERSEY_INDICATOR_CLASS = "org.glassfish.jersey.servlet.ServletContainer";

	static WebApplicationType deduceFromClasspath() {
		//通过类加载器,判断是否存在REACTIVE相关的class
		if (ClassUtils.isPresent(WEBFLUX_INDICATOR_CLASS, null) && !ClassUtils.isPresent(WEBMVC_INDICATOR_CLASS, null)
				&& !ClassUtils.isPresent(JERSEY_INDICATOR_CLASS, null)) {
			return WebApplicationType.REACTIVE;
		}
		//如果还不存在的Servlet类 那么就不是web应用程序了
		for (String className : SERVLET_INDICATOR_CLASSES) {
			if (!ClassUtils.isPresent(className, null)) {
				return WebApplicationType.NONE;
			}
		}
		return WebApplicationType.SERVLET;
	}

}
这句代码,对SpringApplication的webApplicationType进行了配置,直接通过判断Classpath类路径是否存在对应服务的特征类,来确定是servlet应用,还是reactive(spring5出现的webFlux交互式应用)应用。
3.2 第二步 注册 BootstrapRegistryInitializer
new ArrayList<>(getSpringFactoriesInstances(BootstrapRegistryInitializer.class));
private <T> Collection<T> getSpringFactoriesInstances(Class<T> type) {
    return getSpringFactoriesInstances(type, new Class<?>[] {});
}

private <T> Collection<T> getSpringFactoriesInstances(Class<T> type, Class<?>[] parameterTypes, Object... args) {
    ClassLoader classLoader = getClassLoader();
    // Use names and ensure unique to protect against duplicates
    //使用指定的类加载器从“META-INF/spring.factories”中加载给定类型的工厂实现的完全限定类名
    Set<String> names = new LinkedHashSet<>(SpringFactoriesLoader.loadFactoryNames(type, classLoader));
    //利用反射创建了对应对象
    List<T> instances = createSpringFactoriesInstances(type, parameterTypes, classLoader, args, names);
    AnnotationAwareOrderComparator.sort(instances);
    return instances;
}
- 第一步:这里使用了指定的加载器,从META-INF/spring.factories中加载BootstrapRegistryInitializer.class配置的对应的全限定类名。这个方法很熟悉,因为上次探究注解的自动配置时,就看到了该方法从META-INF/spring.factories中加载自动配置类。
- 从spring.factories中获得了对应的全限定类名后,createSpringFactoriesInstances方法中,又使用了BeanUtils依据全限定类名,进行了初始化。
BootstrapRegistryInitializer是什么?
@FunctionalInterface
public interface BootstrapRegistryInitializer {
	/**
	 * 用任何必需的注册初始化给定的BootstrapRegistry
	 * @param registry the registry to initialize
	 */
	void initialize(BootstrapRegistry registry);
}

/**
*一个简单的对象注册表,在启动和环境后处理期间可用,直到ApplicationContext准备好为止。
可以用来注册创建的代价可能很高的实例,或者在ApplicationContext可用之前需要共享的实例。
注册中心使用Class作为键,这意味着只能存储给定类型的单个实例。
可以使用addCloseListener(ApplicationListener)方法添加一个侦听器,
该侦听器可以在BootstrapContext关闭且ApplicationContext完全准备好时执行操作。
例如,一个实例可以选择将自己注册为一个常规Spring bean,以便应用程序可以使用它
*/
public interface BootstrapRegistry {
	....
	//添加一个ApplicationListener,当BootstrapContext被关闭并且ApplicationContext已经准备好时,
    //它将被BootstrapContextClosedEvent调用
    void addCloseListener(ApplicationListener<BootstrapContextClosedEvent> listener);
}
- BootstrapRegistryInitializer接口只有一个方法,就是初始化给定的BootstrapRegistry引导注册器。
- 目前在SpringBoot 2.7.4 的源码中对应的spring.factories中未包含BootstrapRegistryInitializer的配置,后续可能会有对应的拓展。
- BootstrapRegistry是一个启动过程中的的对象注册器,可以在从启动开始,到后处理流程之前都可用。
- 可以用来注册消耗很大的对象,或者注册在ApplicationContext初始化完成之前就需要共享的Bean。
- BootstrapRegistry注册的类,使用class名称作为已注册的class的key,所以名称相同的只存在一个实例。这一点从他的默认实现类,DefaultBootstrapContext中也可以看到,它使用了一个Class<?> 为key的map来对创建好的实例进行了保存。
- BootstrapRegistry可以以注册一个监听器,监听DefaultBootstrapContextClosedEvent也就是说在启动完成,ApplicationContext就绪BootstrapContext关闭时,会调用该方法。
3.3 第三步 设置应用初始化器
setInitializers((Collection) getSpringFactoriesInstances(ApplicationContextInitializer.class));用于SpringApplication应用的初始化器设置。在初始化器设置过程中,会使用Spring类加载器
SpringFactoriesLoader从META-INF/spring.factories类路径下的META-INF下的spring.factores文件中
获取所有可用的应用初始化器类ApplicationContextInitializer 。过程和3.2的注册过程基本一致
3.4 第四步 设置所有的应用监听器
setListeners((Collection) getSpringFactoriesInstances(ApplicationListener.class));
用于SpringApplication应用的监听器设置。监听器设置的过程与上一步初始化器设置的过程基本一样,
也是使用SpringFactoriesLoader从META-INF/spring.factories类路径下的META-INF下的
spring.factores文件中获取所有可用的监听器类ApplicationListener。
3.5 第五步 推断main方法所在的class
this.mainApplicationClass = deduceMainApplicationClass();
private Class<?> deduceMainApplicationClass() {
    try {
        StackTraceElement[] stackTrace = new RuntimeException().getStackTrace();
        for (StackTraceElement stackTraceElement : stackTrace) {
            if ("main".equals(stackTraceElement.getMethodName())) {
                return Class.forName(stackTraceElement.getClassName());
            }
        }
    }
    catch (ClassNotFoundException ex) {
        // Swallow and continue
    }
    return null;
}
可以看到,SpringBoot推断main方法所在的类的方式,是通过构建一个RuntimeException然后从堆栈信息中获取,很巧妙。
四、由SpringApplication初始化和启动 Spring
public ConfigurableApplicationContext run(String... args) {
    //统计启动耗时用的
    long startTime = System.nanoTime();

    //创建了一个启动时的上下文容器实现了BootstrapRegistry,对构建SpringApplication时保存的需要启动时创建的类进行保存注册
    DefaultBootstrapContext bootstrapContext = createBootstrapContext();
    ConfigurableApplicationContext context = null;
    configureHeadlessProperty();

    /*
    第一步
    1.从spring.factories中获取SpringApplicationRunListener配置的运行监听器,并创建监听器集合对象。
    2.监听器启动,向所有监听器发布开始启动的事件,并传入启动时上下文。listeners相当于是一个事件源对象。
    */
    SpringApplicationRunListeners listeners = getRunListeners(args);
    listeners.starting(bootstrapContext, this.mainApplicationClass);
    try {

        //args是启动Spring应用的命令行参数(例如--server.port=8080),参数可以在Spring中被访问。
        ApplicationArguments applicationArguments = new DefaultApplicationArguments(args);

        /**
         * 第二步:
         * 1、传入监听器和启动上下文以及应用参数,来构建项目启动环境
         * 2、listeners 广播通知所有监听器,environmentPrepared
         * 3、保存命令行参数、servletConfigInitParams、servletContextinitParams、
         * systemProperties、systemEnvironment、random、application.yml等到环境配置中
         */
        ConfigurableEnvironment environment = prepareEnvironment(listeners, bootstrapContext, applicationArguments);
        configureIgnoreBeanInfo(environment);
        //准备打印banner
        Banner printedBanner = printBanner(environment);

        /**
         * 第三步 创建Spring容器
         * 1、利用构建SpringApplication时设置的 webApplicationType传入ApplicationContextFactory对象中来构建
         * 2、SpringApplication会根据webApplicationType创建默认的ApplicationContextFactory
         *
         */
        context = createApplicationContext();
        //收集启动时间
        context.setApplicationStartup(this.applicationStartup);

        /**
         * 第四步:容器前置处理
         * 1、设置容器环境、变量等。并且将启动类注入容器类
         */
        prepareContext(bootstrapContext, context, environment, listeners, applicationArguments, printedBanner);

        /**
         * 第五步:刷新容器
         * 1、开启刷新Spring容器,通过refresh方法对整个Ioc容器的初始化,包括Bean的定位、解析、注册等等
         * 2、向JVM注册一个关机回调,JVM关机时会关闭这个容器上下文。
         */
        refreshContext(context);

        /**
         * 第六步:容器后处理*
         */
        afterRefresh(context, applicationArguments);
        //统计耗时
        Duration timeTakenToStartup = Duration.ofNanos(System.nanoTime() - startTime);
        if (this.logStartupInfo) {
            new StartupInfoLogger(this.mainApplicationClass).logStarted(getApplicationLog(), timeTakenToStartup);
        }
        /**
         * 第七步:发布启动完成通知
         */
        listeners.started(context, timeTakenToStartup);

        /**
         * 调用自定义的xxxRunner类,使得项目启动后执行一些特定程序。
         */
        callRunners(context, applicationArguments);
    } catch (Throwable ex) {
        handleRunFailure(context, ex, listeners);
        throw new IllegalStateException(ex);
    }
    try {
        Duration timeTakenToReady = Duration.ofNanos(System.nanoTime() - startTime);
        listeners.ready(context, timeTakenToReady);
    } catch (Throwable ex) {
        handleRunFailure(context, ex, null);
        throw new IllegalStateException(ex);
    }
    return context;
}
按照启动的过程,将启动流程大致分为以下部分,嫌烦的话呢直接看上方的源码也是一样的,已经注释好了。
4.1 第一步 创建了启动时上下文容器
DefaultBootstrapContext bootstrapContext = createBootstrapContext();
- 这个容器的作用,在3.2有提到,是一个启动过程中的的对象注册器,可以在从启动开始,到后处理流程之前都可用。可以用来注册消耗很大的对象,或者注册在ApplicationContext初始化完成之前就需要共享的Bean。
- 注册的过程就是使用3.2中收集到的注册器初始化器,调用其初始化方法注入到容器中。
4.2 第二步 创建监听器的事件源对象 ApplicationArguments
SpringApplicationRunListeners listeners = getRunListeners(args);
listeners.starting(bootstrapContext, this.mainApplicationClass);
private SpringApplicationRunListeners getRunListeners(String[] args) {
    Class<?>[] types = new Class<?>[]{SpringApplication.class, String[].class};
    return new SpringApplicationRunListeners(logger,
            getSpringFactoriesInstances(
                SpringApplicationRunListener.class, types, this, args),this.applicationStartup);
}
- 可以看到,这一步调用了getSpringFactoriesInstances()方法,从spring.factories文件中取出了SpringApplicationRunListener.class的配置对象,并且创建了ApplicationArguments 对象。
- 这里的ApplicationArguments 应该可以理解为事件源,保存了监听器的集合,并且事件通知由其向其保存的监听器进行发布。
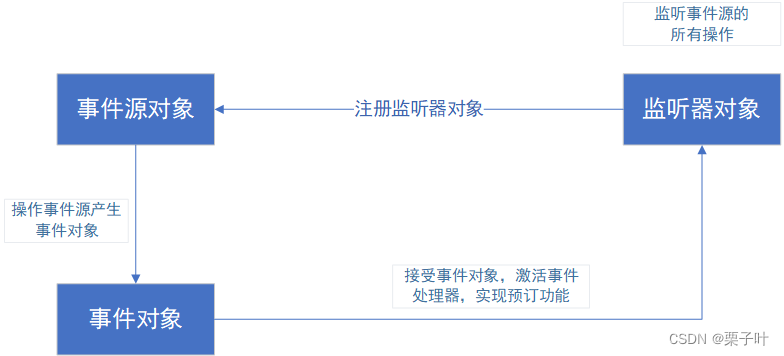
- SpringApplicationRunListener 对比ApplicationListener
- SpringApplicationRunListener 只监听run方法运行时的事件,每次都在run方法运行时重新注册。
- ApplicationListener 由应用程序事件监听器实现的接口。 基于Observer设计模式的标准,在构建SpringApplication时被注册成为SpringApplication的列表成员中。
- 疑问1: 这里的SpringApplicationRunListener监听器,与3.4中注册的监听器有所不同。并且spring为何要将两种监听器分开注册呢? 我的理解:SpringApplicationRunListener只在run方法运行时有作用,所以没有必要像3.4 中的ApplicationListener,长期维护在SpringApplication对象中。
- 疑问2: 这里的只注册了SpringApplicationRunListener,那3.4里提前保存好的ApplicationListener就监听不到run方法的事件了吗?**结果:**spring.factories文件里,目前配置了一个SpringApplicationRunListener就是EventPublishingRunListener,这个对象在构建时,就会取出3.4保存的监听器加到自己的成员变量,每次收到事件时在向他们也发布一遍。这样这些ApplicationListener就也能监控到run方法的运行通知了。
4.3 根据SpringApplicationRunListeners以及参数来准备环境
ConfigurableEnvironment environment = prepareEnvironment(listeners, bootstrapContext, applicationArguments);
- 传入监听器和启动上下文以及应用参数,来构建项目启动环境
- listeners 广播通知所有监听器,发布事件,environmentPrepared
- 保存命令行参数、servletConfigInitParams、servletContextinitParams、systemProperties、systemEnvironment、random、application.yml等到环境配置中
configureIgnoreBeanInfo(environment);方法排除一些不需要的运行环境
4.4 第四步 依据webApplicationType创建Spring容器
context = createApplicationContext();
ConfigurableApplicationContext context = null;


//1、可以发现,容器由 applicationContextFactory 负责创建
protected ConfigurableApplicationContext createApplicationContext() {
		return this.applicationContextFactory.create(this.webApplicationType);
}

//2、SpringApplication中的 ApplicationContextFactory 是一个默认值
private ApplicationContextFactory applicationContextFactory = ApplicationContextFactory.DEFAULT;


/**
 * 3、默认ApplicationContextFactory 用了一段lambda表达式创建了一个对象
 * 一个默认的ApplicationContextFactory实现,它将为WebApplicationType创建一个适当的上下文。
 */
ApplicationContextFactory DEFAULT = (webApplicationType) -> {
    try {
        for (ApplicationContextFactory candidate : SpringFactoriesLoader
                .loadFactories(ApplicationContextFactory.class, ApplicationContextFactory.class.getClassLoader())) {
            ConfigurableApplicationContext context = candidate.create(webApplicationType);
            if (context != null) {
                return context;
            }
        }
        return new AnnotationConfigApplicationContext();
    }
    catch (Exception ex) {
        throw new IllegalStateException("Unable create a default ApplicationContext instance, "
                + "you may need a custom ApplicationContextFactory", ex);
    }
};
# Application Context Factories
org.springframework.boot.ApplicationContextFactory=\
org.springframework.boot.web.reactive.context.AnnotationConfigReactiveWebServerApplicationContext.Factory,\
org.springframework.boot.web.servlet.context.AnnotationConfigServletWebServerApplicationContext.Factory
static class Factory implements ApplicationContextFactory {

    //如果web应用环境,不是这个工厂需要的环境,那么工厂create方法,就返回空。
    @Override
    public ConfigurableApplicationContext create(WebApplicationType webApplicationType) {
        return (webApplicationType != WebApplicationType.REACTIVE) ? null
                : new AnnotationConfigReactiveWebServerApplicationContext();
    }

}
- 可以发现,Spring对context的创建改变挺大的,之前直接在createApplicationContext方法里,就根据webApplicationType判断了需要使用哪个context。但是现在一眼无法发现到底使用的哪个context
- 默认的ApplicationContextFactory的方法中,先从spring.factories加载配置的ApplicationContextFactory
- 配置文件中,分别保存了 AnnotationConfigReactiveWebServerApplicationContext 和AnnotationConfigServletWebServerApplicationContext的工厂类
- 这两个文件的工厂类,都是context的内部类。根据webApplicationType判断是否初始化对应的context。
- 那么Spring容器的创建结果也是一目了然了
- 如果 webApplicationType=WebApplicationType._REACTIVE _那么context的实现了就是AnnotationConfigReactiveWebServerApplicationContext
- 如果 webApplicationType= _SERVLET _那么context的实现就是AnnotationConfigServletWebServerApplicationContext
- 如果webApplicationType= _NONE 那么context的实现就是 _AnnotationConfigApplicationContext
4.5 容器前置处理
prepareContext(bootstrapContext, context, environment, listeners, applicationArguments, printedBanner);
private void prepareContext(DefaultBootstrapContext bootstrapContext, ConfigurableApplicationContext context,
								ConfigurableEnvironment environment, SpringApplicationRunListeners listeners,
								ApplicationArguments applicationArguments, Banner printedBanner) {
    //设置容器环境
    context.setEnvironment(environment);
    //设置上下文的bean生器械 和ApplicationContext相关后处理
    postProcessApplicationContext(context);
    //执行容器中的应用初始化器(包括自定义和spring.factories)
    applyInitializers(context);
    //触发监听器事件
    listeners.contextPrepared(context);
    //引导启动容器到此被关闭
    bootstrapContext.close(context);
    //记录启动日志
    if (this.logStartupInfo) {
        logStartupInfo(context.getParent() == null);
        logStartupProfileInfo(context);
    }
    // Add boot specific singleton beans
    //注册启动时需要的参数Bean 封装金融其
    ConfigurableListableBeanFactory beanFactory = context.getBeanFactory();
    beanFactory.registerSingleton("springApplicationArguments", applicationArguments);
    if (printedBanner != null) {
        beanFactory.registerSingleton("springBootBanner", printedBanner);
    }
    if (beanFactory instanceof AbstractAutowireCapableBeanFactory) {
        ((AbstractAutowireCapableBeanFactory) beanFactory).setAllowCircularReferences(this.allowCircularReferences);
        if (beanFactory instanceof DefaultListableBeanFactory) {
            ((DefaultListableBeanFactory) beanFactory)
                    .setAllowBeanDefinitionOverriding(this.allowBeanDefinitionOverriding);
        }
    }
    //懒加载和工厂bean的后处理器处理
    if (this.lazyInitialization) {
        context.addBeanFactoryPostProcessor(new LazyInitializationBeanFactoryPostProcessor());
    }
    context.addBeanFactoryPostProcessor(new PropertySourceOrderingBeanFactoryPostProcessor(context));
    // 加载所有资源
    Set<Object> sources = getAllSources();
    Assert.notEmpty(sources, "Sources must not be empty");
    //将启动类注入容器,为自动配置奠定基础
    load(context, sources.toArray(new Object[0]));
    listeners.contextLoaded(context);
}
- 该方法重要的地方在于,将启动类注入到了容器中,为自动化配置奠定了基础
- 这里可以看到,4.1创建的启动时的引导类注册器,在这里被关闭。所以3.2 注册的bean,在run方法启动过程中,生命周期就是从run开始,到refresh之前。
4.6 刷新容器 refreshContext(context);
这一步里,完成了对整个IOC容器的初始化,和单独使用Spring类似,同时向JVM注册了一个回调方法,JVM关机时将关闭容器。
4.7 容器后处理 afterRefresh(context, applicationArguments);
拓展接口,设计模式中的模板方法。默认为空实现,重写时可以自定义该处的逻辑。
4.8 发布通知,容器已启动
listeners.started(context, timeTakenToStartup);
这里的started传入的context不再是启动时候的context了,因为bootstrapContext 已经关闭了。
4.9 执行Runners
用于调用项目中自定义的执行器XxxRunner类,使得在项目启动完成后立即执行一些特定程序。其中,
Spring Boot提供的执行器接口有ApplicationRunner 和CommandLineRunner两种,在使用时只需要
自定义一个执行器类实现其中一个接口并重写对应的run()方法接口,然后Spring Boot项目启动后会立
即执行这些特定程序.
@Component
@Slf4j
public class StartCommandLineRunner implements CommandLineRunner {

    @Autowired
    DataIndiCacheUtil dataIndiCacheUtil;

    @Value("${spring.profiles.active}")
    String SERVER_ZONE;

    @Override
    public void run(String... args) throws Exception {
        log.info("程序启动时操作开始执行");
        dataIndiCacheUtil.initLocalMemoryCache();
        log.info("程序启动时操作执行完毕");
    }
}
五、总结
可以看到源码中出于各种原因的考虑,一个类或者方法都被拆的很细,并且这一段也有各种设计模式的应用,比如观察者模式、策略模式、工厂模式等。自己翻的源码,可能解释或理解不正确,如果有错希望可以帮忙指正。


 5628
5628


 被折叠的 条评论
为什么被折叠?
被折叠的 条评论
为什么被折叠?
 到【灌水乐园】发言


