场景

经常会有编写数据库表结构文档的时间付出,那能否通过简单配置实现自动生成。

screw

screw (螺丝钉) 英:[skruː] ~ 简洁好用的数据库表结构文档生成工具。

 screw: 简洁好用的数据库表结构文档工具,支持MySQL/MariaDB/SqlServer/Oracle/PostgreSQL/TIDB/CacheDB 数据库。

特点

简洁、轻量、设计良好

多数据库支持

多种格式文档

灵活扩展

支持自定义模板

数据库支持

MySQL

MariaDB

TIDB

Oracle

SqlServer

PostgreSQL

Cache DB(2016)

H2 (开发中)

DB2 (开发中)

HSQL (开发中)

SQLite(开发中)

瀚高(开发中)

达梦 (开发中)

虚谷 (开发中)

人大金仓(开发中)

文档生成支持

html

word

markdown

注:

博客:霸道流氓气质

实现

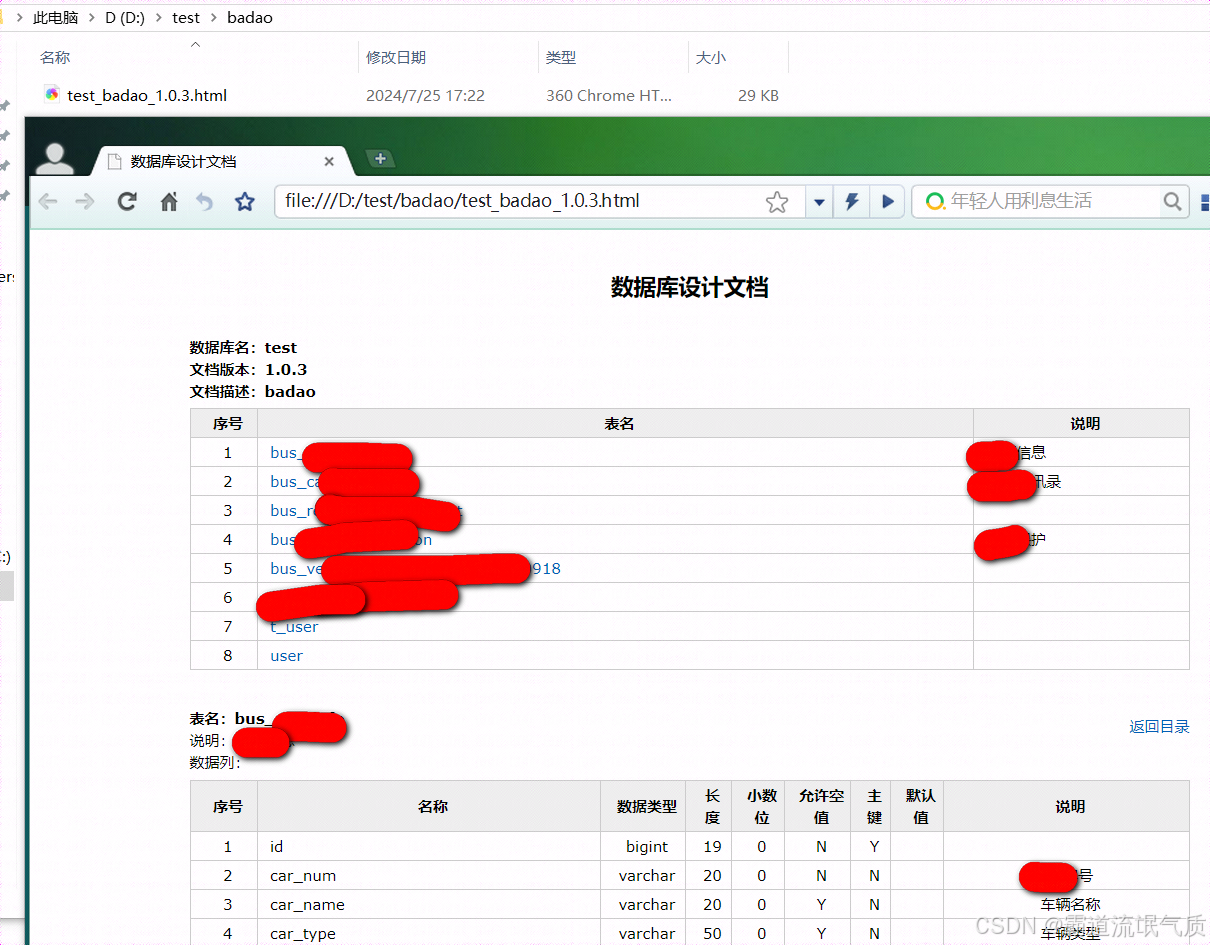
下面以连接mysql数据库并生成html格式的数据库结构文档为例

插件的使用方式除可以使用代码外,还可以使用Maven插件的方式。

这里考虑将其集成到单独的springboot项目中,并使用单元测试的方式需要时配置和运行。

新建springboot项目,并引入screw的依赖

<dependency>
            <groupId>cn.smallbun.screw</groupId>
            <artifactId>screw-core</artifactId>
            <version>1.0.3</version>
        </dependency>
  • 1.
  • 2.
  • 3.
  • 4.
  • 5.

maven仓库地址

 https://mvnrepository.com/artifact/cn.smallbun.screw/screw-core

然后生成文档还需依赖

<dependency>
            <groupId>org.freemarker</groupId>
            <artifactId>freemarker</artifactId>
            <version>2.3.30</version>
        </dependency>
  • 1.
  • 2.
  • 3.
  • 4.
  • 5.

这里还需要连接mysql数据库以及单元测试等的依赖

<dependency>
            <groupId>org.springframework.boot</groupId>
            <artifactId>spring-boot-starter-web</artifactId>
        </dependency>
        <dependency>
            <groupId>org.springframework.boot</groupId>
            <artifactId>spring-boot-starter-test</artifactId>
            <scope>test</scope>
        </dependency>
        <dependency>
            <groupId>org.springframework.boot</groupId>
            <artifactId>spring-boot-starter-jdbc</artifactId>
        </dependency>
        <!--MySQL驱动-->
        <dependency>
            <groupId>mysql</groupId>
            <artifactId>mysql-connector-java</artifactId>
        </dependency>
  • 1.
  • 2.
  • 3.
  • 4.
  • 5.
  • 6.
  • 7.
  • 8.
  • 9.
  • 10.
  • 11.
  • 12.
  • 13.
  • 14.
  • 15.
  • 16.
  • 17.
  • 18.

新建单元测试类

import cn.smallbun.screw.core.Configuration;
import cn.smallbun.screw.core.engine.EngineConfig;
import cn.smallbun.screw.core.engine.EngineFileType;
import cn.smallbun.screw.core.engine.EngineTemplateType;
import cn.smallbun.screw.core.execute.DocumentationExecute;
import cn.smallbun.screw.core.process.ProcessConfig;
import org.junit.jupiter.api.Test;
import org.springframework.beans.factory.annotation.Autowired;
import org.springframework.boot.test.context.SpringBootTest;
import org.springframework.context.ApplicationContext;
import javax.sql.DataSource;
import java.util.ArrayList;
import java.util.Arrays;
import java.util.List;

@SpringBootTest
class ScrewTest {

    @Autowired
    ApplicationContext applicationContext;

    @Test
    void createDataBaseWorld() {
        DataSource dataSourceMysql = applicationContext.getBean(DataSource.class);
        // 生成文件配置
        EngineConfig engineConfig = EngineConfig.builder()
                // 生成文件路径,自己mac本地的地址,这里需要自己更换下路径
                .fileOutputDir("D:\\test\\badao\\")
                // 打开目录
                .openOutputDir(false)
                // 文件类型
                .fileType(EngineFileType.HTML)
                // 生成模板实现
                .produceType(EngineTemplateType.freemarker).build();

        // 生成文档配置(包含以下自定义版本号、描述等配置连接)
        Configuration config = Configuration.builder()
                .version("1.0.3")
                .description("badao")
                .dataSource(dataSourceMysql)
                .engineConfig(engineConfig)
                .produceConfig(getProcessConfig())
                .build();

        // 执行生成
        new DocumentationExecute(config).execute();
    }

    /**
     * 配置想要生成的表+ 配置想要忽略的表
     * @return 生成表配置
     */
    public static ProcessConfig getProcessConfig(){
        // 忽略表名
        List<String> ignoreTableName = Arrays.asList("test_users","test1");
        // 忽略表前缀,如忽略a开头的数据库表
        List<String> ignorePrefix = Arrays.asList("qrtz","sys","gen");
        // 忽略表后缀
        List<String> ignoreSuffix = Arrays.asList("_log");

        return ProcessConfig.builder()
                //根据名称指定表生成
                .designatedTableName(new ArrayList<>())
                //根据表前缀生成
                .designatedTablePrefix(new ArrayList<>())
                //根据表后缀生成
                .designatedTableSuffix(new ArrayList<>())
                //忽略表名
                .ignoreTableName(ignoreTableName)
                //忽略表前缀
                .ignoreTablePrefix(ignorePrefix)
                //忽略表后缀
                .ignoreTableSuffix(ignoreSuffix).build();
    }
}
  • 1.
  • 2.
  • 3.
  • 4.
  • 5.
  • 6.
  • 7.
  • 8.
  • 9.
  • 10.
  • 11.
  • 12.
  • 13.
  • 14.
  • 15.
  • 16.
  • 17.
  • 18.
  • 19.
  • 20.
  • 21.
  • 22.
  • 23.
  • 24.
  • 25.
  • 26.
  • 27.
  • 28.
  • 29.
  • 30.
  • 31.
  • 32.
  • 33.
  • 34.
  • 35.
  • 36.
  • 37.
  • 38.
  • 39.
  • 40.
  • 41.
  • 42.
  • 43.
  • 44.
  • 45.
  • 46.
  • 47.
  • 48.
  • 49.
  • 50.
  • 51.
  • 52.
  • 53.
  • 54.
  • 55.
  • 56.
  • 57.
  • 58.
  • 59.
  • 60.
  • 61.
  • 62.
  • 63.
  • 64.
  • 65.
  • 66.
  • 67.
  • 68.
  • 69.
  • 70.
  • 71.
  • 72.
  • 73.
  • 74.
  • 75.

这里要注意引入依赖的路径。

然后这里需要在配置文件这里是yml中配置数据源

# 数据源
spring:
  application:
    name: badao-tcp-demo
  datasource:
    url: jdbc:mysql://localhost:3306/test?useUnicode=true&characterEncoding=utf8&zeroDateTimeBehavior=convertToNull&useSSL=true&serverTimezone=GMT%2B8
    username: root
    password: root
    driver-class-name: com.mysql.cj.jdbc.Driver
    dbcp2:
      min-idle: 5                                # 数据库连接池的最小维持连接数
      initial-size: 5                            # 初始化连接数
      max-total: 5                               # 最大连接数
      max-wait-millis: 150                       # 等待连接获取的最大超时时间
  • 1.
  • 2.
  • 3.
  • 4.
  • 5.
  • 6.
  • 7.
  • 8.
  • 9.
  • 10.
  • 11.
  • 12.
  • 13.
  • 14.

然后再上面单元测试中还可配置要忽略的表,指定前后缀等。

运行该单元测试,到配置的指定目录下查看

SpringBoot中集成screw(螺丝钉)实现数据库表结构文档生成_后端