


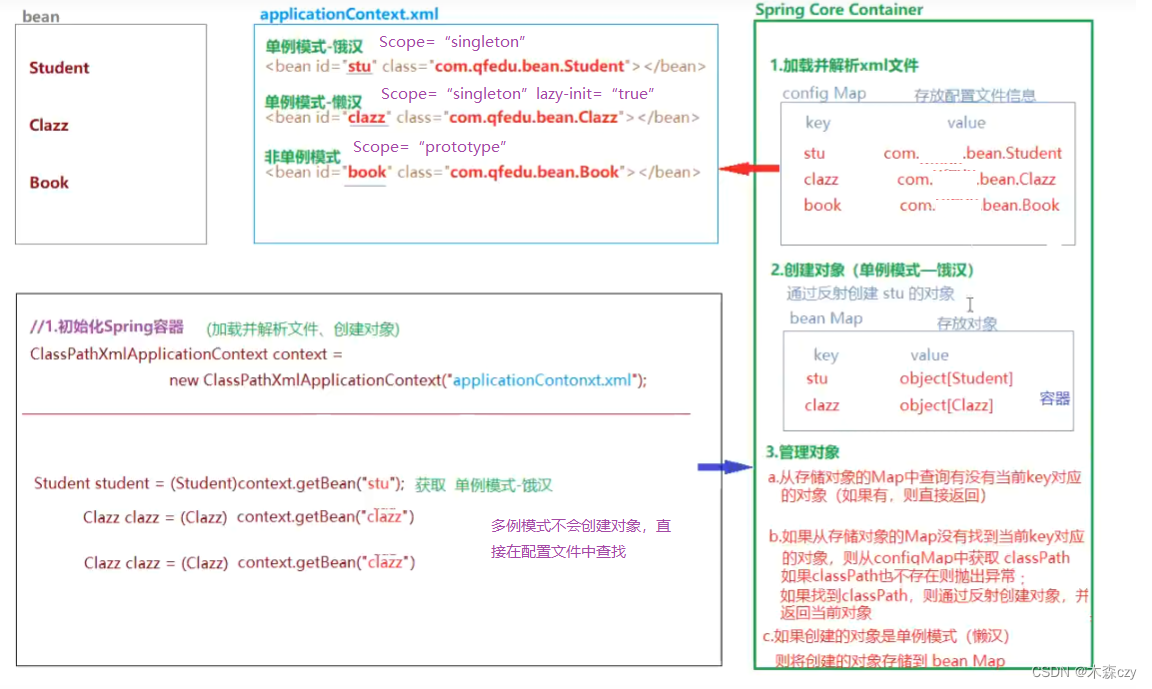
2.8 Spring-IoC 工作原理
三、SpringIoC —基于注解
SpringIoC的使用,需要先通过XM将类声明给Spring容器进行管理,而通过Spring工厂完成对象的创建和属性值的注入
Spring也可通过注解的配置,直接在实体类中添加注解声明给Spring容器管理,以简化开发步骤
3.1 Spring框架步骤
3.1.1 创建Meaven项目
3.1.2添加Spring-IOC依赖(在pom.xml中)
<dependency>
      <groupId>org.springframework</groupId>
      <artifactId>spring-context</artifactId>
      <version>5.2.13.RELEASE</version>
    </dependency>
3.2.3创建Spring配置文件
因为Spring容器初始化时,只会加载applicationContext.xml文件,必须在applicationContext.xml文件中声明扫描范围,才能识别实体类中的注解
?xml version="1.0" encoding="UTF-8" ?>
<beans xmlns="http://www.springframework.org/schema/beans"
       xmlns:xsi="http://www.w3.org/2001/XMLSchema-instance"

       xmlns:context="http://www.springframework.org/schema/context"
       xsi:schemaLocation="http://www.springframework.org/schema/beans
      https://www.springframework.org/schema/beans/spring-beans.xsd
      http://www.springframework.org/schema/context
      https://www.springframework.org/schema/context/spring-context.xsd">
<!--    声明使用注解配置-->
    <context:annotation-config/>
<!--声明Spring注解的扫描范围-->
   <context:component-scan base-package="com.muxin.beans"/>


</beans>
3.2 IoC常用注解
3.2.1@Component
- 类注解,声明此类被Spring容器管理,相当于bean标签的作用
@Component(value=“stu”)value属性用于指定当前bean的id,相当于bean标签的id 属性;value属性也可以省略,如果沈略当前类,id默认值为类名首字母该小写@Service、@Controller、@Repository也可以将类声明Spring管理,他们主要是语义上的区别@Controller主要声明将控制器类型配置给Spring管理,例如:Servlet(控制器)@Service主要声明业务处理类配置Spring管理,Service接口的实现类@Repository主要声明持久化类配置Spring管理,DAO接口@Component除以上三种外
3.2.2@Scope
- 类注解,用于声明是否为单例模式
- @Scope(“prototype”)声明为非单例模式(默认为单例)
3.2.3@Lazy
- 类注解,用于声明一个单例模式的Bean是否为懒汉模式
- @Lazy(true)声明为懒汉(默认为饿汉)
3.2.4@PostConstruct
- 方法注解,声明方法为当前类的初始化方法(在构造器之后执行),相当于bean标签的init-method属性
3.2.5@PreDestroy
- 方法注解,声明方法为当前类的销毁方法(在对象从容器中释放之前执行),相当于bean标签的destory-method属性
3.2.6@Autowired
-
属性注解,声明当前属性自动装配,默认byType,默认必须(如果没有找到类型与属性类型匹配的bean,则抛出异常)
-
@Autowired(required = false)通过request属性设置当前自动装配是否为必须(默认必须——如果没有找到类型与属性类型匹配则抛出异常)- byType
- ref引用

3.2.7@Resource
- 属性注解,声明当前属性自动装配
- 默认byName,默根据byName没有找到对应的bean,则继续根据byType寻找相应的bean,根据byType如果依然有找到Bean或者找到不止一个类型匹配的bean,则抛出异常
四、代理设计模式
5.1代理模式的优势
代理设计模式的优点:将通用性的工作都交给代理对象完成,被代理对象只专注自己的核心业务。
5.2静态代理
静态代理,代理类只能够为特定的类生产代理对象,不能代理任意类
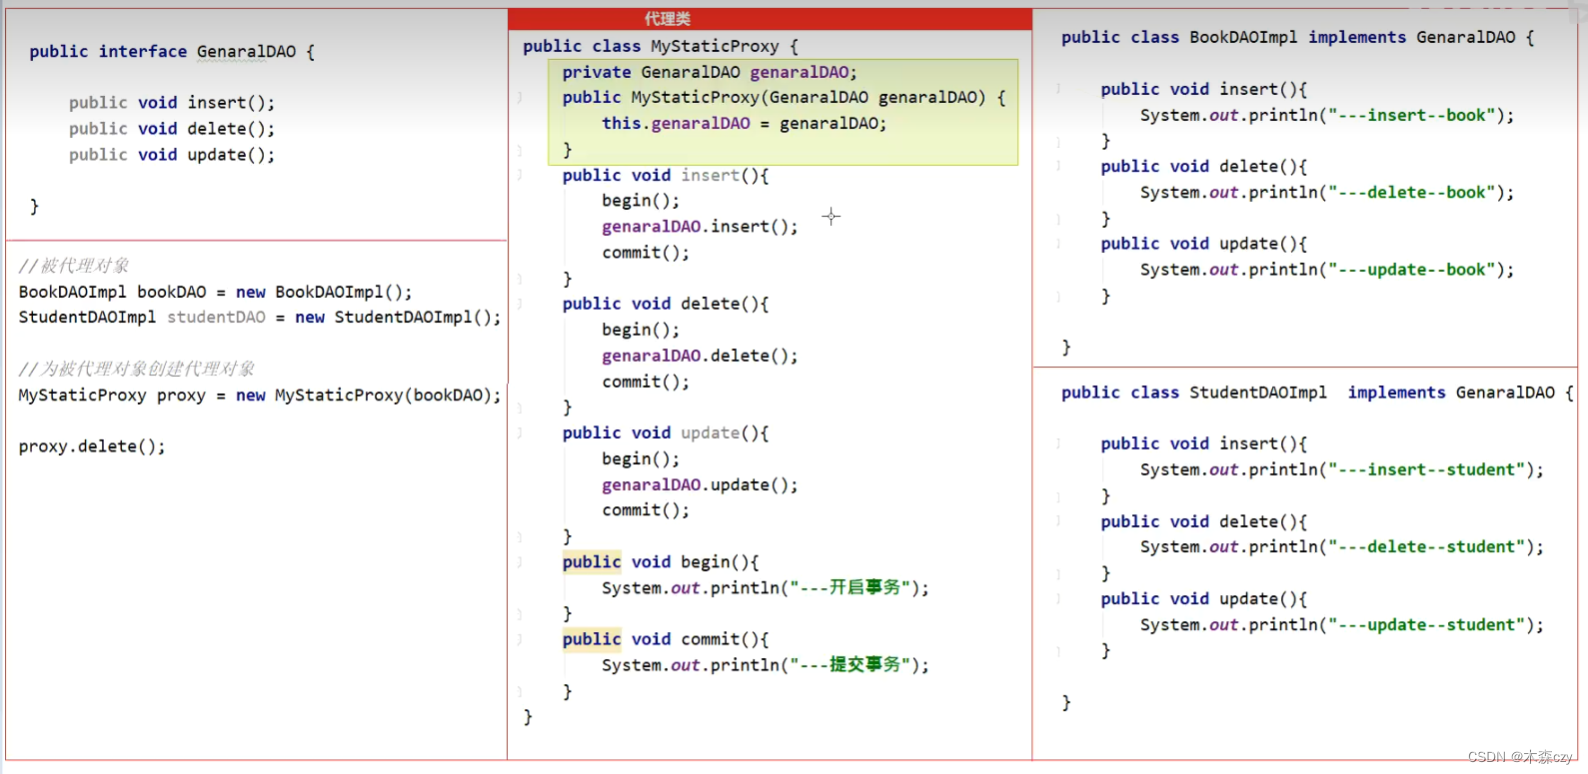
将通用的管理型逻辑(事务管理、业务管理)和业务逻辑分类
将通用代码放在代理类中实现,提供了代码复用性
通过在代理类添加业务逻辑,实现对原有业务逻辑的扩展(增强)
5.3动态代理
几乎可以为所有的类产生代理
实现方法:
- JDK动态代理
CGLib动态代理
JDK动态代理代码:
/***
 * JDK动态代理:通过被代理对象实现的接口产生其代理对象的
 * 1.创建一个类,实现InvocationHandler接口,重写invoke方法
 * 2.在类中定义一个Object类型的变量,并提供这个变量的有参构造器,用于将被代理对象传递进来
 * 3.创建getProxy方法,用于创建并返回代理对象
 */
public class JDKDynamicProxy implements InvocationHandler{

    //被代理对象
    private Object obj;

    public JDKDynamicProxy(Object obj) {
        this.obj = obj;
    }
    //产生代理对象,返回代理对象
    public Object getProxy(){
        //1.获取被代理对象的类加载器
        ClassLoader classLoader=obj.getClass().getClassLoader();
        //2.获取被代理对象的类实现
        Class<?>[] interfaces = obj.getClass().getInterfaces();
        //3.产生代理对象(通过被代理对象的类加载器及实现的接口)
        //第一个参数:被代理对象的类加载器
        //第二个参数:被代理对象实现的接口
        //第三个参数:使用产生代理对象调用方法时,用于拦截方法执行的处理器
//        InvocationHandler handler=new InvocationHandler() {
//            public Object invoke(Object proxy, Method method, Object[] args) throws Throwable {
//                return null;
//            }
//        };
        Object proxy = Proxy.newProxyInstance(classLoader,interfaces,this);
        return proxy;
    }


    public Object invoke(Object proxy, Method method, Object[] args) throws Throwable {
        begin();
        Object returnValue = method.invoke(obj);

        commit();
        return returnValue;
    }
    public void begin(){
        System.out.println("_____________开启事务");

    }
    public void commit(){
        System.out.println("_____________提交事务");
    }
}
- 测试
  		//被代理对象
        BookDAOImpl bookDAO=new BookDAOImpl();
        StudentDAOImpl studentDAO=new StudentDAOImpl();
        //创建动态代理类对象,将被代理类对象传递到代理类中赋值给obj
        JDKDynamicProxy jdkDynamicProxy=new JDKDynamicProxy(studentDAO);
        //proxy就是产生的代理对象,可以强转成被代理对象实现的接口类型
        GenaralDAO proxy= (GenaralDAO) jdkDynamicProxy.getProxy();
        //使用代理对象调用方法,不会直接进入到被代理类
        //调用的方法作为一个Method参数,传递给invoke方法
        proxy.update();
由于JDK动态代理是通过被代理类实现的接口
CGLib动态代理
由于JDK动态代理是通过被代理实现的接口来创建代理对象的,因此JDK动态代理只能代理实现了接口的类的对象。如果一个没有实现任何接口,该如何产生代理对象?
CGLib动态代理,是通过创建被代理类的子类来创建代理对象的,因此即使没有实现任何接口的类也可以通过CGLib产生代理对象
- 添加CGLib的依赖
<dependency>
      <groupId>cglib</groupId>
      <artifactId>cglib</artifactId>
      <version>2.2.2</version>
    </dependency>
- CGLib动态代理实现
/***
 * 1.添加cglib依赖
 * 2.创建一个类,实现MethodInterceptor接口,同时实现接口中的intercept方法
 * 3.在类中定义一个Object类型的变量,并提供这个变量的有参构造器,用于传递被代理对象
 * 4.定义getProxy方法创建并返回代理对象(代理对象是通过创建被代理类的子类来创建的)
 */
public class CGLibDynamicProxy implements MethodInterceptor {
    private Object obj;

    public CGLibDynamicProxy(Object object) {
        this.obj = obj;
    }
    public Object getObject(){
        Enhancer enhancer=new Enhancer();
        enhancer.setSuperclass(obj.getClass());
        enhancer.setCallback(this);
        Object proxy=enhancer.create();
        return  proxy;
    }
    public Object intercept(Object o, Method method, Object[] objects, MethodProxy methodProxy) throws Throwable {
        begin();
        Object returnValue=method.invoke(obj,objects);
        commit();
        return returnValue;
    }
    public void begin(){
        System.out.println("_____________开启事务");

    }
    public void commit(){
        System.out.println("_____________提交事务");
    }
- 测试
//创建被代理对象
        BookDAOImpl bookDAO = new BookDAOImpl();
        StudentDAOImpl studentDAO = new StudentDAOImpl();
//通过cglib动态代理类创建代理对象
        CGLibDynamicProxy cgLibDynamicProxy = new CGLibDynamicProxy(bookDAO);
//代理对象实际上是被代理对象子类,因此代理对象可直接强转为被代理对象
        BookDAOImpl proxy1 = (BookDAOImpl) cgLibDynamicProxy.getProxy();

        proxy1.update();
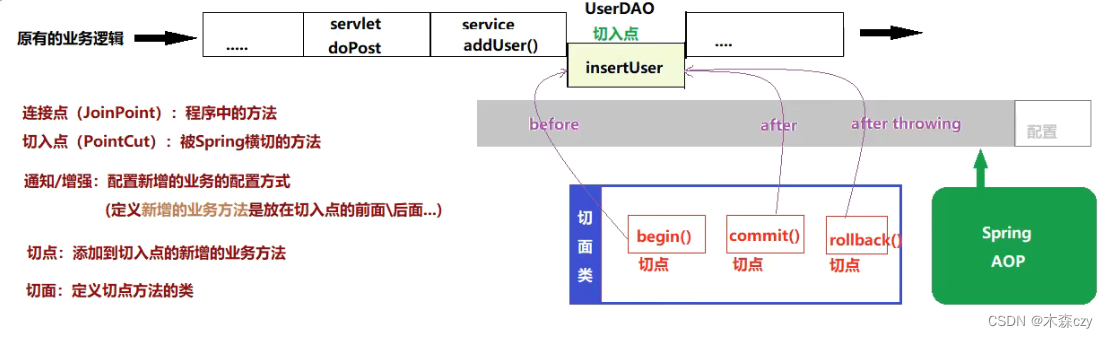
五 、Spring AOP
Aspect Oriented Programming面向切面编程,利用横切技术(底层实现就是动态代理),对原有的业务逻辑进行拦截,并且可以在拦截切面上添加特定的业务逻辑,对原有的业务进行增强。
5.2Spring AOP框架部署
5.2.1 创建Maven项目
5.2.1添加依赖
- context
- aspects
<dependency>
      <groupId>org.springframework</groupId>
      <artifactId>spring-aspects</artifactId>
      <version>5.2.13.RELEASE</version>
    </dependency>
    <dependency>
      <groupId>org.springframework</groupId>
      <artifactId>spring-context</artifactId>
      <version>5.2.13.RELEASE</version>
    </dependency>
5.2.3创建spring配置文件
- 需要引入aop命名空间
<?xml version="1.0" encoding="UTF-8" ?>
<beans xmlns="http://www.springframework.org/schema/beans"
       xmlns:xsi="http://www.w3.org/2001/XMLSchema-instance"
       xmlns:aop="http://www.springframework.org/schema/aop"

       xsi:schemaLocation="http://www.springframework.org/schema/beans
      https://www.springframework.org/schema/beans/spring-beans.xsd
      http://www.springframework.org/schema/aop
      http://www.springframework.org/schema/aop/spring-aop.xsd
     ">
</beans>
5.3 AOP配置——基于XML
在DAO的方法前后添加开启事务和提交事务的逻辑
5.3.1创建一个类,定义要添加的业务逻辑
public class TxManager {
    public static void main(String[] args) {

        public void begin(){
            System.out.println("______开启事务");
        }

        public void commit(){
            System.out.println("______开启事务");
        }
    }
}
5.3.1配置AOP
<?xml version="1.0" encoding="UTF-8" ?>
<beans xmlns="http://www.springframework.org/schema/beans"
       xmlns:xsi="http://www.w3.org/2001/XMLSchema-instance"
       xmlns:aop="http://www.springframework.org/schema/aop"

       xsi:schemaLocation="http://www.springframework.org/schema/beans
      https://www.springframework.org/schema/beans/spring-beans.xsd
      http://www.springframework.org/schema/aop
      http://www.springframework.org/schema/aop/spring-aop.xsd
     ">

    <bean id="bookDAO" class="com.muxin.dao.BookDAOImpl"/>
    <bean id="studentDAO" class="com.muxin.dao.StudentDAOImpl"/>


    <bean id="txManger" class="com.muxin.utils.TxManager"></bean>
    <aop:config>
<!-- 声明切入点-->
        <aop:pointcut id="book_all" expression="execution(* com.muxin.dao.*.*(..))"/>
<!--声明txManager为切面-->
        <aop:aspect ref="txManger">
<!--   通知         -->

            <aop:before method="begin" pointcut-ref="book_all"/>
            <aop:after method="commit" pointcut-ref="book_all"/>
        </aop:aspect>
    </aop:config>
</beans>
AOP开发步骤:
1.创建切面类,在切面类中定义切点方法
2.将切面类配置给Spring容器
3.声明切入点
4.配置AOP的通知策略
5.4 切入点的声明
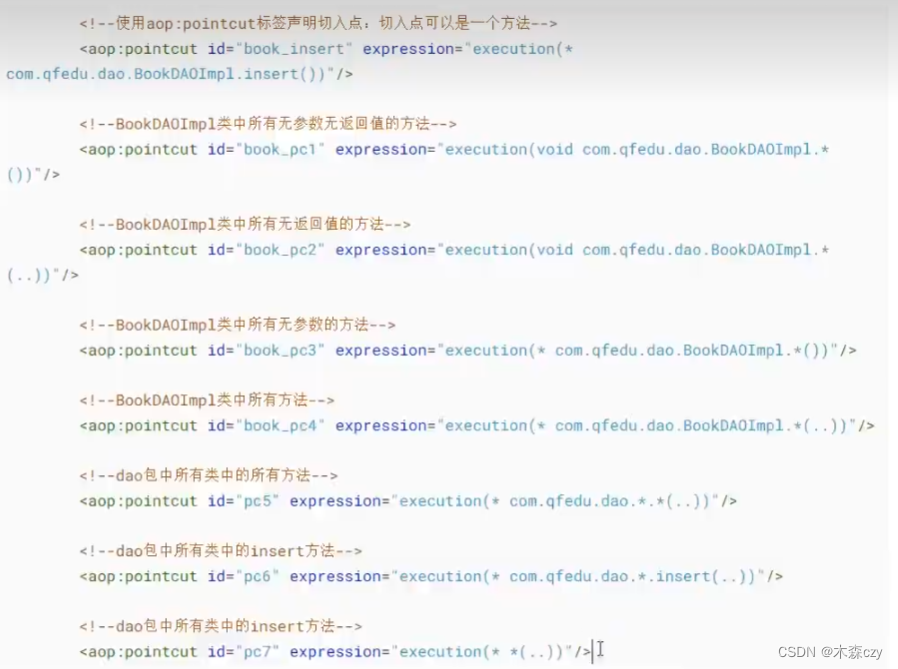
注意事项

5.5 AOP通知策略
AOP通知策略:声明将切面类中的切点方法如何织入到连接点
- before
- after
- after-throwing
- after-returning
- around
<!--声明txManager为切面-->
        <aop:aspect ref="txManger">
<!--   AOP通知策略         -->
<!--aop:before 前置通知,切入到指定切入点之后-->
        <aop:before method="begin" pointcut-ref="book_all"/>
<!--aop:after 后置通知,切入到指定切入点之后-->
        <aop:after method="commit" pointcut-ref="book_all"/>
        </aop:aspect>
        <aop:aspect ref="myAspect">
        <aop:before method="method1" pointcut-ref="book_insert"/>
        <aop:after method="method2" pointcut-ref="book_insert"/>
<!--aop:after-throwing 异常通知,切入点抛出异常之后-->
        <aop:after-throwing method="method3" pointcut-ref="book_insert"/>
<!--  after-returning  方法返回值返回之后,对于Java方法而言return返回至也是方法的一部分,
        因此“方法返回值返回之后”和“方法执行之前”是同一时间点,after-returning和after根据配置前后有关
        -->
        <aop:after-returning method="method4" pointcut-ref="book_insert"/>
        <aop:around method="method5" pointcut-ref="book_insert"/>
        </aop:aspect>
5.5.1定义切面类
public void method1(){
        System.out.println("------------method1");
    }
    public void method2(){
        System.out.println("------------method2");
    }
    public void method3(){
        System.out.println("------------method3");
    }
    public void method4(){
        System.out.println("------------method4");
    }


    //环绕切点通知的方法,必须遵守如下规则:
    //1.必须带有一个ProceedingJoinPoint类型的参数
    //2.必须是Object返回值
    //3.在前后增强事务业务逻辑之间 Object proceed = point.proceed();
    //4.方法返回proceed
    public Object method5(ProceedingJoinPoint point) throws Throwable {
        System.out.println("------------method5----before");
        Object proceed = point.proceed();
        System.out.println("------------method5----after");
        return proceed;
    }


 5137
5137


 被折叠的 条评论
为什么被折叠?
被折叠的 条评论
为什么被折叠?
 到【灌水乐园】发言


