


最近在做一个Android的项目,闲暇之余写写博客。一方面供大家一起学习,另一方面作为以后再次用到的时参考记录一下。博客没什么顺序,完全是做到哪里遇到了问题就写一下。
现在我们来做一个点检计划列表,要做点检列表分三个部分:Spotcheck类、列表适配器、创建列表。所有的列表都分这三个部分。
建立Spotcheck类,代码如下,很简单不做解释了,变量意义看注释
public class SpotCheck {

    private String equipment_name;//设备名称

    private String equipment_id;//设备id

    private String order_date;//生成订单的日期

    private String checker_name;//点检人姓名

    public SpotCheck(String equipment_name,String order_id,String order_date,String checker_name){
        this.equipment_name = equipment_name;
        this.equipment_id = order_id;
        this.order_date = order_date;
        this.checker_name = checker_name;
    }

    public String getEquipment_name() {
        return equipment_name;
    }

    public String getOrder_date() {
        return order_date;
    }

    public String getChecker_name() {
        return checker_name;
    }

    public String getOrder_id() {
        return equipment_id;
    }
}
建立适配器,代码如下,
public class SpotCheckAdapter extends ArrayAdapter<SpotCheck> {

    private int resourceId;

    public SpotCheckAdapter(Context context, int textViewResourceId, List<SpotCheck> objects){
        super(context,textViewResourceId,objects);
        resourceId = textViewResourceId;
    }

    @NonNull
    @Override
    public View getView(int position, @Nullable View convertView, @NonNull ViewGroup parent) {
        SpotCheck spotCheck = getItem(position);//获取当前项的SpotCheck实例
        View view;
        //判断是否加载过布局
        if (convertView == null){
            view = LayoutInflater.from(getContext()).inflate(resourceId,parent,false);//加载传入的布局
        }else {
            view = convertView;
        }

        //获取实例
        TextView equipment_name = (TextView) view.findViewById(R.id.equipment_name);
        TextView checker_name = (TextView) view.findViewById(R.id.checker_name);
        TextView order_id = (TextView) view.findViewById(R.id.equipment_id);
        TextView order_date = (TextView) view.findViewById(R.id.order_date);
        //设置内容
        equipment_name.setText(spotCheck.getEquipment_name());
        checker_name.setText(spotCheck.getChecker_name());
        order_id.setText(spotCheck.getOrder_id());
        order_date.setText(spotCheck.getOrder_date());
        //返回布局
        return view;
    }
}
解释一下构造器SpotCheckAdapter的参数,context顾名思义上下文也就是这个适配器用在哪个activity里,textViewResourceId是列表每一行所对应的xml格式,最后一项很容易是列表内容项。
        if (convertView == null){
            view = LayoutInflater.from(getContext()).inflate(resourceId,parent,false);//加载传入的布局
        }else {
            view = convertView;
        }
这一部分是为了判断是否已经加载布局,如果加载过布局就用以前的布局,如果没有加载就加载新的布局。这样可以大大节省加载布局消耗的资源,在列表项多并且列表快速滚动的时候这几行代码是必要的。
点检类和适配器类都建好了,最后一步就该实现了。
首先,把点检条目的格式定好,代码如下,
<?xml version="1.0" encoding="utf-8"?>
<LinearLayout
    xmlns:android="http://schemas.android.com/apk/res/android"
    android:layout_width="match_parent"
    android:layout_height="50dp"
    android:orientation="vertical"
    android:gravity="center"
    android:paddingLeft="10dp"
    android:paddingRight="10dp">

    <LinearLayout
        android:layout_width="match_parent"
        android:layout_height="wrap_content"
        android:orientation="horizontal">

        <TextView
            android:layout_width="wrap_content"
            android:layout_height="wrap_content"
            android:id="@+id/equipment_name" />

        <TextView
            android:layout_width="match_parent"
            android:layout_height="wrap_content"
            android:id="@+id/checker_name"
            android:gravity="right"/>
    </LinearLayout>

    <LinearLayout
        android:layout_width="match_parent"
        android:layout_height="wrap_content">


        <TextView
            android:layout_width="wrap_content"
            android:layout_height="wrap_content"
            android:text="["/>

        <TextView
            android:layout_width="wrap_content"
            android:layout_height="wrap_content"
            android:id="@+id/equipment_id"/>

        <TextView
            android:layout_width="wrap_content"
            android:layout_height="wrap_content"
            android:text="]"/>

        <TextView
            android:layout_width="wrap_content"
            android:layout_height="wrap_content"
            android:id="@+id/order_date"
            android:layout_marginLeft="20dp"/>
    </LinearLayout>
</LinearLayout>
然后,把点检列表的格式定好,代码如下,
<?xml version="1.0" encoding="utf-8"?>
<FrameLayout
    xmlns:android="http://schemas.android.com/apk/res/android"
    android:layout_width="match_parent"
    android:layout_height="match_parent"
    android:orientation="vertical"
    android:id="@+id/spot_check_list"
    android:background="#ffffff">

    <LinearLayout
        android:layout_width="match_parent"
        android:layout_height="match_parent"
        android:orientation="vertical">

        <include layout="@layout/title_spot_check_list"/>

        <ListView
            android:layout_width="match_parent"
            android:layout_height="match_parent"
            android:id="@+id/list_spotcheck">
        </ListView>

    </LinearLayout>
</FrameLayout>
这里include了一个布局,用于给定标题栏,这里不是重点就不做解释了。
最后,建立Activity就完成了,代码如下,
public class SpotCheckListActivity extends AppCompatActivity{
    //定义数据
    private String[] equipment_name = {"油水分离器","不落轮车轮车床","螺杆式空压机"};
    private String[] order_id = {"285015005","188115001","241015001"};
    private String[] oder_date = {"2018-07-04","2018-07-04","2018-07-04"};
    private String[] checker_name = {"张三","张三","张三"};
    //建立点检列表
    private List<SpotCheck> spotCheckList = new ArrayList<>();

    @Override
    protected void onCreate(@Nullable Bundle savedInstanceState) {
        super.onCreate(savedInstanceState);
        setContentView(R.layout.activity_spot_check_list);
        //隐藏系统自带的actionBar,对应include使用
        ActionBar actionBar = getSupportActionBar();
        if (actionBar != null){
            actionBar.hide();
        }

        initSpotCheck();
        SpotCheckAdapter adapter = new SpotCheckAdapter(SpotCheckListActivity.this,R.layout.spotcheck_item,spotCheckList);//适配器实例
        ListView listView = (ListView) findViewById(R.id.list_spotcheck);//创建列表实例
        listView.setAdapter(adapter);//适配器传递给listView

        listView.setOnItemClickListener(new AdapterView.OnItemClickListener() {
            @Override
            //列表点击事件
            public void onItemClick(AdapterView<?> adapterView, View view, int position, long id) {
                SpotCheck spotCheck = spotCheckList.get(position);
                Intent intent = new Intent(SpotCheckListActivity.this,SpotCheckDetailActivity.class);
                startActivity(intent);
            }
        });
    }

    //初始化数据
    private void initSpotCheck(){
        SpotCheck[] spotCheck = new SpotCheck[3];
        for (int i=0;i<3;i++){
            spotCheck[i]  = new SpotCheck(equipment_name[i],order_id[i],oder_date[i],checker_name[i]);
            spotCheckList.add(spotCheck[i]);
        }
    }
}
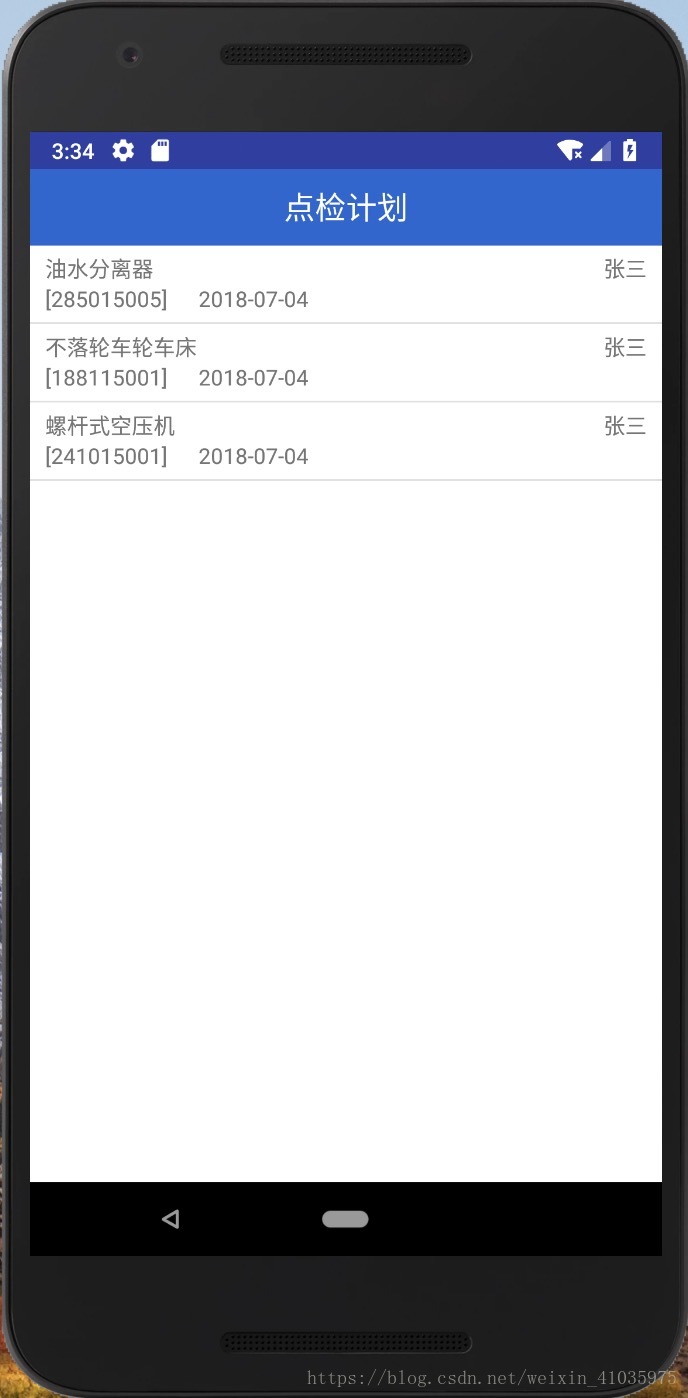
这样,一个点检列表就完成了。给一张效果图。


 140
140

 被折叠的 条评论
为什么被折叠?
被折叠的 条评论
为什么被折叠?
 到【灌水乐园】发言


