


Shopify WebHook对接
配置 Shopify WebHook
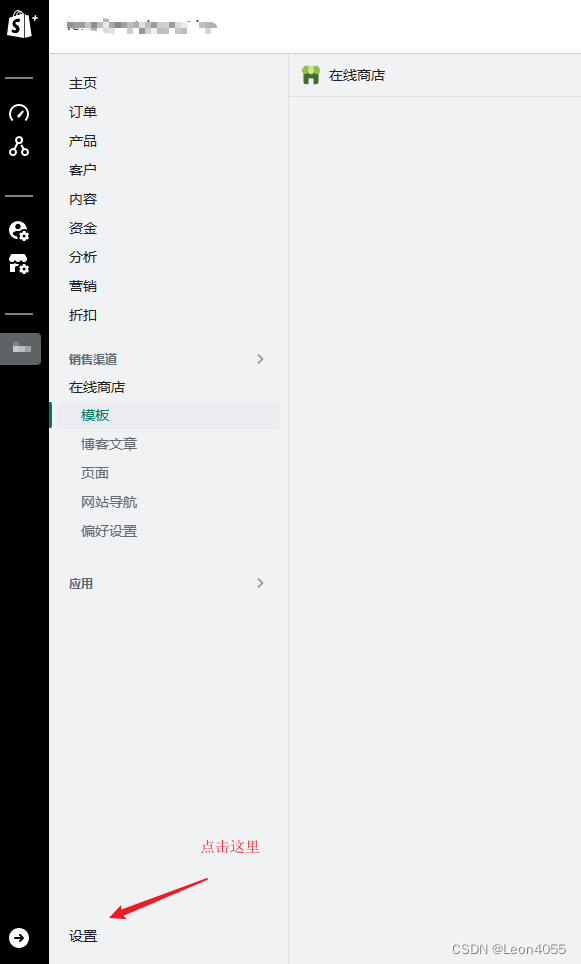
登录商店后台配置 -> 选择
设置
找到通知选中后下滚动到底部WebHook配置位置
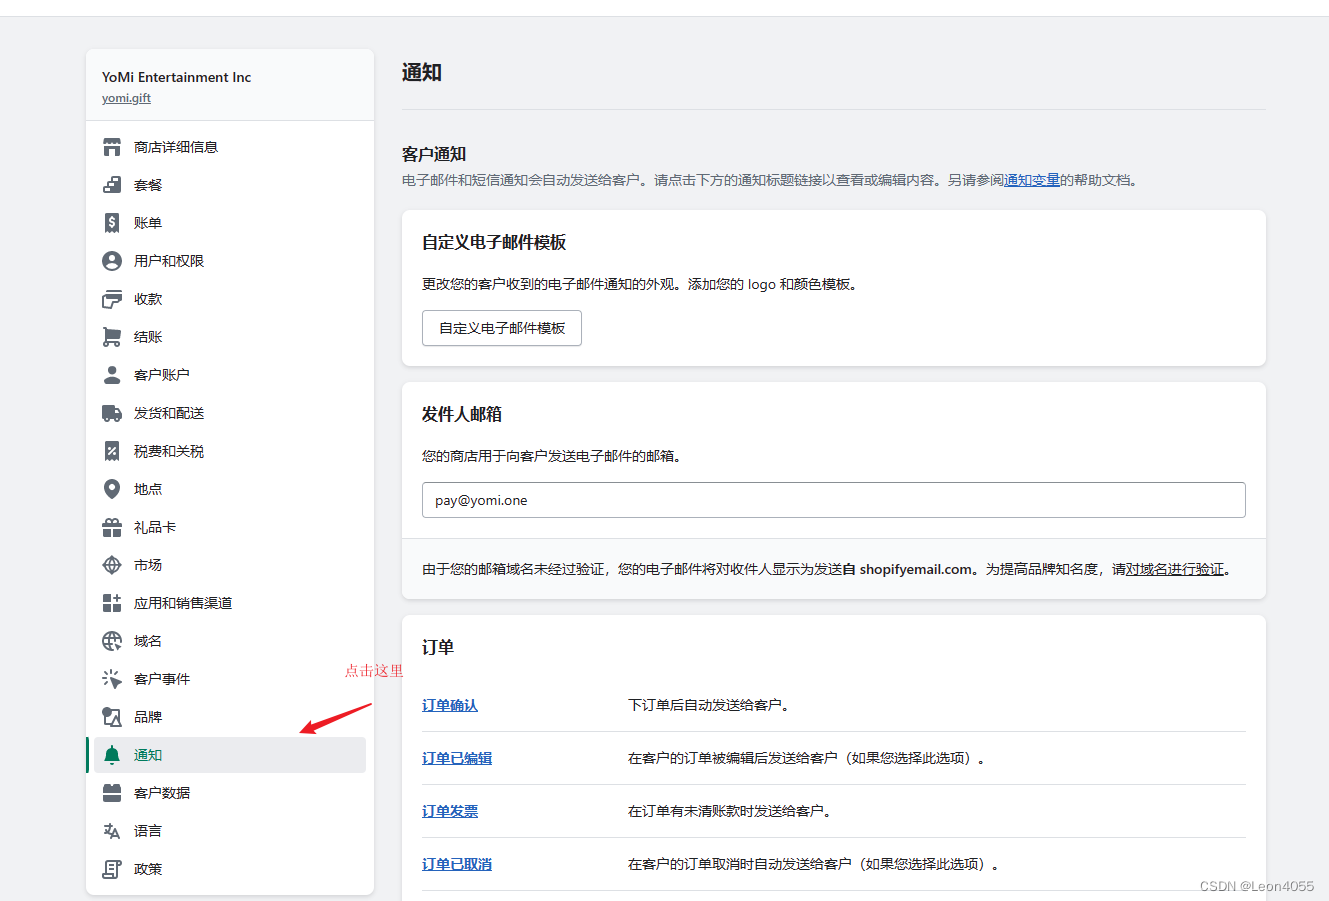
选择
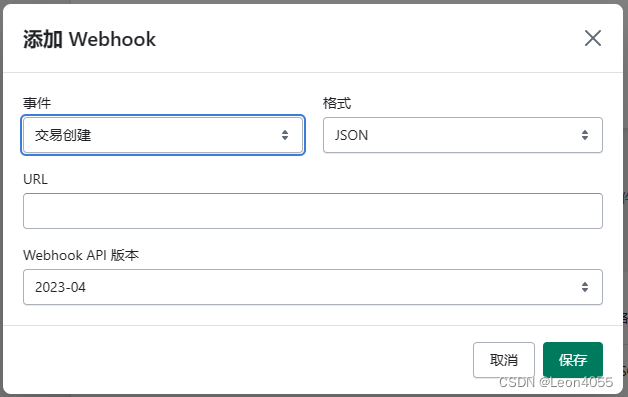
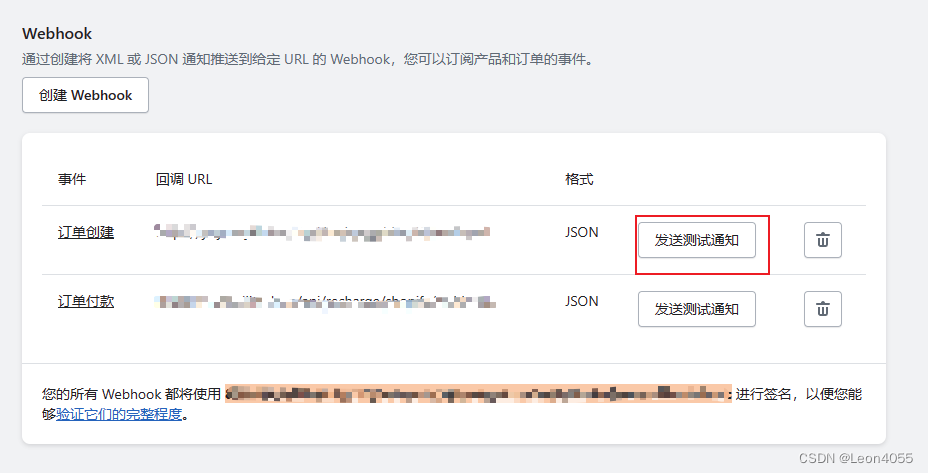
创建Webhook根据业务需求选择事件并填写URL
这里选择了订单创建因为需要记录订单,订单付款可以根据这个状态确认用户支付过了, 从而进行发货操作
Shopify Webhook接收支付通知处理
	/**
     * shopify webhook接收支付通知
     * @param Request $request
     * @return JsonResponse
     * @throws Exception
     */
    public function shopifyWebhookNotify(Request $request): JsonResponse
    {
        // shopify 关键参数
        $shopifyFields = [
            'HTTP_X_SHOPIFY_WEBHOOK_ID',
            'HTTP_X_SHOPIFY_TRIGGERED_AT',
            'HTTP_X_SHOPIFY_TOPIC',
            'HTTP_X_SHOPIFY_TEST',
            'HTTP_X_SHOPIFY_SHOP_DOMAIN',
            'HTTP_X_SHOPIFY_HMAC_SHA256',
            'HTTP_X_SHOPIFY_API_VERSION',
            'HTTP_CONTENT_TYPE',
            'HTTP_USER_AGENT',
        ];
        // 记录全部请求参数
        $params = $request->input();
        // 使用集合函数过滤不需要的参数
        $server = collect($_SERVER)->only($shopifyFields)->all();
        $this->log('shopify === shopifyWebhookNotify ===');
        $this->log('shopify Server->' . json_encode($server, JSON_UNESCAPED_UNICODE));
        $this->log('shopify Params->' . json_encode($params, JSON_UNESCAPED_UNICODE));
        // 验证请求(shopify 官方文档写法)
        $hmac_header = $_SERVER['HTTP_X_SHOPIFY_HMAC_SHA256'] ?? '';
        $data = file_get_contents('php://input');
        $verified = $this->shopifyWebhookVerify($data, $hmac_header);
        $result = [
            "code" => 401,
            "message" => 'No Access Rights',
        ];
        if ($verified) {
            $this->log('shopify-> 验证成功');
            // 创建订单
            if ($server['HTTP_X_SHOPIFY_TOPIC'] === 'orders/create') {
                return $this->shopifyOrderCreate($params, $result);
            }
            // 支付订单
            if ($server['HTTP_X_SHOPIFY_TOPIC'] === 'orders/paid') {
                return $this->shopifyOrderPaid($params, $result);
            }
            return response()->json($result);
        } else {
            return response()->json($result, 401);
        }
    }

	/**
     * shopify-订单-创建
     * @param $params
     * @param $result
     * @return JsonResponse
     * @throws Exception
     */
    public function shopifyOrderCreate($params, $result): JsonResponse
    {
    	// 订单创建逻辑
		if('判断订单号是否存在'){
		  // 订单已存在
          $result["message"] = 'Order already exists';
          $this->log('shopify->创建失败->订单已存在');
          return response()->json($result);
		}

		// 创建订单
		if('创建订单'){
			$result = [
			    "code" => 0,
			    "message" => "success",
			];
			$this->log('shopify->创建成功');
		} else {
		  	$this->log('shopify->创建失败->用户信息不存在');
		  	$result["message"] = 'User Info Does Not Exist'; // 用户信息不存在
		}
      	return response()->json($result);
	}
    /**
     * shopify webhook 验证
     * @param $data
     * @param $hmac_header
     * @return bool
     */
    public function shopifyWebhookVerify($data, $hmac_header): bool
    {
        // 客户秘钥
        $clientSecret = 'xxxxx';
        $calculated_hmac = base64_encode(hash_hmac('sha256', $data, $clientSecret, true));
        return hash_equals($calculated_hmac, $hmac_header);
    }


 1204
1204


 被折叠的 条评论
为什么被折叠?
被折叠的 条评论
为什么被折叠?
 到【灌水乐园】发言


