


目录
02 Spring Boot整合Shiro
【硬核干货】2小时学会Spring Boot整合Shiro_哔哩哔哩_bilibili

p1.shiro概述
1 什么是Shiro
官网: http:/lshiro.apache.orgl
是一款主流的Java安全框架,不依赖任何容器,可以运行在Java SE和JavaE项目中,它的主要作用是对访问系统的用户进行身份认证、授权、会话管理、加密等操作。
Shiro就是用来解决安全管理的系统化框架。
2 Shiro核心组件
用户、角色、权限
会给角色赋予权限,给用户赋予角色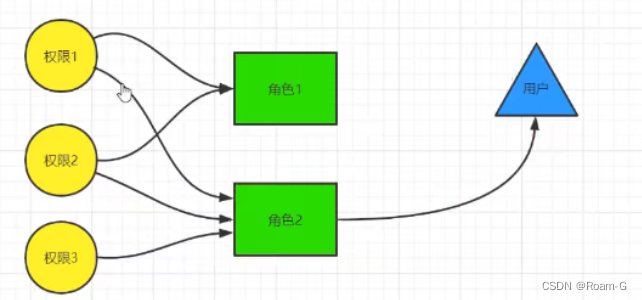
-
UsernamePasswordToken,Shiro 用来封装用户登录信息,使用用户的登录信息来创建令牌Token。
2、SecurityManager,Shiro的核心部分,负责安全认证和授权。
3、Suject,Shiro的一个抽象概念,包含了用户信息。
4、Realm,开发者自定义的模块,根据项目的需求,验证和授权的逻辑全部写在Realm 中。
5、AuthenticationInfo,用户的角色信息集合,认证时使用。
6、Authorzationlnfo,角色的权限信息集合,授权时使用。
7、DefaultwebSecurityDManager,安全管理器,开发者自定义的Realm需要注入到DefaultWebSecurityDManager 进行管理才能生效。
8、ShiroFilterFactoryBean,过滤器工厂,Shiro 的基本运行机制是开发者定制规则,Shiro去执行,具体的执行操作就是由ShiroFilterFactoryBean创建的一个个 Filter对象来完成。
Shiro的运行机制:
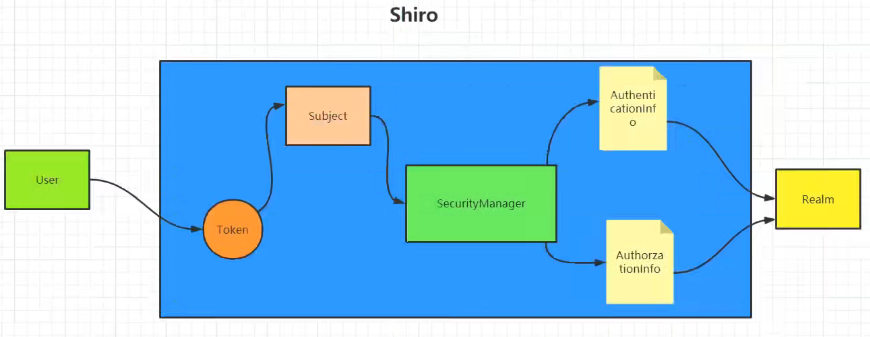
制图软件 processon
p2.Shiro实现登录认证
AccountRealm.java
public class AccountRealm extends AuthorizingRealm {
@Override
protected AuthorizationInfo doGetAuthorizationInfo(PrincipalCollection principals) {
return null;
}
6、Authorzationlnfo,角色的权限信息集合,授权时使用。
@Override
protected AuthenticationInfo doGetAuthenticationInfo(AuthenticationToken token) throws AuthenticationException {
return null;
5、AuthenticationInfo,用户的角色信息集合,认证时使用。
QueryWrapper
queryWrapper是mybatis plus中实现查询的对象封装操作类,他的层级关系如下
mybatis plus 条件构造器queryWrapper学习_bird_tp的博客-CSDN博客_querywrapper
QueryWrapper wrapper =new QueryWrapper();
wrapper.eq("username",username);
return accountMapper.selectOne(wrapper);
类名和表名是一一对应的
entity
public class Account {
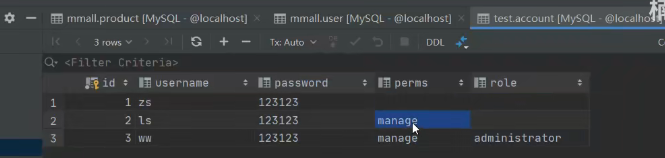
数据库
运行结果
Preparing: SELECT id,username,password,perms,role FROM account
==> Parameters:
<== Columns: id, username, password, perms, role
<== Row: 1, andy, 123456, null, null
<== Row: 2, demi, 123456, null, null
<== Total: 2
mapper报错解决
去掉红线,就 在 AccountMapper.java 文件加注解@Repository
不加也没事,不影响运行
测试
public interface AccountMapper extends BaseMapper<Account> {
在AccountMapper右键 转到go to --测试。
加上注解 @SpringBootTest
@Test
package com.example.springbootshiro.mapper;


import org.junit.jupiter.api.Test;
import org.springframework.beans.factory.annotation.Autowired;
import org.springframework.boot.test.context.SpringBootTest;


import static org.junit.jupiter.api.Assertions.*;
@SpringBootTest
class AccountMapperTest {


    @Autowired
    private AccountMapper accountMapper;

    @Test
    void test(){
        accountMapper.selectList(null).forEach(System.out::println);
    }
}
pom.xml
···
<?xml version="1.0" encoding="UTF-8"?>
<project xmlns="http://maven.apache.org/POM/4.0.0" xmlns:xsi="http://www.w3.org/2001/XMLSchema-instance"
         xsi:schemaLocation="http://maven.apache.org/POM/4.0.0 https://maven.apache.org/xsd/maven-4.0.0.xsd">
    <modelVersion>4.0.0</modelVersion>
    <parent>
        <groupId>org.springframework.boot</groupId>
        <artifactId>spring-boot-starter-parent</artifactId>
        <version>2.6.6</version>
        <relativePath/> <!-- lookup parent from repository -->
    </parent>
    <groupId>com.example</groupId>
    <artifactId>SpringBootShiro</artifactId>
    <version>0.0.1-SNAPSHOT</version>
    <name>SpringBootShiro</name>
    <description>SpringBootShiro</description>
    <properties>
        <java.version>1.8</java.version>
    </properties>
    <dependencies>
<!--        1.模板引擎-->
        <dependency>
            <groupId>org.springframework.boot</groupId>
            <artifactId>spring-boot-starter-thymeleaf</artifactId>
        </dependency>
<!--        2.web-->
        <dependency>
            <groupId>org.springframework.boot</groupId>
            <artifactId>spring-boot-starter-web</artifactId>
        </dependency>
<!--3.lombok-->
        <dependency>
            <groupId>org.projectlombok</groupId>
            <artifactId>lombok</artifactId>
            <optional>true</optional>
        </dependency>
<!--        4.test-->
        <dependency>
            <groupId>org.springframework.boot</groupId>
            <artifactId>spring-boot-starter-test</artifactId>
            <scope>test</scope>
        </dependency>
<!--        5.shiro-->
        <dependency>
            <groupId>org.apache.shiro</groupId>
            <artifactId>shiro-spring</artifactId>
            <version>1.4.0</version>
        </dependency>
<!--        6.mysql-->
        <dependency>
            <groupId>mysql</groupId>
            <artifactId>mysql-connector-java</artifactId>
        </dependency>
<!--        7.mybatis plus-->
        <dependency>
            <groupId>com.baomidou</groupId>
            <artifactId>mybatis-plus-boot-starter</artifactId>
            <version>3.1.0</version>
        </dependency>

    </dependencies>


    <build>
        <plugins>
            <plugin>
                <groupId>org.springframework.boot</groupId>
                <artifactId>spring-boot-maven-plugin</artifactId>
                <configuration>
                    <excludes>
                        <exclude>
                            <groupId>org.projectlombok</groupId>
                            <artifactId>lombok</artifactId>
                        </exclude>
                    </excludes>
                </configuration>
            </plugin>
        </plugins>
    </build>


</project>
p3.Shiro实现请求授权
配置类 ShiroConfig
```
package com.example.springbootshiro.config;


import com.example.springbootshiro.realm.AccountRealm;
import org.apache.shiro.spring.web.ShiroFilterFactoryBean;
import org.apache.shiro.web.mgt.DefaultWebSecurityManager;
import org.springframework.beans.factory.annotation.Qualifier;
import org.springframework.context.annotation.Bean;
import org.springframework.context.annotation.Configuration;


@Configuration
public class ShiroConfig {
    /**
     * 需要配置三个东西
     * 从下往上依次递进
     */
//    3.ShiroFilterFactoryBean
    @Bean
    public ShiroFilterFactoryBean shiroFilterFactoryBean(@Qualifier("securityManager")DefaultWebSecurityManager securityManager){
        ShiroFilterFactoryBean factoryBean=new ShiroFilterFactoryBean();
        factoryBean.setSecurityManager(securityManager);
//        再把manager注入 factoryBean
        return factoryBean;
    }
//    2.DefaultWebSecurityManager
    @Bean
    public DefaultWebSecurityManager securityManager(@Qualifier("accountRealm") AccountRealm accountRealm){
        DefaultWebSecurityManager manager=new DefaultWebSecurityManager();
        manager.setRealm(accountRealm);
//        注入到manager里面
        return manager;
    }
//    需要把 accountRealm注入到 manager里面。accountRealm已经在ioc里面了。 上面直接取就行了
//    @Qualifier("accountRealm") AccountRealm accountRealm 根据名字 accountRealm去ioc中取


//    1. AccountRealm  先把自定义的Realm 创建 并注入 ioc中
    @Bean
    public AccountRealm accountRealm(){
        return new AccountRealm();
    }
}
**编写认证和授权规则:
认证过滤器
anon:无需认证。
authc:必须认证。
authcBasic:需要通过HTTPBasic 认证。
user:不一定通过认证,只要曾经被Shiro记录即可,比如:记住我。
授权过滤器
perms:必须拥有某个权限才能访问。
role:必须拥有某个角色才能访问。
port:请求的端口必须是指定值才可以。
rest:请求必须基于RESTful,POST、PUT、GET、DELETE。
ssl:必须是安全的URL请求,协议HIIPS。
创建3个页面,main.html、manage.html、administrator.html 访问权限如下:
1、必须登录才能访问main.html
2、当前用户必须拥有manage授权才能访问manage.html【权限】
3、当前用户必须拥有administrator角色才能访问administrator.html
controller
package com.example.springbootshiro.controller;


import org.springframework.stereotype.Controller;
import org.springframework.web.bind.annotation.GetMapping;
import org.springframework.web.bind.annotation.PathVariable;


@Controller
public class AccountController {


    @GetMapping("/{url}")
    public String redirect(@PathVariable("url")String url){
        return url;
    }
}
试图解析器配置
spring:
datasource:
url: jdbc:mysql://localhost:3306/account?useSSL=false&serverTimezone=UTC&allowPublicKeyRetrieval=true
driver-class-name: com.mysql.cj.jdbc.Driver
username: root
password: ANDYmysql5436
thymeleaf:
prefix: classpath:/templates/
suffix: .html
<head>
<meta charset="UTF-8">
<title>Title</title>
<!-- 把这个加进去就不会报icon错,每个页面都加-->
<link rel="shortcut icon" href="#"/>
</head>
p4.Shiro整合Thymeleaf
登录调试03:48
Thymeleaf 需要加入。
<html lang="en" xmlns:th="http://www.thymeleaf.org">
--认证完成,开始授权 13:52
数据库 19:06
1、必须登录才能访问main.html
2、当前用户必须拥有manage授权才能访问manage.html【权限】
3、当前用户必须拥有administrator角色才能访问administrator.html
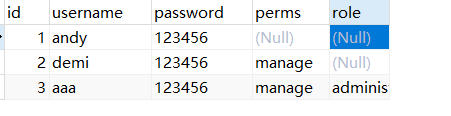
Andy 只能访问main
demi 能访问 manage
aaa 全部能访问
设置session,页面显示用户名 25:22
根据不同权限 显示不同内容 31:10
-
引入依赖
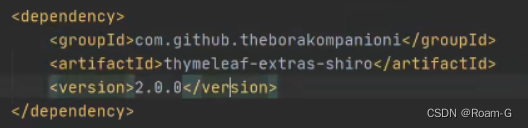
thymeleaf-extras-shiro
暫停
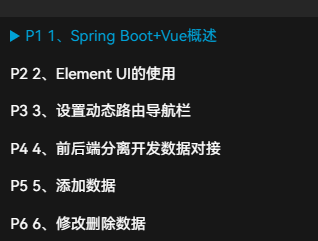
01Springboot +vue
【2020版】4小时学会Spring Boot+Vue前后端分离开发_哔哩哔哩_bilibili
前端位置
C:\vue2\vue2222
后端位置
C:\CodeSpace2022\SpringBoot
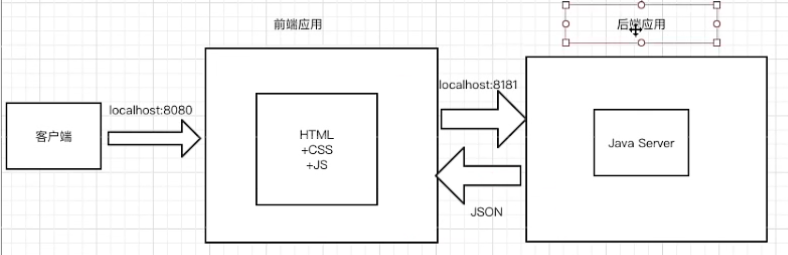
p1

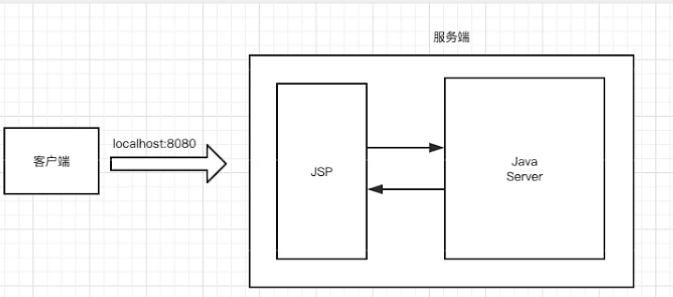
[以上 传统的单体应用]
【以下 前后端分离】
20:43创建vue文件。
vue3.0 以上支持 vue ui
我的是 2.9不支持,公司项目是2.x 先不升级了。
表格数据
<template>
  <div>

    {{books}}
  </div>
</template>
<script>
export default {
  name: "Book",
  data() {
    return {
        // books: []
      books: [
        {
          id: "1",
          name: "aa",
          author: "aaaa",
        },
        {
          id: "2",
          name: "bb",
          author: "bbbbb",
        },
        {
          id: "3",
          name: "cc",
          author: "cccc",
        }
      ]
    };
  },
  created(){
    alert(123)
    const  _this = this
    // http://localhost:8181/findAll
    this.$axios.get('http://localhost:8181/findAll').then(function (resp) {
        _this.books = resp.data;
        console.log(books)
      })
  }
};
</script>
<style scoped>
/* .tabel{
    center
} */
</style>
启动终端
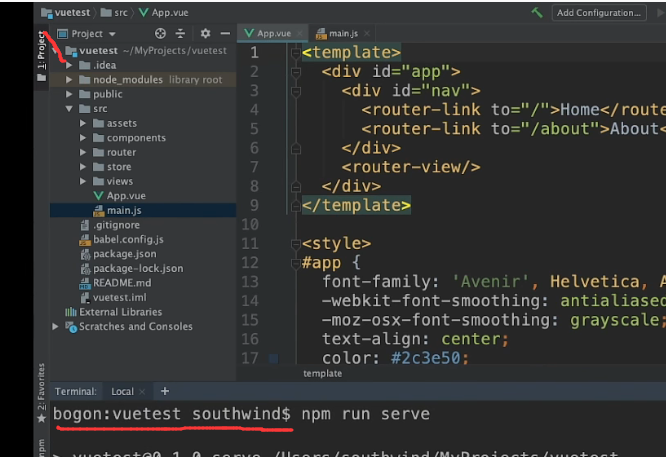
是在项目启动,而不是 在 src

vue3.x可以运行vue2.x项目吗
可以
33:40创建后端 未使用mybatis
lombok, Spring Web
mysql driver,
SpringData JPA
springboot整合Druid数据源配置文件yml和properties两版_幻千纷纭的博客-CSDN博客_datasource druid yml
···
spring:
  datasource:
    url: jdbc:mysql://localhost:3306/user?useSSL=false&serverTimezone=UTC&allowPublicKeyRetrieval=true
    driver-class-name: com.mysql.cj.jdbc.Driver
    username: root
    password: ANDYmysql5436
mybatis-plus:
  configuration:
    log-impl: org.apache.ibatis.logging.stdout.StdOutImpl
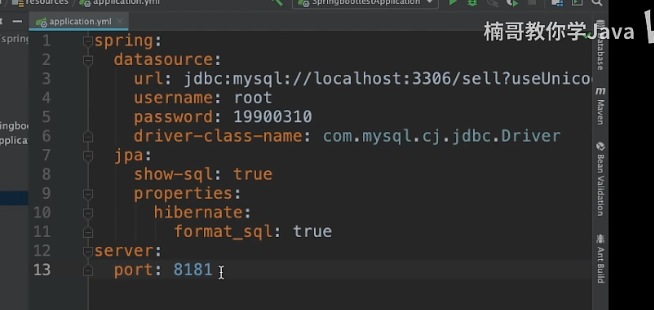
配置jpa
jpa:
show-sql: true
properties:
hibernate:
format_sql:true
user为数据库名称。
vue add axios 56:36
sudo vue add axios
如何查看已经安装了axios?
视频中。
-
vue add axios没反应
2- sudo vue add axios

sudo : 无法将“sudo”项识别为 cmdlet、函数、脚本文件或可运行程序的名称。请检查名称的拼写,如果包括路径,请确保路径正确,然后再试一次。
所在位置 行:1 字符: 1
+ sudo vue add axios
+ ~~~~
+ CategoryInfo : ObjectNotFound: (sudo:String) [], CommandNotFoundException
+ FullyQualifiedErrorId : CommandNotFoundException
解决
cnpm install axios

报错
npm ERR! code ENOENT
npm ERR! syscall open
npm ERR! path C:\CodeSpace2022\Vue\AndyVue\src\package.json
npm ERR! errno -4058
npm ERR! enoent ENOENT: no such file or directory, open 'C:\CodeSpace2022\Vue\AndyVue\src\package.json'
npm ERR! enoent This is related to npm not being able to find a file.
npm ERR! enoent
npm ERR! A complete log of this run can be found in:
npm ERR! C:\Users\andyf\AppData\Roaming\npm-cache\_logs\2022-04-03T17_07_07_748Z-debug.log
PS C:\CodeSpace2022\Vue\AndyVue\src>
全局更新
npm install npm -g
或者用淘宝镜像命令
cnpm install npm -g
up to date, audited 1 package in 150ms
found 0 vulnerabilities
最新,在 150 毫秒内审核了 1 个包
发现0个漏洞
報2
vue中解决出现[Vue warn]: Error in created hook: "ReferenceError: axios is not defined"问题 - 代码先锋网
跨域问题
When allowCredentials is true, allowedOrigins cannot contain the special value "*" since that cannot be set on the "Access-Control-Allow-Origin" response header. To allow credentials to a set of origins, list them explicitly or consider using "allowedOriginPatterns" instead.
at org.springframework.web.cors.CorsConfiguration.validateAllowCredentials(CorsConfiguration.java:473) ~[spring-web-5.3.18.jar:5.3.18]
at org.springframework.web.servlet.handler.AbstractHandlerMapping.getHandler(AbstractHandlerMapping.java:532) ~[spring-webmvc-5.3.18.jar:5.3.18]
at org.springframework.web.servlet.DispatcherServlet.getHandler(DispatcherServlet.java:1261) ~[spring-webmvc-5.3.18.jar:5.3.18]
at org.springframework.web.servlet.DispatcherServlet.doDispatch(DispatcherServlet.java:1043) ~[spring-webmvc-5.3.18.jar:5.3.18]
at org.springframework.web.servlet.DispatcherServlet.doService(DispatcherServlet.java:963) ~[spring-webmvc-5.3.18.jar:5.3.18]
at org.springframework.web.servlet.FrameworkServlet.processRequest(FrameworkServlet.java:1006) ~[spring-webmvc-5.3.18.jar:5.3.18]
at org.springframework.web.servlet.FrameworkServlet.doGet(FrameworkServlet.java:898) ~[spring-webmvc-5.3.18.jar:5.3.18]
at javax.servlet.http.HttpServlet.service(HttpServlet.java:655) ~[tomcat-embed-core-9.0.60.jar:4.0.FR]
at org.springframework.web.servlet.FrameworkServlet.service(FrameworkServlet.java:883) ~[spring-webmvc-5.3.18.jar:5.3.18]
at javax.servlet.http.HttpServlet.service(HttpServlet.java:764) ~[tomcat-embed-core-9.0.60.jar:4.0.FR]
at org.apache.catalina.core.ApplicationFilterChain.internalDoFilter(ApplicationFilterChain.java:227) ~[tomcat-embed-core-9.0.60.jar:9.0.60]
at org.apache.catalina.core.ApplicationFilterChain.doFilter(ApplicationFilterChain.java:162) ~[tomcat-embed-core-9.0.60.jar:9.0.60]
at org.apache.tomcat.websocket.server.WsFilter.doFilter(WsFilter.java:53) ~[tomcat-embed-websocket-9.0.60.jar:9.0.60]
at org.apache.catalina.core.ApplicationFilterChain.internalDoFilter(ApplicationFilterChain.java:189) ~[tomcat-embed-core-9.0.60.jar:9.0.60]
at org.apache.catalina.core.ApplicationFilterChain.doFilter(ApplicationFilterChain.java:162) ~[tomcat-embed-core-9.0.60.jar:9.0.60]
at org.springframework.web.filter.RequestContextFilter.doFilterInternal(RequestContextFilter.java:100) ~[spring-web-5.3.18.jar:5.3.18]
at org.springframework.web.filter.OncePerRequestFilter.doFilter(OncePerRequestFilter.java:117) ~[spring-web-5.3.18.jar:5.3.18]
at org.apache.catalina.core.ApplicationFilterChain.internalDoFilter(ApplicationFilterChain.java:189) ~[tomcat-embed-core-9.0.60.jar:9.0.60]
at org.apache.catalina.core.ApplicationFilterChain.doFilter(ApplicationFilterChain.java:162) ~[tomcat-embed-core-9.0.60.jar:9.0.60]
at org.springframework.web.filter.FormContentFilter.doFilterInternal(FormContentFilter.java:93) ~[spring-web-5.3.18.jar:5.3.18]
at org.springframework.web.filter.OncePerRequestFilter.doFilter(OncePerRequestFilter.java:117) ~[spring-web-5.3.18.jar:5.3.18]
at org.apache.catalina.core.ApplicationFilterChain.internalDoFilter(ApplicationFilterChain.java:189) ~[tomcat-embed-core-9.0.60.jar:9.0.60]
at org.apache.catalina.core.ApplicationFilterChain.doFilter(ApplicationFilterChain.java:162) ~[tomcat-embed-core-9.0.60.jar:9.0.60]
at org.springframework.web.filter.CharacterEncodingFilter.doFilterInternal(CharacterEncodingFilter.java:201) ~[spring-web-5.3.18.jar:5.3.18]
at org.springframework.web.filter.OncePerRequestFilter.doFilter(OncePerRequestFilter.java:117) ~[spring-web-5.3.18.jar:5.3.18]
at org.apache.catalina.core.ApplicationFilterChain.internalDoFilter(ApplicationFilterChain.java:189) ~[tomcat-embed-core-9.0.60.jar:9.0.60]
at org.apache.catalina.core.ApplicationFilterChain.doFilter(ApplicationFilterChain.java:162) ~[tomcat-embed-core-9.0.60.jar:9.0.60]
at org.apache.catalina.core.StandardWrapperValve.invoke(StandardWrapperValve.java:197) ~[tomcat-embed-core-9.0.60.jar:9.0.60]
at org.apache.catalina.core.StandardContextValve.invoke(StandardContextValve.java:97) [tomcat-embed-core-9.0.60.jar:9.0.60]
at org.apache.catalina.authenticator.AuthenticatorBase.invoke(AuthenticatorBase.java:541) [tomcat-embed-core-9.0.60.jar:9.0.60]
at org.apache.catalina.core.StandardHostValve.invoke(StandardHostValve.java:135) [tomcat-embed-core-9.0.60.jar:9.0.60]
at org.apache.catalina.valves.ErrorReportValve.invoke(ErrorReportValve.java:92) [tomcat-embed-core-9.0.60.jar:9.0.60]
at org.apache.catalina.core.StandardEngineValve.invoke(StandardEngineValve.java:78) [tomcat-embed-core-9.0.60.jar:9.0.60]
at org.apache.catalina.connector.CoyoteAdapter.service(CoyoteAdapter.java:360) [tomcat-embed-core-9.0.60.jar:9.0.60]
at org.apache.coyote.http11.Http11Processor.service(Http11Processor.java:399) [tomcat-embed-core-9.0.60.jar:9.0.60]
at org.apache.coyote.AbstractProcessorLight.process(AbstractProcessorLight.java:65) [tomcat-embed-core-9.0.60.jar:9.0.60]
at org.apache.coyote.AbstractProtocol$ConnectionHandler.process(AbstractProtocol.java:889) [tomcat-embed-core-9.0.60.jar:9.0.60]
at org.apache.tomcat.util.net.NioEndpoint$SocketProcessor.doRun(NioEndpoint.java:1743) [tomcat-embed-core-9.0.60.jar:9.0.60]
at org.apache.tomcat.util.net.SocketProcessorBase.run(SocketProcessorBase.java:49) [tomcat-embed-core-9.0.60.jar:9.0.60]
at org.apache.tomcat.util.threads.ThreadPoolExecutor.runWorker(ThreadPoolExecutor.java:1191) [tomcat-embed-core-9.0.60.jar:9.0.60]
at org.apache.tomcat.util.threads.ThreadPoolExecutor$Worker.run(ThreadPoolExecutor.java:659) [tomcat-embed-core-9.0.60.jar:9.0.60]
at org.apache.tomcat.util.threads.TaskThread$WrappingRunnable.run(TaskThread.java:61) [tomcat-embed-core-9.0.60.jar:9.0.60]
at java.lang.Thread.run(Thread.java:748) [na:1.8.0_281]
解决方法
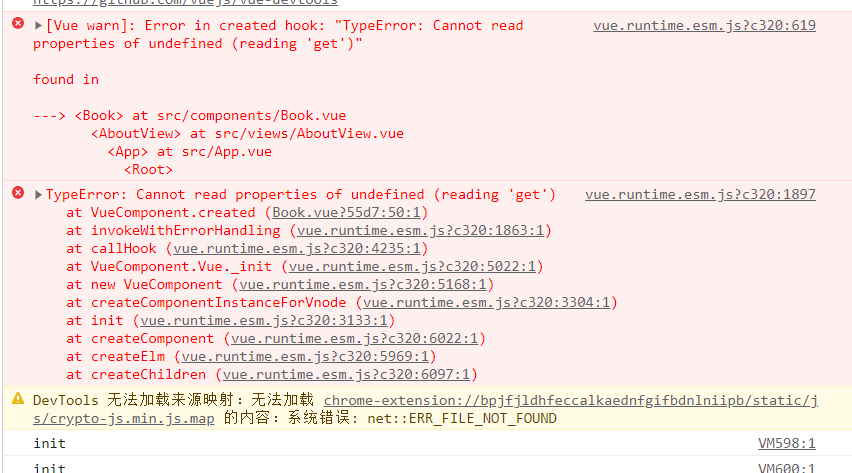
后端数据无法在前端显示
vue.runtime.esm.js?c320:619 [Vue warn]: Error in created hook: "TypeError: Cannot read properties of undefined (reading 'get')"
[Vue warn]: Error in created hook: "TypeError: Cannot read properties of undefined (reading 'get')"
解决
又报错
error in ./src/main.js
Module not found: Error: Can't resolve 'axios' in 'C:\Users\andyf\vue\vue3\andyvue2022\andyvue20222222\src'
ERROR in ./src/main.js 9:0-33
Module not found: Error: Can't resolve 'vue-axios' in 'C:\Users\andyf\vue\vue3\andyvue2022\andyvue20222222\src'
ERROR in ./src/main.js 10:0-26
Module not found: Error: Can't resolve 'axios' in 'C:\Users\andyf\vue\vue3\andyvue2022\andyvue20222222\src'
webpack compiled with 2 errors
解决
vue报错 Can‘t resolve ‘axios‘ in ‘C:\vue\ xxx_newbaby2012的博客-CSDN博客
有报错
Missing script: "serve"
npm ERR!’
"main": "main.js",
1、首先,如图是清楚了当前目录下的整个node_modules文件夹。
2、第一步,清除package-lock.json,注意不是package.json。
3、第二步,强行清除npm缓存(非必须),使用如图命令:npm cache clear --force
4、查看官方文档,可以找到关于cache的说法,官方文档认为除非为了节省空间,是不必强制清除cache的。
5、另一个说明是为什么要清除package-lock.json,实际上根据需要该文件也可不清除,比如可以用npm ci来按照package-lock.json安装(比如为了和开发环境完全一致),而不是package.json。但是通常开发时按照package.json安装。
6、实现上述操作后,使用npm install安装,安装成功后就可以正常运行项目了。
我要以血和泪的经历告诉你,这个 bug 太难解决了 - 知乎
搞定了
总结:
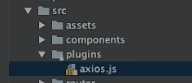
axios
直接安装vue2.x项目,使用 vue add axios 之后就不用管了,可以直接使用了。
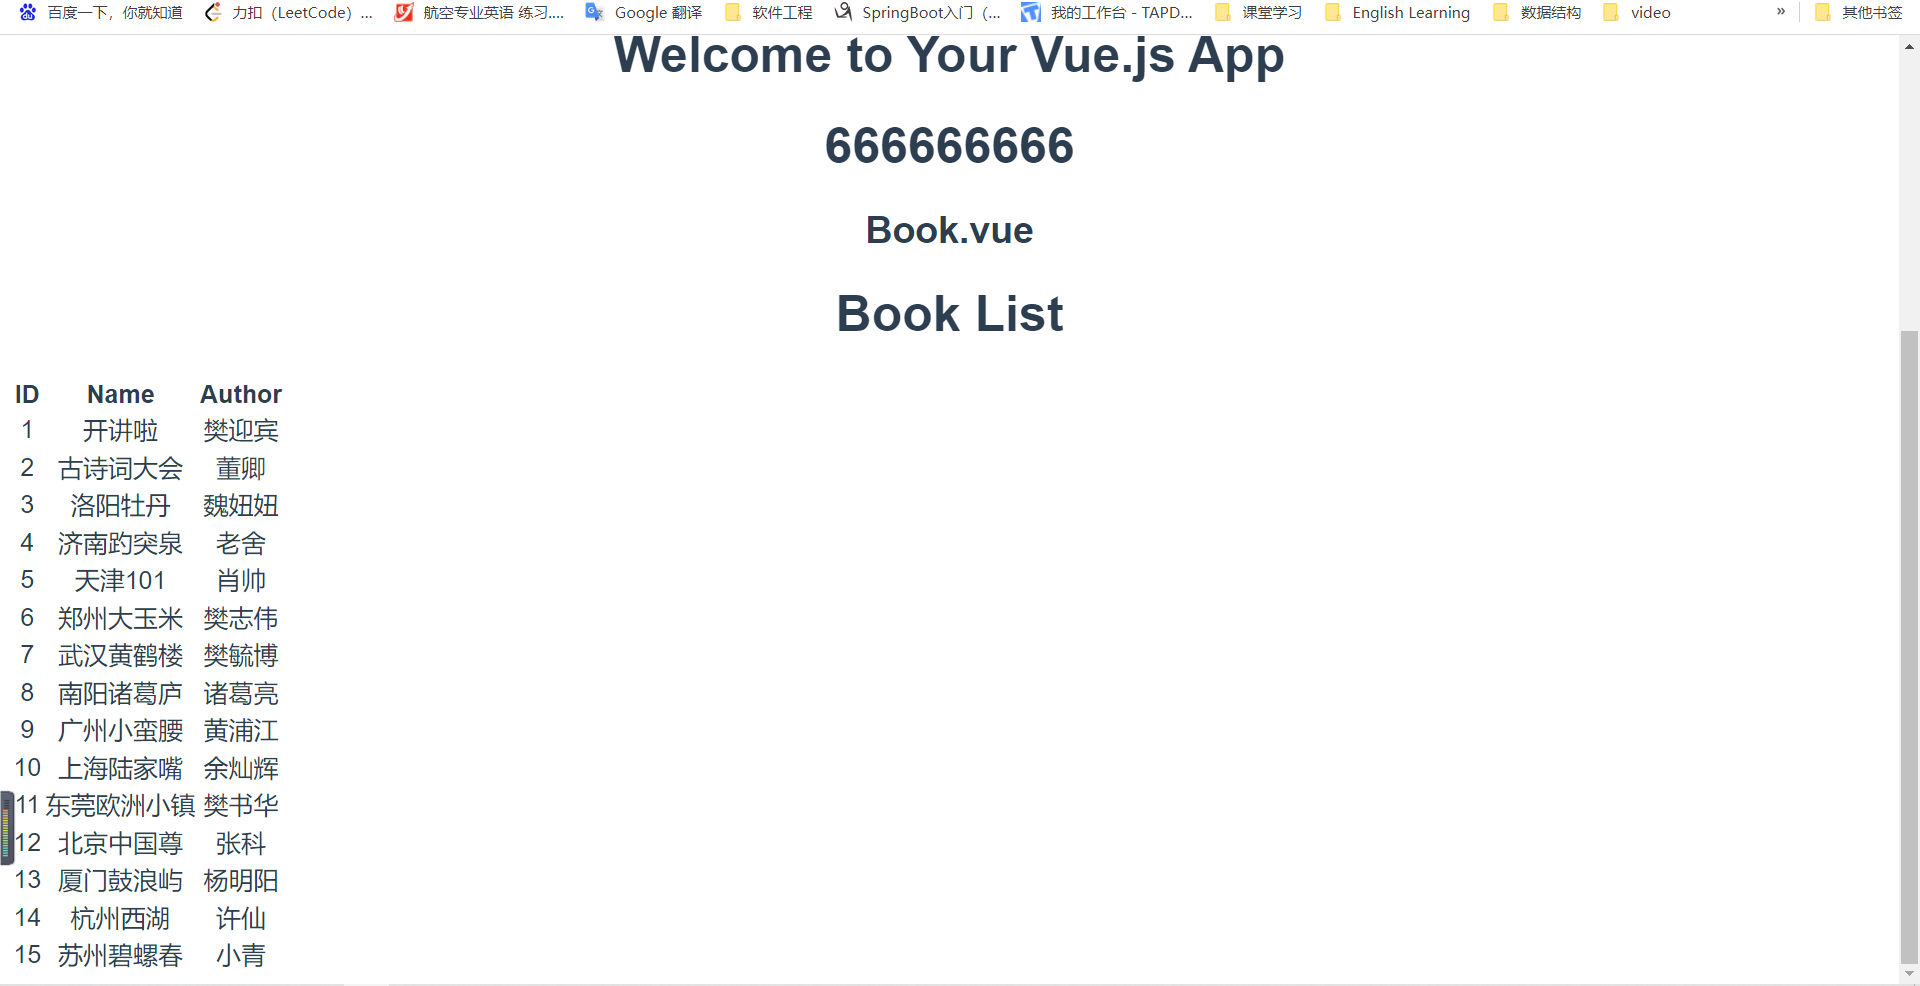
```Book.vue
<template>
  <div class="book">
    <h1>Book List</h1>
    <table>
      <thead>
        <th>ID</th>
        <th>Name</th>
        <th>Author</th>
      </thead>
      <tbody>
        <tr v-for="book in books">
          <td>{{ book.id }}</td>
          <td>{{ book.name }}</td>
          <td>{{ book.author }}</td>
        </tr>
      </tbody>
    </table>
  </div>
</template>
<script>
export default {
  name: "Book",
  data() {
    return {
      books: [
        {
          id: "1",
          name: "andy",
          authot: "aaaa",
        },
        {
          id: "2",
          name: "demi",
          authot: "bbbb",
        },
      ],
    };
  },
  created() {
    alert(booklist);
    const _this = this; // http://localhost:8181/findAll
    this.$axios.get("http://localhost:8181/findAll").then(function (resp) {
      _this.books = resp.data;
      console.log(books);
    });
  },
};
</script>
<style scoped>
</style>
AboutView.vue
<template>
  <div class="about">
    <h1>666666666</h1>
    <h2>Book.vue</h2>
    <Book msg="Welcome to Book "/>
  </div>
</template>


<script>
// @ is an alias to /src
import Book from '@/components/Book.vue'
export default {
  name: 'AboutView',
  components: {
    Book
  }
}
</script>
p2.Element UI 的使用
Element - The world's most popular Vue UI framework
安装 插件
cnpm install --save element-ui
···
<template>
  <div id="app">
    <!-- <nav>
      <router-link to="/">Home</router-link> |
      <router-link to="/about">About</router-link>||||
      <router-link to="/bookList">BookList</router-link>
    </nav>
    <router-view/> -->


    <el-container style="height: 500px; border: 1px solid #eee">
      <el-aside width="200px" style="background-color: rgb(238, 241, 246)">
        <el-menu :default-openeds="['1', '3']">
          <el-submenu index="1">
            <template slot="title"
              ><i class="el-icon-message"></i>导航一</template
            >
            <el-menu-item-group>
              <template slot="title">分组一</template>
              <el-menu-item index="1-1">选项1</el-menu-item>
              <el-menu-item index="1-2">选项2</el-menu-item>
            </el-menu-item-group>
            <el-menu-item-group title="分组2">
              <el-menu-item index="1-3">选项3</el-menu-item>
            </el-menu-item-group>
            <el-submenu index="1-4">
              <template slot="title">选项4</template>
              <el-menu-item index="1-4-1">选项4-1</el-menu-item>
            </el-submenu>
          </el-submenu>
          <el-submenu index="2">
            <template slot="title"><i class="el-icon-menu"></i>导航二</template>
            <el-menu-item-group>
              <template slot="title">分组一</template>
              <el-menu-item index="2-1">选项1</el-menu-item>
              <el-menu-item index="2-2">选项2</el-menu-item>
            </el-menu-item-group>
            <el-menu-item-group title="分组2">
              <el-menu-item index="2-3">选项3</el-menu-item>
            </el-menu-item-group>
            <el-submenu index="2-4">
              <template slot="title">选项4</template>
              <el-menu-item index="2-4-1">选项4-1</el-menu-item>
            </el-submenu>
          </el-submenu>
          <el-submenu index="3">
            <template slot="title"
              ><i class="el-icon-setting"></i>导航三</template
            >
            <el-menu-item-group>
              <template slot="title">分组一</template>
              <el-menu-item index="3-1">选项1</el-menu-item>
              <el-menu-item index="3-2">选项2</el-menu-item>
            </el-menu-item-group>
            <el-menu-item-group title="分组2">
              <el-menu-item index="3-3">选项3</el-menu-item>
            </el-menu-item-group>
            <el-submenu index="3-4">
              <template slot="title">选项4</template>
              <el-menu-item index="3-4-1">选项4-1</el-menu-item>
            </el-submenu>
          </el-submenu>
        </el-menu>
      </el-aside>


      <el-container>
        <el-header style="text-align: right; font-size: 12px">
          <el-dropdown>
            <i class="el-icon-setting" style="margin-right: 15px"></i>
            <el-dropdown-menu slot="dropdown">
              <el-dropdown-item>查看</el-dropdown-item>
              <el-dropdown-item>新增</el-dropdown-item>
              <el-dropdown-item>删除</el-dropdown-item>
            </el-dropdown-menu>
          </el-dropdown>
          <span>王小虎</span>
        </el-header>


        <el-main>
          <el-table :data="tableData">
            <el-table-column prop="date" label="日期" width="140">
            </el-table-column>
            <el-table-column prop="name" label="姓名" width="120">
            </el-table-column>
            <el-table-column prop="address" label="地址"> </el-table-column>
          </el-table>
        </el-main>
      </el-container>
    </el-container>
  </div>
</template>


<script>
  export default {
    data() {
      const item = {
        date: '2016-05-02',
        name: '王小虎',
        address: '上海市普陀区金沙江路 1518 弄'
      };
      return {
        tableData: Array(20).fill(item)
      }
    }
  };
</script>


<style>
  .el-header {
    background-color: #B3C0D1;
    color: #333;
    line-height: 60px;
  }

  .el-aside {
    color: #333;
  }
</style>
semi-colon expectedcss(css-semicolonexpected)
App.vue
···
<template>
  <div id="app">
    <nav>
      <router-link to="/">Home</router-link> |
      <router-link to="/about">About</router-link>
    </nav>
    <router-view/>
  </div>
</template>


<style>
#app {
  font-family: Avenir, Helvetica, Arial, sans-serif;
  -webkit-font-smoothing: antialiased;
  -moz-osx-font-smoothing: grayscale;
  text-align: center;
  color: #2c3e50;
}


nav {
  padding: 30px;
}


nav a {
  font-weight: bold;
  color: #2c3e50;
}


nav a.router-link-exact-active {
  color: #42b983;
}
</style>


 581
581


 被折叠的 条评论
为什么被折叠?
被折叠的 条评论
为什么被折叠?
 到【灌水乐园】发言


