一.负载均衡简介

Nginx 提供了基于 TCP 的 4 层(网络)和 7 层(应用)负载均衡,nginx的4层负载均衡其实就是端口转发。

应用型负载均衡(ALB)提供面向HTTP/HTTPS/QUIC等7层(应用)负载均衡。

4 层负载均衡配置示例:Nginx 监听在 12345 端口上的 TCP 连接,并将请求代理到名为 backend 的上游组。

stream {
    upstream backend {
        server backend.example.com:12345;
    }
    server {
        listen 12345;
        proxy_pass backend;
    }
}
  • 1.
  • 2.
  • 3.
  • 4.
  • 5.
  • 6.
  • 7.
  • 8.
  • 9.

7 层负载均衡配置示例:Nginx 监听在 80 端口上的 HTTP 连接,并将请求代理到名为 backend 的上游组。它还设置了一些常用的 HTTP 头部,以确保上游服务器能获取到正确的客户端信息。

upstream backend {
        server backend1.example.com;
        server backend2.example.com;
    }
    server {
        listen 80;
        server_name example.com;
        location / {
            proxy_pass http://backend;
            proxy_set_header Host $host;
            proxy_set_header X-Real-IP $remote_addr;
            proxy_set_header X-Forwarded-For $proxy_add_x_forwarded_for;
        }
    }
  • 1.
  • 2.
  • 3.
  • 4.
  • 5.
  • 6.
  • 7.
  • 8.
  • 9.
  • 10.
  • 11.
  • 12.
  • 13.
  • 14.

二.环境准备

准备3台ECS主机,操作系统CENTOS7.4

ECS  proxy   

10.0.0.7   EIP 

ECS web01

10.0.08    无EIP

ECS web02 

10.0.0.9   无EIP

三台ECS安装nginx并配置web站点

#ECS proxy web01  web02 注意$转义 \$
cat > /etc/yum.repos.d/nginx.repo <<EOF
[nginx-stable]
name=nginx stable repo
baseurl=http://nginx.org/packages/centos/\$releasever/\$basearch/
gpgcheck=1
enabled=1
gpgkey=https://nginx.org/keys/nginx_signing.key
module_hotfixes=true
EOF

yum install nginx -y
rpm -qa nginx
systemctl start nginx
systemctl enable nginx
systemctl status nginx
netstat -tlunp|grep nginx

#若只有一台绑定EIP,其他两台可以使用rpm包安装
sed -i 's/keepcache=0/keepcache=1/g' /etc/yum.conf
yum install nginx -y --downloaddir=/root
scp *.rpm root@10.0.0.7:/root
#其他两台安装nginx
cd /root
yum loadinstall -y nginx-1.26.1-2.el7.ngx.x86_64.rpm

#web01 web02配置web站点
cd /etc/nginx/conf.d
mv default.conf default.conf.bak
cat >www.conf<<EOF
server {
        listen       80;
        server_name  www.alibaby007.com;
        location / {
            root   /usr/share/nginx/html/www;
            index  index.html index.htm;
        }
    }
EOF
#web01
cd /usr/share/nginx/html/
mkdir -p www
echo web01 >/usr/share/nginx/html/www/index.html
nginx -t
systemctl restart nginx
#web02
cd /usr/share/nginx/html/
mkdir -p www
echo web02 >/usr/share/nginx/html/www/index.html
nginx -t
systemctl restart nginx
  • 1.
  • 2.
  • 3.
  • 4.
  • 5.
  • 6.
  • 7.
  • 8.
  • 9.
  • 10.
  • 11.
  • 12.
  • 13.
  • 14.
  • 15.
  • 16.
  • 17.
  • 18.
  • 19.
  • 20.
  • 21.
  • 22.
  • 23.
  • 24.
  • 25.
  • 26.
  • 27.
  • 28.
  • 29.
  • 30.
  • 31.
  • 32.
  • 33.
  • 34.
  • 35.
  • 36.
  • 37.
  • 38.
  • 39.
  • 40.
  • 41.
  • 42.
  • 43.
  • 44.
  • 45.
  • 46.
  • 47.
  • 48.
  • 49.
  • 50.
  • 51.

三.配置7层nginx负载均衡

ECS proxy

#ECS proxy
/etc/nginx/conf.d
mv default.conf default.conf.bak
#ECS proxy 注意$转义 \$
cat > lb.conf <<EOF
upstream backend {
        server 10.0.0.8:80;
        server 10.0.0.9:80;
    }
    server {
        listen 80;
        server_name www.alibaby007.com;
        location / {
            proxy_pass http://backend;
            proxy_set_header Host \$host;
            proxy_set_header X-Real-IP \$remote_addr;
            proxy_set_header X-Forwarded-For \$proxy_add_x_forwarded_for;
        }
    }
EOF
nginx -t
systemctl restart nginx
#无域名绑定EIP,本地ECS proxy访问测试
echo "EIP www.alibaby007.com" >>/etc/hosts
curl www.alibaby007.com
web01
curl www.alibaby007.com
web02
#或本地电脑hosts增加本地域名解析EIP www.alibaby007.com
浏览器访问测试www.alibaby007.com

#########lb.conf另外一种写法########
cat > lb.conf <<EOF
upstream backend {
        server 10.0.0.8:80;
        server 10.0.0.9:80;
    }
    server {
        listen 80;
        server_name www.alibaby007.com;
        location / {
        proxy_pass http://backend;
        include proxy_params;
        }
    }
EOF
cat > /etc/nginx/proxy_params <<EOF
proxy_set_header Host \$host;
proxy_set_header X-Real-IP \$remote_addr;
proxy_set_header X-Forwarded-For \$proxy_add_x_forwarded_for;
EOF
  • 1.
  • 2.
  • 3.
  • 4.
  • 5.
  • 6.
  • 7.
  • 8.
  • 9.
  • 10.
  • 11.
  • 12.
  • 13.
  • 14.
  • 15.
  • 16.
  • 17.
  • 18.
  • 19.
  • 20.
  • 21.
  • 22.
  • 23.
  • 24.
  • 25.
  • 26.
  • 27.
  • 28.
  • 29.
  • 30.
  • 31.
  • 32.
  • 33.
  • 34.
  • 35.
  • 36.
  • 37.
  • 38.
  • 39.
  • 40.
  • 41.
  • 42.
  • 43.
  • 44.
  • 45.
  • 46.
  • 47.
  • 48.
  • 49.
  • 50.
  • 51.

四.配置4层nginx负载均衡

# ECS proxy 修改主配置文件/etc/nginx/nginx.conf,在http模块上层添加
#四层负载均衡
include /etc/nginx/conf.c/*.conf;
mkdir -p etc/nginx/conf.c
cat > lb.conf <<EOF
stream {
    upstream ssh_web01 {
        server 10.0.0.8:22;
    }
    server {
        listen 5555;
        proxy_pass ssh_web01;
        proxy_connect_timeout 3s;
        proxy_timeout 90s;
    }
    upstream ssh_web02 {
        server 10.0.0.9:22;
    }
    server {
        listen 6666;
        proxy_pass ssh_web02;
        proxy_connect_timeout 3s;
        proxy_timeout 60s;
    }   
}
EOF
nginx -t 
nginx -s reload
阿里云安全组放行5555和6666端口
使用xshell测试
ssh root@EIP 5555
ssh root@EIP 6666
  • 1.
  • 2.
  • 3.
  • 4.
  • 5.
  • 6.
  • 7.
  • 8.
  • 9.
  • 10.
  • 11.
  • 12.
  • 13.
  • 14.
  • 15.
  • 16.
  • 17.
  • 18.
  • 19.
  • 20.
  • 21.
  • 22.
  • 23.
  • 24.
  • 25.
  • 26.
  • 27.
  • 28.
  • 29.
  • 30.
  • 31.
  • 32.

五.阿里云ALB负载均衡

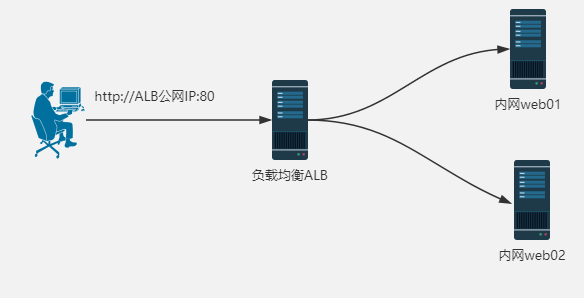
简单说明:基于以上的环境ECS proxy的nginx停掉(systemctl stop nginx),只剩下2台web服务器,分别为web01和web02,然后使用创建阿里云ALB,ALB实例要与两台web服务器在一个地域。
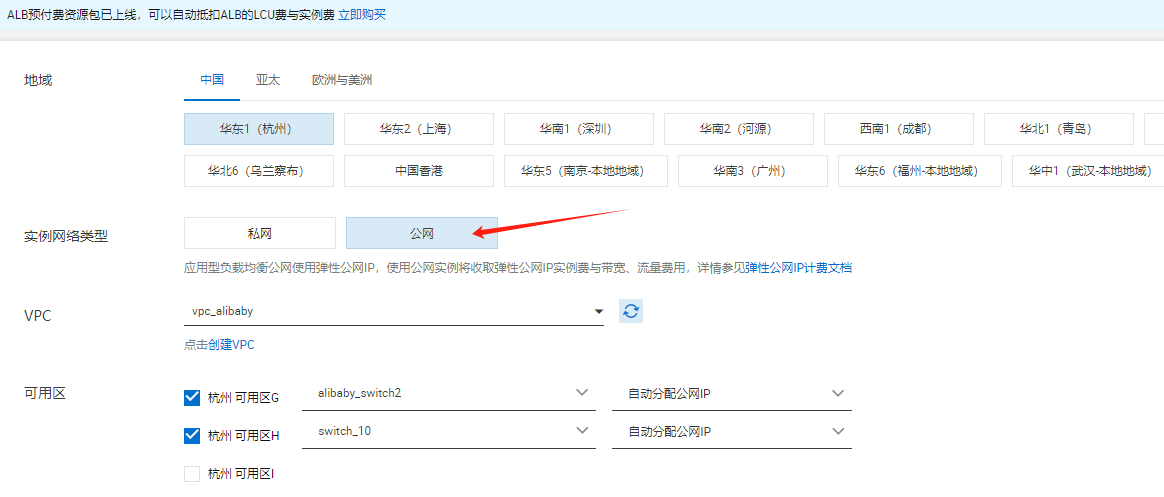
ALB的实例类型有内网和外网,此实验选外网,ALB实例有公网IP,公网IP在ALB实例中可查看,可以监听这个公网IP的80端口;
创建后端服务器组,即将两台web服务器web01-02加入服务器组,web服务器的web端口也是默认的80;
这样ALB实例的公网IP+80端口,就可以负载均衡的转发到内网web01-02服务器了。
  • 1.
  • 2.
  • 3.

ECS中实现nginx4层7层负载均衡和ALB/NLB原SLB负载均衡_负载均衡

1.创建实例

ECS中实现nginx4层7层负载均衡和ALB/NLB原SLB负载均衡_负载均衡_02

2.实例网络类型选公网,可用区要2个,一个在创建ECS实例时创建过(用这个公网IP验证试验),再随便创建一个。

ECS中实现nginx4层7层负载均衡和ALB/NLB原SLB负载均衡_IP_03

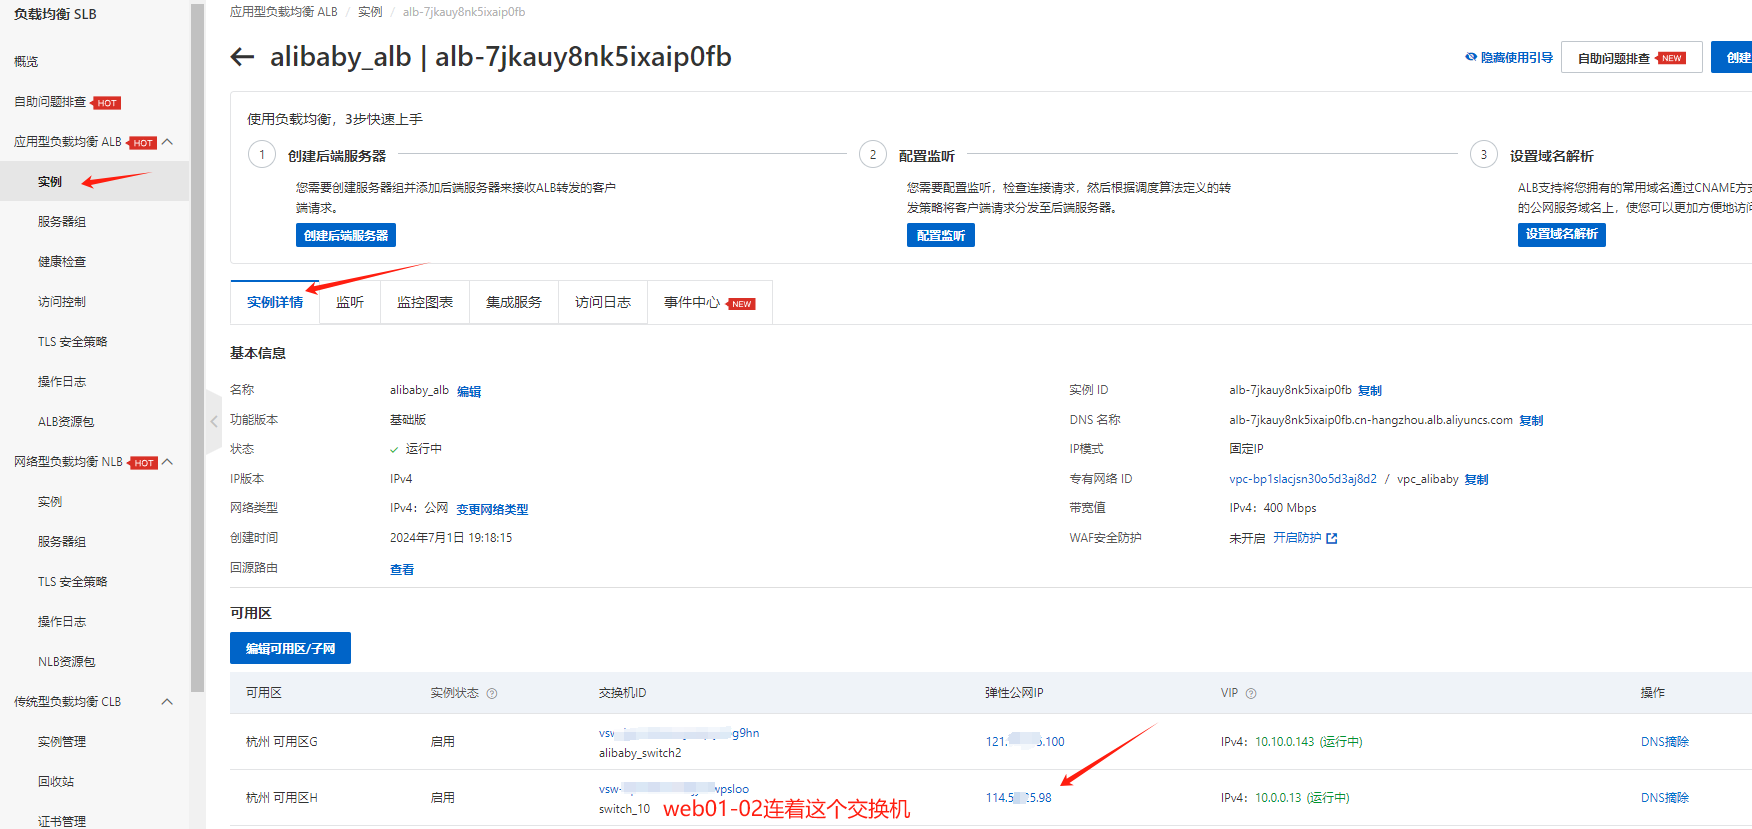
3.ALB实例公网IP 实例---实例详情中可以看到内网web服务器对应的公网IP

ECS中实现nginx4层7层负载均衡和ALB/NLB原SLB负载均衡_负载均衡_04

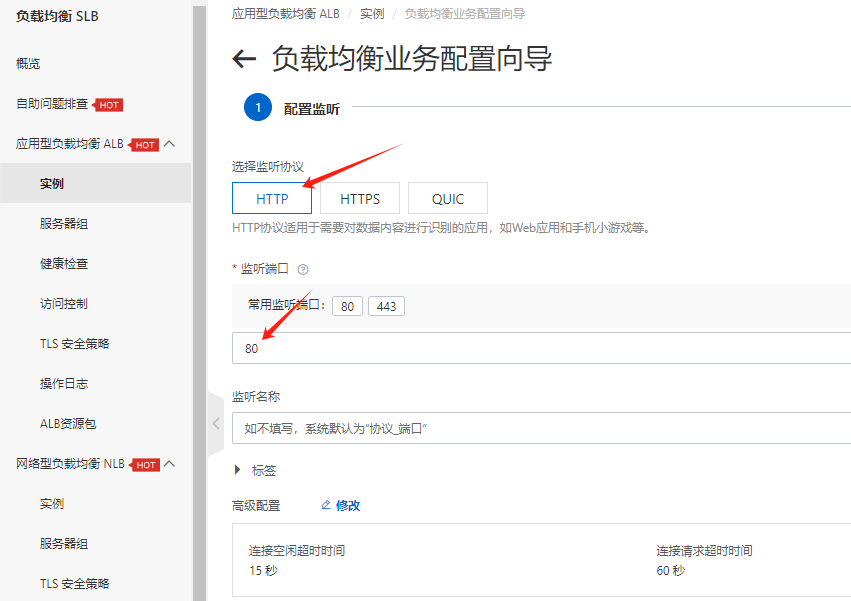
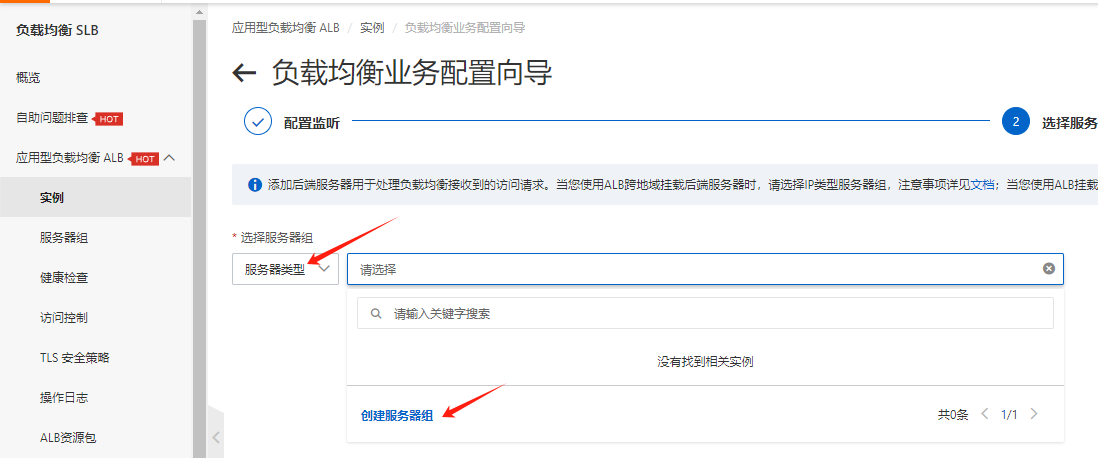
4.创建监听 即监听ALB公网IP的应用和端口,这里是http 80端口

ECS中实现nginx4层7层负载均衡和ALB/NLB原SLB负载均衡_IP_05

ECS中实现nginx4层7层负载均衡和ALB/NLB原SLB负载均衡_IP_06

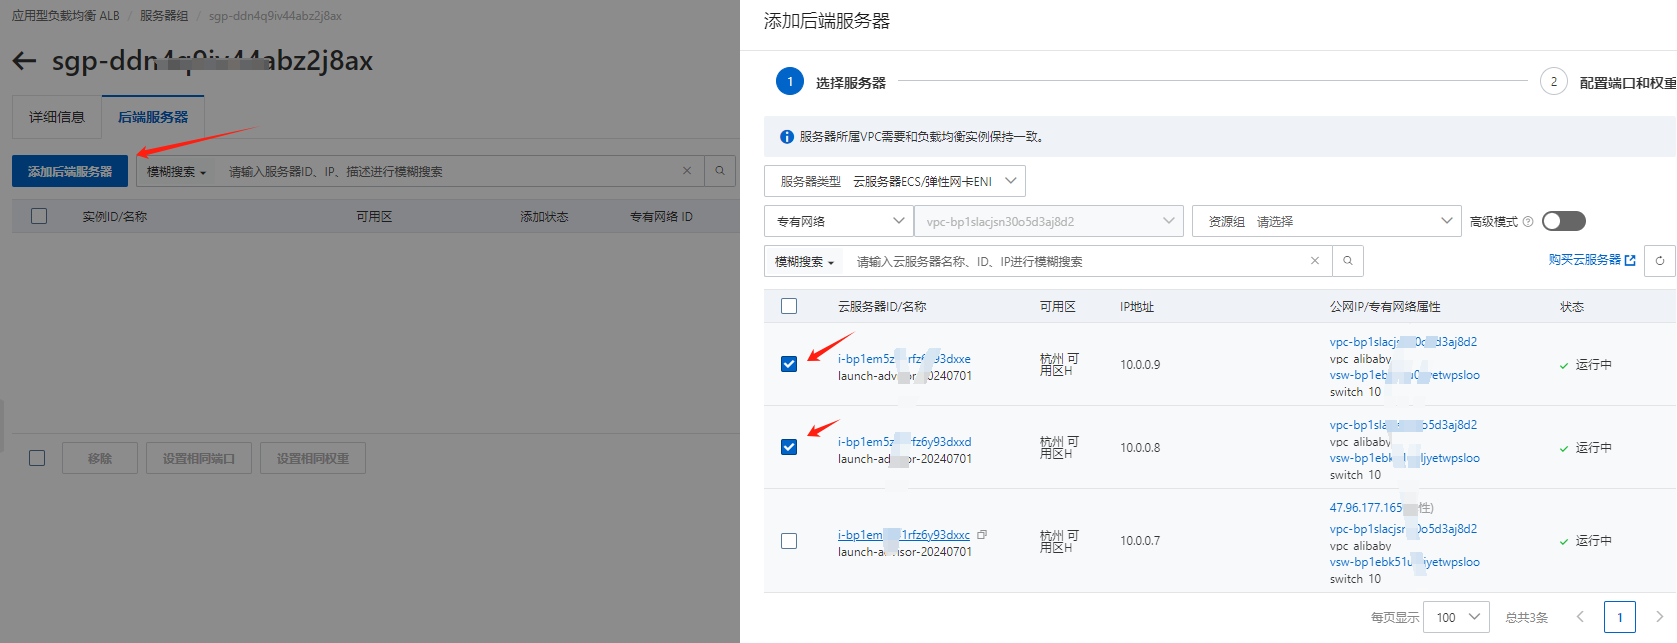
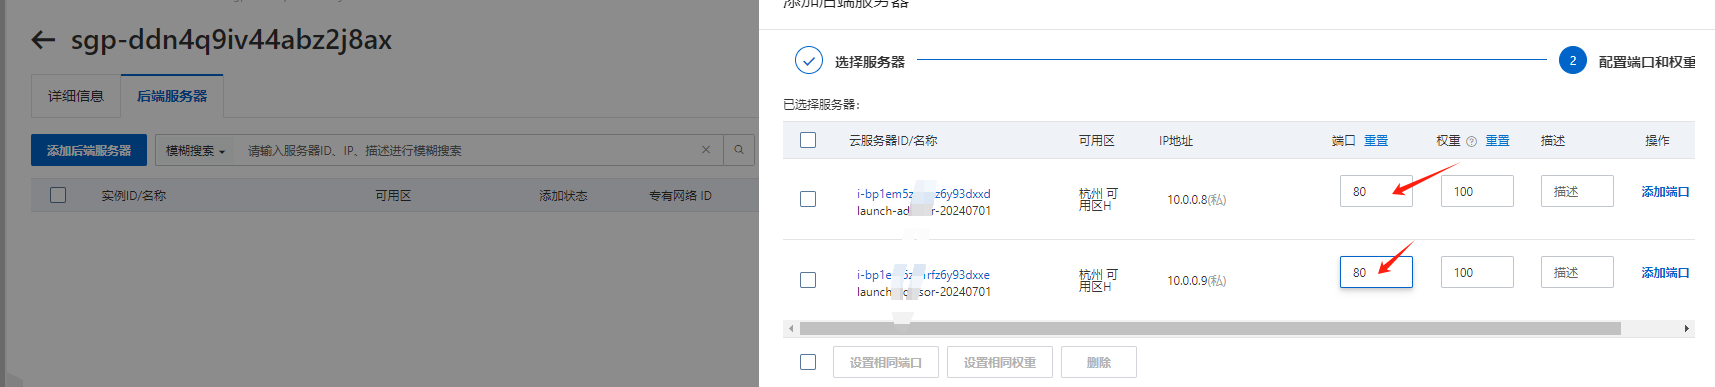
5.创建服务器组,即ALB后端的web01-02服务器,放到一个组里面,就是对组里面的服务器进行负载均衡的,web服务器端口也是这个过程填写。
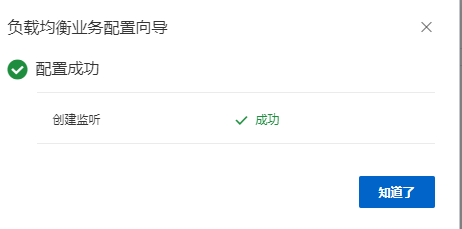
ECS中实现nginx4层7层负载均衡和ALB/NLB原SLB负载均衡_负载均衡_07

ECS中实现nginx4层7层负载均衡和ALB/NLB原SLB负载均衡_nginx_08

ECS中实现nginx4层7层负载均衡和ALB/NLB原SLB负载均衡_IP_09

ECS中实现nginx4层7层负载均衡和ALB/NLB原SLB负载均衡_负载均衡_10

发现还要再来一遍,哈哈哈。

ECS中实现nginx4层7层负载均衡和ALB/NLB原SLB负载均衡_IP_05

最后提交。

ECS中实现nginx4层7层负载均衡和ALB/NLB原SLB负载均衡_IP_12

6.浏览器使用内网服务器所在ALB实例的交换机的公网IP访问验证

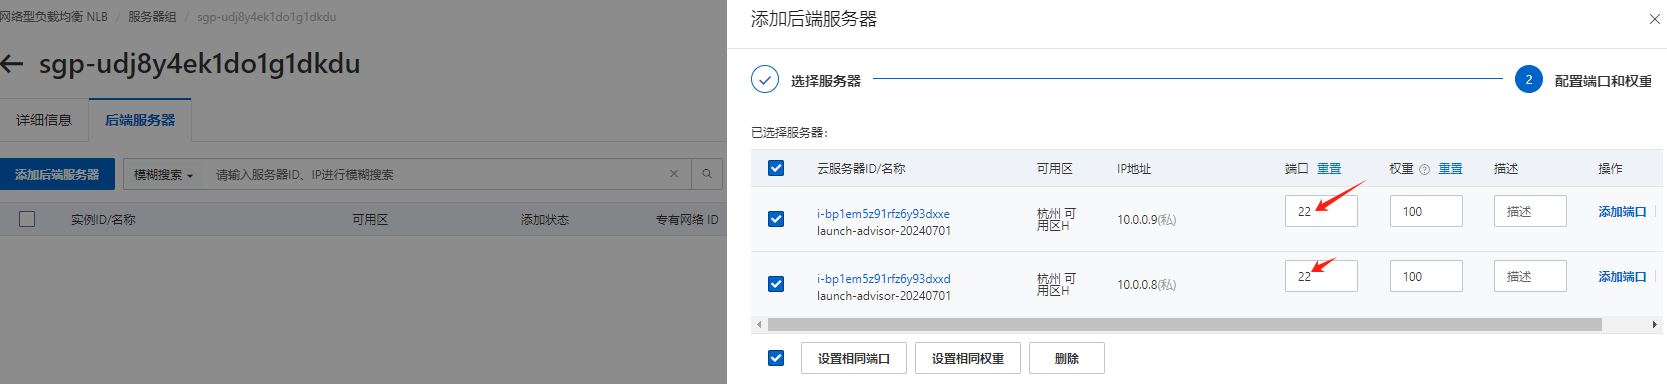
六.阿里云NLB负载均衡 只展示与ALB不一样的部分

ECS中实现nginx4层7层负载均衡和ALB/NLB原SLB负载均衡_负载均衡_13

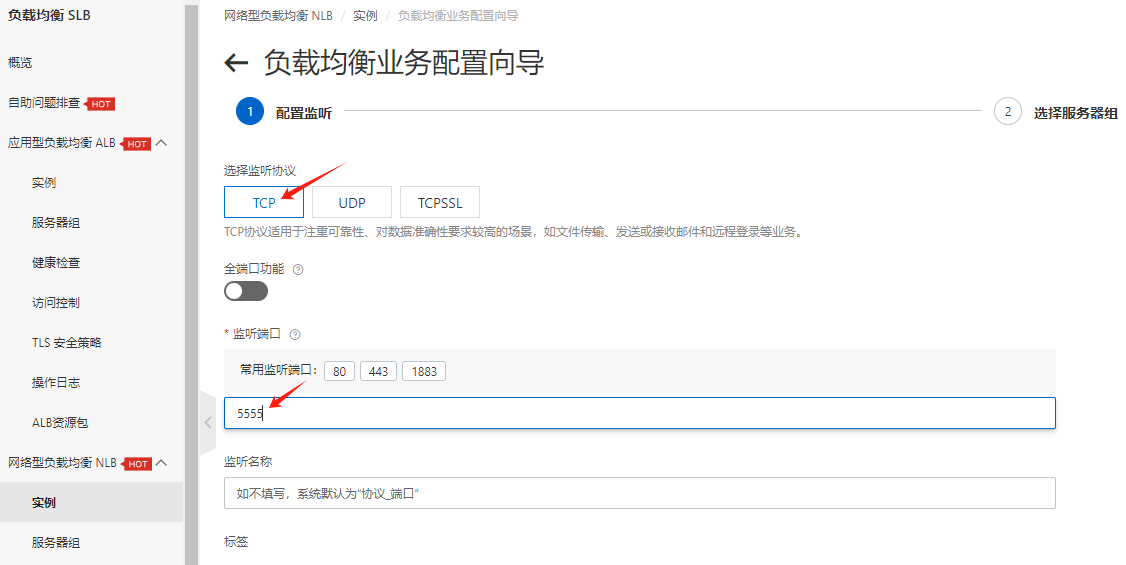
做ssh转发的话,后端服务器就一对一,不要组了,不然会2台服务器每次连接可能不一样,可以做2个不同的端口映射。

如NLB的公网IP+5555对应web01内网IP的22,NLB的公网IP+6666对应web02内网IP的22。

ECS中实现nginx4层7层负载均衡和ALB/NLB原SLB负载均衡_nginx_14

xhsell验证即可
ssh  root@NLB_ip 5555
ssh  root@NLB_ip 6666
  • 1.
  • 2.
  • 3.