


spring-cloud-config 源码解析:
本文主要针对 spring-cloud-dependencies Hoxton.SR4版本, spring-cloud-config-server/client的 2.2.2.RELEASE 版本进行源码的解析。
对于未接触过 Config 的小伙伴可以参考 https://www.cnblogs.com/wuzhenzhao/p/10670580.html 进行一些基础知识的了解。
本文主要从以下几个点来分析:
- @Value 的源码解析
- Environment的初始化
- SpringBoot 配置的加载过程
- Config Client 配置加载过程
- Config Server获取配置过程
- 实现自定义配置中心 PropertySourceLocator (基于拓展org.springframework.cloud.bootstrap.BootstrapConfiguration)
@Value 的源码解析
在 spring-cloud-config 配置中心的使用中,我们通常只需要使用 @Value 注解,就能完成属性的注入。而 @Value 基于 Environment 的机制。我们先来看一下 @Value的注入过程
以如下代码为例:
@Value("${wuzz.name}")
private String name;
@Value 发生于 依赖注入的阶段,对于依赖注入不熟悉的朋友可以先参考:https://www.cnblogs.com/wuzhenzhao/p/10882050.html
在注入的流程中有个至关重要的方法:AbstractAutowireCapableBeanFactory#populateBean
protected void populateBean(String beanName, RootBeanDefinition mbd, @Nullable BeanWrapper bw) {
        //........
        PropertyDescriptor[] filteredPds = null;
        if (hasInstAwareBpps) {
            if (pvs == null) {
                pvs = mbd.getPropertyValues();
            }
            for (BeanPostProcessor bp : getBeanPostProcessors()) {
                if (bp instanceof InstantiationAwareBeanPostProcessor) {
                    InstantiationAwareBeanPostProcessor ibp = (InstantiationAwareBeanPostProcessor) bp;
            // @Value  的注入入口,基于 AutowiredAnnotationBeanPostProcessor
                    PropertyValues pvsToUse = ibp.postProcessProperties(pvs, bw.getWrappedInstance(), beanName);
                    if (pvsToUse == null) {
                        if (filteredPds == null) {
                            filteredPds = filterPropertyDescriptorsForDependencyCheck(bw, mbd.allowCaching);
                        }
                        pvsToUse = ibp.postProcessPropertyValues(pvs, filteredPds, bw.getWrappedInstance(), beanName);
                        if (pvsToUse == null) {
                            return;
                        }
                    }
                    pvs = pvsToUse;
                }
            }
        }
        //.......
}
基于 AutowiredAnnotationBeanPostProcessor#postProcessProperties ,这个东西有点类似于类的后置处理器。
@Override
public PropertyValues postProcessProperties(PropertyValues pvs, Object bean, String beanName) {
     // 扫描注解元数据
        InjectionMetadata metadata = findAutowiringMetadata(beanName, bean.getClass(), pvs);
        try { // 注入
            metadata.inject(bean, beanName, pvs);
        }
        catch (BeanCreationException ex) {
            throw ex;
        }
        catch (Throwable ex) {
            throw new BeanCreationException(beanName, "Injection of autowired dependencies failed", ex);
        }
        return pvs;
}
调用重载的方法 inject,这里有很多的实现,基于目前我们注入是一个 属性,调用到 AutowiredAnnotationBeanPostProcessor.AutowiredFieldElement#inject ,最终会进入 DefaultListableBeanFactory#doResolveDependency
@Nullable
    public Object doResolveDependency(DependencyDescriptor descriptor, @Nullable String beanName,
            @Nullable Set<String> autowiredBeanNames, @Nullable TypeConverter typeConverter) throws BeansException {
        InjectionPoint previousInjectionPoint = ConstructorResolver.setCurrentInjectionPoint(descriptor);
        try {
            Object shortcut = descriptor.resolveShortcut(this);
            if (shortcut != null) {
                return shortcut;
            }

            Class<?> type = descriptor.getDependencyType();
       // 获取 @Value 的表达式
            Object value = getAutowireCandidateResolver().getSuggestedValue(descriptor);
            if (value != null) {
                if (value instanceof String) {
            //处理表达式的值,其实就是从 Eviromengt里面去获取
                    String strVal = resolveEmbeddedValue((String) value);
                    BeanDefinition bd = (beanName != null && containsBean(beanName) ?
                            getMergedBeanDefinition(beanName) : null);
                    value = evaluateBeanDefinitionString(strVal, bd);
                }
                TypeConverter converter = (typeConverter != null ? typeConverter : getTypeConverter());
                try {
                    return converter.convertIfNecessary(value, type, descriptor.getTypeDescriptor());
                }
                catch (UnsupportedOperationException ex) {
                    // A custom TypeConverter which does not support TypeDescriptor resolution...
            // 转换类型,进行实际注入
                    return (descriptor.getField() != null ?
                            converter.convertIfNecessary(value, type, descriptor.getField()) :
                            converter.convertIfNecessary(value, type, descriptor.getMethodParameter()));
                }
            }
      // ........
        }
        finally {
            ConstructorResolver.setCurrentInjectionPoint(previousInjectionPoint);
        }
    }
DefaultListableBeanFactory#doResolveDependency 作用是处理 bean中的依赖。由此可见,处理 @Value 注解的时机是在getBean方法中,即SpringApplication#run的最后一步,实例化 bean。当获取 @Value 注解中的表达式之后,进入了 resolveEmbeddedValue 方法,来替换表达式的值:
public String resolveEmbeddedValue(@Nullable String value) {
        if (value == null) {
            return null;
        }
        String result = value;
      // 遍历 StringValueResolver
        for (StringValueResolver resolver : this.embeddedValueResolvers) {
            result = resolver.resolveStringValue(result);
            if (result == null) {
                return null;
            }
        }
        return result;
}
通过代码逻辑我们看到,对于属性的解析已经委托给了StringValueResolver 对应的实现类,接下来我们就要分析一下这个 StringValueResolver 是如何初始化的。
StringValueResolver 的初始化 依赖于 PropertySourcesPlaceholderConfigurer ,来看一下该类类图:

很明显 ,该类实现了 BeanFactoryPostProcessor ,必然会执行 postProcessBeanFactory 方法。
@Override
    public void postProcessBeanFactory(ConfigurableListableBeanFactory beanFactory) throws BeansException {
        if (this.propertySources == null) {
            this.propertySources = new MutablePropertySources();
            if (this.environment != null) {
                this.propertySources.addLast(
                    new PropertySource<Environment>(ENVIRONMENT_PROPERTIES_PROPERTY_SOURCE_NAME, this.environment) {
                        @Override
                        @Nullable
                        public String getProperty(String key) {
                            return this.source.getProperty(key);
                        }
                    }
                );
            }
            try {
                PropertySource<?> localPropertySource =
                        new PropertiesPropertySource(LOCAL_PROPERTIES_PROPERTY_SOURCE_NAME, mergeProperties());
                if (this.localOverride) {
                    this.propertySources.addFirst(localPropertySource);
                }
                else {
                    this.propertySources.addLast(localPropertySource);
                }
            }
            catch (IOException ex) {
                throw new BeanInitializationException("Could not load properties", ex);
            }
        }
     // 创建替换 ${...} 表达式的处理器
        processProperties(beanFactory, new PropertySourcesPropertyResolver(this.propertySources));
        this.appliedPropertySources = this.propertySources;
}
然后进入 processProperties :
protected void processProperties(ConfigurableListableBeanFactory beanFactoryToProcess,
            final ConfigurablePropertyResolver propertyResolver) throws BeansException {
    // 设置占位符的前缀:"{"
    propertyResolver.setPlaceholderPrefix(this.placeholderPrefix);
    // 设置占位符的后缀:"}"
    propertyResolver.setPlaceholderSuffix(this.placeholderSuffix);
    // 设置默认值分隔符:":"
    propertyResolver.setValueSeparator(this.valueSeparator);
    // 生成处理 ${...} 表达式的处理器
        StringValueResolver valueResolver = strVal -> {
            String resolved = (this.ignoreUnresolvablePlaceholders ?
                    propertyResolver.resolvePlaceholders(strVal) :
                    propertyResolver.resolveRequiredPlaceholders(strVal));
            if (this.trimValues) {
                resolved = resolved.trim();
            }
            return (resolved.equals(this.nullValue) ? null : resolved);
        };
        // 将处理器放入 Spring 容器
        doProcessProperties(beanFactoryToProcess, valueResolver);
}
protected void doProcessProperties(ConfigurableListableBeanFactory beanFactoryToProcess,
            StringValueResolver valueResolver) {

        BeanDefinitionVisitor visitor = new BeanDefinitionVisitor(valueResolver);

        String[] beanNames = beanFactoryToProcess.getBeanDefinitionNames();
        for (String curName : beanNames) {
            // Check that we're not parsing our own bean definition,
            // to avoid failing on unresolvable placeholders in properties file locations.
            if (!(curName.equals(this.beanName) && beanFactoryToProcess.equals(this.beanFactory))) {
                BeanDefinition bd = beanFactoryToProcess.getBeanDefinition(curName);
                try {
                    visitor.visitBeanDefinition(bd);
                }
                catch (Exception ex) {
                    throw new BeanDefinitionStoreException(bd.getResourceDescription(), curName, ex.getMessage(), ex);
                }
            }
        }

        // New in Spring 2.5: resolve placeholders in alias target names and aliases as well.
        beanFactoryToProcess.resolveAliases(valueResolver);

        // New in Spring 3.0: resolve placeholders in embedded values such as annotation attributes.
    // 将 StringValueResolver 存入 BeanFactory 中
    beanFactoryToProcess.addEmbeddedValueResolver(valueResolver);
}

@Override
public void addEmbeddedValueResolver(StringValueResolver valueResolver) {
        Assert.notNull(valueResolver, "StringValueResolver must not be null");
        this.embeddedValueResolvers.add(valueResolver);
}
回到 AbstractBeanFactory#resolveEmbeddedValue。这个时候我们能知道 embeddedValueResolvers 里面就一个实现,即 PropertySourcesPlaceholderConfigurer#processProperties 方法内构造的匿名内部类:
StringValueResolver valueResolver = strVal -> {
        // 默认是 false 走后面的逻辑
            String resolved = (this.ignoreUnresolvablePlaceholders ?
                    propertyResolver.resolvePlaceholders(strVal) :
                    propertyResolver.resolveRequiredPlaceholders(strVal));
            if (this.trimValues) {
                resolved = resolved.trim();
            }
            return (resolved.equals(this.nullValue) ? null : resolved);
};
然后这里会走propertyResolver.resolveRequiredPlaceholders(strVal)) ,而这里的 propertyResolver 即 PropertySourcesPropertyResolver,在 PropertySourcesPlaceholderConfigurer#postProcessBeanFactory 创建出来的。
由于其为重写该方法,所以进入其父类 AbstractPropertyResolver#resolveRequiredPlaceholders:
@Override
public String resolveRequiredPlaceholders(String text) throws IllegalArgumentException {
        if (this.strictHelper == null) {
            this.strictHelper = createPlaceholderHelper(false);
        }
        return doResolvePlaceholders(text, this.strictHelper);
}
private String doResolvePlaceholders(String text, PropertyPlaceholderHelper helper) {
   return helper.replacePlaceholders(text, this::getPropertyAsRawString);
}
然后来到了很关键的一步 this::getPropertyAsRawString :
@Override
@Nullable
protected String getPropertyAsRawString(String key) {
  return getProperty(key, String.class, false);
}

@Nullable
protected <T> T getProperty(String key, Class<T> targetValueType, boolean resolveNestedPlaceholders) {
        if (this.propertySources != null) {
            for (PropertySource<?> propertySource : this.propertySources) {
                if (logger.isTraceEnabled()) {
                    logger.trace("Searching for key '" + key + "' in PropertySource '" +
                            propertySource.getName() + "'");
                }
                Object value = propertySource.getProperty(key);
                if (value != null) {
                    if (resolveNestedPlaceholders && value instanceof String) {
                        value = resolveNestedPlaceholders((String) value);
                    }
                    logKeyFound(key, propertySource, value);
                    return convertValueIfNecessary(value, targetValueType);
                }
            }
        }
        if (logger.isTraceEnabled()) {
            logger.trace("Could not find key '" + key + "' in any property source");
        }
        return null;
}
这里的 propertySources 也是 PropertySourcesPlaceholderConfigurer#postProcessBeanFactory 创建出来的:
if (this.environment != null) {
                this.propertySources.addLast(
                    new PropertySource<Environment>(ENVIRONMENT_PROPERTIES_PROPERTY_SOURCE_NAME, this.environment) {
                        @Override
                        @Nullable
                        public String getProperty(String key) {
                            return this.source.getProperty(key);
                        }
                    }
                );
            }
通过 Debug 可以看到相关信息

然后就会来到 PropertySourcesPlaceholderConfigurer#postProcessBeanFactory 匿名内部类中的 getProperty:
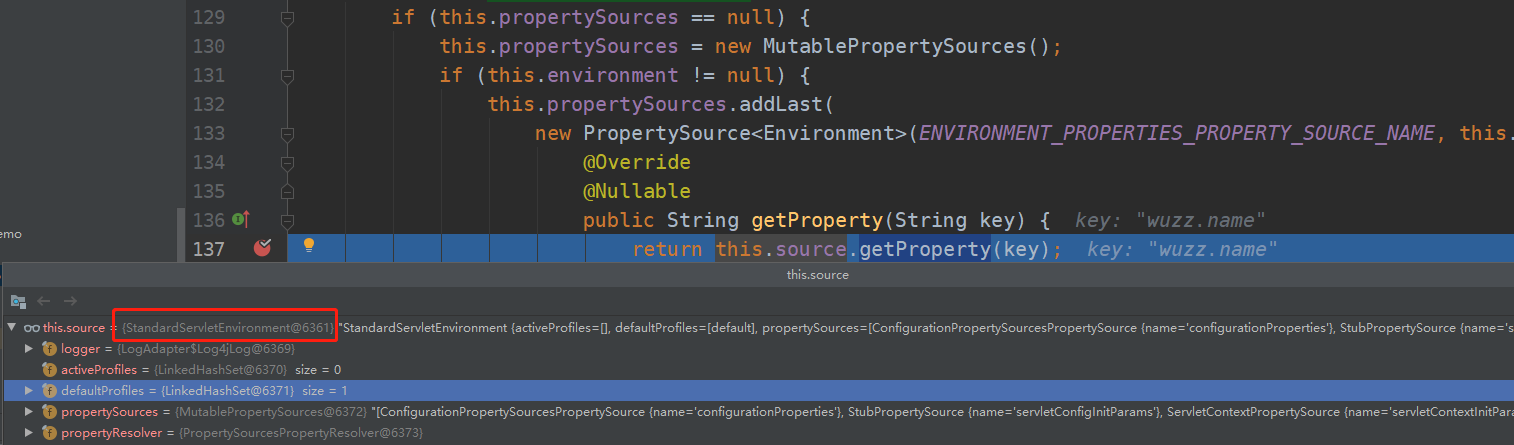
获取到了一个 StandardServletEnvironment,然后通过该 Environment 类型进行获取配置源,这个时候又会进到 PropertySourcesPropertyResolver#getProperty,但是这个时候所看到的 propertySources 属性则如下图所示
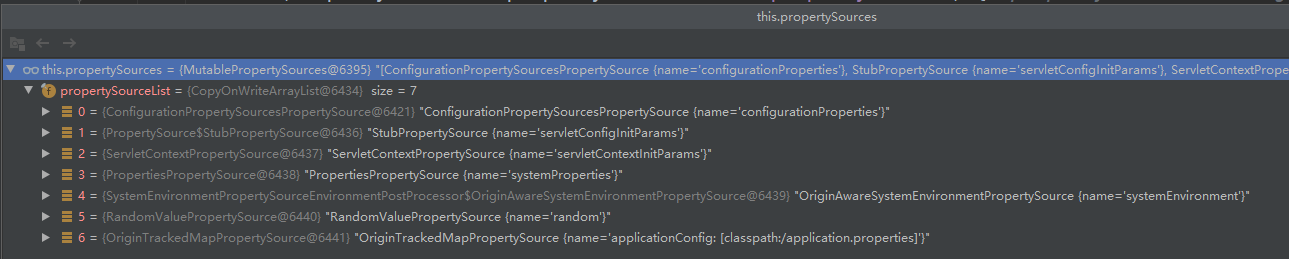
这就是所有的本环境下的配置源,然后遍历这些配置源进行属性的读取。因为我们这里是直接通过application.properties 配置的 ,所以在 ConfigurationPropertySourcesPropertySource#getProperty 获取到配置。
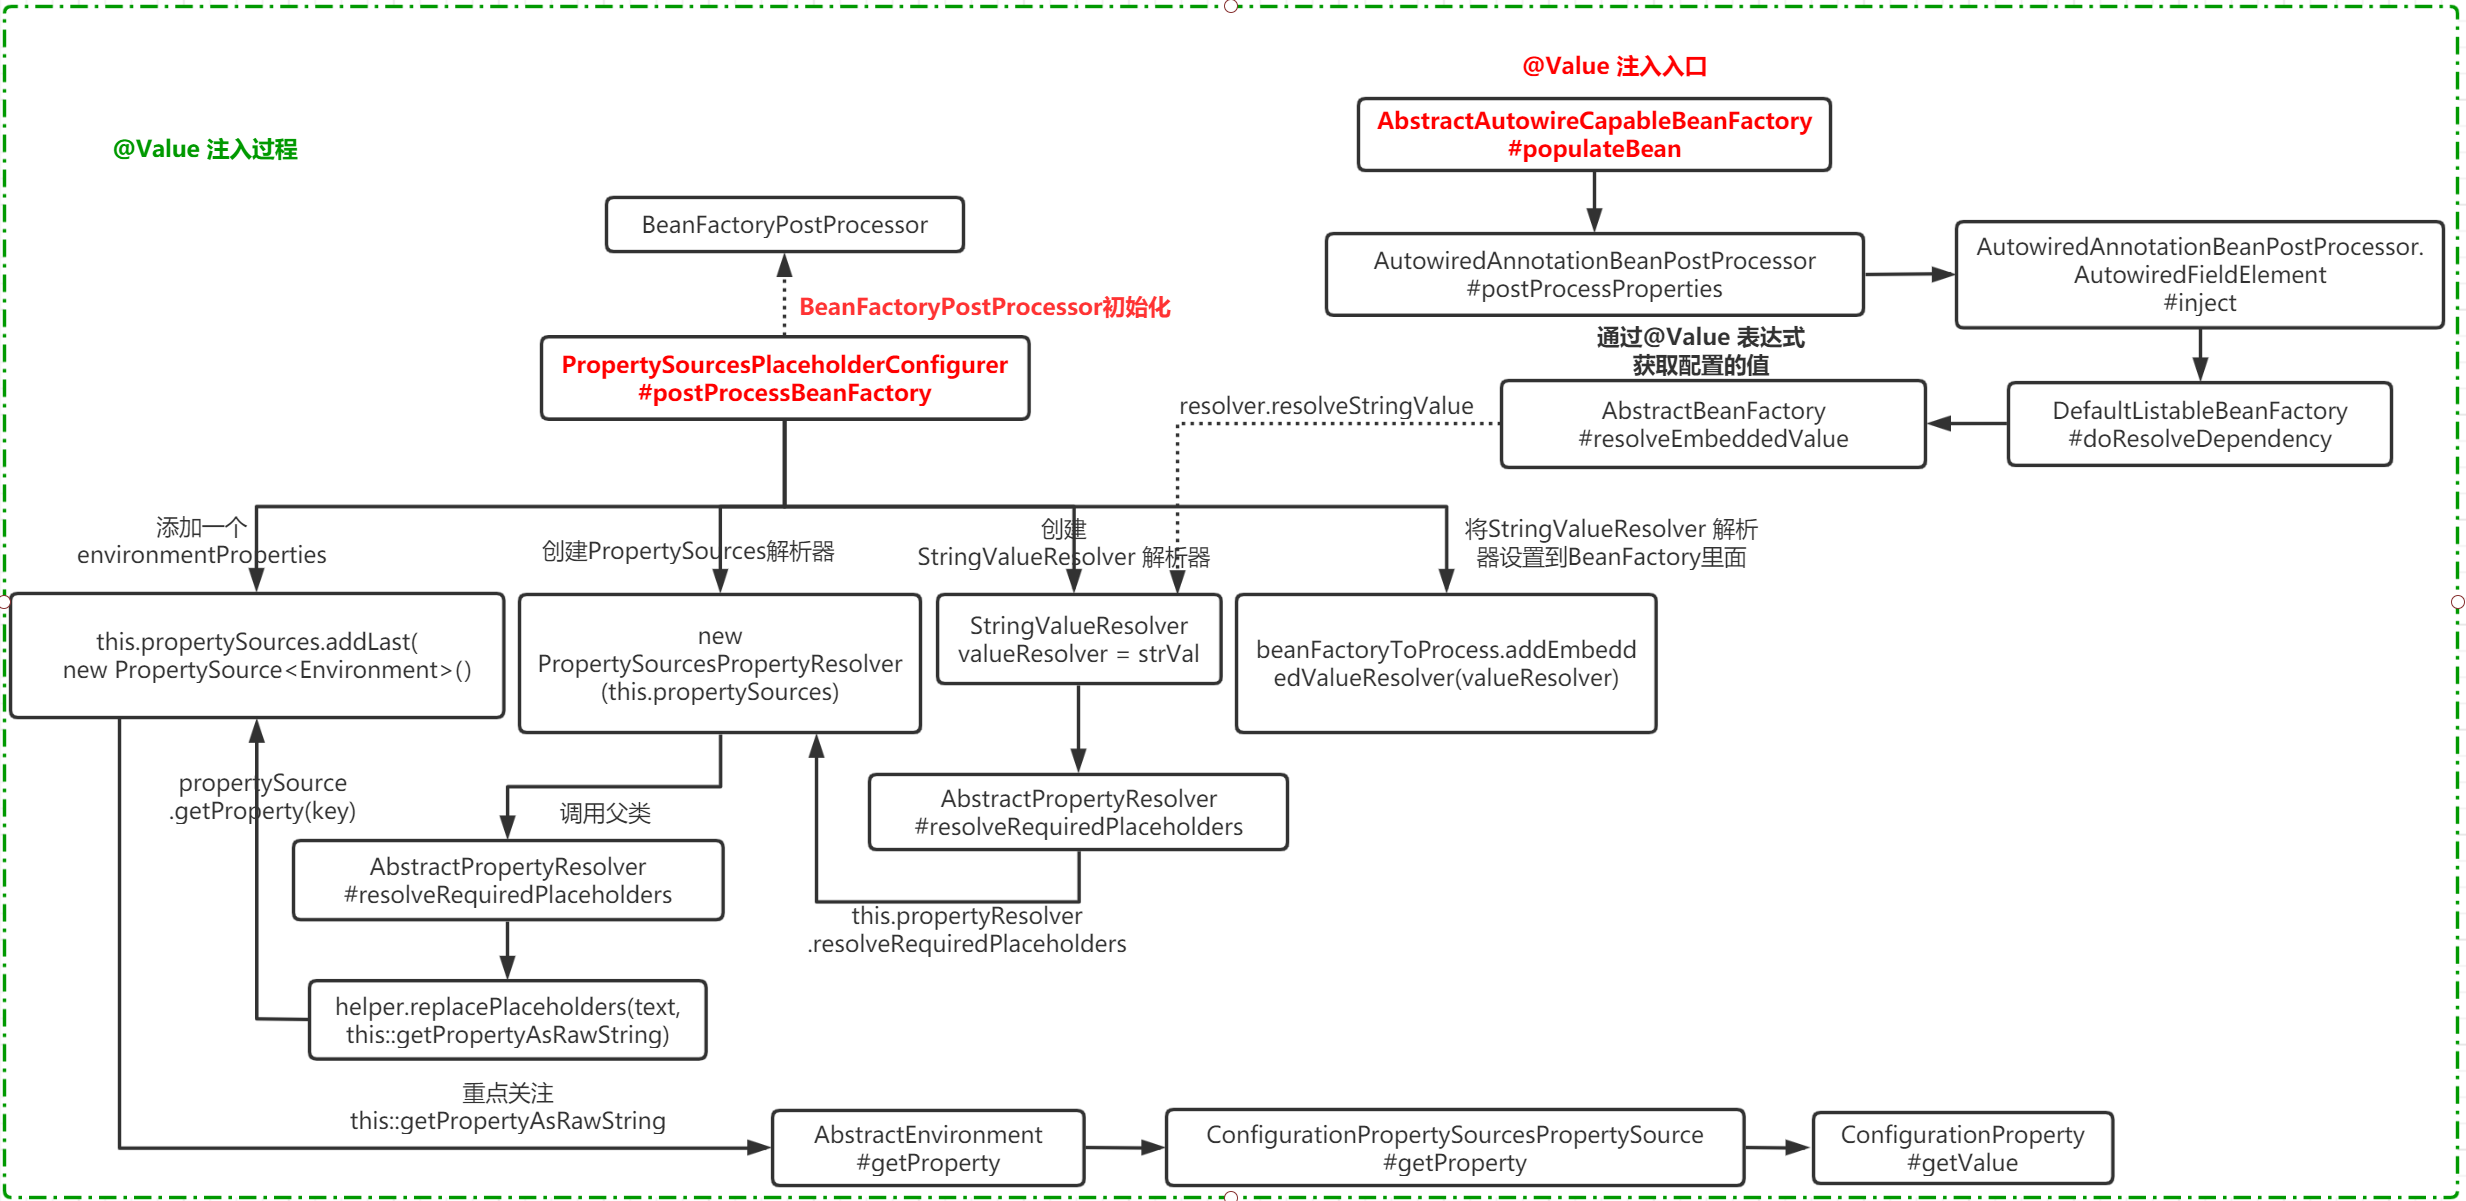
然后回到 DefaultListableBeanFactory#doResolveDependency 会通过 converter.convertIfNecessary 将获取到的值进行注入到对应的Bean 里面,完成 @Value 的注入操作. 流程图如下:
Environment的初始化
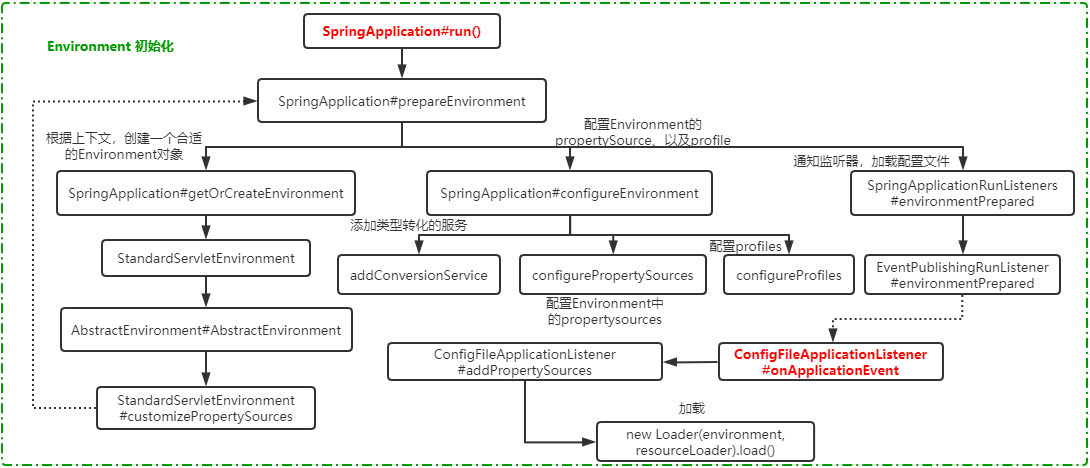
上面的 @Value 代码的注入流程我们大致是了解了,但是这一过程有个 StandardServletEnvironment 是怎么初始化的 ,也就是spring boot需要解析的外部资源文件的路径是如何初始化的。在spring boot的启动流程中,有一个 prepareEnvironment 方法,这个方法就是用来准备Environment这个对象的。
springApplication.run -> prepareEnvironment
private ConfigurableEnvironment prepareEnvironment(SpringApplicationRunListeners listeners,
            ApplicationArguments applicationArguments) {
        // Create and configure the environment
    // 根据上下文,创建一个合适的Environment对象
        ConfigurableEnvironment environment = getOrCreateEnvironment();
        //配置Environment的propertySource、以及profile
        configureEnvironment(environment, applicationArguments.getSourceArgs());
        ConfigurationPropertySources.attach(environment);
        // 通知监听器,加载配置文件
        listeners.environmentPrepared(environment);
        bindToSpringApplication(environment);
        if (!this.isCustomEnvironment) {
            environment = new EnvironmentConverter(getClassLoader()).convertEnvironmentIfNecessary(environment,
                    deduceEnvironmentClass());
        }
        ConfigurationPropertySources.attach(environment);
        return environment;
}
getOrCreateEnvironment 这个方法,就是根据当前的webApplication类型匹配对应的environment,当前默认的应该就是StandardServletEnvironment ,如果是spring webflflux,则是StandardReactiveWebEnvironment .
private ConfigurableEnvironment getOrCreateEnvironment() {
        if (this.environment != null) {
            return this.environment;
        }
        switch (this.webApplicationType) {
        case SERVLET:
            return new StandardServletEnvironment();
        case REACTIVE:
            return new StandardReactiveWebEnvironment();
        default:
            return new StandardEnvironment();
        }
}
StandardServletEnvironment 是整个spring boot应用运行环境的实现类,后面所有的关于环境相关的配置操作都是基于这个类,它的类图如下
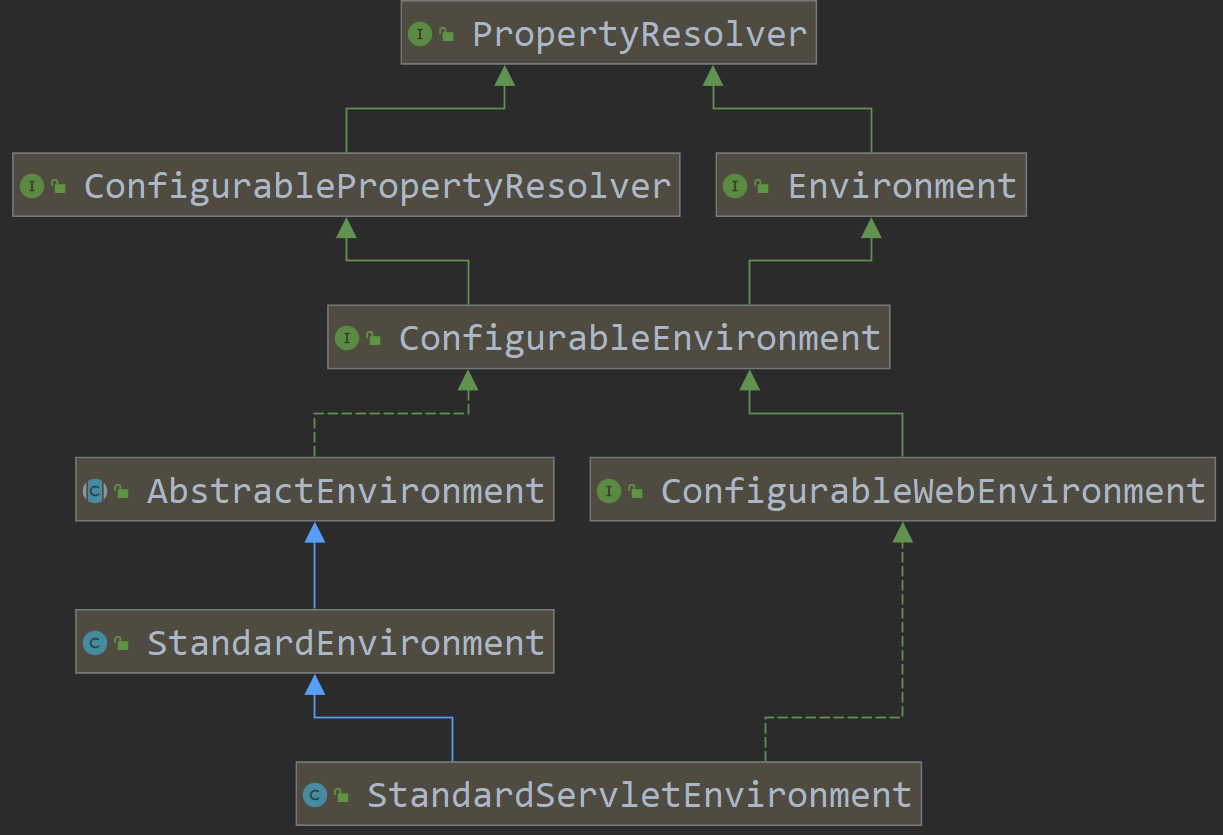
StandardServletEnvironment 的初始化过程,会做一些事情,就是配置一些基本的属性来源。StandardServletEnvironment 会初始化父类 AbstractEnvironment ,在这个类的构造方法中,会调用一个自定义配置文件的方法
public AbstractEnvironment() {
    customizePropertySources(this.propertySources);
}
customizePropertySources 这个方法被 StandardServletEnvironment 重写了,所以会调用StandardServletEnvironment 中的 customizePropertySources 方法。相信大家不难看出,这里是将几个不同的配置源封装成 StubPropertySource 添加到MutablePropertySources 中,调用 addLast 是表示一直往最后的位置添加。
- SERVLET_CONFIG_PROPERTY_SOURCE_NAME:servlet的配置信息,也就是在中配置的
- SERVLET_CONTEXT_PROPERTY_SOURCE_NAME: 这个是servlet初始化的上下文,也就是以前我们在web.xml中配置的 context-param 。
- JNDI_PROPERTY_SOURCE_NAME: 加载jndi.properties配置信息。
- SYSTEM_PROPERTIES_PROPERTY_SOURCE_NAME: 系统变量,通过System.setProperty设置的变量,默认可以看到 java.version 、 os.name 等。
- SYSTEM_ENVIRONMENT_PROPERTY_SOURCE_NAME: 系统环境变量,也就是我们配置JAVA_HOME的地方。
private final List<PropertySource<?>> propertySourceList = new CopyOnWriteArrayList<>();
接着,我们来看一下它怎么用的,找到 AbstractEnvironment 这个类,在这里定义了 MutablePropertySources。并且把这个MutablePropertySources作为参数传递给了 ConfigurablePropertyResolver 配置解析器中,而这个配置解析器是一个 PropertySourcesPropertyResolver 实例。
private final MutablePropertySources propertySources = new MutablePropertySources();
private final ConfigurablePropertyResolver propertyResolver = new PropertySourcesPropertyResolver(this.propertySources);
我们来看一下这个类关系图, AbstractEnvironment 实现了文件解析器ConfigurablePropertyResolver ,而在上面这段代码中我们把 MutablePropertySources 传递到PropertySourcesPropertyResolver 中。这样就可以让 AbstractEnvironment 具备文件解析的功能,只是这个功能,委托给了PropertySourcesPropertyResolver来实现。 这跟我们上面的分析是一致的.
通过上面的代码,spring构造了一个 StandardServletEnvironment 对象并且初始化了一些需要解析的propertySource。我们继续来看 configureEnvironment 这个方法,这个方法有两个作用
- addConversionService 添加类型转化的服务,我们知道properties文件中配置的属性都是String类型的,而转化为Java对象之后要根据合适的类型进行转化,而 ConversionService 是一套通用的转化方案,这里把这个转化服务设置到当前的Environment,很显然,就是为Environment配置解析时提供一个类型转化的解决方案。这块大家有空可以去研究一下,也是一个值的学习的设计。
- configurePropertySources 配置Environment中的propertysources,在上面五个属性来源的基础上又加了两个configureProfiles :这个方法就比较容易理解,就是配置当前激活的profifiles,将当前的activeProfifiles设置到enviroment中。这样就能够使得我们完成不同环境下配置的获取问题。
- 设置 defaultProperties 属性来源
- 设置commandLineProperties来源,如果设置了命令行参数,则会加载SimpleCommandLinePropertySource 作为propertySource
这个defaultProperties是什么呢?给大家演示一个东西,就是说我们可以设置一个默认的属性,如果设置过,则需要加载。否则就不需要。
public static void main(String[] args) {
//        SpringApplication.run(ConfigClientApp.class,args);
//        log.info("服务启动成功");
        SpringApplication springApplication=new SpringApplication(ConfigClientApp.class);
        Map<String, Object> pro = new HashMap<>();
        pro.put("key", "value");
        springApplication.setDefaultProperties(pro);
        springApplication.run(args);

}
上述工作完成之后,就是发布一个environmentPrepared环境准备就绪的通知,具体的时间监听过程的代码就不再分析了,我们直接进入到 ConfigFileApplicationListener 这个监听器,这个监听器就是用来处理项目配置的。
SpringBoot 配置的加载过程
ConfigFileApplicationListener.onApplicationEvent 收到事件之后,会执行如下代码onApplicationEnvironmentPreparedEvent
private void onApplicationEnvironmentPreparedEvent(ApplicationEnvironmentPreparedEvent event) {
        List<EnvironmentPostProcessor> postProcessors = loadPostProcessors();
                // 把自己加进去了,意味着会执行 this.postProcessEnvironment
        postProcessors.add(this);
        AnnotationAwareOrderComparator.sort(postProcessors);
        for (EnvironmentPostProcessor postProcessor : postProcessors) {
            postProcessor.postProcessEnvironment(event.getEnvironment(), event.getSpringApplication());
        }
    }
最终执行到 ConfigFileApplicationListener.addPropertySources 方法中,这个方法做两个事情
- 添加一个RandomValuePropertySource到Environment的MutablePropertySources中
- 加载spring boot中的配置信息,比如application.yml或者application.properties
这块的代码就不继续深入分析了,小伙伴自己感兴趣的深入去看看。load 所做的事情如下:
- 获取默认的配置文件路径,有4种。private static final String DEFAULT_SEARCH_LOCATIONS = "classpath:/,classpath:/config/,file:./,file:./config/*/,file:./config/";
- 遍历所有的路径,拼装配置文件名称。
- 再遍历解析器,选择yml或者properties解析,将解析结果添加到集合MutablePropertySources当中。
至此,springBoot中的资源文件加载完毕,解析顺序从上到下,所以前面的配置文件会覆盖后面的配置文件。可以看到 application.properties 的优先级最低,系统变量和环境变量的优先级相对较高。
结合上面 @Value 的流程,是不是就串起来了呢? 显示SpringBoot 启动的时候将加载相关配置到 Environment ,然后注入的时候去这个里面拿.
Config Client 配置加载过程
- 如何将配置加载到 Environment
- 配置变更时,如何控制 Bean 是否需要 create,重新触发一次 Bean 的初始化,才能将 @Value 注解指定的字段从 Environment 中重新注入。
- 配置变更时,如何控制新的配置会更新到 Environment 中,才能保证配置变更时可注入最新的值。
- PropertySourceLocator:抽象出这个接口,就是让用户可定制化的将一些配置加载到Environment。这部分的配置获取遵循了 Spring Cloud Config 的理念,即希望能从外部储存介质中来 loacte。
- RefreshScope: Spring Cloud 定义这个注解,是扩展了 Spring 原有的 Scope 类型。用来标识当前这个 Bean 是一个refresh 类型的 Scope。其主要作用就是可以控制 Bean 的整个生命周期。
- ContextRefresher:抽象出这个 Class,是让用户自己按需来刷新上下文(比如当有配置刷新时,希望可以刷新上下文,将最新的配置更新到 Environment,重新创建 Bean 时,就可以从Environment 中注入最新的配置)。
从前面的代码分析过程中我们知道,Environment中所有外部化配置,针对不同类型的配置都会有与之对应的PropertySource,比如(SystemEnvironmentPropertySource、CommandLinePropertySource)。以及PropertySourcesPropertyResolver来进行解析。那Config Client在启动的时候,必然也会需要从远程服务器上获取配置加载到Environment中,这样才能使得应用程序通过@value进行属性的注入,而且我们一定可以猜测到的是,这块的工作一定又和spring中某个机制有关系。
在spring boot项目启动时,有一个prepareContext的方法,它会回调所有实现了ApplicationContextInitializer 的实例,来做一些初始化工作。
public ConfigurableApplicationContext run(String... args) {
    //省略代码...
    prepareContext(context, environment, listeners,applicationArguments, printedBanner);
    //省略代码
    return context;
}
protected void applyInitializers(ConfigurableApplicationContext context) {
   for (ApplicationContextInitializer initializer : getInitializers()) {
      Class<?> requiredType = GenericTypeResolver.resolveTypeArgument(initializer.getClass(),
            ApplicationContextInitializer.class);
      Assert.isInstanceOf(requiredType, context, "Unable to call initializer.");
      initializer.initialize(context);
   }
}
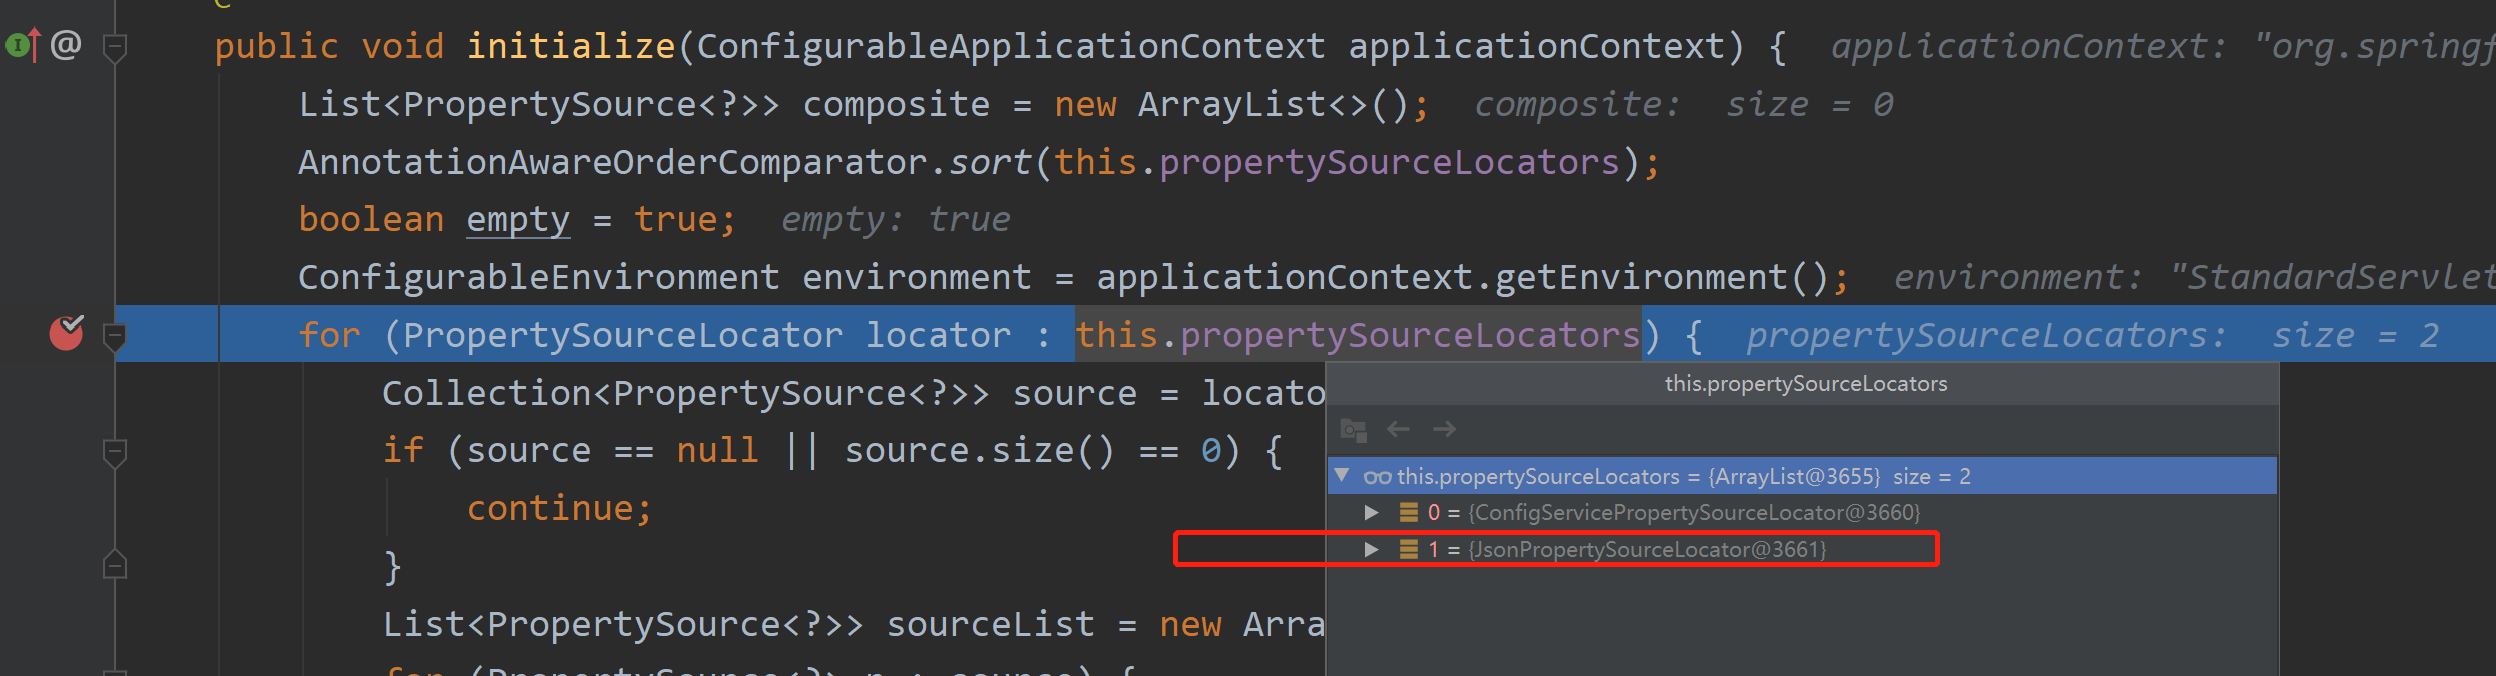
PropertySourceBootstrapConfiguration 实现了 ApplicationContextInitializer 接口,其目的就是在应用程序上下文初始化的时候做一些额外的操作.根据默认的 AnnotationAwareOrderComparator 排序规则对propertySourceLocators数组进行排序获取运行的环境上下文ConfifigurableEnvironment 遍历propertySourceLocators时 ,调用 locate 方法,传入获取的上下文environment,将source添加到PropertySource的链表中,设置source是否为空的标识标量empty。source不为空的情况,才会设置到environment中,返回Environment的可变形式,可进行的操作如addFirst、addLast,移除propertySources中的bootstrapProperties,根据config server覆写的规则,设置propertySources,处理多个active profiles的配置信息 。
public void initialize(ConfigurableApplicationContext applicationContext) {
        List<PropertySource<?>> composite = new ArrayList<>();
       //对propertySourceLocators数组进行排序,根据默认的AnnotationAwareOrderComparator
        AnnotationAwareOrderComparator.sort(this.propertySourceLocators);
        boolean empty = true;
       //获取运行的环境上下文
        ConfigurableEnvironment environment = applicationContext.getEnvironment();
        for (PropertySourceLocator locator : this.propertySourceLocators) {
      //回调所有实现PropertySourceLocator接口实例的locate方法,
            Collection<PropertySource<?>> source = locator.locateCollection(environment);
            if (source == null || source.size() == 0) {
                continue;
            }
            List<PropertySource<?>> sourceList = new ArrayList<>();
            for (PropertySource<?> p : source) {
                sourceList.add(new BootstrapPropertySource<>(p));
            }
            logger.info("Located property source: " + sourceList);
            composite.addAll(sourceList);//将source添加到数组
            empty = false;//表示propertysource不为空
        }
      //只有propertysource不为空的情况,才会设置到environment中
        if (!empty) {
            MutablePropertySources propertySources = environment.getPropertySources();
            String logConfig = environment.resolvePlaceholders("${logging.config:}");
            LogFile logFile = LogFile.get(environment);
            for (PropertySource<?> p : environment.getPropertySources()) {
                if (p.getName().startsWith(BOOTSTRAP_PROPERTY_SOURCE_NAME)) {
                    propertySources.remove(p.getName());
                }
            }
            insertPropertySources(propertySources, composite);
            reinitializeLoggingSystem(environment, logConfig, logFile);
            setLogLevels(applicationContext, environment);
            handleIncludedProfiles(environment);
        }
}
PropertySourceLoader.locateCollection,这个方法会调用子类的locate方法,来获得一个PropertySource,然后将PropertySource集合返回。接着它会调用 ConfigServicePropertySourceLocator 的locate方法。

ConfigServicePropertySourceLocator.locate :这个就是Confifig Client的关键实现了,它会通过RestTemplate调用一个远程地址获得配置信息,getRemoteEnvironment 。然后把这个配置PropertySources,然后将这个信息包装成一个OriginTrackedMapPropertySource,设置到 Composite 中。
Config Server获取配置过程
服务器端去远程仓库加载配置的流程就比较简单了,核心接口是: EnvironmentRepository ,提供了配置读取的功能。我们先从请求入口开始看
EnvironmentController :Spring Cloud Config Server提供了EnvironmentController,这样通过在浏览器访问即可从git中获取配置信息
在这个controller中,提供了很多的映射,最终会调用的是 getEnvironment 。
public Environment getEnvironment(String name, String profiles, String label,
            boolean includeOrigin) {
        name = Environment.normalize(name);
        label = Environment.normalize(label);
        Environment environment = this.repository.findOne(name, profiles, label,
                includeOrigin);
        if (!this.acceptEmpty
                && (environment == null || environment.getPropertySources().isEmpty())) {
            throw new EnvironmentNotFoundException("Profile Not found");
        }
        return environment;
}
this.repository.findOne ,调用某个repository存储组件来获得环境配置信息进行返回。repository是一个 EnvironmentRepository 对象,它有很多实现,其中就包含RedisEnvironmentRepository 、 JdbcEnvironmentRepository 等。默认实现是MultipleJGitEnvironmentRepository ,表示多个不同地址的git数据源。
MultipleJGitEnvironmentRepository.findOne :MultipleJGitEnvironmentRepository 代理遍历每个 JGitEnvironmentRepository,JGitEnvironmentRepository 下使用 NativeEnvironmentRepository 代理读取本地文件。
public Environment findOne(String application, String profile, String label,
            boolean includeOrigin) {
for (PatternMatchingJGitEnvironmentRepository repository : this.repos.values()) {
            if (repository.matches(application, profile, label)) {
                for (JGitEnvironmentRepository candidate : getRepositories(repository,
                        application, profile, label)) {
                    try {
                        if (label == null) {
                            label = candidate.getDefaultLabel();
                        }
                        Environment source = candidate.findOne(application, profile,
                                label, includeOrigin);
                        if (source != null) {
                            return source;
                        }
                    }
                    catch (Exception e) {
                        if (this.logger.isDebugEnabled()) {
                            this.logger.debug(
                                    "Cannot load configuration from " + candidate.getUri()
                                            + ", cause: (" + e.getClass().getSimpleName()
                                            + ") " + e.getMessage(),
                                    e);
                        }
                        continue;
                    }
                }
            }
        }
        JGitEnvironmentRepository candidate = getRepository(this, application, profile,
                label);
        if (label == null) {
            label = candidate.getDefaultLabel();
        }
        if (candidate == this) {
            return super.findOne(application, profile, label, includeOrigin);
        }
        return candidate.findOne(application, profile, label, includeOrigin);
}
AbstractScmEnvironmentRepository.findOne :调用抽象类的findOne方法,主要有两个核心逻辑
- 调用getLocations从GIT远程仓库同步到本地
- 使用 NativeEnvironmentRepository 委托来读取本地文件内容
@Override
    public synchronized Environment findOne(String application, String profile,
            String label, boolean includeOrigin) {
        NativeEnvironmentRepository delegate = new NativeEnvironmentRepository(getEnvironment(), new NativeEnvironmentProperties());
        Locations locations = getLocations(application, profile, label);
        delegate.setSearchLocations(locations.getLocations());
        Environment result = delegate.findOne(application, profile, "", includeOrigin);
        result.setVersion(locations.getVersion());
        result.setLabel(label);
        return this.cleaner.clean(result, getWorkingDirectory().toURI().toString(),getUri());
}
然后调用 getLocations 如下:
@Override
public synchronized Locations getLocations(String application, String profile,
            String label) {
        if (label == null) {
            label = this.defaultLabel;
        }
        String version = refresh(label);
        return new Locations(application, profile, label, version,
                getSearchLocations(getWorkingDirectory(), application, profile, label));
}
// 调用 Git 相关API 进行获取相关配置
public String refresh(String label) {
        Git git = null;
        try {
            git = createGitClient();
            if (shouldPull(git)) {
                FetchResult fetchStatus = fetch(git, label);
                if (this.deleteUntrackedBranches && fetchStatus != null) {
                    deleteUntrackedLocalBranches(fetchStatus.getTrackingRefUpdates(),
                            git);
                }
                // checkout after fetch so we can get any new branches, tags, ect.
                checkout(git, label);
                tryMerge(git, label);
            }
            else {
                // nothing to update so just checkout and merge.
                // Merge because remote branch could have been updated before
                checkout(git, label);
                tryMerge(git, label);
            }
            // always return what is currently HEAD as the version
            return git.getRepository().findRef("HEAD").getObjectId().getName();
        }
  // ........
}
总体来说,spring-cloud-config 的相关代码流程并不复杂,主要是我们需要熟悉 @Value 的原理 、Environment 的原理。这样看起来就很轻松了。
实现自定义配置中心 PropertySourceLocator (基于拓展org.springframework.cloud.bootstrap.BootstrapConfiguration)
看过了 Spring-Cloud-Config 相关源码,我们怎么基于同样的机制来实现我们的配置中心呢? 只需要以下几个步骤,以JSON 为例:
- 编写类JsonPropertySourceLocator实现 org.springframework.cloud.bootstrap.config.PropertySourceLocator 接口,实现 locate 方法
- 编写类继承 org.springframework.core.env.EnumerablePropertySource
- 新建 resource/META-INF/spring.factories 文件拓展 org.springframework.cloud.bootstrap.BootstrapConfiguration
- 新建配置源文件 json
1.编写类JsonPropertySourceLocator实现 org.springframework.cloud.bootstrap.config.PropertySourceLocator 接口,实现 locate 方法
@Component
public class JsonPropertySourceLocator implements PropertySourceLocator{

    private final static String DEFAULT_LOCATION="classpath:gupao.json";

    private final ResourceLoader resourceLoader=new DefaultResourceLoader(getClass().getClassLoader());

    @Override
    public PropertySource<?> locate(Environment environment) {
        WuzzDefineJsonPropertySource jsonPropertySource=
                new WuzzDefineJsonPropertySource("jsonPropertyConfig",mapPropertySource());
        return jsonPropertySource;
    }

    private Map<String,Object> mapPropertySource(){
        //访问远程配置?http接口。
        Resource resource=this.resourceLoader.getResource(DEFAULT_LOCATION);
        if(resource==null){
            return null;
        }
        Map<String,Object> result=new HashMap<>();
        JsonParser jsonParser= JsonParserFactory.getJsonParser();
        Map<String,Object> fileMap=jsonParser.parseMap(readFile(resource));
        processorMap("",result,fileMap);
        return result;
    }

    private void processorMap(String prefix,Map<String,Object> result,Map<String,Object> fileMap){
        if(prefix.length()>0){
            prefix+=".";
        }
        for (Map.Entry<String,Object> entrySet:fileMap.entrySet()){
            if(entrySet.getValue() instanceof Map){
                processorMap(prefix+entrySet.getKey(),result,(Map<String,Object>)entrySet.getValue());
            }else{
                result.put(prefix+entrySet.getKey(),entrySet.getValue());
            }
        }
    }

    /**
     * JSON格式
     * @param resource
     * @return
     */
    private String readFile(Resource resource){
        FileInputStream fileInputStream=null;
        try{
            fileInputStream=new FileInputStream(resource.getFile());
            byte[] readByte=new byte[(int)resource.getFile().length()]; //TODO 错误演示
            fileInputStream.read(readByte);
            return new String(readByte,"UTF-8");
        }catch (Exception e){
            e.printStackTrace();
        }finally {
            if(fileInputStream!=null){
                try {
                    fileInputStream.close();
                } catch (IOException e) {
                    e.printStackTrace();
                }
            }
        }
        return null;
    }
}
2.编写类继承 org.springframework.core.env.EnumerablePropertySource
public class WuzzDefineJsonPropertySource extends EnumerablePropertySource<Map<String, Object>> {

    public WuzzDefineJsonPropertySource(String name, Map<String, Object> source) {
        super(name, source);
    }

    @Override
    public String[] getPropertyNames() {
        return StringUtils.toStringArray(this.source.keySet());
    }

    @Override
    public Object getProperty(String name) {
        return this.source.get(name);
    }
}
3.新建 resource/META-INF/spring.factories 文件拓展 org.springframework.cloud.bootstrap.BootstrapConfiguration
org.springframework.cloud.bootstrap.BootstrapConfiguration=\
  com.wuzz.demo.sourceloader.JsonPropertySourceLocator
4.新建配置源文件 json
{
  "custom":{
    "property":{
      "hello": "hello Wuzz"
    }
  }
}
5.测试类
@Value("${custom.property.hello}")
    private String config;

@GetMapping("/config")
public String config(){
    return config;
}
启动的时候可以断点进去看看是否被加载:
访问配置好的路径 :

更多的信息请参考官网。


 被折叠的 条评论
为什么被折叠?
被折叠的 条评论
为什么被折叠?
 到【灌水乐园】发言


