


3. Java 线程
本章内容
-
创建和运行线程
-
查看线程
-
线程 API
-
线程状态
3.1 创建和运行线程
Java启动时自带一个默认main方法线程
方法一,直接使用 Thread
// 创建线程对象
Thread t = new Thread() {
    public void run() {
        // 要执行的任务
    }
};

// 启动线程,给CPU调度
t.start();
例如:
// 构造方法的参数是给线程指定名字,推荐
Thread t1 = new Thread("t1") {
    @Override
    // run 方法内实现了要执行的任务
    public void run() {
        log.debug("hello");
    }
};

t1.start();
//主线程打印任务
//log.debug("running");
输出:
19:19:00 [t1] c.ThreadStarter - hello
方法二,使用 Runnable 配合 Thread
把【线程】和【任务】(要执行的代码)分开
-
Thread 代表线程
-
Runnable 可运行的任务(线程要执行的代码)
Runnable runnable = new Runnable() {
    public void run(){
        // 要执行的任务
    }
};

// 创建线程对象
Thread t = new Thread( runnable );
// 启动线程
t.start();
例如:
// 创建任务对象
Runnable task2 = new Runnable() {
    @Override
    public void run() {
        log.debug("hello");
    }
};

// 参数1 是任务对象; 参数2 是线程名字,推荐
Thread t2 = new Thread(task2, "t2");
t2.start();
输出
19:19:00 [t2] c.ThreadStarter - hello
Java 8 以后可以使用 lambda 精简代码(@FuncationalInterface,即只含有一个抽象方法的接口,可以简化为Lambda)
// 创建任务对象
Runnable task2 = () -> log.debug("hello");

// 参数1 是任务对象; 参数2 是线程名字,推荐
Thread t2 = new Thread(task2, "t2");
t2.start()
*原理之 Thread 与 Runnable 的关系
分析 Thread 的源码,理清它与 Runnable 的关系
小结
-
方法1 是把线程和任务合并在了一起,方法2 是把线程和任务分开了
-
用 Runnable 更容易与线程池等高级 API 配合
-
用 Runnable 让任务类脱离了 Thread 继承体系,更灵活(组合大于继承,Runnable和Thread是组合关系)
方法三,FutureTask 配合 Thread
FutureTask 能够接收 Callable 类型的参数,用来处理有返回结果的情况(也是一个任务对象)
// 创建任务对象(使用Callable的Lambda表达式)
FutureTask<Integer> task3 = new FutureTask<>(() -> {
    log.debug("hello");
    Thread.sleep(1000);
    return 100;
});

// 参数1 是任务对象; 参数2 是线程名字,推荐
new Thread(task3, "t3").start();

// 主线程阻塞,同步等待 task 执行完毕的结果
Integer result = task3.get();
log.debug("结果是:{}", result);
输出
19:22:27 [t3] c.ThreadStarter - hello
19:22:25 [main] c.ThreadStarter - 结果是:100 # 阻塞等待
3.2 观察多个线程同时运行
主要是理解(多核)
-
交替执行
-
谁先谁后,不由我们控制,由CPU任务调度器控制
3.3 查看进程线程的方法
Windows
-
任务管理器可以查看进程和线程数,也可以用来杀死进程
-
tasklist 查看进程
-
taskkill 杀死进程
Linux
-
ps -fe [ | grep java ] 查看所有进程
-
ps -fT -p 查看某个进程(PID)的所有线程
-
kill 杀死进程
-
top 按大写-H 切换是否显示线程
-
top -H -p 查看某个进程(PID)的所有线程
Java
-
jps 命令查看所有 Java 进程
-
jstack 查看某个 Java 进程(PID)的所有线程状态
-
jconsole 来查看某个 Java 进程中线程的运行情况(图形界面)
jconsole 远程监控配置(cmd输入jconsole)
- 需要以如下方式运行你的 java 类
java -Djava.rmi.server.hostname=`ip地址` -Dcom.sun.management.jmxremote -
Dcom.sun.management.jmxremote.port=`连接端口` -Dcom.sun.management.jmxremote.ssl=是否安全连接 -
Dcom.sun.management.jmxremote.authenticate=是否认证 java类
- 修改 /etc/hosts 文件将 127.0.0.1 映射至主机名
如果要认证访问,还需要做如下步骤
-
复制 jmxremote.password 文件
-
修改 jmxremote.password 和 jmxremote.access 文件的权限为 600 即文件所有者可读写
-
连接时填入 controlRole(用户名),R&D(密码)
3.4 原理之线程运行
栈与栈帧
Java Virtual Machine Stacks (Java 虚拟机栈)
我们都知道 JVM 中由堆、栈、方法区所组成,其中栈内存是给谁用的呢?其实就是线程,每个线程启动后,虚拟机就会为其分配一块栈内存。
-
每个栈由多个栈帧(Frame)组成,对应着每次方法调用时所占用的内存
-
每个线程只能有一个活动栈帧,对应着当前正在执行的那个方法
-
方法执行完,就销毁栈帧,释放内存
线程上下文切换(Thread Context Switch)
因为以下一些原因导致 cpu 不再执行当前的线程,转而执行另一个线程的代码
-
线程的 cpu 时间片用完
-
垃圾回收
-
有更高优先级的线程需要运行
-
线程自己调用了 sleep、yield、wait、join、park、synchronized、lock 等方法
当 Context Switch 发生时,需要由操作系统保存当前线程的状态,并恢复另一个线程的状态,Java 中对应的概念就是程序计数器(Program Counter Register),它的作用是记住下一条 jvm 指令的执行地址,是线程私有的
-
状态包括程序计数器、虚拟机栈中每个栈帧的信息,如局部变量、操作数栈、返回地址等
-
Context Switch 频繁发生会影响性能
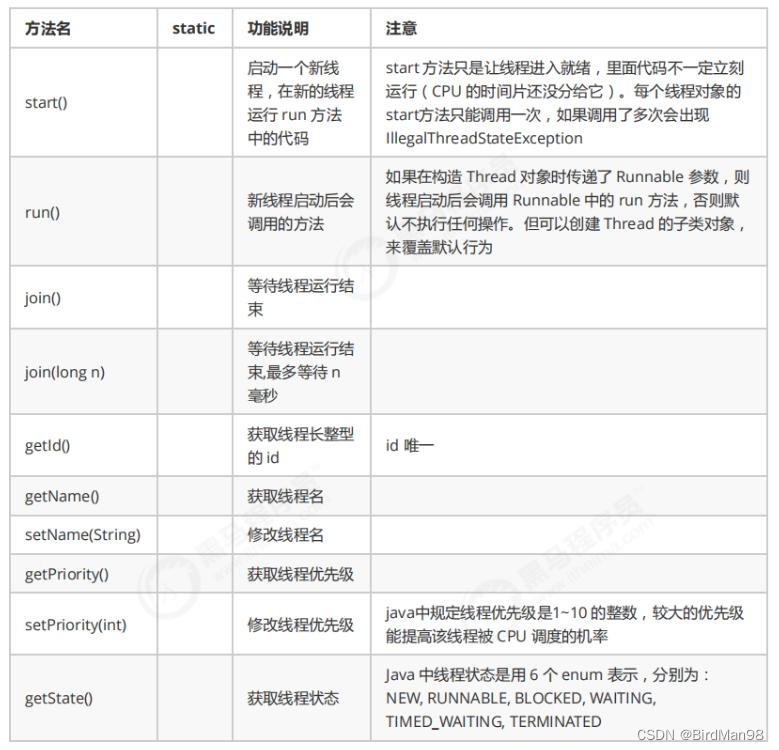
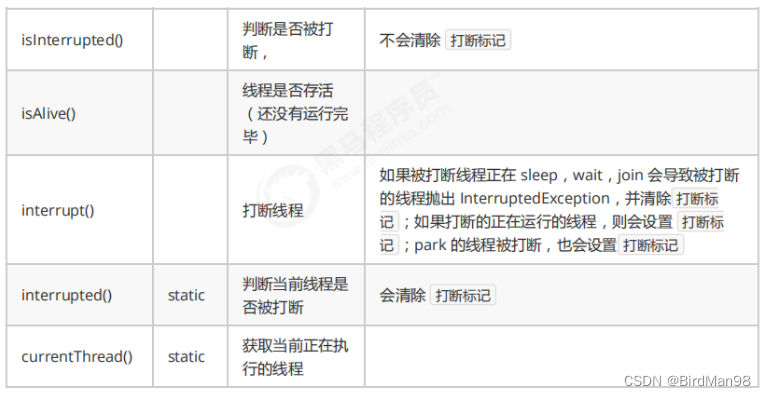
3.5 常见方法

3.6 start 与 run
调用 run
public static void main(String[] args) {
    Thread t1 = new Thread("t1") {
        @Override
        public void run() {
            log.debug(Thread.currentThread().getName());
            FileReader.read(Constants.MP4_FULL_PATH);
        }
    };

    t1.run();
    log.debug("do other things ...");
}
输出
19:39:14 [main] c.TestStart - main
19:39:14 [main] c.FileReader - read [1.mp4] start ...
19:39:18 [main] c.FileReader - read [1.mp4] end ... cost: 4227 ms
19:39:18 [main] c.TestStart - do other things ...
程序仍在 main 线程运行, FileReader.read() 方法调用还是同步的
调用 start
将上述代码的 t1.run() 改为
t1.start();
输出
19:41:30 [main] c.TestStart - do other things ...
19:41:30 [t1] c.TestStart - t1
19:41:30 [t1] c.FileReader - read [1.mp4] start ...
19:41:35 [t1] c.FileReader - read [1.mp4] end ... cost: 4542 ms
程序在 t1 线程运行, FileReader.read() 方法调用是异步的
小结
-
直接调用 run 是在主线程中执行了 run,没有启动新的线程
-
使用 start 是启动新的线程,通过新的线程间接执行run 中的代码
3.7 sleep 与 yield
sleep
-
调用 sleep 会让当前线程从 Running 进入 Timed Waiting 状态(阻塞)
-
其它线程可以使用 interrupt 方法打断正在睡眠的线程,这时 sleep 方法会抛出 InterruptedException
-
睡眠结束后的线程未必会立刻得到执行
-
建议用 TimeUnit 的 sleep 代替 Thread 的 sleep 来获得更好的可读性
yield(让出,谦让)
-
调用 yield 会让当前线程从 Running 进入 Runnable 就绪状态,然后调度执行其它线程
-
具体的实现依赖于操作系统的任务调度器(想让没让出去的情况也存在)
sleep与yield的区别
-
CPU任务调度器不会把时间片分给Timed Waiting状态的线程,但是会分配给Runnable状态的线程
-
sleep方法有时间参数,yield方法没有时间参数,是立即执行结果的
线程优先级
-
线程优先级会**提示(hint)**调度器优先调度该线程,但它仅仅是一个提示,调度器可以忽略它
-
如果 cpu 比较忙,那么优先级高的线程会获得更多的时间片,但 cpu 闲时,优先级几乎没作用
Runnable task1 = () -> {
    int count = 0;
    for (;;) {
        System.out.println("---->1 " + count++);
    }
};

Runnable task2 = () -> {
    int count = 0;
    for (;;) {
        // Thread.yield();
        System.out.println(" ---->2 " + count++);
    }
};

Thread t1 = new Thread(task1, "t1");
Thread t2 = new Thread(task2, "t2");
// t1.setPriority(Thread.MIN_PRIORITY);
// t2.setPriority(Thread.MAX_PRIORITY);

t1.start();
t2.start();
* 应用之效率(案例2)
案例-防止CPU占用100%
sleep 实现
在没有利用 cpu 来计算时,不要让 while(true) 空转浪费 cpu,这时可以使用 yield 或 sleep 来让出 cpu 的使用权给其他程序
while(true) {
    try {
        Thread.sleep(50);
    } catch (InterruptedException e) {
        e.printStackTrace();
    }
}
-
可以用 wait 或 条件变量达到类似的效果
-
不同的是,后两种都需要加锁,并且需要相应的唤醒操作,一般适用于要进行同步的场景
-
sleep 适用于无需锁同步的场景
3.8 join 方法详解
为什么需要 join
下面的代码执行,打印 r 是什么?
static int r = 0;
public static void main(String[] args) throws InterruptedException {
    test1();
}
private static void test1() throws InterruptedException {
    log.debug("开始");
    Thread t1 = new Thread(() -> {
        log.debug("开始");
        sleep(1);
        log.debug("结束");
        r = 10;
    });
    t1.start();
    log.debug("结果为:{}", r);
    log.debug("结束");
}
分析
-
因为主线程和线程 t1 是并行执行的,t1 线程需要 1 秒之后才能算出 r=10
-
而主线程一开始就要打印 r 的结果,所以只能打印出 r=0
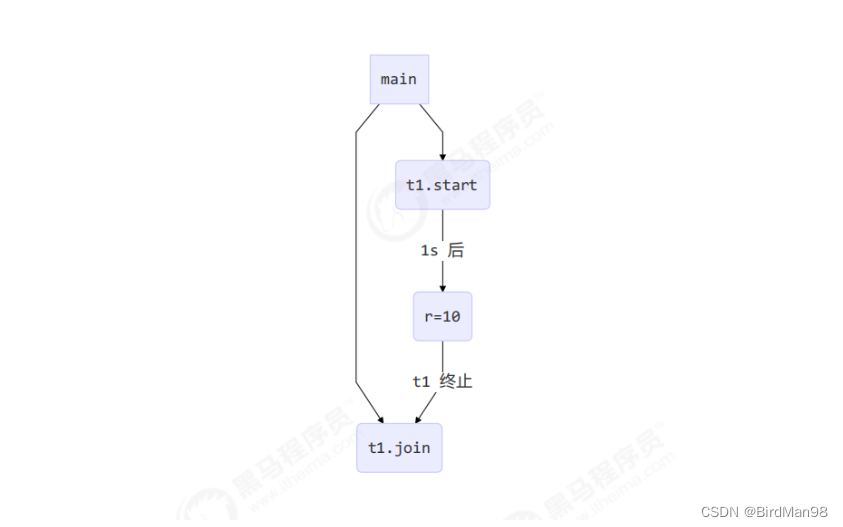
解决方法
-
用 sleep 行不行?为什么?(不知道线程花费的时间)
-
用 join,加在
t1.start()之后即可
*应用之同步(案例1)
以调用方角度来讲,如果
-
需要等待结果返回,才能继续运行就是同步
-
不需要等待结果返回,就能继续运行就是异步
等待多个结果
问,下面代码 cost 大约多少秒?
static int r1 = 0;
static int r2 = 0;
public static void main(String[] args) throws InterruptedException {
    test2();
}
private static void test2() throws InterruptedException {
    Thread t1 = new Thread(() -> {
        sleep(1);
        r1 = 10;
    });
    Thread t2 = new Thread(() -> {
        sleep(2);
        r2 = 20;
    });

    long start = System.currentTimeMillis();
    t1.start();
    t2.start();
    t1.join();
    t2.join();
    long end = System.currentTimeMillis();
    log.debug("r1: {} r2: {} cost: {}", r1, r2, end - start);
}
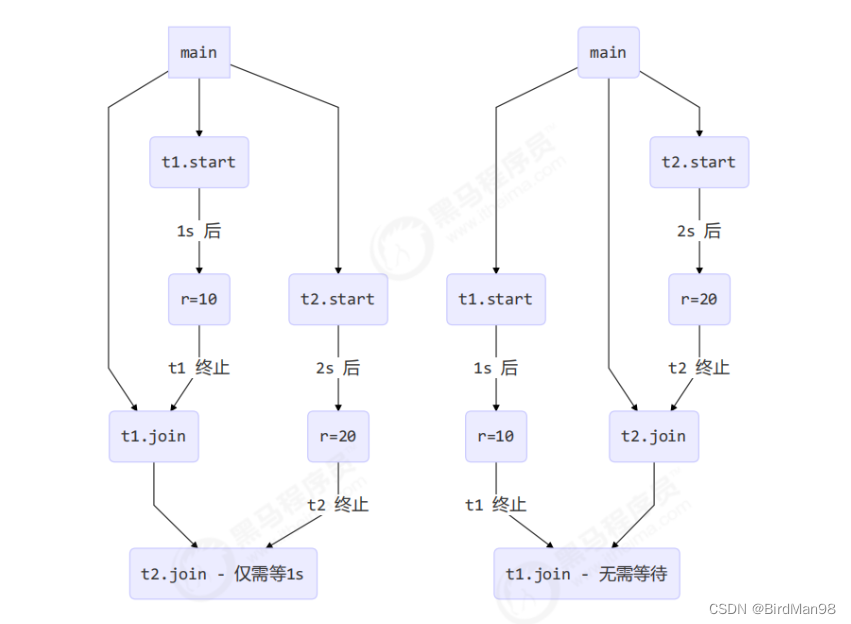
分析如下
-
第一个 join:等待 t1 时, t2 并没有停止, 而在运行
-
第二个 join:1s 后, 执行到此, t2 也运行了 1s, 因此也只需再等待 1s
如果颠倒两个 join 呢?
最终都是输出
20:45:43.239 [main] c.TestJoin - r1: 10 r2: 20 cost: 2005
有时效的 join
等够时间
static int r1 = 0;
static int r2 = 0;

public static void main(String[] args) throws InterruptedException {
    test3();
}

public static void test3() throws InterruptedException {
    Thread t1 = new Thread(() -> {
        sleep(1);
        r1 = 10;
    });
    long start = System.currentTimeMillis();
    t1.start();
    // 线程执行结束会导致 join 结束
    t1.join(1500);
    long end = System.currentTimeMillis();
    log.debug("r1: {} r2: {} cost: {}", r1, r2, end - start);
}
输出
20:48:01.320 [main] c.TestJoin - r1: 10 r2: 0 cost: 1010
没等够时间
static int r1 = 0;
static int r2 = 0;

public static void main(String[] args) throws InterruptedException {
    test3();
}

public static void test3() throws InterruptedException {
    Thread t1 = new Thread(() -> {
        sleep(2);
        r1 = 10;
    });
    long start = System.currentTimeMillis();
    t1.start();
    // 线程执行结束会导致 join 结束
    t1.join(1500);
    long end = System.currentTimeMillis();
    log.debug("r1: {} r2: {} cost: {}", r1, r2, end - start);
}
输出
20:52:15.623 [main] c.TestJoin - r1: 0 r2: 0 cost: 1502


 732
732


 被折叠的 条评论
为什么被折叠?
被折叠的 条评论
为什么被折叠?
 到【灌水乐园】发言


