文章目录
  • 一、概述
  • 二、calicoctl 安装
  • 三、calicoctl 简单使用
  • 3.1 calicoctl 认证信息配置
  • 3.2 calicoctl 操作各种资源
  • 3.3 calicoctl 操作 IPPool
  • 3.3.1 calicoctl 查看 IPPool
  • 3.3.2 calicoctl 创建 IPPool
  • 方式1:使用 calicoctl 创建 IPPool
  • 方式2:使用 kubectl 创建 IPPool
  • 3.3.3 calicoctl 将Pod应用字对应的IPPool
  • 3.3.4 calicoctl 给Pod实现固定 IP
  • 3.4 网络策略(NetworkPolicy)
  • 四、Kube-ipam
  • 1)安装kube-ipam
  • 2)子网和etcd配置
  • 3)固定IP示例演示


一、概述

这里是Calico第三篇了,我们已经学习了Calico作为一个cni插件的三个功能:
(1) 给Pod分配虚拟IP,并完成Pod之间的网络通信,包括同一Node上的Pod、不同Node上的Pod两种情况 (作为cni插件的基本功能)
(2) 给Pod分配固定IP (由Calico自定义的 IPPool 实现)
(3) 给Pod分配网络策略NetworkPolicy

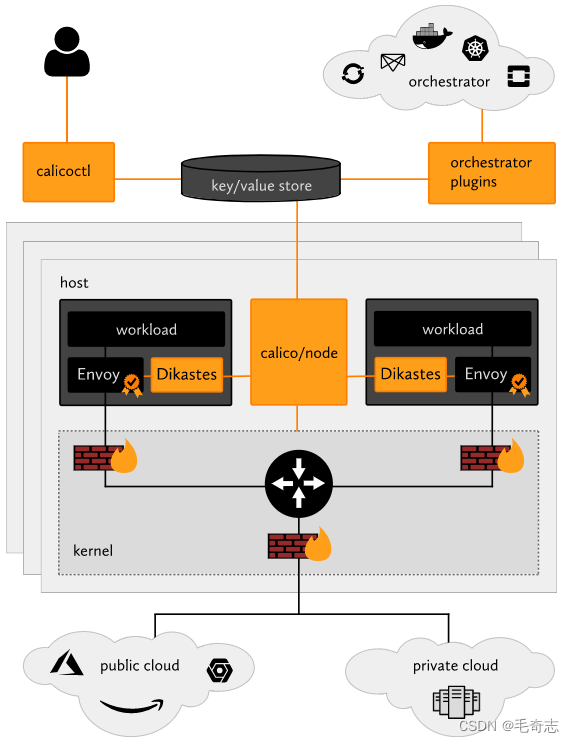
我们操作calico之前还是使用kubectl命令,但是其实这是操作k8s集群的二进制文件,calico有专门的操作自己的二进制文件calicoctl,本文来熟练使用这个二进制文件/工具。

官方文档:https://projectcalico.docs.tigera.io/reference/calicoctl/
Kubernetes_容器网络_Calico_03_calicoctl工具的使用_kubernetes

二、calicoctl 安装

wget https://github.com/projectcalico/calico/releases/download/v3.24.5/calicoctl-linux-amd64
mv calicoctl-linux-amd64 /usr/local/bin/calicoctl 
chmod +x /usr/local/bin/calicoctl

# 查看
calicoctl version
  • 1.
  • 2.
  • 3.
  • 4.
  • 5.
  • 6.

Github网络不好的话,也可以从这里下载:https://www.syjshare.com/res/225M82WB

Kubernetes_容器网络_Calico_03_calicoctl工具的使用_IP_02

三、calicoctl 简单使用

calicoctl通过读写calico的数据存储系统(datastore)进行查看或者其他各类管理操作,通常,它需要提供认证信息经由相应的数据存储完成认证。在使用Kubernetes API数据存储时,需要使用类似kubectl的认证信息完成认证。它可以通过环境变量声明的DATASTORE_TYPE和KUBECONFIG接入集群,例如以下命令格式运行calicoctl:

3.1 calicoctl 认证信息配置
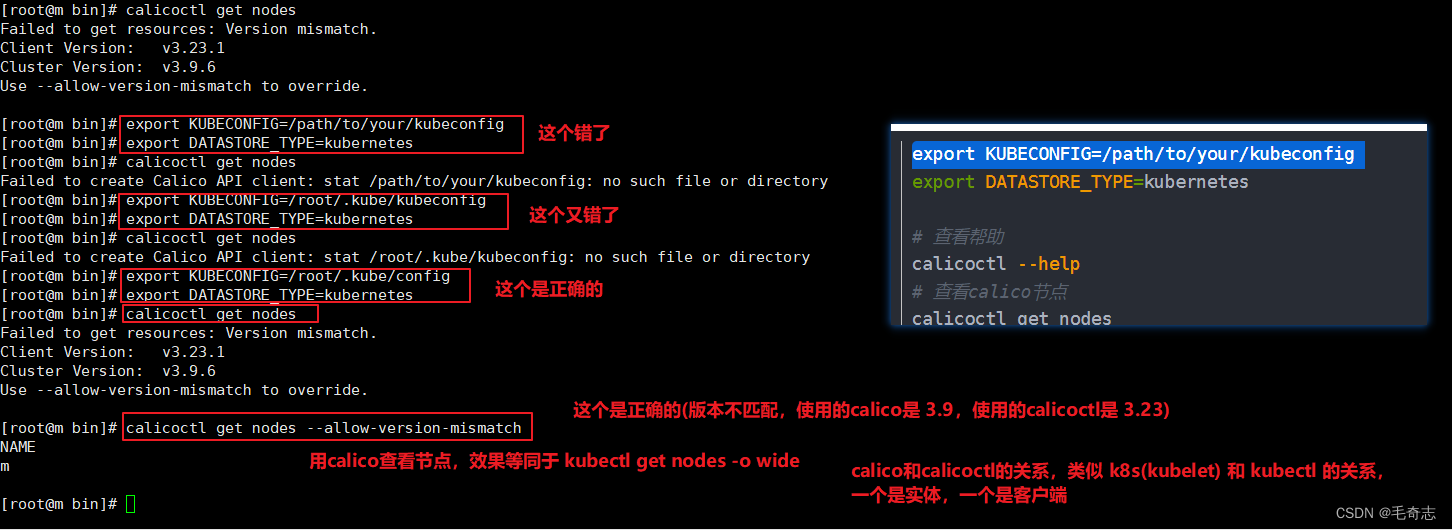
# 设置环境变量(临时方式,仅当前xshell会话生效)
export KUBECONFIG=/root/.kube/config
export DATASTORE_TYPE=kubernetes

# 设置环境变量(永久方式)
vi /etc/profile
export KUBECONFIG=/root/.kube/config
export DATASTORE_TYPE=kubernetes
source /etc/profile

# 查看帮助
calicoctl --help
# 查看calico节点
calicoctl get nodes
calicoctl get nodes --allow-version-mismatch
  • 1.
  • 2.
  • 3.
  • 4.
  • 5.
  • 6.
  • 7.
  • 8.
  • 9.
  • 10.
  • 11.
  • 12.
  • 13.
  • 14.
  • 15.

Kubernetes_容器网络_Calico_03_calicoctl工具的使用_IP_03

3.2 calicoctl 操作各种资源

calicoctl 是 Calico 客户端管理工具。 可以方便的管理 calico 网络,配置和安全策略,calicoctl 命令行提供了许多资源管理命令,允许您创建,修改,删除和查看不同的 Calico 资源,网络资源包含:node,bgpPeer,hostEndpoint,workloadEndpoint,ipPool,policy,profile等。

[root@w1 ~]# calicoctl --help --allow-version-mismatch
Usage:
  calicoctl [options] <command> [<args>...]

    create       Create a resource by file, directory or stdin.
    replace      Replace a resource by file, directory or stdin.
    apply        Apply a resource by file, directory or stdin.  This creates a resource
                 if it does not exist, and replaces a resource if it does exists.
    patch        Patch a pre-exisiting resource in place.
    delete       Delete a resource identified by file, directory, stdin or resource type and
                 name.
    get          Get a resource identified by file, directory, stdin or resource type and
                 name.
    label        Add or update labels of resources.
    convert      Convert config files between different API versions.
    ipam         IP address management.
    node         Calico node management.
    version      Display the version of this binary.
    datastore    Calico datastore management.

Options:
  -h --help                    Show this screen.
  -l --log-level=<level>       Set the log level (one of panic, fatal, error,
                               warn, info, debug) [default: panic]
     --context=<context>       The name of the kubeconfig context to use.
     --allow-version-mismatch  Allow client and cluster versions mismatch.

Description:
  The calicoctl command line tool is used to manage Calico network and security
  policy, to view and manage endpoint configuration, and to manage a Calico
  node instance.

  See 'calicoctl <command> --help' to read about a specific subcommand.
  • 1.
  • 2.
  • 3.
  • 4.
  • 5.
  • 6.
  • 7.
  • 8.
  • 9.
  • 10.
  • 11.
  • 12.
  • 13.
  • 14.
  • 15.
  • 16.
  • 17.
  • 18.
  • 19.
  • 20.
  • 21.
  • 22.
  • 23.
  • 24.
  • 25.
  • 26.
  • 27.
  • 28.
  • 29.
  • 30.
  • 31.
  • 32.
  • 33.
kubectl api-resources | grep calico
  • 1.

Kubernetes_容器网络_Calico_03_calicoctl工具的使用_IP_04


从这里知道,calicoctl + verb + resource 构成整个命令,其中,verb 包括从 calicoctl --help 里面看到的所有的,resource 包括从 kubectl api-resources | grep calico 看到的所有的资源。

calicoctl get hgpPeer --allow-version-mismatch
calicoctl get hgpPeer -A --allow-version-mismatch
calicoctl get hostEndpoint --allow-version-mismatch
calicoctl get hostEndpoint -A --allow-version-mismatch
  • 1.
  • 2.
  • 3.
  • 4.

Kubernetes_容器网络_Calico_03_calicoctl工具的使用_ico_05

calicoctl get workloadEndpoint --allow-version-mismatch
calicoctl get workloadEndpoint -A --allow-version-mismatch
  • 1.
  • 2.

Kubernetes_容器网络_Calico_03_calicoctl工具的使用_IP_06

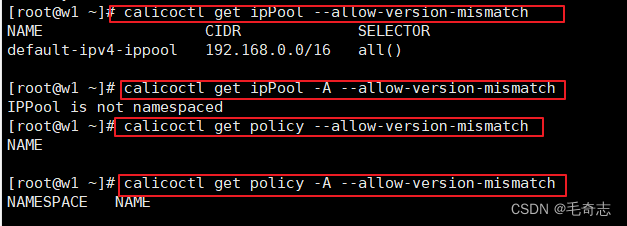
calicoctl get ipPool --allow-version-mismatch
calicoctl get ipPool -A --allow-version-mismatch
calicoctl get policy --allow-version-mismatch
calicoctl get policy -A --allow-version-mismatch
  • 1.
  • 2.
  • 3.
  • 4.

Kubernetes_容器网络_Calico_03_calicoctl工具的使用_kubernetes_07

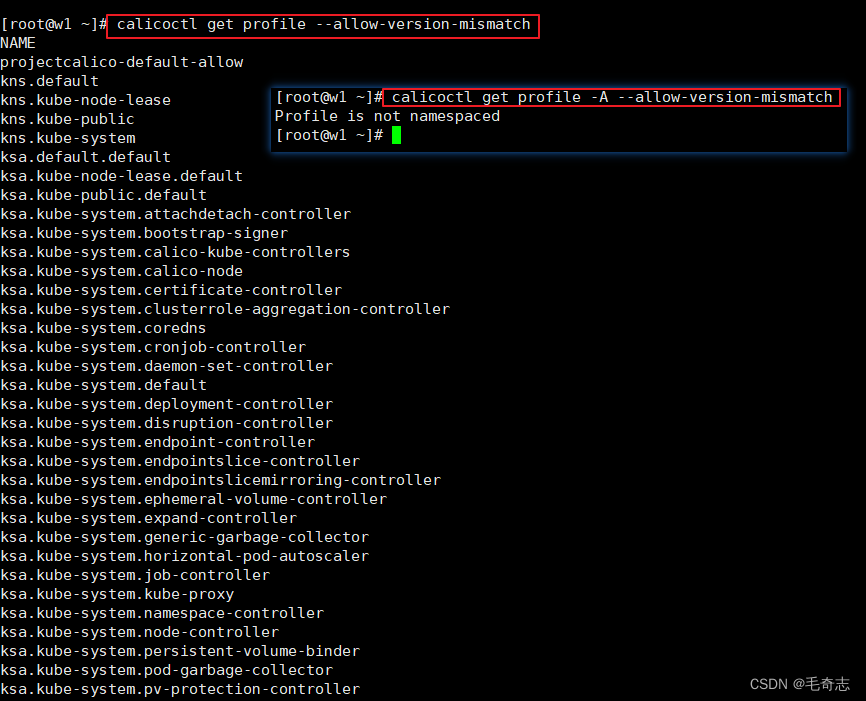
calicoctl get profile --allow-version-mismatch
calicoctl get profile -A --allow-version-mismatch
  • 1.
  • 2.

Kubernetes_容器网络_Calico_03_calicoctl工具的使用_linux_08

3.3 calicoctl 操作 IPPool

3.3.1 calicoctl 查看 IPPool

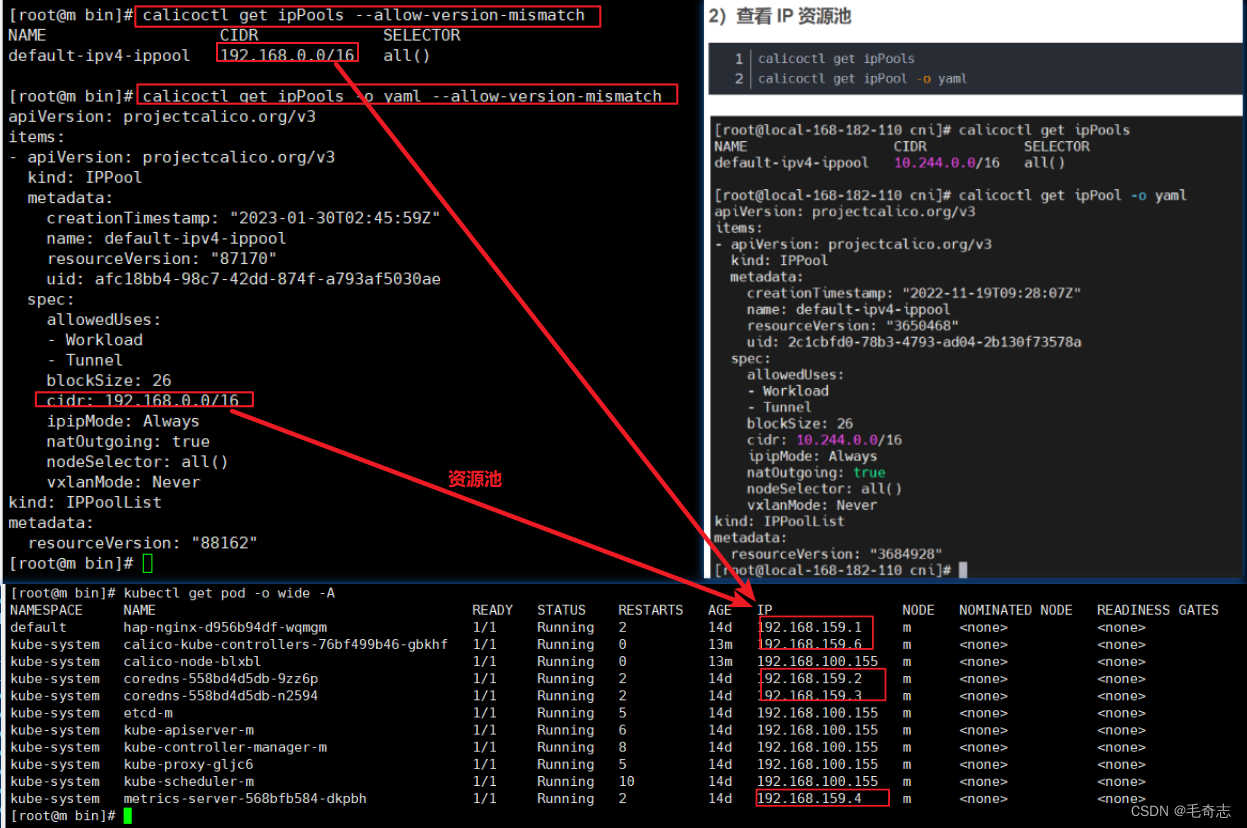
使用calicoctl命令,可以查看calico生成虚拟ip的资源池
Kubernetes_容器网络_Calico_03_calicoctl工具的使用_IP_09

3.3.2 calicoctl 创建 IPPool

IP 池 是 Calico 使用的 IP 地址范围 工作负载终端节点(workloadendpoints)。

使用 calicoctl create -f ippool.yaml , 则 apiVersion: projectcalico.org/v3
使用 kubectl apply -f ippool.yaml , 则 apiVersion: crd.projectcalico.org/v1

方式1:使用 calicoctl 创建 IPPool

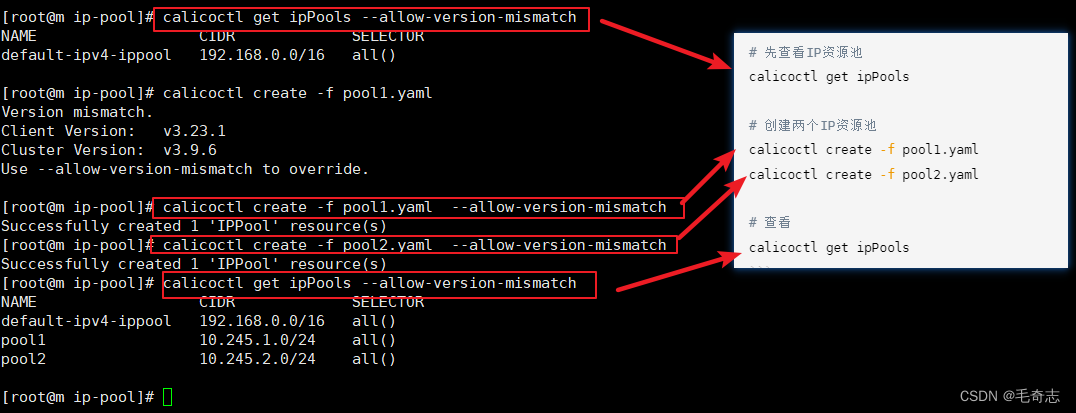
定义两个在此群集中使用的 IP 池。 您可以仅使用一个 池,但我们定义了两个,编排操作如下:

cat > pool1.yaml <<EOF
apiVersion: projectcalico.org/v3
kind: IPPool
metadata:
  name: pool1
spec:
  cidr: 10.245.1.0/24
  ipipMode: Never
  natOutgoing: true
  disabled: false
  nodeSelector: all()
EOF

cat > pool2.yaml <<EOF
apiVersion: projectcalico.org/v3
kind: IPPool
metadata:
  name: pool2
spec:
  cidr: 10.245.2.0/24
  ipipMode: Never
  natOutgoing: true
  disabled: true
  nodeSelector: all()
EOF
  • 1.
  • 2.
  • 3.
  • 4.
  • 5.
  • 6.
  • 7.
  • 8.
  • 9.
  • 10.
  • 11.
  • 12.
  • 13.
  • 14.
  • 15.
  • 16.
  • 17.
  • 18.
  • 19.
  • 20.
  • 21.
  • 22.
  • 23.
  • 24.
  • 25.

执行并查看

# 先查看IP资源池
calicoctl get ipPools

# 创建两个IP资源池
calicoctl create -f pool1.yaml
calicoctl create -f pool2.yaml

# 查看
calicoctl get ipPools
  • 1.
  • 2.
  • 3.
  • 4.
  • 5.
  • 6.
  • 7.
  • 8.
  • 9.

Kubernetes_容器网络_Calico_03_calicoctl工具的使用_IP_10

方式2:使用 kubectl 创建 IPPool

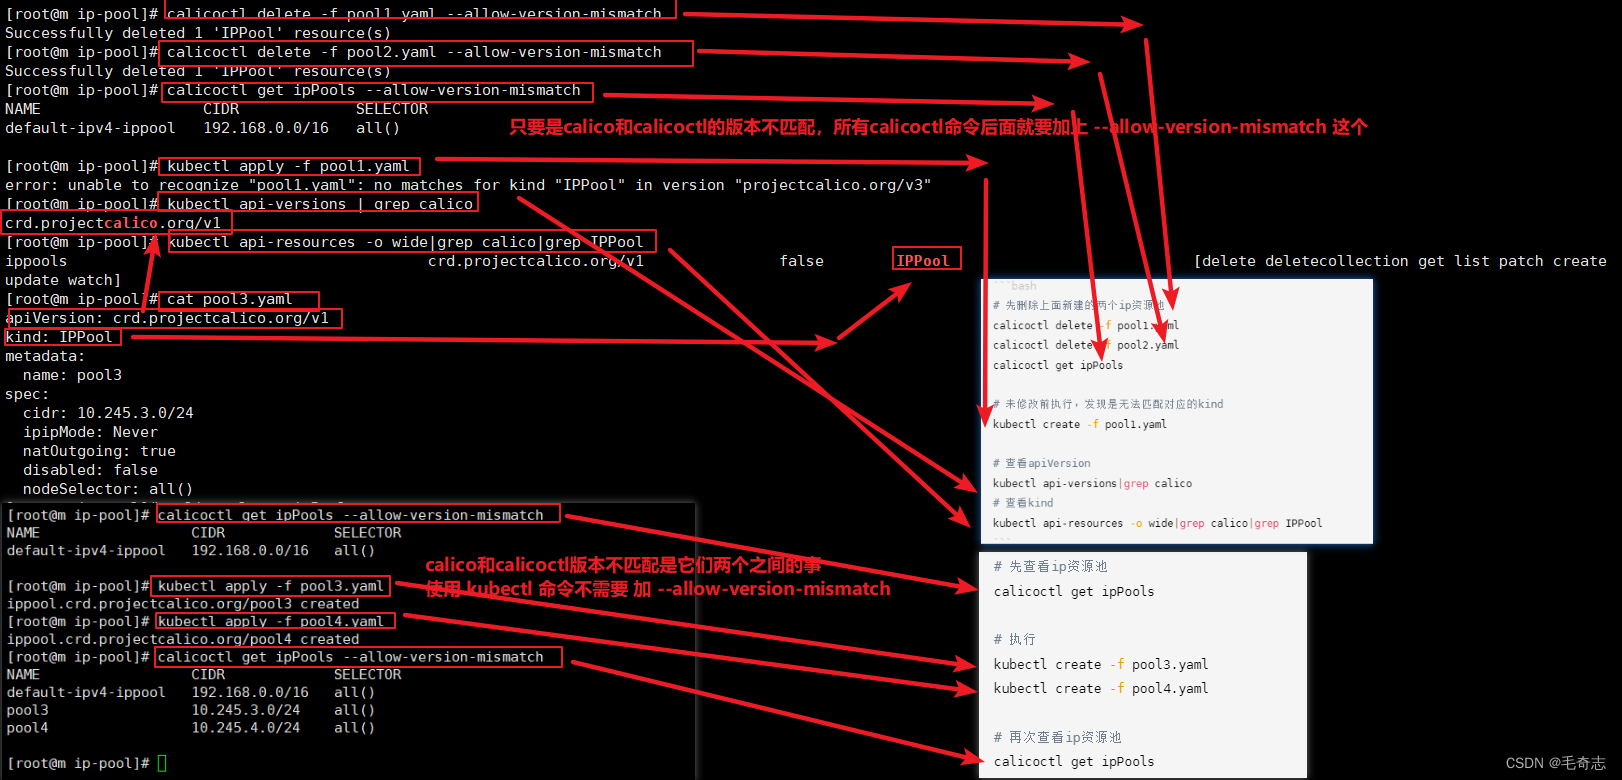
如果使用kubectl创建,就必须查询apiVersion和kind

# 先删除上面新建的两个ip资源池
calicoctl delete -f pool1.yaml
calicoctl delete -f pool2.yaml
calicoctl get ipPools

# 未修改前执行,发现是无法匹配对应的kind
kubectl apply/create -f pool1.yaml

# 查看apiVersion
kubectl api-versions|grep calico
# 查看kind
kubectl api-resources -o wide|grep calico|grep IPPool
  • 1.
  • 2.
  • 3.
  • 4.
  • 5.
  • 6.
  • 7.
  • 8.
  • 9.
  • 10.
  • 11.
  • 12.

Kubernetes_容器网络_Calico_03_calicoctl工具的使用_linux_11


修改

# 这里只需要把apiVersion换掉即可,换成 apiVersion: crd.projectcalico.org/v1
cat > pool3.yaml <<EOF
apiVersion: crd.projectcalico.org/v1
kind: IPPool
metadata:
  name: pool3
spec:
  cidr: 10.245.3.0/24
  ipipMode: Never
  natOutgoing: true
  disabled: false
  nodeSelector: all()
EOF

cat > pool4.yaml <<EOF
apiVersion: crd.projectcalico.org/v1
kind: IPPool
metadata:
  name: pool4
spec:
  cidr: 10.245.4.0/24
  ipipMode: Never
  natOutgoing: true
  disabled: true
  nodeSelector: all()
EOF

# 先查看ip资源池
calicoctl get ipPools

# 执行
kubectl create -f pool3.yaml
kubectl create -f pool4.yaml

# 再次查看ip资源池
calicoctl get ipPools
  • 1.
  • 2.
  • 3.
  • 4.
  • 5.
  • 6.
  • 7.
  • 8.
  • 9.
  • 10.
  • 11.
  • 12.
  • 13.
  • 14.
  • 15.
  • 16.
  • 17.
  • 18.
  • 19.
  • 20.
  • 21.
  • 22.
  • 23.
  • 24.
  • 25.
  • 26.
  • 27.
  • 28.
  • 29.
  • 30.
  • 31.
  • 32.
  • 33.
  • 34.
  • 35.
  • 36.

Kubernetes_容器网络_Calico_03_calicoctl工具的使用_linux_12


Kubernetes_容器网络_Calico_03_calicoctl工具的使用_docker_13

注意:这里的 --allow-version-mismatch 应该是跳过一个版本不匹配检查之类的。

3.3.3 calicoctl 将Pod应用字对应的IPPool

Pod应用字对应的IPPool:利用注解cni.projectcalico.org/ipv4pools。
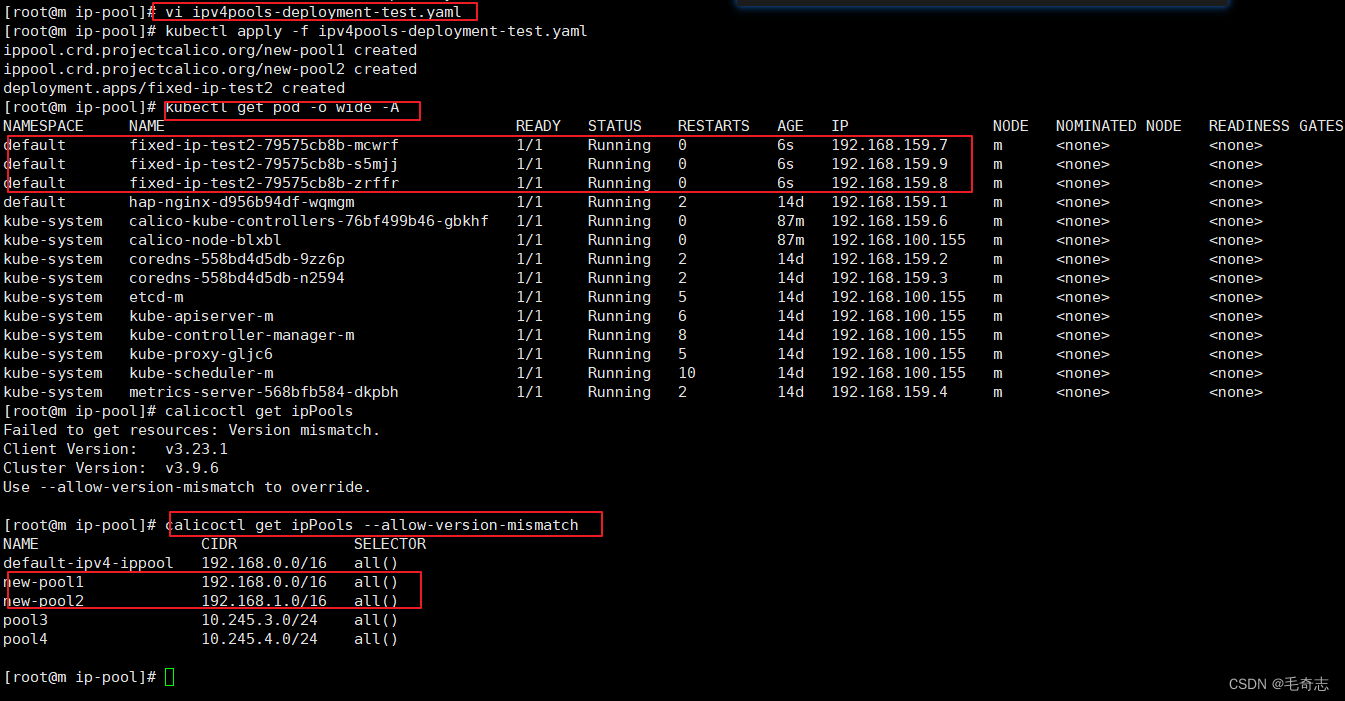
cat > ipv4pools-deployment-test.yaml <<EOF
# apiVersion: projectcalico.org/v3
apiVersion: crd.projectcalico.org/v1
kind: IPPool
metadata:
  name: new-pool1
spec:
  blockSize: 31
  cidr: 192.168.0.0/16
  ipipMode: Never
  natOutgoing: true
---
# apiVersion: projectcalico.org/v3
apiVersion: crd.projectcalico.org/v1
kind: IPPool
metadata:
  name: new-pool2
spec:
  blockSize: 31
  cidr: 192.168.1.0/16
  ipipMode: Never
  natOutgoing: true
---
apiVersion: apps/v1
kind: Deployment
metadata:
  name: fixed-ip-test2
  namespace: default
  labels:
    k8s-app: cloudnativer-test
spec:
  replicas: 3
  strategy:
    type: RollingUpdate
    rollingUpdate:
      maxUnavailable: 1
  selector:
    matchLabels:
      k8s-app: cloudnativer-test
  template:
    metadata:
      labels:
        k8s-app: cloudnativer-test
      annotations:
        # 【注意】不能使用单引号
        "cni.projectcalico.org/ipv4pools": "[\"new-pool1\",\"new-pool2\"]"
    spec:
      containers:
      - name: fixed-ip-test
        image: nginx:latest
        imagePullPolicy: IfNotPresent
        ports:
        - name: http
          containerPort: 80
EOF
  • 1.
  • 2.
  • 3.
  • 4.
  • 5.
  • 6.
  • 7.
  • 8.
  • 9.
  • 10.
  • 11.
  • 12.
  • 13.
  • 14.
  • 15.
  • 16.
  • 17.
  • 18.
  • 19.
  • 20.
  • 21.
  • 22.
  • 23.
  • 24.
  • 25.
  • 26.
  • 27.
  • 28.
  • 29.
  • 30.
  • 31.
  • 32.
  • 33.
  • 34.
  • 35.
  • 36.
  • 37.
  • 38.
  • 39.
  • 40.
  • 41.
  • 42.
  • 43.
  • 44.
  • 45.
  • 46.
  • 47.
  • 48.
  • 49.
  • 50.
  • 51.
  • 52.
  • 53.
  • 54.
  • 55.

Kubernetes_容器网络_Calico_03_calicoctl工具的使用_docker_14

3.3.4 calicoctl 给Pod实现固定 IP

calicoctl/kubectl 给Pod实现固定 IP :利用注解 cni.projectcalico.org/ipAddrs
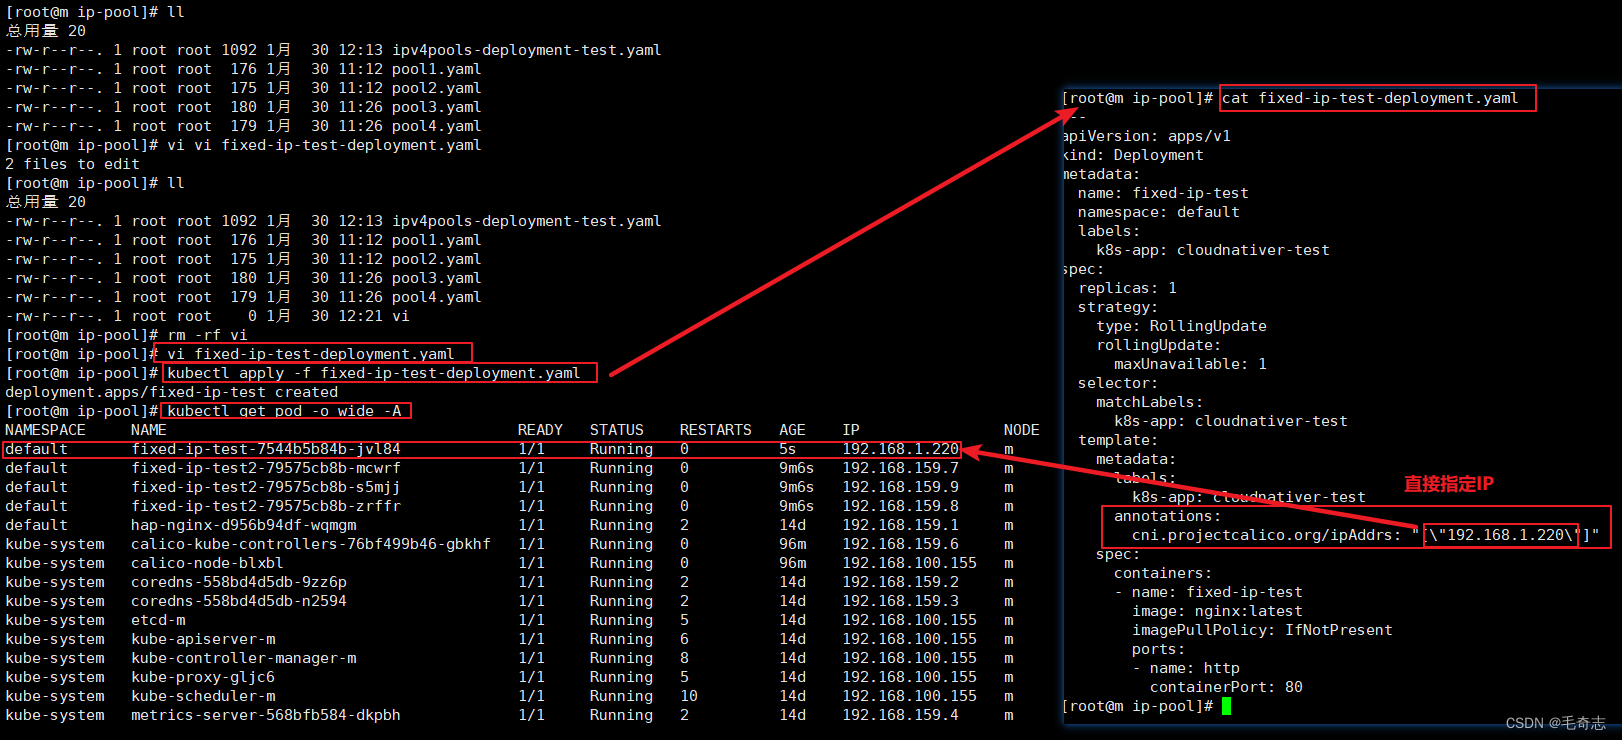
# vi fixed-ip-test-deployment.yaml
---
apiVersion: apps/v1
kind: Deployment
metadata:
  name: fixed-ip-test
  namespace: default
  labels:
    k8s-app: cloudnativer-test
spec:
  replicas: 1
  strategy:
    type: RollingUpdate
    rollingUpdate:
      maxUnavailable: 1
  selector:
    matchLabels:
      k8s-app: cloudnativer-test
  template:
    metadata:
      labels:
        k8s-app: cloudnativer-test
      annotations:
        cni.projectcalico.org/ipAddrs: "[\"192.168.1.220\"]"
    spec:
      containers:
      - name: fixed-ip-test
        image: nginx:latest
        imagePullPolicy: IfNotPresent
        ports:
        - name: http
          containerPort: 80
  • 1.
  • 2.
  • 3.
  • 4.
  • 5.
  • 6.
  • 7.
  • 8.
  • 9.
  • 10.
  • 11.
  • 12.
  • 13.
  • 14.
  • 15.
  • 16.
  • 17.
  • 18.
  • 19.
  • 20.
  • 21.
  • 22.
  • 23.
  • 24.
  • 25.
  • 26.
  • 27.
  • 28.
  • 29.
  • 30.
  • 31.
  • 32.

Kubernetes_容器网络_Calico_03_calicoctl工具的使用_linux_15

3.4 网络策略(NetworkPolicy)

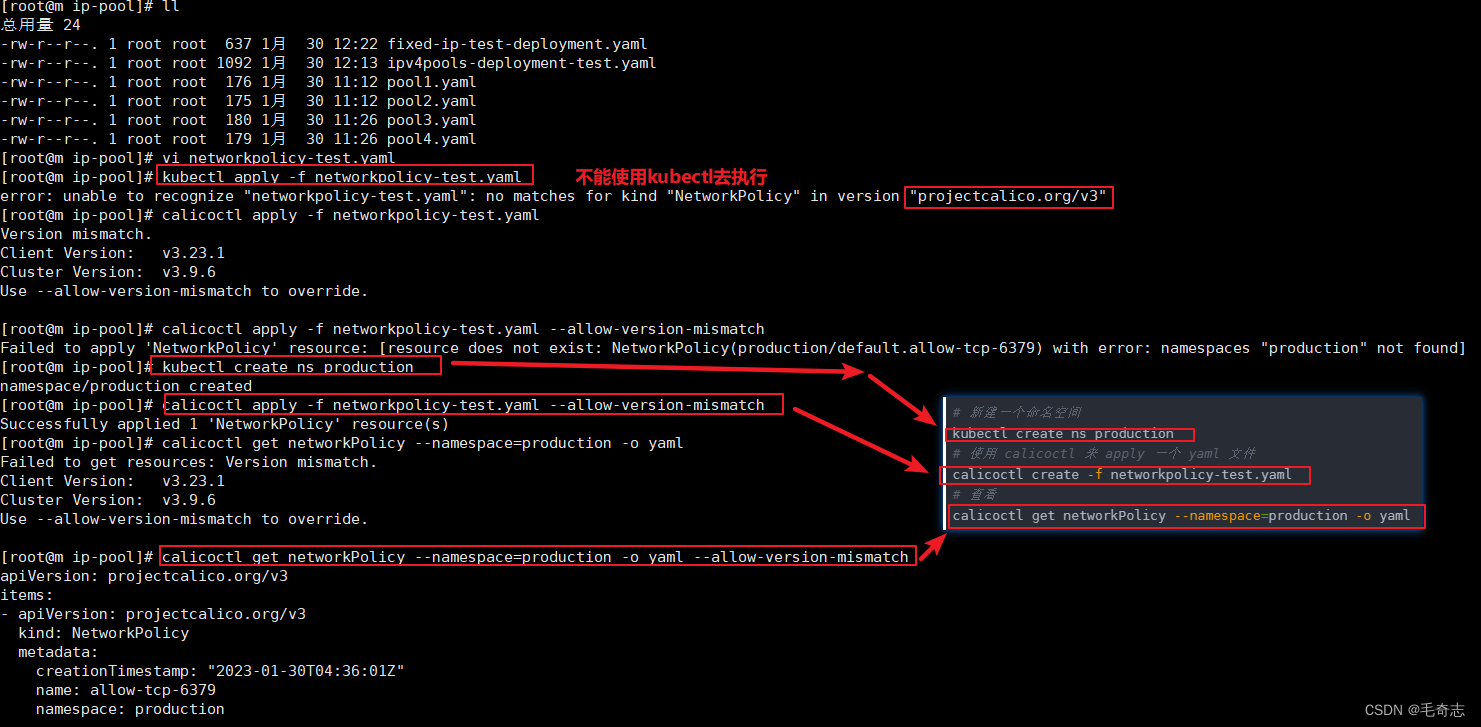
网络策略资源 (NetworkPolicy) 表示应用的一组有序规则 到与 标签选择器。NetworkPolicy 是命名空间资源。 NetworkPolicy 在特定命名空间中 仅适用于 工作负载终端节点资源 在该命名空间中。两个资源位于同一命名空间中,如果 namespace 两者上的值设置相同。 看 全局网络策略资源 对于非命名空间网络策略。

【示例】此示例策略允许来自 TCP 流量 frontend 端口 6379 的终结点 database 端点。

# vim networkpolicy-test.yaml
apiVersion: projectcalico.org/v3
kind: NetworkPolicy
metadata:
  name: allow-tcp-6379
  namespace: production
spec:
  selector: role == 'database'
  types:
  - Ingress
  - Egress
  ingress:
  - action: Allow
    metadata:
      annotations:
        from: frontend
        to: database
    protocol: TCP
    # source 源端口,destination 终点端口
    source:
      selector: role == 'frontend'
    destination:
      ports:
      - 6379
  egress:
  - action: Allow
  • 1.
  • 2.
  • 3.
  • 4.
  • 5.
  • 6.
  • 7.
  • 8.
  • 9.
  • 10.
  • 11.
  • 12.
  • 13.
  • 14.
  • 15.
  • 16.
  • 17.
  • 18.
  • 19.
  • 20.
  • 21.
  • 22.
  • 23.
  • 24.
  • 25.
  • 26.

执行

# 新建一个命名空间
kubectl create ns production
# 使用 calicoctl 来 apply 一个 yaml 文件
calicoctl create -f networkpolicy-test.yaml
# 查看
calicoctl get networkPolicy --namespace=production -o yaml
  • 1.
  • 2.
  • 3.
  • 4.
  • 5.
  • 6.

Kubernetes_容器网络_Calico_03_calicoctl工具的使用_IP_16

想了解更多网络策略,可以查看官方文档:https://projectcalico.docs.tigera.io/reference/resources/networkpolicy

四、Kube-ipam

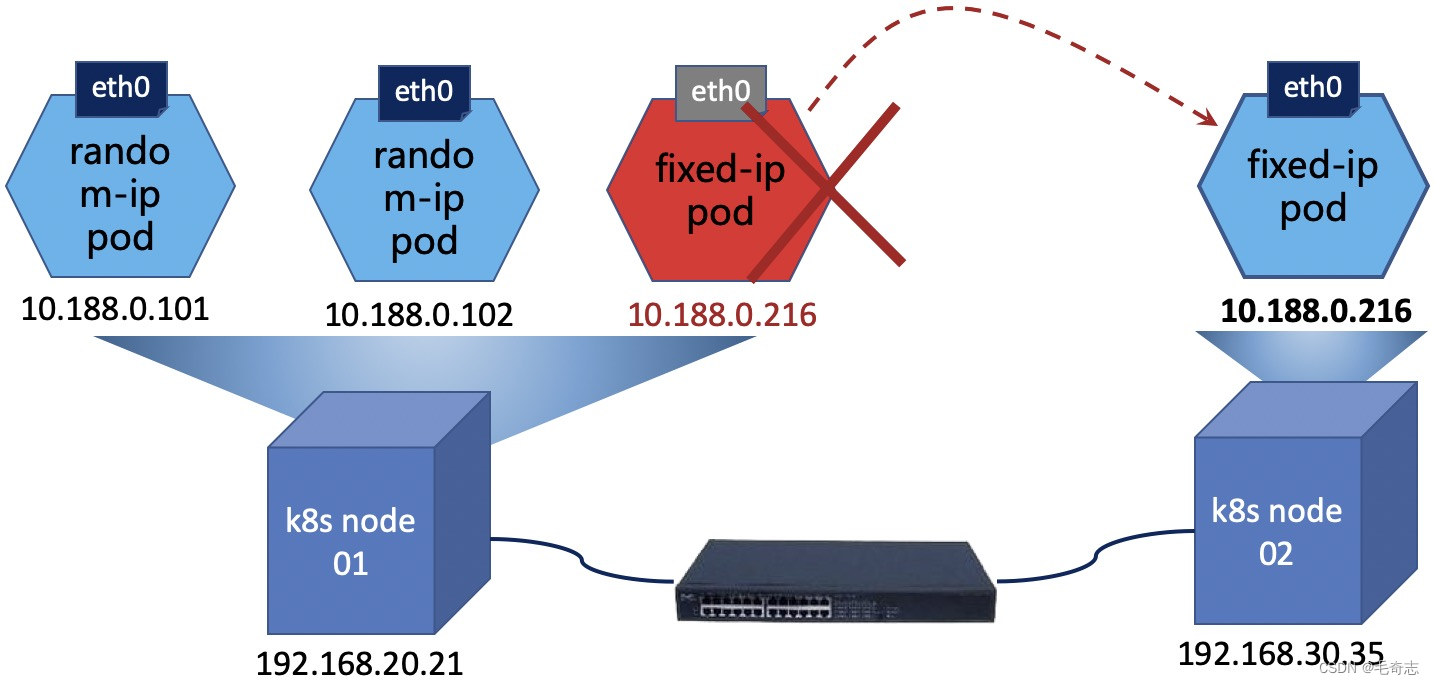
Kube-ipam 基于etcd分布式存储实现kubernetes动态IP网络分配管理,确保集群中IP地址的唯一性。Kube-ipam支持给kubernetes集群中的Pod固定IP地址,同时支持resolv.conf的DNS配置。这个需要基于网络插件(例如:macvlan、ipvlan、kube-router、bridge、calico等),这里就使用calico网络插件来实现。

一些场景往往对IP地址有依赖,需要使用固定IP地址的Pod,可以使用kube-ipam轻松解决这类问题。例如,mysql主从架构的时候,主database与从database之间的同步;例如keepalived做集群HA的时候,两个节点之间检测通信等;例如某些安全防护设备,需要基于IP地址进行网络安全访问策略限制的场景等。

GitHub地址:https://github.com/cloudnativer/kube-ipam
Kubernetes_容器网络_Calico_03_calicoctl工具的使用_IP_17

1)安装kube-ipam

请确保你的kubelet正确的配置了network-plugin、cni-conf-dir 和 cni-bin-dir 参数。下面给出一个kubelet的配置示例供你参考:

# vi /usr/lib/systemd/system/kubelet.service
# ...
ExecStart=/usr/local/bin/kubelet \
--network-plugin=cni \
--cni-conf-dir=/etc/cni/net.d \
--cni-bin-dir=/opt/cni/bin/ \

# 重启kubelet
systemctl daemon-reload
systemctl restart kubelet
  • 1.
  • 2.
  • 3.
  • 4.
  • 5.
  • 6.
  • 7.
  • 8.
  • 9.
  • 10.

下载安装 kube-ipam

wget https://github.com/cloudnativer/kube-ipam/releases/download/v0.2.0/kube-ipam-v0.2.0-x86.tgz
tar -zxvf kube-ipam-v0.2.0-x86.tgz
mv kube-ipam/kube-ipam /opt/cni/bin/kube-ipam
  • 1.
  • 2.
  • 3.

2)子网和etcd配置

你可以通过 subnet 参数设置IP子网信息,通过 gateway 设置网关信息。你可以通过 etcdConfig 配置etcd的证书和endpoint地址。编辑所有kubernetes node主机的 /etc/cni/net.d/1-kube-ipam.conf 文件。

# 类型
#"type": "calico",
# 主网卡名称
#"master": "ens33",
# cat /etc/cni/net.d/1-kube-ipam.conf
{
        "cniVersion":"0.3.1",
        "name": "k8snetwork",
        "type": "calico",
        "master": "ens33",
        "ipam": {
                "name": "kube-subnet",
                "type": "kube-ipam",
                "kubeConfig": "/etc/kubernetes/pki/kubectl.kubeconfig"
                "etcdConfig": {
                        "etcdURL": "https://192.168.1.50:2379,https://192.168.1.58:2379,https://192.168.1.63:2379",
                        "etcdCertFile": "/etc/kubernetes/pki/etcd.pem",
                        "etcdKeyFile": "/etc/kubernetes/pki/etcd-key.pem",
                        "etcdTrustedCAFileFile": "/etc/kubernetes/pki/ca.pem"
                },
                "subnet": "10.188.0.0/16",
                "fixedStart": "10.188.0.10",
                "fixedEnd": "10.188.0.255",
                "rangeStart": "10.188.1.0",
                "rangeEnd": "10.188.255.254",
                "gateway": "10.188.0.1",
                "routes": [{
                        "dst": "0.0.0.0/0"
                }],
                "resolvConf": "/etc/resolv.conf"
        }
}
  • 1.
  • 2.
  • 3.
  • 4.
  • 5.
  • 6.
  • 7.
  • 8.
  • 9.
  • 10.
  • 11.
  • 12.
  • 13.
  • 14.
  • 15.
  • 16.
  • 17.
  • 18.
  • 19.
  • 20.
  • 21.
  • 22.
  • 23.
  • 24.
  • 25.
  • 26.
  • 27.
  • 28.
  • 29.
  • 30.
  • 31.
  • 32.

3)固定IP示例演示

# cat fixed-ip-test-Deployment.yaml
---
apiVersion: apps/v1
kind: Deployment
metadata:
  name: fixed-ip-test
  namespace: default
  labels:
    k8s-app: cloudnativer-test
spec:
  replicas: 1
  strategy:
    type: RollingUpdate
    rollingUpdate:
      maxUnavailable: 1
  selector:
    matchLabels:
      k8s-app: cloudnativer-test
  template:
    metadata:
      labels:
        k8s-app: cloudnativer-test
      annotations:
        kube-ipam.ip: "10.188.0.216"
        kube-ipam.netmask: "255.255.0.0"
        kube-ipam.gateway: "10.188.0.1"
    spec:
      containers:
      - name: fixed-ip-test
        image: nginx:1.7.9
        imagePullPolicy: IfNotPresent
        ports:
        - name: http
          containerPort: 80  
---
  • 1.
  • 2.
  • 3.
  • 4.
  • 5.
  • 6.
  • 7.
  • 8.
  • 9.
  • 10.
  • 11.
  • 12.
  • 13.
  • 14.
  • 15.
  • 16.
  • 17.
  • 18.
  • 19.
  • 20.
  • 21.
  • 22.
  • 23.
  • 24.
  • 25.
  • 26.
  • 27.
  • 28.
  • 29.
  • 30.
  • 31.
  • 32.
  • 33.
  • 34.
  • 35.

这里没有真正的去验证,只是稍微说一下,还可以通过kube-ipam进行固定IP配置。我们使用 Calico IPPool 就可以做到了。