


1. SpringBoot入门
1.1 快速构建
-
准备工作
-
已经连接稳定良好的外网
-
依赖最好是提前下载好的(目前使用这种方式,默认选用
springboot是2.7.0)
-
-
操作步骤
-
新建模块,新建好之后项目整合就好了。
-
编写业务代码,
Controller
注意:
使用SpringBoot构建Spring项目,业务代码编写方式完全一样。简化的是配置和依赖导入。
1.2 基于SpringBoot官网创建项目
下载下来zip包就是项目,解压导入Idea中即可。
1.3 手动构建
新建一个使用maven管理的Java项目,在项目pom.xml中添加parent指向SpringBoot根启动器,并添加一个插件
-
pom.xml<groupId>com.itheima</groupId> <artifactId>springboot-helloworld</artifactId> <version>1.0-SNAPSHOT</version> <!--springboot工程需要继承的父工程--> <parent> <groupId>org.springframework.boot</groupId> <artifactId>spring-boot-starter-parent</artifactId> <version>2.7.0</version> </parent> <dependencies> <!--web开发的起步依赖/场景启动器--> <dependency> <groupId>org.springframework.boot</groupId> <artifactId>spring-boot-starter-web</artifactId> </dependency> </dependencies> <build> <plugins> <!-- 这个插件要添加,否则项目打成jar包之后无法运行 --> <plugin> <groupId>org.springframework.boot</groupId> <artifactId>spring-boot-maven-plugin</artifactId> </plugin> </plugins> </build> <!-- 老师的私服 --> <repositories> <repository> <!-- 依赖仓库id,不可重复。repositories可以配置多个仓库,如果ID重复后面配置会覆盖之前的配置 --> <id>dependencies_Repositories</id> <!-- 私服仓库地址,即nexus仓库组的地址 --> <url>http://192.168.36.200:8081/repository/maven-public/</url> <!-- 是否下载releases版本构件 --> <releases> <enabled>true</enabled> </releases> <!-- 是否下载snapshots版本构件 --> <snapshots> <enabled>true</enabled> </snapshots> </repository> </repositories> <!-- 配置插件从私服下载 --> <pluginRepositories> <pluginRepository> <id>plugins_Repositories</id> <url>http://192.168.36.200:8081/repository/maven-public/</url> <!-- 是否下载release版本构件 --> <releases> <enabled>true</enabled> </releases> <!-- 是否下载snapshots版本构件 --> <snapshots> <enabled>true</enabled> </snapshots> </pluginRepository> </pluginRepositories> -
编写启动类/引导类
package com.itheima; /* 引导类。SpringBoot项目的入口 该类名字建议以Application结尾。 要求:该类需要编写在主包下。项目的所有其他java文件都要放在主包或者主包的子包下。 */ @SpringBootApplication public class HelloApplication { public static void main(String[] args) { SpringApplication.run(HelloApplication.class,args); } } -
正常编写
controller-HelloController.javapackage com.itheima.controller; //@RestController @Controller @ResponseBody public class HelloController { @RequestMapping("/hello") public String hello(){ return " hello Spring Boot !"; } } -
运行启动类的
main方法即可发布项目并启动web容器,访问8080端口即可
注意
SpringBoot在创建项目时,使用jar的打包方式。继承统一的父模块。web场景启动器会自动引入web相关的依赖和插件SpringBoot的引导类,是项目入口,运行main方法就可以启动项目。该类需要在主包下,项目的其他所有java文件都要放在主包或者主包的子包下。使用
SpringBoot和Spring构建的项目,业务代码编写方式完全一样。简化的是配置和依赖导入。
1.4 SpringBoot项目快速启动
① 对SpringBoot项目打包(执行Maven构建指令package)
② 执行启动指令
java -jar springboot_01_quickstart.jar # 项目的名称根据实际情况修改
注意事项:
jar支持命令行启动需要依赖maven插件支持,请确认打包时是否具有SpringBoot对应的maven插件。
<build>
    <plugins>
        <!-- 这个插件要添加,否则项目打成jar包之后无法运行 -->
        <plugin>
            <groupId>org.springframework.boot</groupId>
            <artifactId>spring-boot-maven-plugin</artifactId>
        </plugin>
    </plugins>
</build>
2 概念
2.1 概念
作用:为了快速开发Spring项目:简化配置 ,简化依赖引入。
Spring的缺点:配置繁琐、依赖繁琐。
可以使用SpringBoot的自动配置和场景启动器(起步依赖)克服上述缺点。
SpringBoot提供了一种**快速使用Spring的方式,基于约定优于配置**的思想,可以让开发人员不必在配置与逻辑业务之间进行思维的切换,全身心的投入到逻辑业务的代码编写中,提高开发的效率,缩短了项目周期。
SpringBoot实现0配置,1个依赖完成项目搭建。内部提供了大量默认配置,按照约定方式编码即可;针对不同的场景封装了启动器,比如:web场景启动器中引入了所有web需要的依赖,我们只需要引入web场景启动器坐标即可。
SpringBoot还提供了一些嵌入式web服务器、安全、指标、健康监测、外部配置等。
注意:SpringBoot只是提供了一种快速开发Spring项目的方式,而非对Spring功能上的增强。
2.2 起步依赖
又名场景启动器
2.2.1 使用
起步依赖,就是依赖。可以理解为一个依赖组,一组依赖。
像导入普通依赖一样,导入即可。
2.2.2 原理
starterSpringBoot中常见项目名称,定义了当前项目使用的所有项目坐标,以达到减少依赖配置的目的
<?xml version="1.0" encoding="UTF-8"?>
<project xmlns="http://maven.apache.org/POM/4.0.0" xmlns:xsi="http://www.w3.org/2001/XMLSchema-instance"
         xsi:schemaLocation="http://maven.apache.org/POM/4.0.0 https://maven.apache.org/xsd/maven-4.0.0.xsd">
    <modelVersion>4.0.0</modelVersion>
    <parent>
        <groupId>org.springframework.boot</groupId>
        <artifactId>spring-boot-starter-parent</artifactId>
        <version>2.5.0</version>
    </parent>
    <groupId>com.itheima</groupId>
    <artifactId>springboot-01-quickstart</artifactId>
    <version>0.0.1-SNAPSHOT</version>
    <dependencies>
        <dependency>
            <groupId>org.springframework.boot</groupId>
            <artifactId>spring-boot-starter-web</artifactId>
        </dependency>
    </dependencies>
</project>
<project xmlns="http://maven.apache.org/POM/4.0.0"
         xsi:schemaLocation="http://maven.apache.org/POM/4.0.0 http://maven.apache.org/xsd/maven-4.0.0.xsd"
         xmlns:xsi="http://www.w3.org/2001/XMLSchema-instance">
    <modelVersion>4.0.0</modelVersion>
    <groupId>org.springframework.boot</groupId>
    <artifactId>spring-boot-dependencies</artifactId>
    <version>2.5.0</version>
    <packaging>pom</packaging>
    <properties>
        <servlet-api.version>4.0.1</servlet-api.version>
        ...
    </properties>
</project>
- parent
- 所有
SpringBoot项目要继承的项目,定义了若干个坐标版本号(依赖管理,而非依赖),以达到减少依赖冲突的目的 - spring-boot-starter-parent(2.5.0)与 spring-boot-starter-parent(2.4.6)共计57处坐标版本不同
- 所有
<?xml version="1.0" encoding="UTF-8"?>
<project xmlns="http://maven.apache.org/POM/4.0.0"
         xsi:schemaLocation="http://maven.apache.org/POM/4.0.0 http://maven.apache.org/xsd/maven-4.0.0.xsd"
         xmlns:xsi="http://www.w3.org/2001/XMLSchema-instance">
    <modelVersion>4.0.0</modelVersion>
    <parent>
        <groupId>org.springframework.boot</groupId>
        <artifactId>spring-boot-dependencies</artifactId>
        <version>2.5.0</version>
    </parent>
    <artifactId>spring-boot-starter-parent</artifactId>
    <packaging>pom</packaging>
    ...
</project>
- 实际开发
- 使用任意坐标时,仅书写
GAV中的G和A,V由SpringBoot提供 - 如发生坐标错误,再指定
version(要小心版本冲突)
- 使用任意坐标时,仅书写
<dependency>
    <groupId>junit</groupId>
    <artifactId>junit</artifactId>
    <version>${junit.version}</version>
</dependency>
<dependency>
    <groupId>javax.servlet</groupId>
    <artifactId>javax.servlet-api</artifactId>
    <version>${servlet-api.version}</version>
</dependency>
<?xml version="1.0" encoding="UTF-8"?>
<project xmlns="http://maven.apache.org/POM/4.0.0" xmlns:xsi="http://www.w3.org/2001/XMLSchema-instance"
         xsi:schemaLocation="http://maven.apache.org/POM/4.0.0 https://maven.apache.org/xsd/maven-4.0.0.xsd">
    <parent>
        <groupId>org.springframework.boot</groupId>
        <artifactId>spring-boot-starter-parent</artifactId>
        <version>2.5.0</version>
    </parent>
    <dependencies>
        <dependency>
            <groupId>org.springframework.boot</groupId>
            <artifactId>spring-boot-starter-web</artifactId>
        </dependency>
        <dependency>
            <groupId>org.springframework.boot</groupId>
            <artifactId>spring-boot-starter-test</artifactId>
            <scope>test</scope>
        </dependency>
    </dependencies>
</project>
2.3 切换web容器
- Jetty比Tomcat更轻量级,可扩展性更强(相较于Tomcat),谷歌应用引擎(GAE)已经全面切换为Jetty
<dependencies>
    <dependency>
        <groupId>org.springframework.boot</groupId>
        <artifactId>spring-boot-starter-web</artifactId>
        <!--web起步依赖环境中,排除Tomcat起步依赖-->
        <exclusions>
            <exclusion>
                <groupId>org.springframework.boot</groupId>
                <artifactId>spring-boot-starter-tomcat</artifactId>
            </exclusion>
        </exclusions>
    </dependency>
    <!--添加Jetty起步依赖,版本由SpringBoot的starter控制-->
    <dependency>
        <groupId>org.springframework.boot</groupId>
        <artifactId>spring-boot-starter-jetty</artifactId>
    </dependency>
</dependencies>
3. 配置
3.1 配置文件分类
SpringBoot支持yml/yaml和properties等格式的配置文件。
按照约定,配置文件的文件名为application.xxx
三种配置文件的优先级:properties > yml > yaml,
多个配置(文件)中配置了相同的key,优先级高的生效;多个配置(文件)中配置了不同的key,同时生效。
示例如下:
-
propertiesserver.port=8080 -
xml(SpringBoot不支持)<server> <port>8080</port> </server> -
yml/yaml-简洁,以数据为核心server: port: 8080
3.2 yml语法
-
大小写敏感
-
数据值前边必须有空格,作为分隔符
-
行头使用缩进表示层级关系
-
缩进时不允许使用
Tab键,只允许使用空格(各个系统 Tab对应的 空格数目可能不同,导致层次混乱)。 -
缩进的空格数目不重要,只要相同层级的元素左侧对齐即可
-
#表示单行注释,从这个字符一直到行尾,都会被解析器忽略。# 这是一行注释 lesson: SpringBoot server: port: 80 -
数组:一组按次序排列的值,使用 “ - ”表示数组每个元素
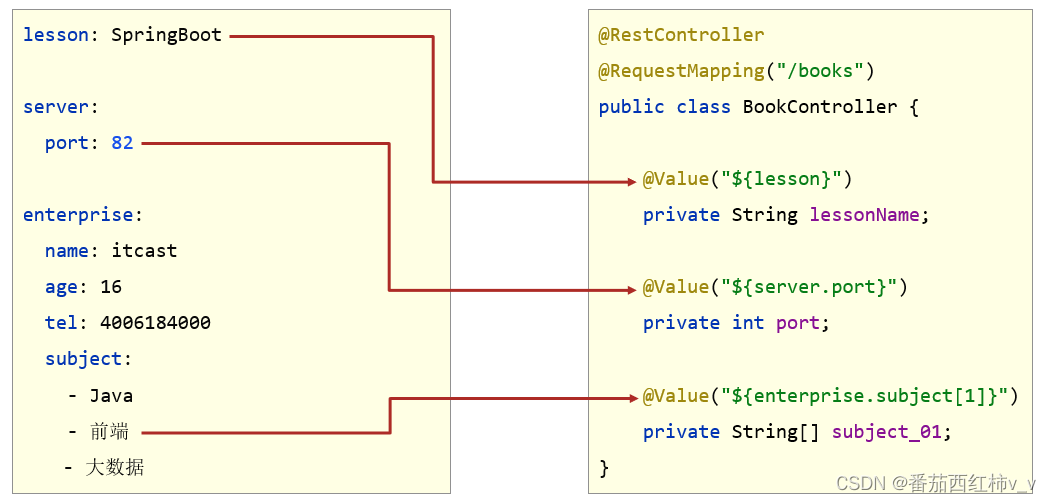
lesson: SpringBoot

server:
  port: 80

enterprise:
  name: itcast
  age: 16
  tel: 4006184000
  subject:
    - Java
    - 前端
    - 大数据
3.3 yaml数据读取
3.3.1 使用@Value读取单个数据
-
获取方式
@Value中写法:属性名引用方式:${一级属性名.二级属性名……} -
映射图示
-
Yaml文件lesson: SpringBoot server: port: 80 enterprise: name: itcast age: 16 tel: 4006184000 subject: - Java - 前端 - 大数据 -
读取代码
@RestController
@RequestMapping("/books")
public class BookController {
    //使用@Value读取单一属性数据
    @Value("${lesson}")
    private String lesson;
    @Value("${server.port}")
    private Integer port;
    @Value("${enterprise.subject[0]}")
    private String subject_00;

    @GetMapping("/{id}")
    public String getById(@PathVariable Integer id){
        System.out.println(lesson);
        System.out.println(port);
        System.out.println(subject_00);
        return "hello , spring boot!";
    }

}
3.3.2 封装全部数据到Environment对象
-
获取方式
首先在当前类中注入
Environment对象,然后通过该对象的getProperty(“key”)方法获取对应的值 -
关系图示

-
Yaml文件lesson: SpringBoot server: port: 80 enterprise: name: itcast age: 16 tel: 4006184000 subject: - Java - 前端 - 大数据 -
读取代码
@RestController
@RequestMapping("/books")
public class BookController {
    //使用Environment封装全配置数据
    @Autowired
    private Environment environment;


    @GetMapping("/{id}")
    public String getById(@PathVariable Integer id){
        System.out.println(environment.getProperty("lesson"));
        System.out.println(environment.getProperty("server.port"));
        System.out.println(environment.getProperty("enterprise.age"));
        System.out.println(environment.getProperty("enterprise.subject[1]"));
        return "hello , spring boot!";
    }

}
3.3.3自定义对象封装指定数据
-
映射图示
[外链图片转存失败,源站可能有防盗链机制,建议将图片保存下来直接上传(img-m5EFWD5k-1654993414188)(06-SpringBoot-课堂笔记59.assets/image-20210811195844691.png)]
-
Yaml文件lesson: SpringBoot server: port: 80 enterprise: name: itcast age: 16 tel: 4006184000 subject: - Java - 前端 - 大数据 -
准备实体类
@Data // 装配进Spring容器 @Component // 添加注解,并指定访问前缀。前缀与配置文件中对应的一级属性名一致 @ConfigurationProperties(prefix = "enterprise") public class Enterprise { // 实体类中成员变量名和二级属性名一致 private String name; private Integer age; private String tel; private String[] subject; } -
读取代码
@RestController @RequestMapping("/books") public class BookController { // 注入Enterprise,该对象就读取了配置文件,并封装配置文件属性到该对象中。 @Autowired private Enterprise enterprise; @GetMapping("/{id}") public String getById(@PathVariable Integer id){ System.out.println(enterprise); return "hello , spring boot!"; } } -
自定义对象封装数据警告且无提示的问题

-
解决方案(配置依赖)
<dependency>
    <groupId>org.springframework.boot</groupId>
    <artifactId>spring-boot-configuration-processor</artifactId>
    <optional>true</optional>
</dependency>
3.4 多环境
在实际开发中,项目的开发环境、测试环境、生产环境的配置信息不一致。SpringBoot支持快速切换。
3.4.1 多环境配置并启用
3.4.1.1 yaml文件多环境
yaml单文件多文件
-
演示配置文件(单位件多文档)
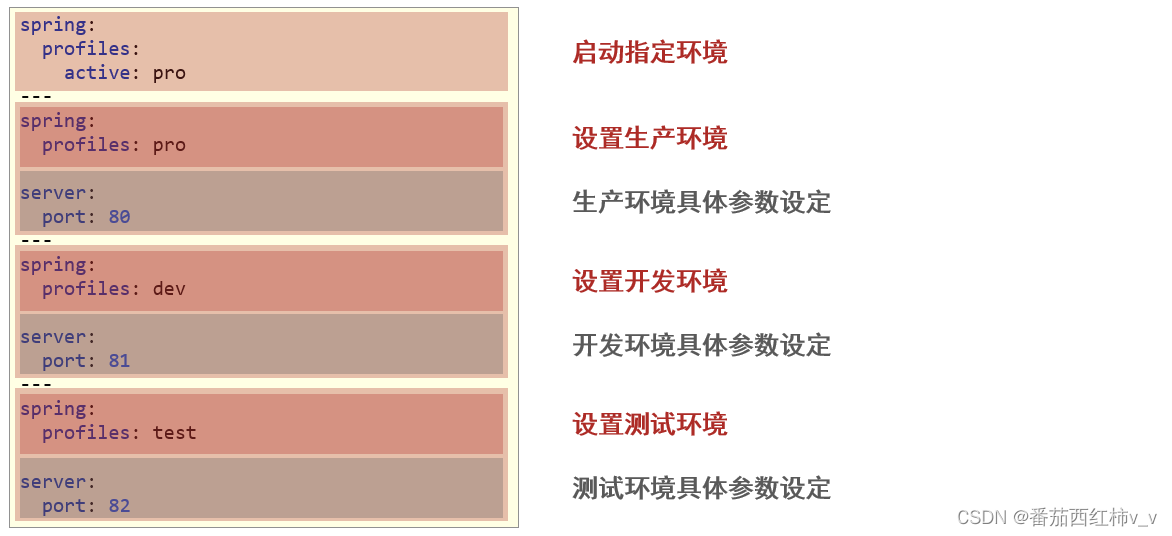
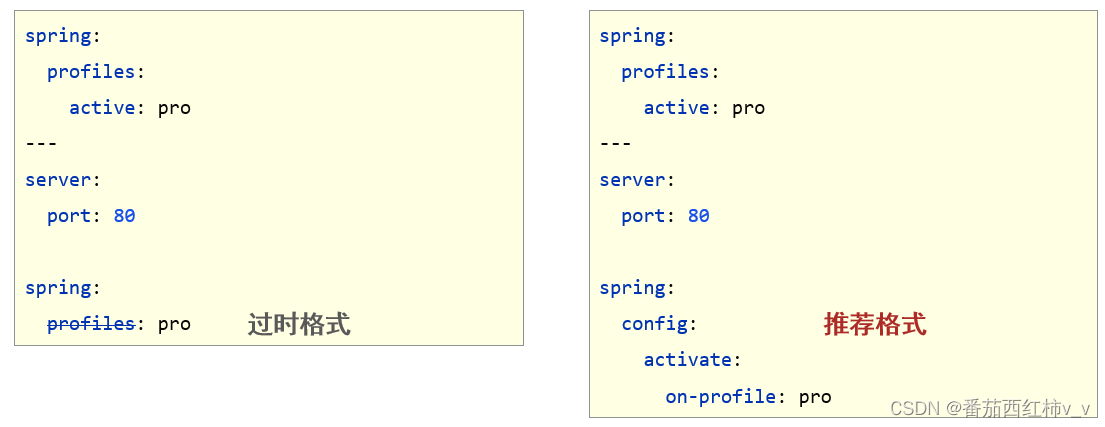
#设置启用的环境
spring:
  profiles:
    active: dev

---  #文档分隔线,上下分别表示不同的文档
#开发
spring:
  config:
    activate:
      on-profile: dev
server:
  port: 80
---
#生产
spring:
  profiles: pro
server:
  port: 81
---
#测试
spring:
  profiles: test
server:
  port: 82
---
3.4.1.2 properties文件多环境
properties配置文件通过添加文件名后缀的方式定义多个环境
# 主配置文件
application.properties

# dev分配置文件
application-dev.properties

# xxx分配置文件
application-xxx.properties
- properties多文件多环境
#主启动配置文件,启动时选择默认的环境 application.properties
spring.profiles.active=pro
#环境分类配置文件 application-pro.properties
server.port=80
#环境分类配置文件 application-dev.properties
server.port=81
#环境分类配置文件application-test.properties
server.port=82
3.4.2 命令行切换多环境
-
命令行启动工程时,可以通过指定参数切换多环境。也可以指定其他参数。
SpringBoot配置文件中的属性,都可以通过命令行参数的方式指定;且,命令行的配置方式优先级较高,会覆盖配置文件中相同的配置。
# 使用参数启动项目,参数名与SpringBoot中属性名一致,以--开头
java –jar springboot.jar --spring.profiles.active=test
java –jar springboot.jar --server.port=88
java –jar springboot.jar --server.port=88 --spring.profiles.active=test
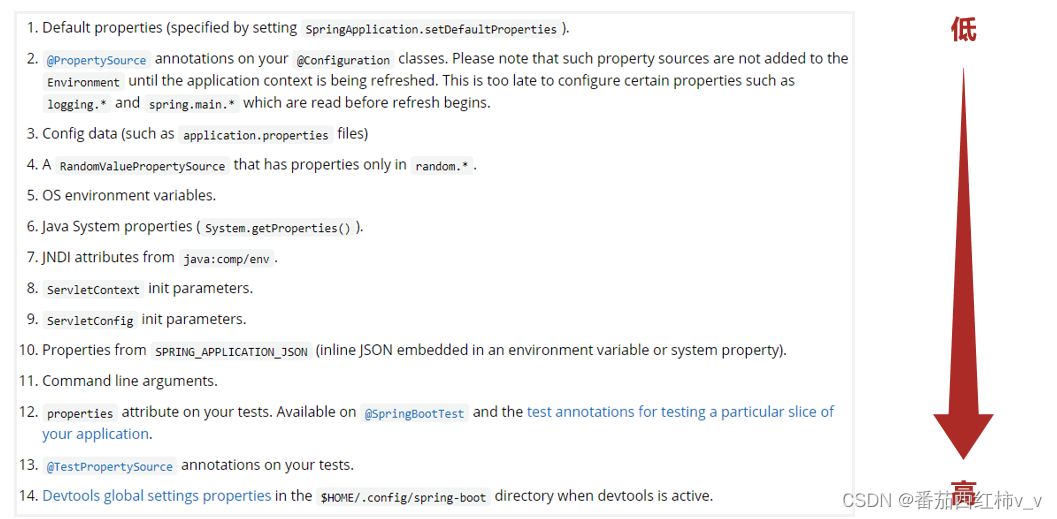
3.4.3 参数加载优先顺序
- 参看文档:https://docs.spring.io/spring-boot/docs/current/reference/html/spring-boot-features.html#boot-features-external-config
- 命令行在第11条,优先级高于第3条配置文件
3.4.4 兼容Maven中多环境配置
Maven通知支持多环境配置。SpringBoot项目在启动时,可以读取Maven中关于多环境的配置。
逻辑过于复杂,不推荐使用。
实现步骤如下
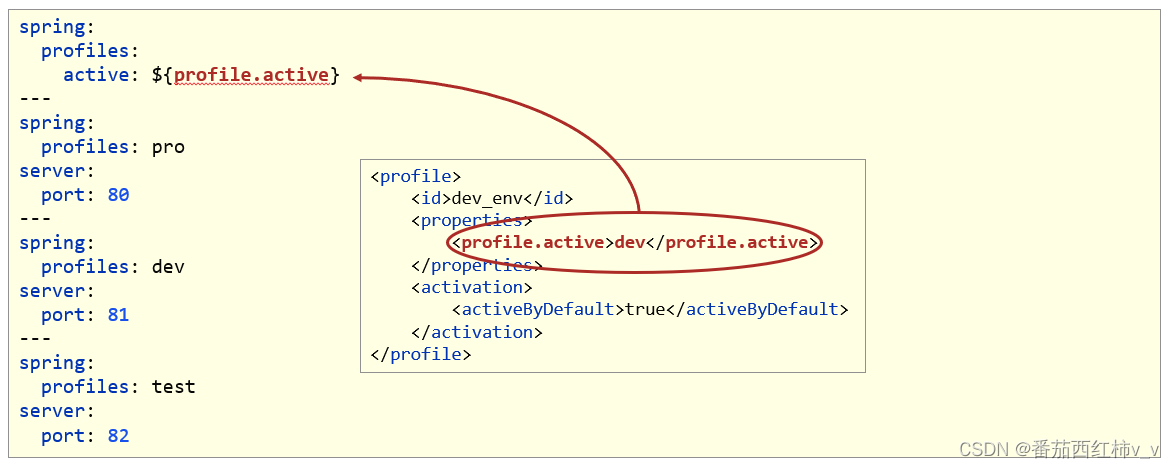
-
Maven中配置多环境,也就是在当前项目的pom.xml中配置<profiles> <!-- 每个profile就是一个环境 ---> <profile> <id>dev_env</id> <properties> <!-- 指定激活的环境,需要被SpringBoot解析 --> <profile.active>dev</profile.active> </properties> <activation> <activeByDefault>true</activeByDefault> </activation> </profile> <profile> <id>pro_env</id> <properties> <profile.active>pro</profile.active> </properties> </profile> <profile> <id>test_env</id> <properties> <profile.active>test</profile.active> </properties> </profile> </profiles> -
SpringBoot中引用Maven属性
-
执行Maven打包指令
Maven指令执行完毕后,生成了对应的包,其中类参与编译;
但是打包后包中配置文件并没有编译,而是把
${}原样复制到包内配置文件中

- 解决思路:配置插件,解析非
java类的操作${}占位符
- 前项目的
pom配置文件中,添加对资源文件解析处理的插件,对资源文件开启对默认占位符的解析
<build>
    <plugins>
        <plugin>
            <artifactId>maven-resources-plugin</artifactId>
            <configuration>
                <encoding>utf-8</encoding>
                <!-- 开启配置文件中${}的解析 -->
                <useDefaultDelimiters>true</useDefaultDelimiters>
            </configuration>
        </plugin>
    </plugins>
</build>
- Maven打包加载到属性,打包顺利通过
![[外链图片转存失败,源站可能有防盗链机制,建议将图片保存下来直接上传(img-HlKn3gV1-1654993414192)(06-SpringBoot-课堂笔记59.assets/image-20210811200628431.png)]](https://img-blog.csdnimg.cn/837e4f1efb474ba587d43bd640675990.png)
3.5 多配置文件
SpringBoot支持从不同的位置读取配置文件。
多个配置(文件)中配置了相同的key,优先级高的生效;多个配置(文件)中配置了不同的key,同时生效。
3.5.1 配置文件位置及加载顺序
工程启动时,可能会用的的配置文件的顺序。
https://docs.spring.io/spring-boot/docs/current/reference/html/spring-boot-features.html#boot-features-external-config-application-property-files
按照下面的顺序从上到下,优先级依次降低。
file:./config/(表示和当前模块同级)<优先级最高>file:./config/*/file:./classpath:/config/classpath:/<优先级最低,编码中最常用位置>
编码期间,建议使用4/5两种方式,容易修改和获取并且不容易忘;
前面的方式容易忘记被忽略,建议在打包后临时修改数据使用。
打包后临时修改数据
- 如果要临时配置的参数较少,可以使用命令行指定参数
- 如果要临时配置的参数较多,把这多个参数写进配置文件,放在上述1/2/3处。工程启动时,会自动读取。
3. SpringBoot整合其他技术
3.1 整合SpringMVC
只需要导入web的起步依赖,即可。
3.2 整合Junit
-
添加整合
junit起步依赖(init**方式可以直接勾选)<dependency> <groupId>org.springframework.boot</groupId> <artifactId>spring-boot-starter-test</artifactId> <!-- 在不配置scope=test的前提下,只配置一个test起步依赖即可 --> <!-- <scope>test</scope> --> </dependency> -
编写测试类,开始测试(
init*方式自动生成了该类)@SpringBootTest // 测试类,如果放在主包下,不需要指定启动类;否则需要通过属性指定配置类 // @SpringBootTest(classes = Springboot07TestApplication.class) class Springboot07JunitApplicationTests { @Autowired private BookService bookService; @Test public void testSave() { bookService.save(); } }
3.3 整合Mybatis
3.3.1 对比Spring整合Mybatis
SpringConfig配置类
- 导入
JdbcConfig配置类- 定义数据源(加载properties配置项:driver、url、username、password)
- 导入
MyBatisConfig配置类- 定义SqlSessionFactoryBean
- 定义映射配置
3.3.2 SpringBoot整合Mybatis
-
导入异步依赖
<?xml version="1.0" encoding="UTF-8"?> <project xmlns="http://maven.apache.org/POM/4.0.0" xmlns:xsi="http://www.w3.org/2001/XMLSchema-instance" xsi:schemaLocation="http://maven.apache.org/POM/4.0.0 https://maven.apache.org/xsd/maven-4.0.0.xsd"> <modelVersion>4.0.0</modelVersion> <!-- 指定父工程 --> <parent> <groupId>org.springframework.boot</groupId> <artifactId>spring-boot-starter-parent</artifactId> <version>2.5.0</version> </parent> <groupId>com.itheima</groupId> <artifactId>springboot_08_mybatis</artifactId> <version>0.0.1-SNAPSHOT</version> <!-- 指定JDK版本,SpringBoot中新的写法 --> <properties> <!-- 明确编码为U8 --> <project.build.sourceEncoding>utf-8</project.build.sourceEncoding> <java.version>1.8</java.version> </properties> <dependencies> <!-- mybatis起步依赖 --> <dependency> <groupId>org.mybatis.spring.boot</groupId> <artifactId>mybatis-spring-boot-starter</artifactId> <version>2.2.0</version> </dependency> <!-- mysql数据库驱动 --> <dependency> <groupId>mysql</groupId> <artifactId>mysql-connector-java</artifactId> <!--<scope>runtime</scope>--> </dependency> <!-- test起步依赖 --> <dependency> <groupId>org.springframework.boot</groupId> <artifactId>spring-boot-starter-test</artifactId> <scope>test</scope> </dependency> <!-- druid --> <dependency> <groupId>com.alibaba</groupId> <artifactId>druid</artifactId> <version>1.1.16</version> </dependency> </dependencies> <build> <plugins> <plugin> <groupId>org.springframework.boot</groupId> <artifactId>spring-boot-maven-plugin</artifactId> </plugin> </plugins> </build> </project> -
application.yml中配置连接四要素,指定使用druidspring: datasource: driver-class-name: com.mysql.cj.jdbc.Driver url: jdbc:mysql://localhost:3306/ssm_db?serverTimezone=UTC username: root password: root type: com.alibaba.druid.pool.DruidDataSource -
编写dao层接口,并编写SQL语句
@Mapper //这个注解要标注 public interface BookDao { @Select("select * from tbl_book where id = #{id}") public Book getById(Integer id); } -
注入dao并测试
@SpringBootTest
class Springboot08MybatisApplicationTests {

	@Autowired
	private BookDao bookDao;

	@Test
	void testGetById() {
		Book book = bookDao.getById(1);
		System.out.println(book);
	}
}
3.4 整合SSM
3.4.1 需要做的工作
SpringBoot整合Spring(不需要)SpringBoot整合SpringMVC(导入web起步依赖)SpringBoot整合MyBatis(主要)
3.4.2 基于3.3继续工作继续完成
-
导入依赖
<!-- web起步依赖 -->
<dependency>
    <groupId>org.springframework.boot</groupId>
    <artifactId>spring-boot-starter-web</artifactId>
</dependency>
完整的
pom.xml如下<?xml version="1.0" encoding="UTF-8"?> <project xmlns="http://maven.apache.org/POM/4.0.0" xmlns:xsi="http://www.w3.org/2001/XMLSchema-instance" xsi:schemaLocation="http://maven.apache.org/POM/4.0.0 https://maven.apache.org/xsd/maven-4.0.0.xsd"> <modelVersion>4.0.0</modelVersion> <!-- 指定父工程 --> <parent> <groupId>org.springframework.boot</groupId> <artifactId>spring-boot-starter-parent</artifactId> <version>2.5.0</version> </parent> <groupId>com.itheima</groupId> <artifactId>springboot_08_mybatis</artifactId> <version>0.0.1-SNAPSHOT</version> <!-- 指定JDK版本,SpringBoot中新的写法 --> <properties> <!-- 明确编码为U8 --> <project.build.sourceEncoding>utf-8</project.build.sourceEncoding> <java.version>1.8</java.version> </properties> <dependencies> <!-- web起步依赖 --> <dependency> <groupId>org.springframework.boot</groupId> <artifactId>spring-boot-starter-web</artifactId> </dependency> <!-- mybatis起步依赖 --> <dependency> <groupId>org.mybatis.spring.boot</groupId> <artifactId>mybatis-spring-boot-starter</artifactId> <version>2.2.0</version> </dependency> <!-- mysql数据库驱动 --> <dependency> <groupId>mysql</groupId> <artifactId>mysql-connector-java</artifactId> <!--<scope>runtime</scope>--> </dependency> <!-- test起步依赖 --> <dependency> <groupId>org.springframework.boot</groupId> <artifactId>spring-boot-starter-test</artifactId> <scope>test</scope> </dependency> <!-- druid --> <dependency> <groupId>com.alibaba</groupId> <artifactId>druid</artifactId> <version>1.1.16</version> </dependency> </dependencies> <build> <plugins> <plugin> <groupId>org.springframework.boot</groupId> <artifactId>spring-boot-maven-plugin</artifactId> </plugin> </plugins> </build> </project> -
(同3.3)
application.yml中配置连接四要素,指定使用druidspring: datasource: driver-class-name: com.mysql.cj.jdbc.Driver url: jdbc:mysql://localhost:3306/ssm_db?serverTimezone=UTC username: root password: root type: com.alibaba.druid.pool.DruidDataSource -
编写
dao层接口,并编写SQL语句// TODO 添加@Mapper @Mapper public interface BookDao { @Insert("insert into tbl_book (type,name,description) values(#{type},#{name},#{description})") public int save(Book book); @Update("update tbl_book set type = #{type}, name = #{name}, description = #{description} where id = #{id}") public int update(Book book); @Delete("delete from tbl_book where id = #{id}") public int delete(Integer id); @Select("select * from tbl_book where id = #{id}") public Book getById(Integer id); @Select("select * from tbl_book") public List<Book> getAll(); } -
编写
Service接口和实现类package com.itheima.service; @Transactional public interface BookService { /** * 保存 * @param book * @return */ public boolean save(Book book); /** * 修改 * @param book * @return */ public boolean update(Book book); /** * 按id删除 * @param id * @return */ public boolean delete(Integer id); /** * 按id查询 * @param id * @return */ public Book getById(Integer id); /** * 查询全部 * @return */ public List<Book> getAll(); }package com.itheima.service.impl; import java.util.List; @Service public class BookServiceImpl implements BookService { @Autowired private BookDao bookDao; public boolean save(Book book) { return bookDao.save(book) > 0; } public boolean update(Book book) { return bookDao.update(book) > 0; } public boolean delete(Integer id) { return bookDao.delete(id) > 0; } public Book getById(Integer id) { if(id == 1){ throw new BusinessException(Code.BUSINESS_ERR,"请不要使用你的技术挑战我的耐性!"); } return bookDao.getById(id); } public List<Book> getAll() { return bookDao.getAll(); } } -
新建
Controllerpackage com.itheima.controller; import com.itheima.domain.Book; import com.itheima.service.BookService; import org.springframework.beans.factory.annotation.Autowired; import org.springframework.web.bind.annotation.*; import java.util.List; @RestController @RequestMapping("/books") public class BookController { @Autowired private BookService bookService; @PostMapping public Result save(@RequestBody Book book) { boolean flag = bookService.save(book); return new Result(flag ? Code.SAVE_OK:Code.SAVE_ERR,flag); } @PutMapping public Result update(@RequestBody Book book) { boolean flag = bookService.update(book); return new Result(flag ? Code.UPDATE_OK:Code.UPDATE_ERR,flag); } @DeleteMapping("/{id}") public Result delete(@PathVariable Integer id) { boolean flag = bookService.delete(id); return new Result(flag ? Code.DELETE_OK:Code.DELETE_ERR,flag); } @GetMapping("/{id}") public Result getById(@PathVariable Integer id) { Book book = bookService.getById(id); Integer code = book != null ? Code.GET_OK : Code.GET_ERR; String msg = book != null ? "" : "数据查询失败,请重试!"; return new Result(code,book,msg); } @GetMapping public Result getAll() { List<Book> bookList = bookService.getAll(); Integer code = bookList != null ? Code.GET_OK : Code.GET_ERR; String msg = bookList != null ? "" : "数据查询失败,请重试!"; return new Result(code,bookList,msg); } } -
Web层其他类:package com.itheima.controller; public class Result { private Object data; private Integer code; private String msg; public Result() { } public Result(Integer code,Object data) { this.data = data; this.code = code; } public Result(Integer code, Object data, String msg) { this.data = data; this.code = code; this.msg = msg; } public Object getData() { return data; } public void setData(Object data) { this.data = data; } public Integer getCode() { return code; } public void setCode(Integer code) { this.code = code; } public String getMsg() { return msg; } public void setMsg(String msg) { this.msg = msg; } } -
Web层其他类:package com.itheima.controller; public class Code { public static final Integer SAVE_OK = 20011; public static final Integer DELETE_OK = 20021; public static final Integer UPDATE_OK = 20031; public static final Integer GET_OK = 20041; public static final Integer SAVE_ERR = 20010; public static final Integer DELETE_ERR = 20020; public static final Integer UPDATE_ERR = 20030; public static final Integer GET_ERR = 20040; public static final Integer SYSTEM_ERR = 50001; public static final Integer SYSTEM_TIMEOUT_ERR = 50002; public static final Integer SYSTEM_UNKNOW_ERR = 59999; public static final Integer BUSINESS_ERR = 60002; } -
Web层其他类:package com.itheima.controller; import com.itheima.exception.BusinessException; import com.itheima.exception.SystemException; import org.springframework.web.bind.annotation.ExceptionHandler; import org.springframework.web.bind.annotation.RestControllerAdvice; @RestControllerAdvice public class ProjectExceptionAdvice { @ExceptionHandler(SystemException.class) public Result doSystemException(SystemException ex){ //记录日志 //发送消息给运维 //发送邮件给开发人员,ex对象发送给开发人员 return new Result(ex.getCode(),null,ex.getMessage()); } @ExceptionHandler(BusinessException.class) public Result doBusinessException(BusinessException ex){ return new Result(ex.getCode(),null,ex.getMessage()); } @ExceptionHandler(Exception.class) public Result doOtherException(Exception ex){ //记录日志 //发送消息给运维 //发送邮件给开发人员,ex对象发送给开发人员 return new Result(Code.SYSTEM_UNKNOW_ERR,null,"系统繁忙,请稍后再试!"); } } -
Web层其他类:异常类package com.itheima.exception; public class BusinessException extends RuntimeException{ private Integer code; public Integer getCode() { return code; } public void setCode(Integer code) { this.code = code; } public BusinessException(Integer code, String message) { super(message); this.code = code; } public BusinessException(Integer code, String message, Throwable cause) { super(message, cause); this.code = code; } }package com.itheima.exception; public class SystemException extends RuntimeException{ private Integer code; public Integer getCode() { return code; } public void setCode(Integer code) { this.code = code; } public SystemException(Integer code, String message) { super(message); this.code = code; } public SystemException(Integer code, String message, Throwable cause) { super(message, cause); this.code = code; } }
3.4.3 静态页面
静态页面,放在resources/static文件下。
也可以使用SpringMVC中的放行静态资源,SpringBoot支持读取配置类,方式和之前一致。
常见问题
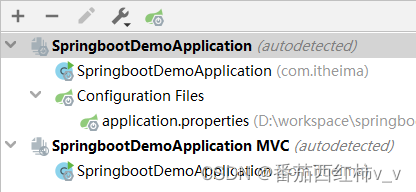
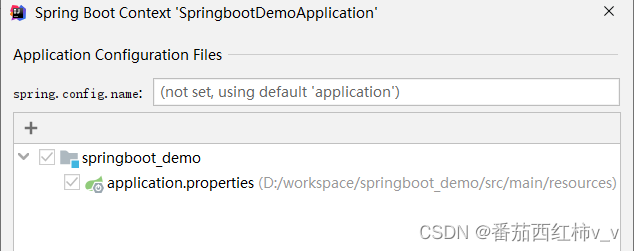
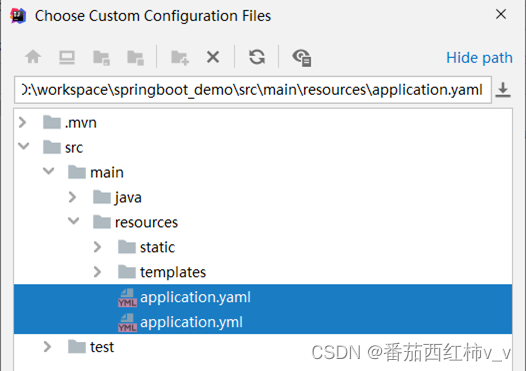
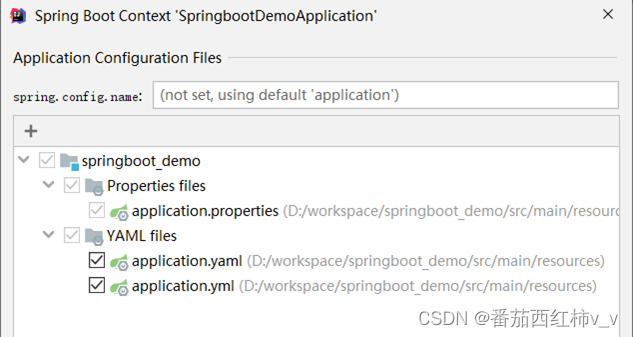
SpringBoot配置文件无提示
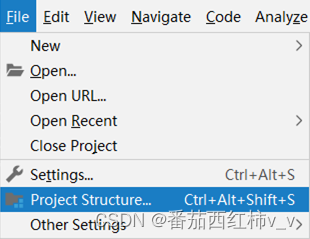
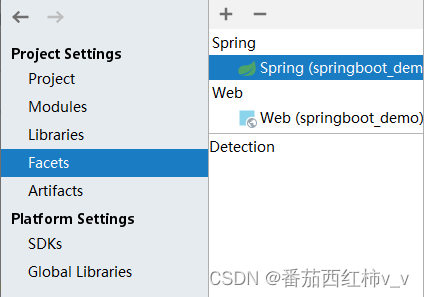
操作步骤:
出现逾期外的错误
确认项目无问题,但是一直报错。
遇事不决,先Clean
code;
public Integer getCode() {
return code;
}
public void setCode(Integer code) {
this.code = code;
}
public BusinessException(Integer code, String message) {
super(message);
this.code = code;
}
public BusinessException(Integer code, String message, Throwable cause) {
super(message, cause);
this.code = code;
}
}
```java
package com.itheima.exception;

public class SystemException extends RuntimeException{
    private Integer code;

    public Integer getCode() {
        return code;
    }

    public void setCode(Integer code) {
        this.code = code;
    }

    public SystemException(Integer code, String message) {
        super(message);
        this.code = code;
    }

    public SystemException(Integer code, String message, Throwable cause) {
        super(message, cause);
        this.code = code;
    }

}
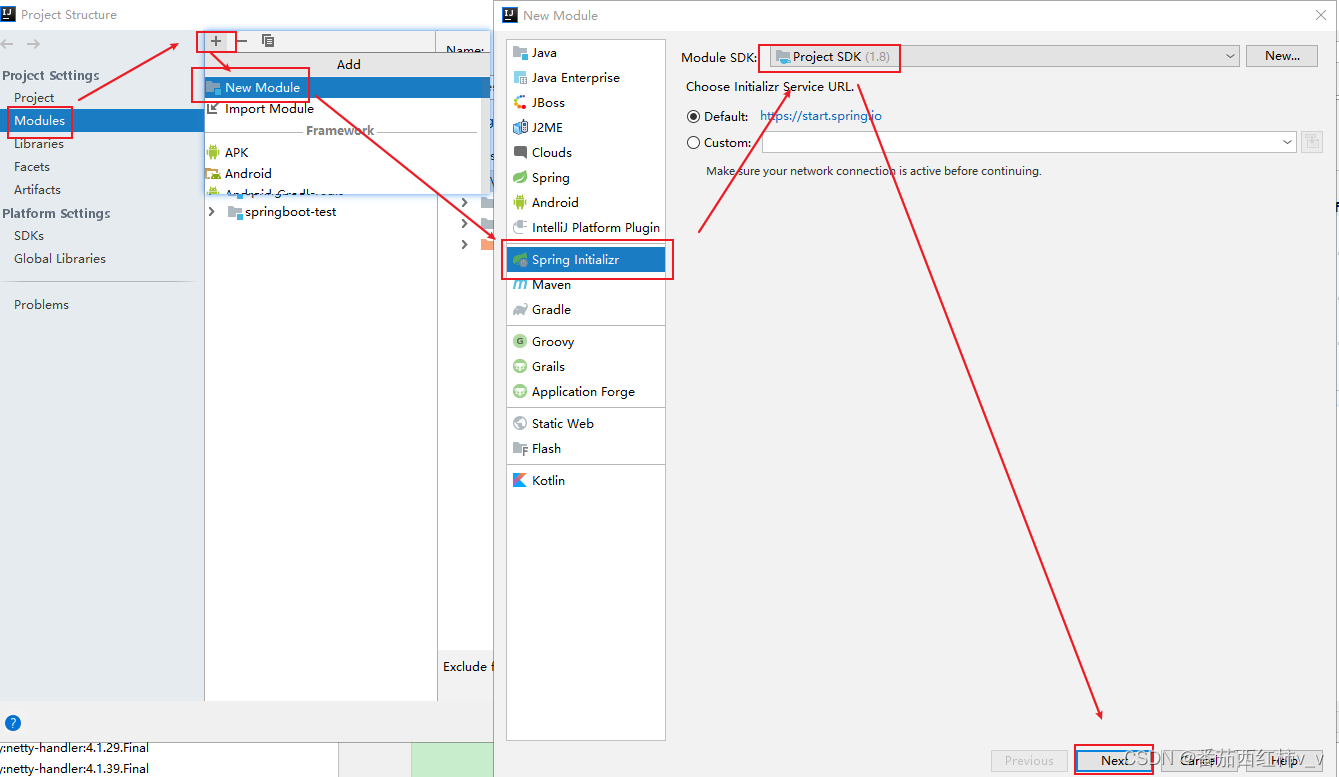
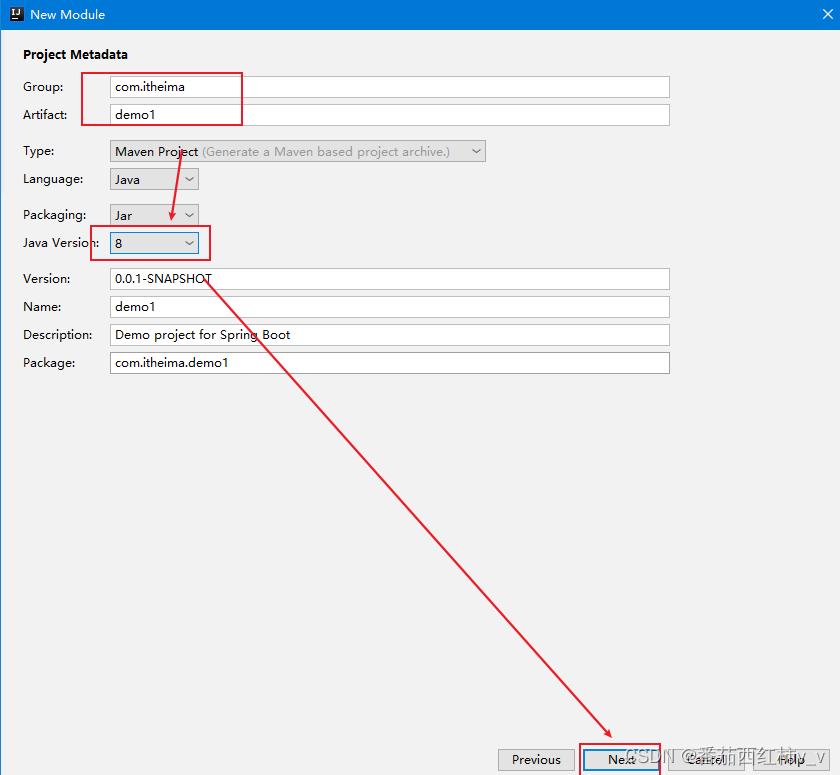
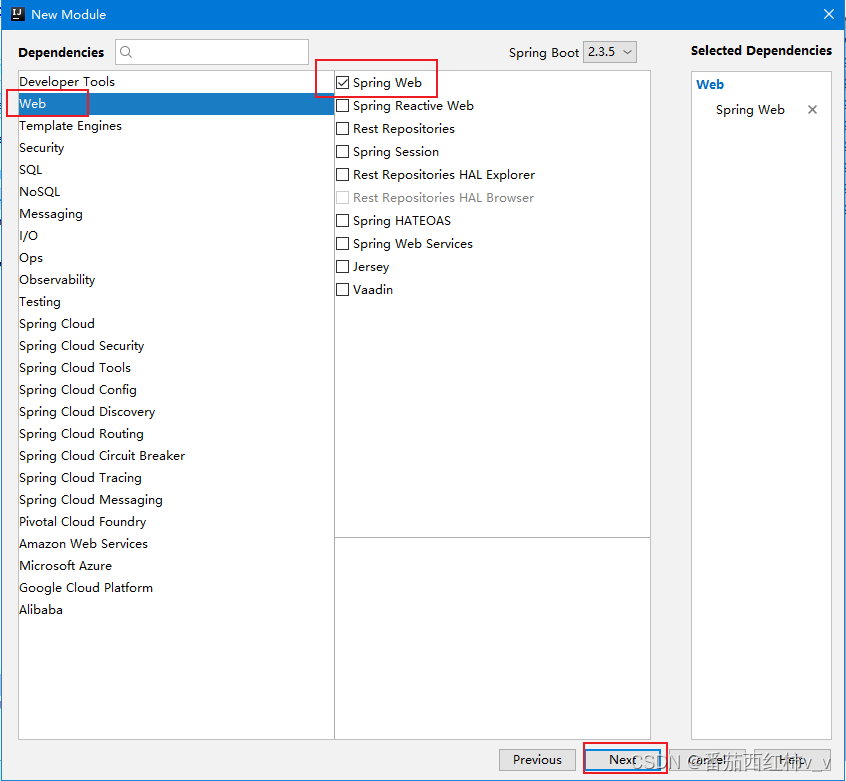
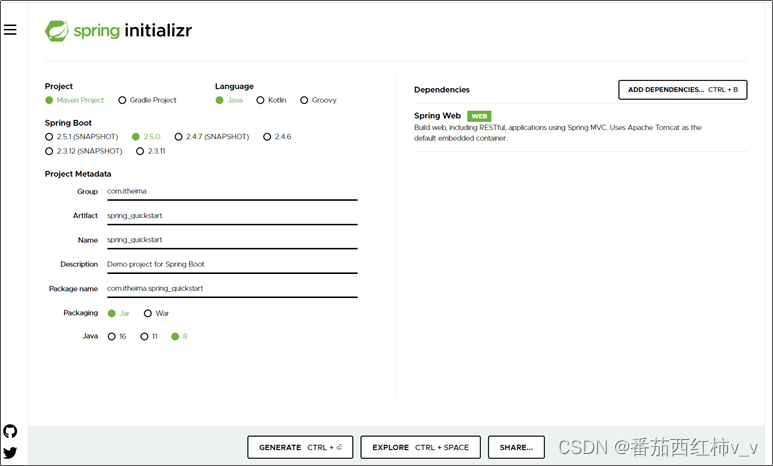
3.4.3 静态页面
静态页面,放在resources/static文件下。
也可以使用SpringMVC中的放行静态资源,SpringBoot支持读取配置类,方式和之前一致。
常见问题
SpringBoot配置文件无提示
操作步骤:

![[外链图片转存中...(img-UQnBxKke-1654993414194)]](https://img-blog.csdnimg.cn/d406fdd0502545c19cfbeb9ad7fb2e3b.png)
![[外链图片转存中...(img-CsIXgChu-1654993414194)]](https://img-blog.csdnimg.cn/81d5bbc7a5714979be43d75de9347393.png)
![[外链图片转存中...(img-fsWu0skN-1654993414195)]](https://img-blog.csdnimg.cn/ee8e85648d9a4ad080be982c9da0e868.png)
![[外链图片转存中...(img-AGjoojUr-1654993414195)]](https://img-blog.csdnimg.cn/b6f57980287d4baf8e898163b46ab340.png)
![[外链图片转存中...(img-R3uVudJj-1654993414196)]](https://img-blog.csdnimg.cn/7543fe0f4907467aa9b5373caf22e4ee.png)
出现逾期外的错误
确认项目无问题,但是一直报错。
遇事不决,先Clean


 141
141


 被折叠的 条评论
为什么被折叠?
被折叠的 条评论
为什么被折叠?
 到【灌水乐园】发言


