


实现步骤:
1、自定义需要的布局
2、创建适配器,适配布局
3、调用自定义对话框
详解:
1、自定义需要的布局
我需要的布局(view_bomb_box.xml)效果是这样的
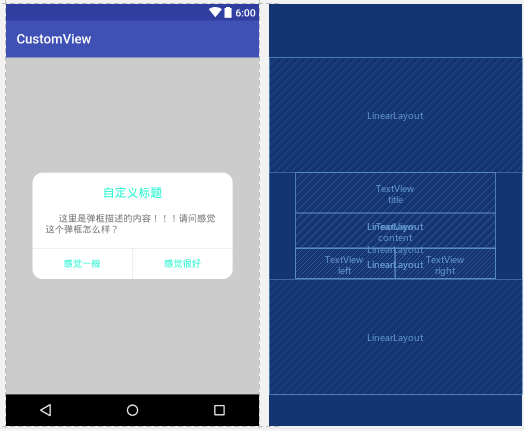
其实自定义就是根据自己需要自己定义,相信大家都会布局的,下面是我的布局
<?xml version="1.0" encoding="utf-8"?>
<!--自定义弹框布局-->
<LinearLayout xmlns:android="http://schemas.android.com/apk/res/android"
    android:orientation="vertical"
    android:layout_width="match_parent"
    android:layout_height="match_parent">

    <!--占位置,让弹框居中-->
    <LinearLayout
        android:layout_weight="1"
        android:layout_width="match_parent"
        android:layout_height="0dp"></LinearLayout>

    <LinearLayout
        android:layout_width="match_parent"
        android:layout_height="wrap_content"
        android:background="@drawable/radius_bomb_box"
        android:orientation="vertical">

        <TextView
            android:id="@+id/title"
            android:layout_width="match_parent"
            android:layout_height="wrap_content"
            android:paddingTop="15dp"
            android:paddingBottom="15dp"
            android:paddingLeft="100dp"
            android:paddingRight="100dp"
            android:gravity="center"
            android:textColor="#22f5cf"
            android:textSize="18dp"
            android:text="自定义标题"/>

        <TextView
            android:id="@+id/content"
            android:layout_width="match_parent"
            android:layout_height="wrap_content"
            android:paddingLeft="20dp"
            android:paddingRight="20dp"
            android:paddingBottom="20dp"
            android:text="\t\t这里是弹框描述的内容!!!请问感觉这个弹框怎么样?"/>

        <LinearLayout
            android:layout_width="match_parent"
            android:layout_height="1px"
            android:background="#d1cfcf"></LinearLayout>

        <LinearLayout
            android:layout_width="match_parent"
            android:layout_height="wrap_content"
            android:orientation="horizontal">

            <TextView
                android:id="@+id/left"
                android:layout_weight="1"
                android:layout_width="0dp"
                android:layout_height="wrap_content"
                android:paddingBottom="15dp"
                android:paddingTop="15dp"
                android:gravity="center"
                android:textColor="#22f5cf"
                android:text="感觉一般"/>

            <LinearLayout
                android:layout_width="1px"
                android:layout_height="match_parent"
                android:background="#d1cfcf"></LinearLayout>

            <TextView
                android:id="@+id/right"
                android:layout_weight="1"
                android:layout_width="0dp"
                android:layout_height="wrap_content"
                android:paddingBottom="15dp"
                android:paddingTop="15dp"
                android:gravity="center"
                android:textColor="#22f5cf"
                android:text="感觉很好"/>

        </LinearLayout>
    </LinearLayout>

    <!--占位置,让弹框居中-->
    <LinearLayout
        android:layout_weight="1"
        android:layout_width="match_parent"
        android:layout_height="0dp"></LinearLayout>

</LinearLayout>
关键在于,需要控制的控件都有 id
标题 title 、弹框内容 content 、左边按钮 left 、右边按钮 right
可以根据 id 改变它们的文字内容 (如果你的布局中有图片,也是一样的)
布局中的背景样式为 radius_bomb_box.xml (在 drawable中)
<?xml version="1.0" encoding="utf-8"?>
<shape xmlns:android="http://schemas.android.com/apk/res/android">
    <corners android:radius="15dp"/>
    <solid android:color="#FFFFFF"/>
    <stroke android:width="1dp" android:color="#ffffff" /><!-- 描边,边框宽度、颜色 -->
</shape>
2、创建适配器,适配布局
通过 id 和自定义 set 方法来实现赋值
自定义 MyBombBoxAdapter类 继承 Dialog
import android.app.Dialog;
import android.content.Context;
import android.content.DialogInterface;
import android.view.LayoutInflater;
import android.view.View;
import android.widget.LinearLayout;
import android.widget.RadioGroup;
import android.widget.TextView;

import com.win.customview.R;

/**
 * Created by Administrator on 2018/3/13 0013.
 * 自定义弹框适配器
 */
                                //继承
public class MyBombBoxAdapter extends Dialog {

    public MyBombBoxAdapter(Context context) {
        super(context);
    }

    public MyBombBoxAdapter(Context context, int themeResId) {
        super(context, themeResId);
    }

    public static class Builder {
        private Context context;        //上下文
        private String title;           //标题
        private String content;         //弹框内容
        private String left;            //左按钮
        private String right;           //右按钮
        private View contentView;      //视图
        private DialogInterface.OnClickListener leftClick;      //左按钮点击事件
        private DialogInterface.OnClickListener rightClick;     //右按钮点击事件

        public Builder(Context context) { //传入上下文(弹框在哪里弹出)
            this.context = context;
        }

        public Builder setTitle(String title) { //传入标题
            this.title = title;
            return this;
        }

        public Builder setContent(String content) { //传入弹框提示文字
            this.content = content;
            return this;
        }

        public Builder setLeft(String left, DialogInterface.OnClickListener listener) {
            this.left = left;                       //传入左边按钮文字
            this.leftClick = listener;             //传入左边按钮点击事件
            return this;
        }

        public Builder setRight(String right, DialogInterface.OnClickListener listener) {
            this.right = right;                       //传入右边按钮文字
            this.rightClick = listener;              //传入右边按钮点击事件
            return this;
        }

        //通过 id 进行适配
        public MyBombBoxAdapter create() {
            LayoutInflater inflater = (LayoutInflater) context.getSystemService(Context.LAYOUT_INFLATER_SERVICE);
            // 用自定义主题实例化对话框
            final MyBombBoxAdapter dialog = new MyBombBoxAdapter(context, R.style.Dialog);
            //绑定自定义的布局
            View layout = inflater.inflate(R.layout.view_bomb_box, null);
            //添加视图
            dialog.addContentView(layout, new LinearLayout.LayoutParams(LinearLayout.LayoutParams.FILL_PARENT, RadioGroup.LayoutParams.WRAP_CONTENT));
            //设置对话框标题 (根据 layout)
            ((TextView) layout.findViewById(R.id.title)).setText(title);
            //设置对话框内容 (根据 layout)
            ((TextView) layout.findViewById(R.id.content)).setText(content);
            //设置左边按钮(如果为空就不显示)
            if(left != null){
                ((TextView) layout.findViewById(R.id.left)).setText(left);
                if(leftClick != null){
                    ((TextView) layout.findViewById(R.id.left)).setOnClickListener(new View.OnClickListener() {
                        @Override
                        public void onClick(View view) {
                            leftClick.onClick(dialog, DialogInterface.BUTTON_POSITIVE);
                        }
                    });
                }
            }else{
                layout.findViewById(R.id.left).setVisibility(View.GONE);//隐藏按钮
            }
            //设置右边按钮(如果为空就不显示)
            if(right != null){
                ((TextView) layout.findViewById(R.id.right)).setText(right);
                if(rightClick != null){
                    ((TextView) layout.findViewById(R.id.right)).setOnClickListener(new View.OnClickListener() {
                        @Override
                        public void onClick(View view) {
                            rightClick.onClick(dialog, DialogInterface.BUTTON_POSITIVE);
                        }
                    });
                }
            }else{
                layout.findViewById(R.id.right).setVisibility(View.GONE);//隐藏按钮
            }
            dialog.setContentView(layout);
            return dialog;
        }
    }
}
通过 set 方法或取到传入的容后,根据绑定的 布局(view_bomb_box.xml) 以及 id 分别赋值,
以达到需要的效果。
其中 R.style.Dialog 也是自己定义的,在 res/values/style 中加入:
!--自定义对话框的主题-->
<style name="Dialog" parent="android:style/Theme.Dialog">
    <item name="android:background">#00000000</item>
    <item name="android:windowBackground">@android:color/transparent</item>
    <item name="android:windowNoTitle">true</item>
    <item name="android:windowIsFloating">true</item>
</style>
这样 布局 和 适配 就完成了
3、调用自定义对话框
最后可以根据自己的需要调用这个自定义的弹框了,其核心代码为:
builder = new MyBombBoxAdapter.Builder(BombBoxActivity.this);
builder.setTitle("对话框");
builder.setContent("感觉好用吗?");
builder.setRight("还行", new DialogInterface.OnClickListener() {
    @Override
    public void onClick(DialogInterface dialogInterface, int i) {
        //在这里实现点击 右边按钮 后需要实现的事件
        Toast.makeText(BombBoxActivity.this,"真有眼光,我也觉得好用!",Toast.LENGTH_SHORT).show();
    }
});
builder.setLeft("差评", new DialogInterface.OnClickListener() {
    @Override
    public void onClick(DialogInterface dialogInterface, int i) {
        //在这里实现点击 左边按钮 后需要实现的事件
        Toast.makeText(BombBoxActivity.this,"还有其他用法,看看在说吧!",Toast.LENGTH_SHORT).show();
    }
});
builder.create().show();
可以看到,这里主要是实例化适配器后,根据开始在适配器中定义的 set 方法添加内容(根据自己需要)
这里的完整代码如下:
import android.content.DialogInterface;
import android.support.v7.app.AppCompatActivity;
import android.os.Bundle;
import android.view.View;
import android.widget.Button;
import android.widget.Toast;

import com.win.customview.R;

public class BombBoxActivity extends AppCompatActivity {

    private Button bomb_box;//点击按钮弹框
    private MyBombBoxAdapter.Builder builder;
    @Override
    protected void onCreate(Bundle savedInstanceState) {
        super.onCreate(savedInstanceState);
        setContentView(R.layout.activity_bomb_box);
        bomb_box = (Button)findViewById(R.id.bomb_box);
        bomb_box.setOnClickListener(new View.OnClickListener() {
            @Override
            public void onClick(View view) {
                //在这里调用自定义弹框
                builder = new MyBombBoxAdapter.Builder(BombBoxActivity.this);
                builder.setTitle("对话框");
                builder.setContent("感觉好用吗?");
                builder.setRight("还行", new DialogInterface.OnClickListener() {
                    @Override
                    public void onClick(DialogInterface dialogInterface, int i) {
                        //在这里实现点击 右边按钮 后需要实现的事件
                        Toast.makeText(BombBoxActivity.this,"真有眼光,我也觉得好用!",Toast.LENGTH_SHORT).show();
                    }
                });
                builder.setLeft("差评", new DialogInterface.OnClickListener() {
                    @Override
                    public void onClick(DialogInterface dialogInterface, int i) {
                        //在这里实现点击 左边按钮 后需要实现的事件
                        Toast.makeText(BombBoxActivity.this,"还有其他用法,看看在说吧!",Toast.LENGTH_SHORT).show();
                    }
                });
                builder.create().show();
            }
        });
    }
}
这样就实现了完整的自定义对话框!
这里只是一种视图样式,如果需要有一些图片、文字的改动,也只是需要在 布局 和 适配器 上做些改变就好了
在调用时,根据改变的内容 set 新的内容就好了
源码:https://github.com/iscopy/CustomView
在 bomb_box 包里面


 906
906

 被折叠的 条评论
为什么被折叠?
被折叠的 条评论
为什么被折叠?
 到【灌水乐园】发言


