


参考原文:https://blog.csdn.net/wts563540/article/details/109126661?spm=1001.2014.3001.5506
作者比我记录的要详细很多
文章目录
一、商品分类
1. 商品分类树形菜单
1.1 验证application.yml内容
spring:
  datasource:
    username: fan
    password: 123456
    url: jdbc:mysql://8.134.249.86:3306/gulimall_pms?useUnicode=true&characterEncoding=UTF-8&useSSL=false&serverTimezone=Asia/Shanghai
    driver-class-name: com.mysql.jdbc.Driver
  application:
    name: gulimall-product

mybatis-plus:
  mapper-locations: classpath:/mapper/**/*.xml
  global-config:
    db-config:
      id-type: auto

server:
  port: 8082
1.2 导入数据库gulimall_pms的中的表pms_category数据
1.3 修改实体类
@Data
@TableName("pms_category")
public class CategoryEntity implements Serializable {
	private static final long serialVersionUID = 1L;

	/**
	 * 分类id
	 */
	@TableId
	private Long catId;
	/**
	 * 分类名称
	 */
	private String name;
	/**
	 * 父分类id
	 */
	private Long parentCid;
	/**
	 * 层级
	 */
	private Integer catLevel;
	/**
	 * 是否显示[0-不显示,1显示]
	 */
	private Integer showStatus;
	/**
	 * 排序
	 */
	private Integer sort;
	/**
	 * 图标地址
	 */
	private String icon;
	/**
	 * 计量单位
	 */
	private String productUnit;
	/**
	 * 商品数量
	 */
	private Integer productCount;

	/**
	 * 子菜单
	 */
	@TableField(exist = false)
	//该注解表示当前属性不是数据库的字段,但在项目中必须使用,这样在新增等使用bean的时候,mybatis-plus就会忽略这个,不会报错
	private List<CategoryEntity> children;

}
1.4 修改controller
/**
 * 查询所有分类以及子分类
 */
@RequestMapping("/list/tree")
public R listTree(){
    List<CategoryEntity> list = categoryService.listWithTree();

    return R.ok().put("data", list);
}
我是自己新加了一个方法,也可按教程修改原来的list方法
1.5 编写service及实现类
@Override
public List<CategoryEntity> listWithTree() {
    //1、查出所有分类
    List<CategoryEntity> entities = baseMapper.selectList(null);
    //2、组装成父子的树形结构
    List<CategoryEntity> level1Menus = entities.stream()
            .filter(categoryEntity -> categoryEntity.getParentCid() == 0)
            .map((categoryEntity) -> {
                categoryEntity.setChildren(getChildrens(categoryEntity, entities));
                return categoryEntity;
            })
            .sorted((menu1, menu2) -> {
//                    return menu1.getSort() - menu2.getSort();
                return (menu1.getSort() == null ? 0 : menu1.getSort()) - (menu2.getSort() == null ? 0 : menu2.getSort());
            })
            .collect(Collectors.toList());
    //2.1、找到所有的一级分类
    return level1Menus;
}

 /**
  * 递归查找所有菜单的子菜单
  * @param root
  * @param all
  * @return
  */
 private List<CategoryEntity> getChildrens(CategoryEntity root, List<CategoryEntity> all) {
     List<CategoryEntity> children = all.stream()
             .filter(categoryEntity -> categoryEntity.getParentCid() == root.getCatId())
             .map((categoryEntity) -> {
                 //1、找到子菜单
                 categoryEntity.setChildren(getChildrens(categoryEntity, all));
                 return categoryEntity;
             })
             //2、菜单排序
             .sorted((menu1, menu2) -> {
//                    return menu1.getSort() - menu2.getSort();
                 return (menu1.getSort()==null?0:menu1.getSort()) - (menu2.getSort()==null?0:menu2.getSort());
             })
             .collect(Collectors.toList());

     return children;
 }
注意点1:排序方法也可替换为
sorted(Comparator.comparingInt(menu -> (menu.getSort() == null ? 0 : menu.getSort())))
注意点2:注意两个方法filter中的筛选条件
一级菜单为 .filter(categoryEntity -> categoryEntity.getParentCid() == 0)
子菜单为 .filter(categoryEntity -> categoryEntity.getParentCid() == root.getCatId())
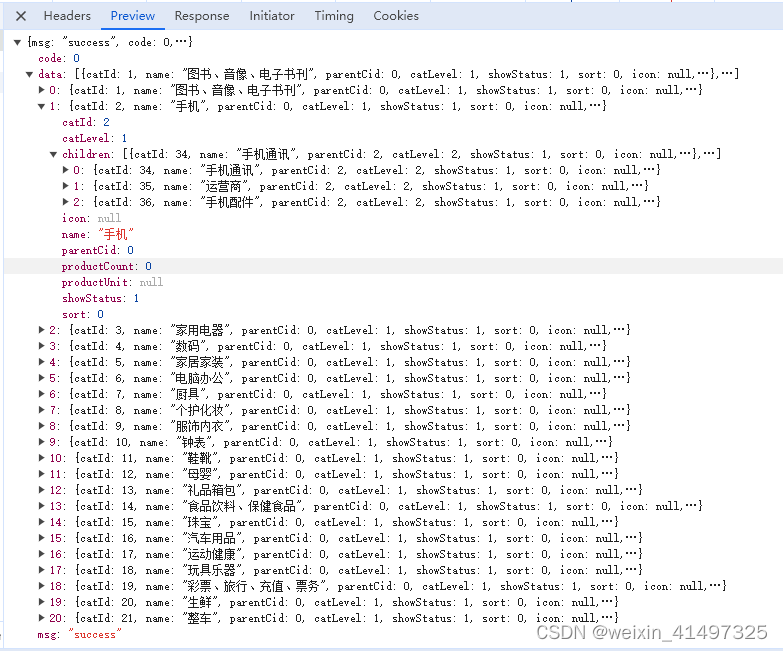
1.6 查询结果展示
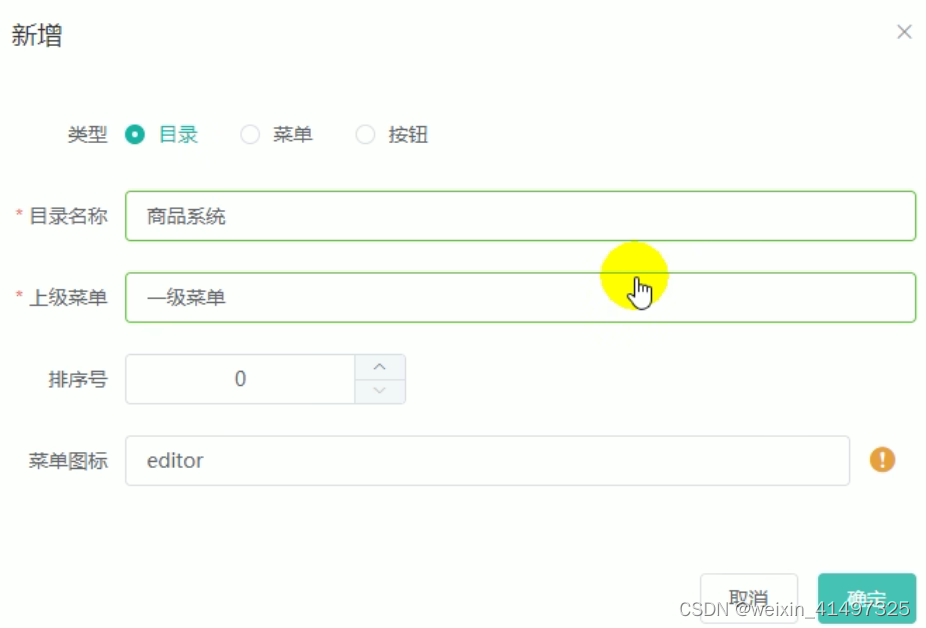
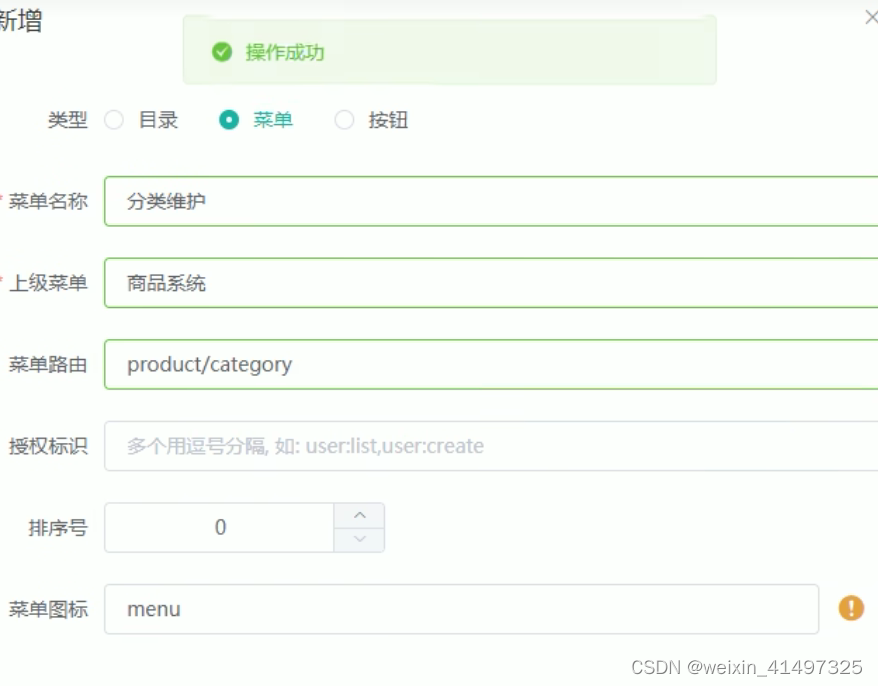
1.7 前端增加目录“商品系统”和菜单节点“分类维护”
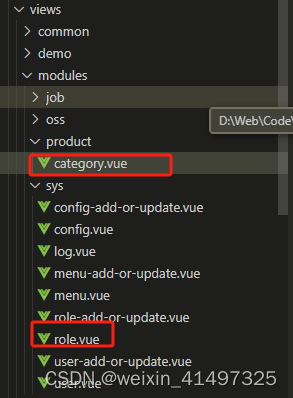
1.8 前端文件规则解析及创建
观察其他自带节点如“”角色管理”的url路径为/sys-role,在前端项目renren-fast-vue的目录\src\views\modules\sys\role.vue
得出规律:我们的分类维护要有对应的目录和文件\src\views\modules\product\category.vue
1.8 请求根路由更改
替换“static\config\index.js”文件中的“window.SITE_CONFIG[‘baseUrl’]”
/**
 * 开发环境
 */
;(function () {
  window.SITE_CONFIG = {};

  // api接口请求地址
  // window.SITE_CONFIG['baseUrl'] = 'http://localhost:8080/renren-fast';
  window.SITE_CONFIG['baseUrl'] = 'http://localhost:88/api';

  // cdn地址 = 域名 + 版本号
  window.SITE_CONFIG['domain']  = './'; // 域名
  window.SITE_CONFIG['version'] = '';   // 版本号(年月日时分)
  window.SITE_CONFIG['cdnUrl']  = window.SITE_CONFIG.domain + window.SITE_CONFIG.version;
})();
替换为网关的端口
替换前:window.SITE_CONFIG[‘baseUrl’] = ‘http://localhost:8080/renren-fast’
替换后:window.SITE_CONFIG[‘baseUrl’]= ‘http://localhost:88/api’
1.9 跨域请求处理
1.9.1 修改gateway路由规则
spring:
  application:
    name: gateway
  cloud:
    nacos:
      config:
        server-addr: 127.0.0.1:8848
    gateway:
      routes:
        - id: test_route
          uri: https://www.baidu.com
          predicates:
            - Query=url,baidu


# 注意: 发现问题了没,id和uri、predicates等没对齐导致启动项目报错,耽误我很久时间
#        - id: product_route
#            uri: lb://gulimall-product
#            predicates:
#              - Path=/api/product/**
#            filters:
#              - RewritePath=/api/(?<segment>/?.*),/$\{segment}
        - id: product_route
          uri: lb://gulimall-product
          predicates:
            - Path=/api/product/**
          filters:
            - RewritePath=/api/(?<segment>/?.*), /$\{segment}

        - id: admin_route
          uri: lb://renren-fast
          predicates:
            - Path=/api/**
          filters:
            - RewritePath=/api/(?<segment>/?.*), /renren-fast/$\{segment}

server:
  port: 88
在路由规则的顺序上,将精确的路由规则放置到模糊的路由规则的前面,否则的话,精确的路由规则将不会被匹配到,类似于异常体系中try catch子句中异常的处理顺序
-Path=/api/** 如果放在 - Path=/api/product/**前面会导致商品的路由失效,(在这里表现为树形菜单获取失败 url404)
1.9.2 网关gateway添加配置类跨域放行
@Configuration
public class GulimallCorsConfiguration {

    @Bean
    public CorsWebFilter corsWebFilter(){
        UrlBasedCorsConfigurationSource source = new UrlBasedCorsConfigurationSource();

        CorsConfiguration corsConfiguration = new CorsConfiguration();

        //1、配置跨域
        corsConfiguration.addAllowedHeader("*");
        corsConfiguration.addAllowedMethod("*");
        corsConfiguration.addAllowedOrigin("*");
        corsConfiguration.setAllowCredentials(true);

        source.registerCorsConfiguration("/**",corsConfiguration);
        return new CorsWebFilter(source);
    }
}
1.9.3 注释掉后端项目renren-fast中的跨域文件
gulimall\renren-fast\src\main\java\io\renren\config\CorsConfig.java
如果不注释会重复请求
2 逻辑删除商品分类
2.1 配置全局逻辑删除规则
mybatis-plus:
  global-config:
    db-config:
      logic-delete-field: flag # 全局逻辑删除的实体字段名(since 3.3.0,配置后可以忽略不配置步骤2)
      logic-delete-value: 1 # 逻辑已删除值(默认为 1)
      logic-not-delete-value: 0 # 逻辑未删除值(默认为 0)
2.2 配置逻辑删除的组件bean(高版本可忽略)
2.3 实体类字段配置逻辑删除注解
	/**
	 * 是否显示[0-不显示,1显示],和配置文件相反可编辑具体的value
	 */
	@TableLogic(value = "1",delval = "0")
	private Integer showStatus;
2.4 结果验证

3 逻辑删除前端页面处理
4 新增商品分类
4.1 前端页面处理
//打开新增窗口时字段重新赋值,因为修改操作打开窗口要赋值
append(data) {
      console.log("append", data);
      this.dialogType = "add";
      this.title = "添加分类";
      this.dialogVisible = true;
      this.category.parentCid = data.catId;
      this.category.catLevel = data.catLevel * 1 + 1;
      this.category.catId = null;
      this.category.name = "";
      this.category.icon = "";
      this.category.productUnit = "";
      this.category.sort = 0;
      this.category.showStatus = 1;
    }

//添加三级分类
 addCategory() {
   console.log("提交的三级分类数据", this.category);
   this.$http({
     url: this.$http.adornUrl("/product/category/save"),
     method: "post",
     data: this.$http.adornData(this.category, false)
   }).then(({ data }) => {
     this.$message({
       message: "菜单保存成功",
       type: "success"
     });
     //关闭对话框
     this.dialogVisible = false;
     //刷新出新的菜单
     this.getMenus();
     //设置需要默认展开的菜单
     this.expandedKey = [this.category.parentCid];
   });
 },
4.2 后端处理
@RequestMapping("/save")
    public R save(@RequestBody CategoryEntity category){
		categoryService.save(category);

        return R.ok();
    }
5 修改商品分类
5.1 前端页面处理
//打开修改窗口
edit(data) {
      console.log("要修改的数据", data);
      this.dialogType = "edit";
      this.title = "修改分类";
      this.dialogVisible = true;

      //发送请求获取当前节点最新的数据
      this.$http({
        url: this.$http.adornUrl(`/product/category/info/${data.catId}`),
        method: "get"
      }).then(({ data }) => {
        //请求成功
        console.log("要回显的数据", data);
        this.category.name = data.data.name;
        this.category.catId = data.data.catId;
        this.category.icon = data.data.icon;
        this.category.productUnit = data.data.productUnit;
        this.category.parentCid = data.data.parentCid;
        this.category.catLevel = data.data.catLevel;
        this.category.sort = data.data.sort;
        this.category.showStatus = data.data.showStatus;
        /**
         *         parentCid: 0,
        catLevel: 0,
        showStatus: 1,
        sort: 0,
         */
      });
    },
//修改三级分类数据
    editCategory() {
      var { catId, name, icon, productUnit } = this.category;
      this.$http({
        url: this.$http.adornUrl("/product/category/update"),
        method: "post",
        data: this.$http.adornData({ catId, name, icon, productUnit }, false)
      }).then(({ data }) => {
        this.$message({
          message: "菜单修改成功",
          type: "success"
        });
        //关闭对话框
        this.dialogVisible = false;
        //刷新出新的菜单
        this.getMenus();
        //设置需要默认展开的菜单
        this.expandedKey = [this.category.parentCid];
      });
    },
5.2 后端处理
//查询
@RequestMapping("/info/{catId}")
    public R info(@PathVariable("catId") Long catId){
		CategoryEntity category = categoryService.getById(catId);
        return R.ok().put("data", category);
    }

@RequestMapping("/update")
    public R update(@RequestBody CategoryEntity category){
		categoryService.updateById(category);

        return R.ok();
    }
因为修改窗口赋值要重新查询一下最新的数据,所以放了查询的方法,返回data。前端解析data.data.字段
6 拖拽修改
6.1 前端页面处理(参考后面页面)
6.2 后端处理
@RequestMapping("/update/sort")
    public R updateSort(@RequestBody CategoryEntity[] category){
        categoryService.updateBatchById(Arrays.asList(category));
        return R.ok();
    }
7 批量删除
7.1 前端页面处理(参考后面页面)
7.2 后端处理
@RequestMapping("/delete")
    public R delete(@RequestBody Long[] catIds){
//		categoryService.removeByIds(Arrays.asList(catIds));
        categoryService.removeMenuByIds(Arrays.asList(catIds));

        return R.ok();
    }


@Override
public void removeMenuByIds(List<Long> asList) {

    //TODO 1.检查当前删除的菜单是否被别的地方引用
    baseMapper.deleteBatchIds(asList);
}
8. 前端页面category.vue
<template>
  <div>
    <el-switch v-model="draggable" active-text="开启拖拽" inactive-text="关闭拖拽"></el-switch>
    <el-button v-if="draggable" @click="batchSave">批量保存</el-button>
    <el-button type="danger" @click="batchDelete">批量删除</el-button>
    <el-tree
      :data="menus"
      :props="defaultProps"
      :expand-on-click-node="false"
      show-checkbox
      node-key="catId"
      :default-expanded-keys="expandedKey"
      :draggable="draggable"
      :allow-drop="allowDrop"
      @node-drop="handleDrop"
      ref="menuTree"
    >
      <span class="custom-tree-node" slot-scope="{ node, data }">
        <span>{{ node.label }}</span>
        <span>
          <el-button
            v-if="node.level <=2"
            type="text"
            size="mini"
            @click="() => append(data)"
          >Append</el-button>
          <el-button type="text" size="mini" @click="edit(data)">edit</el-button>
          <el-button
            v-if="node.childNodes.length==0"
            type="text"
            size="mini"
            @click="() => remove(node, data)"
          >Delete</el-button>
        </span>
      </span>
    </el-tree>

    <el-dialog
      :title="title"
      :visible.sync="dialogVisible"
      width="30%"
      :close-on-click-modal="false"
    >
      <el-form :model="category">
        <el-form-item label="分类名称">
          <el-input v-model="category.name" autocomplete="off"></el-input>
        </el-form-item>
        <el-form-item label="图标">
          <el-input v-model="category.icon" autocomplete="off"></el-input>
        </el-form-item>
        <el-form-item label="计量单位">
          <el-input v-model="category.productUnit" autocomplete="off"></el-input>
        </el-form-item>
      </el-form>
      <span slot="footer" class="dialog-footer">
        <el-button @click="dialogVisible = false">取 消</el-button>
        <el-button type="primary" @click="submitData">确 定</el-button>
      </span>
    </el-dialog>
  </div>
</template>

<script>
//这里可以导入其他文件(比如:组件,工具js,第三方插件js,json文件,图片文件等等)
//例如:import 《组件名称》 from '《组件路径》';

export default {
  //import引入的组件需要注入到对象中才能使用
  components: {},
  props: {},
  data() {
    return {
      pCid: [],
      draggable: false,
      updateNodes: [],
      maxLevel: 0,
      title: "",
      dialogType: "", //edit,add
      category: {
        name: "",
        parentCid: 0,
        catLevel: 0,
        showStatus: 1,
        sort: 0,
        productUnit: "",
        icon: "",
        catId: null
      },
      dialogVisible: false,
      menus: [],
      expandedKey: [],
      defaultProps: {
        children: "children",
        label: "name"
      }
    };
  },

  //计算属性 类似于data概念
  computed: {},
  //监控data中的数据变化
  watch: {},
  //方法集合
  methods: {
    getMenus() {
      this.$http({
        url: this.$http.adornUrl("/product/category/list/tree"),
        method: "get"
      }).then(({ data }) => {
        console.log("成功获取到菜单数据...", data.data);
        this.menus = data.data;
      });
    },
    batchDelete() {
      let catIds = [];
      let checkedNodes = this.$refs.menuTree.getCheckedNodes();
      console.log("被选中的元素", checkedNodes);
      for (let i = 0; i < checkedNodes.length; i++) {
        catIds.push(checkedNodes[i].catId);
      }
      this.$confirm(`是否批量删除【${catIds}】菜单?`, "提示", {
        confirmButtonText: "确定",
        cancelButtonText: "取消",
        type: "warning"
      })
        .then(() => {
          this.$http({
            url: this.$http.adornUrl("/product/category/delete"),
            method: "post",
            data: this.$http.adornData(catIds, false)
          }).then(({ data }) => {
            this.$message({
              message: "菜单批量删除成功",
              type: "success"
            });
            this.getMenus();
          });
        })
        .catch(() => {});
    },
    batchSave() {
      this.$http({
        url: this.$http.adornUrl("/product/category/update/sort"),
        method: "post",
        data: this.$http.adornData(this.updateNodes, false)
      }).then(({ data }) => {
        this.$message({
          message: "菜单顺序等修改成功",
          type: "success"
        });
        //刷新出新的菜单
        this.getMenus();
        //设置需要默认展开的菜单
        this.expandedKey = this.pCid;
        this.updateNodes = [];
        this.maxLevel = 0;
        // this.pCid = 0;
      });
    },
    handleDrop(draggingNode, dropNode, dropType, ev) {
      console.log("handleDrop: ", draggingNode, dropNode, dropType);
      //1、当前节点最新的父节点id
      let pCid = 0;
      let siblings = null;
      if (dropType == "before" || dropType == "after") {
        pCid =
          dropNode.parent.data.catId == undefined
            ? 0
            : dropNode.parent.data.catId;
        siblings = dropNode.parent.childNodes;
      } else {
        pCid = dropNode.data.catId;
        siblings = dropNode.childNodes;
      }
      this.pCid.push(pCid);

      //2、当前拖拽节点的最新顺序,
      for (let i = 0; i < siblings.length; i++) {
        if (siblings[i].data.catId == draggingNode.data.catId) {
          //如果遍历的是当前正在拖拽的节点
          let catLevel = draggingNode.level;
          if (siblings[i].level != draggingNode.level) {
            //当前节点的层级发生变化
            catLevel = siblings[i].level;
            //修改他子节点的层级
            this.updateChildNodeLevel(siblings[i]);
          }
          this.updateNodes.push({
            catId: siblings[i].data.catId,
            sort: i,
            parentCid: pCid,
            catLevel: catLevel
          });
        } else {
          this.updateNodes.push({ catId: siblings[i].data.catId, sort: i });
        }
      }

      //3、当前拖拽节点的最新层级
      console.log("updateNodes", this.updateNodes);
    },
    updateChildNodeLevel(node) {
      if (node.childNodes.length > 0) {
        for (let i = 0; i < node.childNodes.length; i++) {
          var cNode = node.childNodes[i].data;
          this.updateNodes.push({
            catId: cNode.catId,
            catLevel: node.childNodes[i].level
          });
          this.updateChildNodeLevel(node.childNodes[i]);
        }
      }
    },
    allowDrop(draggingNode, dropNode, type) {
      //1、被拖动的当前节点以及所在的父节点总层数不能大于3

      //1)、被拖动的当前节点总层数
      console.log("allowDrop:", draggingNode, dropNode, type);
      //
      this.countNodeLevel(draggingNode);
      //当前正在拖动的节点+父节点所在的深度不大于3即可
      let deep = Math.abs(this.maxLevel - draggingNode.level) + 1;
      console.log("深度:", deep);

      //   this.maxLevel
      if (type == "inner") {
        // console.log(
        //   `this.maxLevel:${this.maxLevel};draggingNode.data.catLevel:${draggingNode.data.catLevel};dropNode.level:${dropNode.level}`
        // );
        return deep + dropNode.level <= 3;
      } else {
        return deep + dropNode.parent.level <= 3;
      }
    },
    countNodeLevel(node) {
      //找到所有子节点,求出最大深度
      if (node.childNodes != null && node.childNodes.length > 0) {
        for (let i = 0; i < node.childNodes.length; i++) {
          if (node.childNodes[i].level > this.maxLevel) {
            this.maxLevel = node.childNodes[i].level;
          }
          this.countNodeLevel(node.childNodes[i]);
        }
      }
    },
    edit(data) {
      console.log("要修改的数据", data);
      this.dialogType = "edit";
      this.title = "修改分类";
      this.dialogVisible = true;

      //发送请求获取当前节点最新的数据
      this.$http({
        url: this.$http.adornUrl(`/product/category/info/${data.catId}`),
        method: "get"
      }).then(({ data }) => {
        //请求成功
        console.log("要回显的数据", data);
        this.category.name = data.data.name;
        this.category.catId = data.data.catId;
        this.category.icon = data.data.icon;
        this.category.productUnit = data.data.productUnit;
        this.category.parentCid = data.data.parentCid;
        this.category.catLevel = data.data.catLevel;
        this.category.sort = data.data.sort;
        this.category.showStatus = data.data.showStatus;
        /**
         *         parentCid: 0,
        catLevel: 0,
        showStatus: 1,
        sort: 0,
         */
      });
    },
    append(data) {
      console.log("append", data);
      this.dialogType = "add";
      this.title = "添加分类";
      this.dialogVisible = true;
      this.category.parentCid = data.catId;
      this.category.catLevel = data.catLevel * 1 + 1;
      this.category.catId = null;
      this.category.name = "";
      this.category.icon = "";
      this.category.productUnit = "";
      this.category.sort = 0;
      this.category.showStatus = 1;
    },

    submitData() {
      if (this.dialogType == "add") {
        this.addCategory();
      }
      if (this.dialogType == "edit") {
        this.editCategory();
      }
    },
    //修改三级分类数据
    editCategory() {
      var { catId, name, icon, productUnit } = this.category;
      this.$http({
        url: this.$http.adornUrl("/product/category/update"),
        method: "post",
        data: this.$http.adornData({ catId, name, icon, productUnit }, false)
      }).then(({ data }) => {
        this.$message({
          message: "菜单修改成功",
          type: "success"
        });
        //关闭对话框
        this.dialogVisible = false;
        //刷新出新的菜单
        this.getMenus();
        //设置需要默认展开的菜单
        this.expandedKey = [this.category.parentCid];
      });
    },
    //添加三级分类
    addCategory() {
      console.log("提交的三级分类数据", this.category);
      this.$http({
        url: this.$http.adornUrl("/product/category/save"),
        method: "post",
        data: this.$http.adornData(this.category, false)
      }).then(({ data }) => {
        this.$message({
          message: "菜单保存成功",
          type: "success"
        });
        //关闭对话框
        this.dialogVisible = false;
        //刷新出新的菜单
        this.getMenus();
        //设置需要默认展开的菜单
        this.expandedKey = [this.category.parentCid];
      });
    },

    remove(node, data) {
      var ids = [data.catId];
      this.$confirm(`是否删除【${data.name}】菜单?`, "提示", {
        confirmButtonText: "确定",
        cancelButtonText: "取消",
        type: "warning"
      })
        .then(() => {
          this.$http({
            url: this.$http.adornUrl("/product/category/delete"),
            method: "post",
            data: this.$http.adornData(ids, false)
          }).then(({ data }) => {
            this.$message({
              message: "菜单删除成功",
              type: "success"
            });
            //刷新出新的菜单
            this.getMenus();
            //设置需要默认展开的菜单
            this.expandedKey = [node.parent.data.catId];
          });
        })
        .catch(() => {});

      console.log("remove", node, data);
    }
  },
  //生命周期 - 创建完成(可以访问当前this实例)
  created() {
    this.getMenus();
  },
  //生命周期 - 挂载完成(可以访问DOM元素)
  mounted() {},
  beforeCreate() {}, //生命周期 - 创建之前
  beforeMount() {}, //生命周期 - 挂载之前
  beforeUpdate() {}, //生命周期 - 更新之前
  updated() {}, //生命周期 - 更新之后
  beforeDestroy() {}, //生命周期 - 销毁之前
  destroyed() {}, //生命周期 - 销毁完成
  activated() {} //如果页面有keep-alive缓存功能,这个函数会触发
};
</script>
<style scoped>
</style>
二、品牌管理
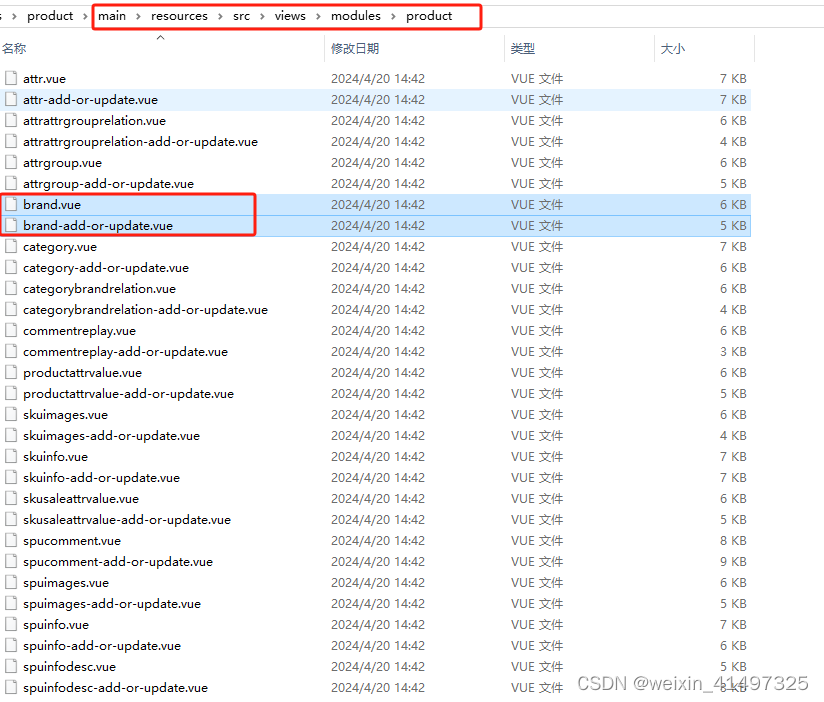
后续的项目使用renren-generator项目自动生成的前端vue页面
页面的生成路径为main\resources\src\views\modules\product。如下图
复制生成的页面到前端项目对应的目录下src\views\modules的对应模组中
1.暂时去掉权限过滤,返回全部权限
修改src\utils\index.js下的文件
/**
 * 是否有权限
 * @param {*} key
 */
export function isAuth (key) {
  // return JSON.parse(sessionStorage.getItem('permissions') || '[]').indexOf(key) !== -1 || false
  return true
}
2.新增菜单,设置路由
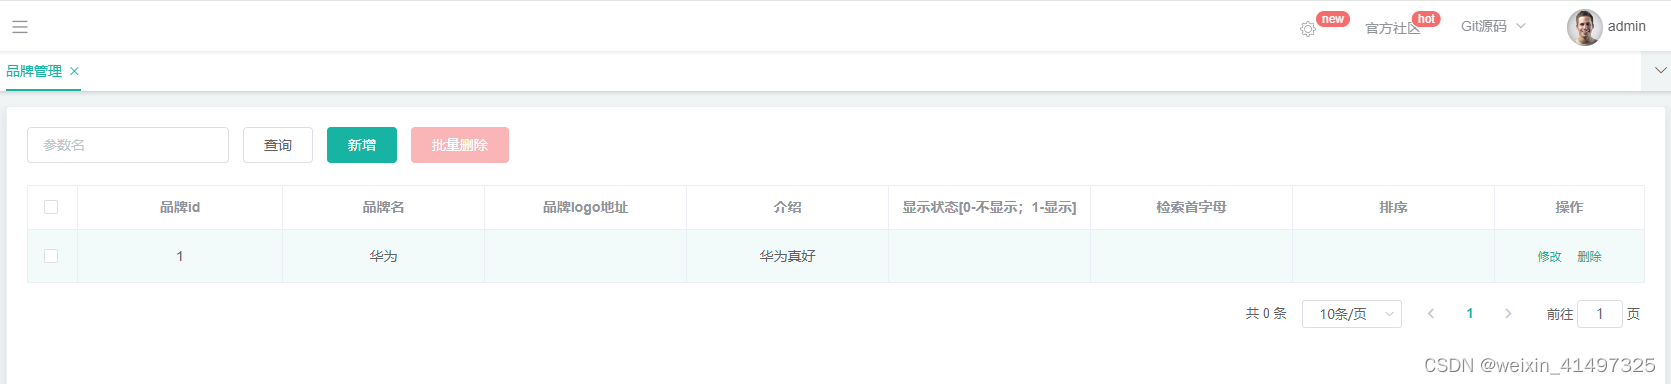
3.优化显示状态字段
前端代码增加
<el-table-column prop="showStatus" header-align="center" align="center" label="显示状态">
  <template slot-scope="scope">
    <el-switch
      v-model="scope.row.showStatus"
      active-color="#13ce66"
      inactive-color="#ff4949"
      :active-value="1"
      :inactive-value="0"
      @change="updateBrandStatus(scope.row)"
    ></el-switch>
  </template>
</el-table-column>


updateBrandStatus(data) {
  console.log("最新信息", data);
  let { brandId, showStatus } = data;
  //发送请求修改状态
  this.$http({
    url: this.$http.adornUrl("/product/brand/update/status"),
    method: "post",
    data: this.$http.adornData({ brandId, showStatus }, false)
  }).then(({ data }) => {
    this.$message({
      type: "success",
      message: "状态更新成功"
    });
  });
},
后端代码
@RequestMapping("/update/status")
    public R updateStatus(@RequestBody BrandEntity brand){
        brandService.updateById(brand);

        return R.ok();
    }
4. OSS上传文件
4.1 增加模块gulimall-third-party
<?xml version="1.0" encoding="UTF-8"?>
<project xmlns="http://maven.apache.org/POM/4.0.0" xmlns:xsi="http://www.w3.org/2001/XMLSchema-instance"
         xsi:schemaLocation="http://maven.apache.org/POM/4.0.0 https://maven.apache.org/xsd/maven-4.0.0.xsd">
    <modelVersion>4.0.0</modelVersion>
    <parent>
        <groupId>org.springframework.boot</groupId>
        <artifactId>spring-boot-starter-parent</artifactId>
        <version>2.3.1.RELEASE</version>
        <relativePath/> <!-- lookup parent from repository -->
    </parent>
    <groupId>com.atguigu.gulimall</groupId>
    <artifactId>gulimall-third-party</artifactId>
    <version>0.0.1-SNAPSHOT</version>
    <name>gulimall-third-party</name>
    <description>第三方服务</description>
    <properties>
        <java.version>8</java.version>
    </properties>
    <dependencies>
        <dependency>
            <groupId>com.atguigu.gulimall</groupId>
            <artifactId>gulimall-common</artifactId>
            <version>0.0.1-SNAPSHOT</version>
            <exclusions>
                <exclusion>
                    <groupId>com.baomidou</groupId>
                    <artifactId>mybatis-plus-boot-starter</artifactId>
                </exclusion>
            </exclusions>
        </dependency>

        <dependency>
            <groupId>org.springframework.boot</groupId>
            <artifactId>spring-boot-starter-web</artifactId>
        </dependency>

        <dependency>
            <groupId>org.springframework.cloud</groupId>
            <artifactId>spring-cloud-starter-openfeign</artifactId>
            <version>2.2.6.RELEASE</version>
        </dependency>
        <dependency>
            <groupId>org.springframework.boot</groupId>
            <artifactId>spring-boot-starter</artifactId>
        </dependency>

        <dependency>
            <groupId>org.springframework.boot</groupId>
            <artifactId>spring-boot-starter-test</artifactId>
            <scope>test</scope>
        </dependency>
        <!--阿里云文件上传-->
        <dependency>
            <groupId>com.alibaba.cloud</groupId>
            <artifactId>spring-cloud-starter-alicloud-oss</artifactId>
            <version>2.2.0.RELEASE</version>
        </dependency>
    </dependencies>

    <dependencyManagement>
        <dependencies>
            <dependency>
                <groupId>com.alibaba.cloud</groupId>
                <artifactId>spring-cloud-alibaba-dependencies</artifactId>
                <version>2.2.3.RELEASE</version>
                <type>pom</type>
                <scope>import</scope>
            </dependency>
        </dependencies>
    </dependencyManagement>

    <build>
        <plugins>
            <plugin>
                <groupId>org.springframework.boot</groupId>
                <artifactId>spring-boot-maven-plugin</artifactId>
            </plugin>
        </plugins>
    </build>

</project>
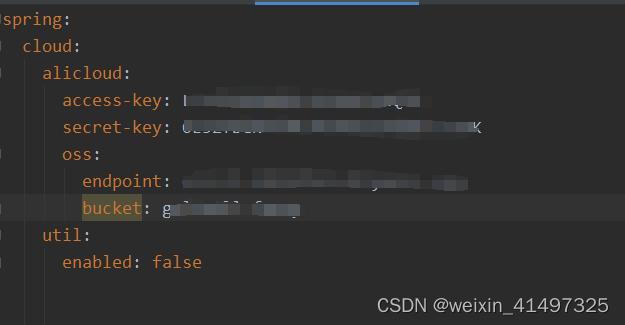
4.2 配置OSS及项目配置,这里只展示OSS
4.3 签名实现
package com.atguigu.gulimall.thirdparty.controller;

import com.aliyun.oss.OSS;
import com.aliyun.oss.common.utils.BinaryUtil;
import com.aliyun.oss.model.MatchMode;
import com.aliyun.oss.model.PolicyConditions;
import com.atguigu.common.utils.R;
import lombok.extern.slf4j.Slf4j;
import org.springframework.beans.factory.annotation.Autowired;
import org.springframework.beans.factory.annotation.Value;
import org.springframework.web.bind.annotation.RequestMapping;
import org.springframework.web.bind.annotation.RestController;

import java.text.SimpleDateFormat;
import java.util.Date;
import java.util.LinkedHashMap;
import java.util.Map;

@Slf4j
@RestController
public class OSSController {

    @Autowired
    private OSS ossClient;

    @Value("${spring.cloud.alicloud.oss.endpoint}")
    private String endpoint;

    @Value("${spring.cloud.alicloud.oss.bucket}")
    private String bucket;

    @Value("${spring.cloud.alicloud.access-key}")
    private String accessId;

    @RequestMapping("/oss/policy")
    public R policy() {
        // https://wts-gulimall.oss-cn-shanghai.aliyuncs.com/8bf441260bffa42f.jpg
        String host = "https://" + bucket + "." + endpoint; // host的格式为 bucketname.endpoint

        // callbackUrl为 上传回调服务器的URL,请将下面的IP和Port配置为您自己的真实信息。
        //String callbackUrl = "http://88.88.88.88:8888";
        String format = new SimpleDateFormat("yyyy-MM-dd").format(new Date());
        String dir = format + "/"; // 用户上传文件时指定的前缀。
        Map<String, String> respMap = null;
        try {
            long expireTime = 30;
            long expireEndTime = System.currentTimeMillis() + expireTime * 1000;
            Date expiration = new Date(expireEndTime);
            // PostObject请求最大可支持的文件大小为5 GB,即CONTENT_LENGTH_RANGE为5*1024*1024*1024。
            PolicyConditions policyConds = new PolicyConditions();
            policyConds.addConditionItem(PolicyConditions.COND_CONTENT_LENGTH_RANGE, 0, 1048576000);
            policyConds.addConditionItem(MatchMode.StartWith, PolicyConditions.COND_KEY, dir);

            String postPolicy = ossClient.generatePostPolicy(expiration, policyConds);
            byte[] binaryData = postPolicy.getBytes("utf-8");
            String encodedPolicy = BinaryUtil.toBase64String(binaryData);
            String postSignature = ossClient.calculatePostSignature(postPolicy);

            respMap = new LinkedHashMap<String, String>();
            respMap.put("accessid", accessId);
            respMap.put("policy", encodedPolicy);
            respMap.put("signature", postSignature);
            respMap.put("dir", dir);
            respMap.put("host", host);
            respMap.put("expire", String.valueOf(expireEndTime / 1000));
            // respMap.put("expire", formatISO8601Date(expiration));


        } catch (Exception e) {
           log.error("上传对象存储异常{}", e.getMessage(), e);
        } finally {
            ossClient.shutdown();
        }
        return R.ok().put("data", respMap);
    }

}
4.4 验证签名
http://localhost:8087/oss/policy

{
  "msg": "success",
  "code": 0,
  "data": {
    "accessid": "LTAI5tQHhQBtcd12XVYadQ78",
    "policy": "eyJleHBpcmF0aW9uIjoiMjAyNC0wNC0yNFQwNzoyMzowOC4wNzNaIiwiY29uZGl0aW9ucyI6W1siY29udGVudC1sZW5ndGgtcmFuZ2UiLDAsMTA0ODU3NjAwMF0sWyJzdGFydHMtd2l0aCIsIiRrZXkiLCIyMDI0LTA0LTI0LyJdXX0=",
    "signature": "1HUoCpL0dzI62HVXRixKqwBj51c=",
    "dir": "2024-04-24/",
    "host": "https://gulimall-xxx.oss-cn-shenzhen.aliyuncs.com",
    "expire": "1713943388"
  }
}
4.5 配置网关,验证通过网关访问
- id: third_party_route
  uri: lb://gulimall-third-party
  predicates:
    - Path=/api/thirdparty/**
  filters:
    - RewritePath=/api/thirdparty/(?<segment>.*),/$\{segment}
4.6 前端页面改动
OSS服务器的配置、用户签名、跨域设置不做赘述
细节及详细实现细节参考 https://blog.csdn.net/wts563540/article/details/109126661?spm=1001.2014.3001.5506
5. JSR303 参数校验
什么是JSR303 参数校验?
JSR303 是一套 JavaBean 参数校验的标准,它定义了很多常用的校验注解,我们可以直接将这些注解加在我们 JavaBean 的属性上面,就是类里面的字段上面,就可以在需要校验的时候进行校验了
5.1 实体类字段加校验注解
@NotBlank(message = "品牌名必须提交")	//没有message采用原始报错
private String name;

@URL(message = "logo必须是一个合法的url地址")
private String logo;
//其他字段校验注解还有很多
如果@URL无法导入可能是缺少了jar包,需要手动引入
<dependency>
    <groupId>org.hibernate</groupId>
    <artifactId>hibernate-validator</artifactId>
    <version>6.0.17.Final</version>
</dependency>
5.2 请求参数@Valid开启校验
@RequestMapping("/save")
public R save(@Valid @RequestBody BrandEntity brand){
brandService.save(brand);

    return R.ok();
}
我自己有个问题,返回400代表参数校验失败,但没返回默认的报错信息errors,求解
{
    "timestamp": "2024-04-24T10:45:05.750+00:00",
    "status": 400,
    "error": "Bad Request",
    "message": "",
    "path": "/product/brand/save"
}
5.3 自定义错误封装
紧跟一个BindResult,就可以获取到校验的结果。拿到校验的结果,就可以自定义的封装
  @RequestMapping("/save")
  public R save(@Valid @RequestBody BrandEntity brand, BindingResult result){
      if( result.hasErrors()){
          Map<String,String> map=new HashMap<>();
          //1.获取错误的校验结果
          result.getFieldErrors().forEach((item)->{
              //获取发生错误时的message
              String message = item.getDefaultMessage();
              //获取发生错误的字段
              String field = item.getField();
              map.put(field, message);
          });
          return R.error(400,"提交的数据不合法").put("data",map);
      }else {

      }
	brandService.save(brand);

    return R.ok();
  }
5.4 全局异常处理
@Slf4j
@RestControllerAdvice(basePackages = "com.atguigu.gulimall.product.controller")
public class GulimallExceptionControllerAdvice {

 @ExceptionHandler(MethodArgumentNotValidException.class)
 public R handleVaildException(MethodArgumentNotValidException e){//申明捕获那个异常类
     log.error("数据校验出现问题{},异常类型:{}",e.getMessage(), e.getClass());
     BindingResult bindingResult = e.getBindingResult();
     Map<String, String> errorMap = new HashMap<>();
     bindingResult.getFieldErrors()
             .forEach(fieldError -> errorMap.put(fieldError.getField(),fieldError.getDefaultMessage()));
//        return R.error( 400,"数据校验出现问题").put("data",errorMap);
     return R.error(BizCodeEnum.VAILD_EXCEPTION.getCode(), BizCodeEnum.VAILD_EXCEPTION.getMessage()).put("data", errorMap);
 }

 @ExceptionHandler(value = Throwable.class)
 public R handleException(Throwable throwable) {

     log.error("错误:", throwable);
     return R.error(BizCodeEnum.UNKNOW_EXCEPTION.getCode(), BizCodeEnum.UNKNOW_EXCEPTION.getMessage());
    }
@RestControllerAdvice是复合注解,包含了@ControllerAdvice和@ResponseBody
@ExceptionHandler一般是用来自定义异常的。可以认为它是一个异常拦截器(处理器)。
错误信息枚举类
/**
 * @Author fanny
 * @Description
 * @Date 2024/4/24
 * * 错误码和错误信息定义类
 * 1. 错误码定义规则为5为数字
 * 2. 前两位表示业务场景,最后三位表示错误码。例如:100001。10:通用 001:系统未知异常
 * 3. 维护错误码后需要维护错误描述,将他们定义为枚举形式
 * 错误码列表:
 *  10: 通用
 *      001:参数格式校验
 *      002:短信验证码频率太高
 *  11: 商品
 *  12: 订单
 *  13: 购物车
 *  14: 物流
 *  15:用户
 **/
public enum BizCodeEnum {

    UNKNOW_EXCEPTION(10000,"系统未知异常"),
    VAILD_EXCEPTION(10001,"参数格式校验失败"),
    TO_MANY_REQUEST(10002,"请求流量过大,请稍后再试"),
    SMS_CODE_EXCEPTION(10002,"验证码获取频率太高,请稍后再试"),
    PRODUCT_UP_EXCEPTION(11000,"商品上架异常"),
    USER_EXIST_EXCEPTION(15001,"存在相同的用户"),
    PHONE_EXIST_EXCEPTION(15002,"存在相同的手机号"),
    NO_STOCK_EXCEPTION(21000,"商品库存不足"),
    LOGINACCT_PASSWORD_EXCEPTION(15003,"账号或密码错误"),
    ;

    private Integer code;
    private String message;

    BizCodeEnum(Integer code, String message) {
        this.code = code;
        this.message = message;
    }

    public Integer getCode() {
        return code;
    }

    public String getMessage() {
        return message;
    }
}
5.5 分组校验功能(完成多场景的复杂校验)
5.5.1 给校验注解,标注上groups,指定什么情况下才需要进行校验
common模块添加分组类
package com.atguigu.common.valid;
 //新增参数校验器
public interface AddGroup {
}
package com.atguigu.common.valid;
 //修改参数校验器
public interface UpdateGroup {
}
//修改显示状态字段的校验器
public interface UpdateStatusGroup {
}
5.5.2 给校验注解,标注上groups,指定什么情况下才需要进行校验
@Data
@TableName("pms_brand")
public class BrandEntity implements Serializable {
	private static final long serialVersionUID = 1L;

	/**
	 * 品牌id
	 */
	@NotNull(message = "修改必须指定品牌id",groups = {UpdateGroup.class})
	@Null(message = "新增不能指定id",groups = {AddGroup.class})
	@TableId
	private Long brandId;
	/**
	 * 品牌名
	 */
	@NotBlank(message = "品牌名必须提交",groups = {AddGroup.class,UpdateGroup.class})
	private String name;
	/**
	 * 品牌logo地址
	 */
	@NotNull(groups = {AddGroup.class})
	@URL(message = "logo必须是一个合法的url地址")
	private String logo;
	/**
	 * 介绍
	 */
	private String descript;
	/**
	 * 显示状态[0-不显示;1-显示]
	 */
	@NotNull(groups = {AddGroup.class, UpdateGroup.class})
	private Integer showStatus;
	/**
	 * 检索首字母
	 */
	@NotEmpty(groups={AddGroup.class})
	@Pattern(regexp="^[a-zA-Z]$",message = "检索首字母必须是一个字母",groups={AddGroup.class,UpdateGroup.class})
	private String firstLetter;
	/**
	 * 排序
	 */
	@NotNull(groups={AddGroup.class})
	@Min(value = 0,message = "排序必须大于等于0",groups={AddGroup.class,UpdateGroup.class})
	private Integer sort;

}
指定在更新和添加的时候,都需要进行校验
在这种情况下,没有指定分组的校验注解,默认是不起作用的。想要起作用就必须要加groups。
5.5.3业务方法参数上使用@Validated注解
@RequestMapping("/save")
public R save(@Validated(AddGroup.class) @RequestBody BrandEntity brand){
    brandService.save(brand);
    return R.ok();
}

@RequestMapping("/update")
public R update(@Validated(UpdateGroup.class) @RequestBody BrandEntity brand){
	brandService.updateById(brand);
    return R.ok();
}
默认情况下,在分组校验情况下,没有指定分组的校验注解,将不会生效,它只会在分组的情况下生效
6. 自定义校验
6.1 编写一个自定义的校验注解
package com.atguigu.common.valid;

import javax.validation.Constraint;
import javax.validation.Payload;
import java.lang.annotation.Documented;
import java.lang.annotation.Retention;
import java.lang.annotation.Target;

import static java.lang.annotation.ElementType.*;
import static java.lang.annotation.RetentionPolicy.RUNTIME;

/**
 * @Author Jimmy
 * @Description
 * @Date 2024/4/24
 **/
@Documented
@Constraint(validatedBy = { ListValueConstraintValidator.class })
@Target({ METHOD, FIELD, ANNOTATION_TYPE, CONSTRUCTOR, PARAMETER, TYPE_USE })
@Retention(RUNTIME)
public @interface ListValue {
    String message() default "{com.xunqi.common.valid.ListValue.message}";

    Class<?>[] groups() default { };

    Class<? extends Payload>[] payload() default { };

    int[] vals() default { };
}
参考原生的校验注解,如@NotEmpty
package javax.validation.constraints;

import java.lang.annotation.Documented;
import java.lang.annotation.ElementType;
import java.lang.annotation.Repeatable;
import java.lang.annotation.Retention;
import java.lang.annotation.RetentionPolicy;
import java.lang.annotation.Target;
import javax.validation.Constraint;
import javax.validation.Payload;

@Documented
@Constraint(
    validatedBy = {}
)
@Target({ElementType.METHOD, ElementType.FIELD, ElementType.ANNOTATION_TYPE, ElementType.CONSTRUCTOR, ElementType.PARAMETER, ElementType.TYPE_USE})
@Retention(RetentionPolicy.RUNTIME)
@Repeatable(NotEmpty.List.class)
public @interface NotEmpty {
    String message() default "{javax.validation.constraints.NotEmpty.message}";

    Class<?>[] groups() default {};

    Class<? extends Payload>[] payload() default {};

    @Target({ElementType.METHOD, ElementType.FIELD, ElementType.ANNOTATION_TYPE, ElementType.CONSTRUCTOR, ElementType.PARAMETER, ElementType.TYPE_USE})
    @Retention(RetentionPolicy.RUNTIME)
    @Documented
    public @interface List {
        NotEmpty[] value();
    }
}
6.2 编写一个自定义的校验器
package com.atguigu.common.valid;

import javax.validation.ConstraintValidator;
import javax.validation.ConstraintValidatorContext;
import java.util.HashSet;
import java.util.Set;

/**
 * @Author Jimmy
 * @Description
 * @Date 2024/4/24
 **/
public class ListValueConstraintValidator implements ConstraintValidator<ListValue,Integer> {

    private Set<Integer> set = new HashSet<>();

    /**
     * 初始化方法
     * @param constraintAnnotation
     */
    @Override
    public void initialize(ListValue constraintAnnotation) {
        int[] vals = constraintAnnotation.vals();

        for (int val : vals) {
            set.add(val);
        }
    }

    /**
     * 判断是否效验成功
     * @param value 需要效验的值
     * @param context
     * @return
     */
    @Override
    public boolean isValid(Integer value, ConstraintValidatorContext context) {
        //判断是否有包含的值
        boolean contains = set.contains(value);

        return contains;
    }
}
6.3 关联自定义的校验器和自定义的校验注解
@Constraint(validatedBy = { ListValueConstraintValidator.class })
报错信息文件ValidationMessages.properties
com.atguigu.common.valid.ListValue.message=必须提交指定的值
6.3 使用自定义注解
BrandEntity实体类修改showStatus校验
/**
	 * 显示状态[0-不显示;1-显示]
	 */
//	@Pattern()
	@NotNull(groups = {AddGroup.class, UpdateStatusGroup.class})
	@ListValue(vals={0,1},groups = {AddGroup.class, UpdateStatusGroup.class})
	private Integer showStatus;
地址:http://localhost:88/api/product/brand/save
参数:{"name":"","logo":"abc","id":1,"showStatus":4}

{
    "msg": "参数格式校验失败",
    "code": 10001,
    "data": {
        "name": "品牌名必须提交",
        "logo": "logo必须是一个合法的url地址",
        "showStatus": "必须提交指定的值",
        "sort": "不能为null",
        "firstLetter": "不能为空"
    }
}


 5595
5595


 被折叠的 条评论
为什么被折叠?
被折叠的 条评论
为什么被折叠?
 到【灌水乐园】发言


