


目录
1.父传后代 ( 后代拿到了父的数据 )
1. 父组件引入子组件,绑定数据
<List :str1=‘str1’></List>
子组件通过props来接收
props:{
		str1:{
			type:String,
			default:''
		}
	}
***这种方式父传子很方便,但是父传给孙子辈分的组件就很麻烦(父=》子=》孙)
这种方式:子不能直接修改父组件的数据
2. 子组件直接使用父组件的数据
子组件通过:this.$parent.xxx使用父组件的数据
这种方式:子可以直接修改父组件的数据
3. 依赖注入(使用 provide/inject API)
优势:父组件可以直接向某个后代组件传值(不让一级一级的传递)
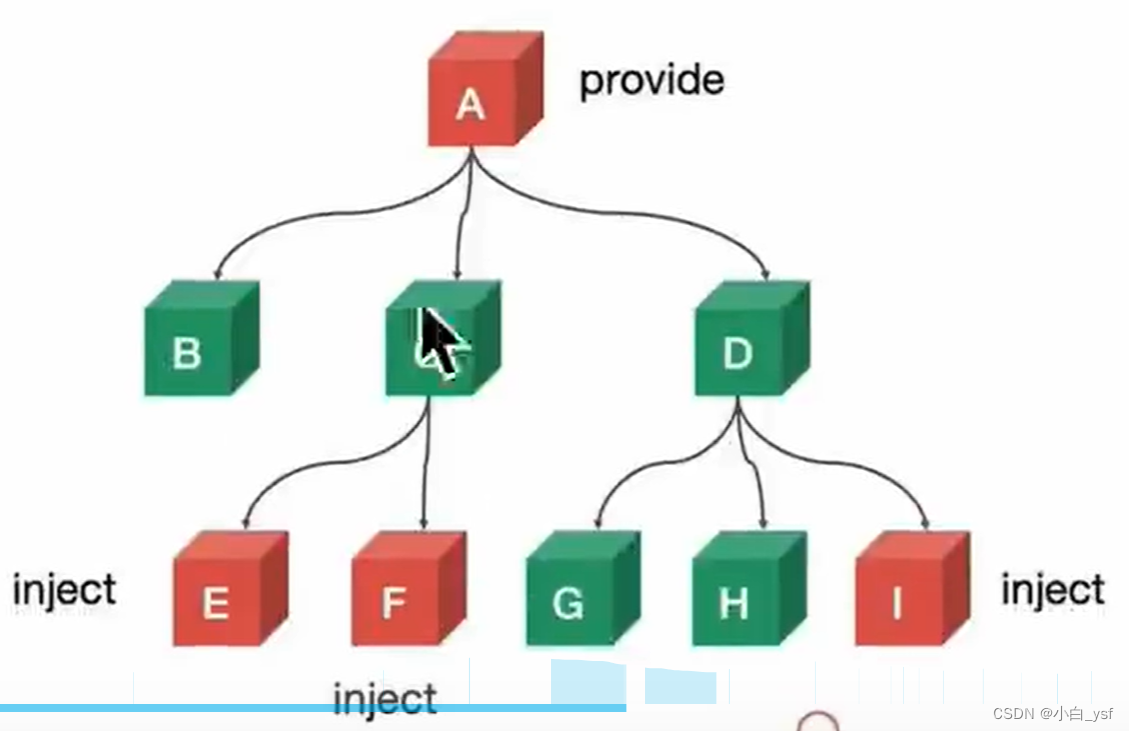
1.在祖先组件中使用 provide
在祖先组件中,你可以使用 provide 选项来提供数据或方法。这些数据或方法可以被任何后代组件通过 inject 选项来接收。
<!-- AncestorComponent.vue -->
<template>
  <div>
    <DescendantComponent />
  </div>
</template>

<script>
import DescendantComponent from './DescendantComponent.vue';

export default {
  components: {
    DescendantComponent
  },
  provide() {
    return {
      foo: 'foo',
      myMethod: this.myMethod
    };
  },
  methods: {
    myMethod() {
      console.log('This is a method from AncestorComponent.');
    }
  }
};
</script>
2.在后代组件中使用 inject
在后代组件中,你可以使用 inject 选项来接收在祖先组件中 provide 的数据或方法。
<!-- DescendantComponent.vue -->
<template>
  <div>
    <p>{{ foo }}</p>
    <button @click="callAncestorMethod">Call Ancestor Method</button>
  </div>
</template>

<script>
export default {
  inject: ['foo', 'myMethod'],
  methods: {
    callAncestorMethod() {
      this.myMethod();
    }
  }
};
</script>
在这个例子中,DescendantComponent 接收了 foo 字符串和 myMethod 方法,它们都是在 AncestorComponent 中通过 provide 提供的。
2.后代传父 (父拿到了后代的数据)
1. 子组件传值给父组件
子组件定义自定义事件 this.$emit
子组件中:
// ChildComponent.vue
export default {
  methods: {
    sendToParent() {
      this.$emit('child-event', 'Data from child');
    }
  }
};
父组件中:
<!-- ParentComponent.vue -->
<template>
  <div>
    <ChildComponent @child-event="handleChildEvent" />
  </div>
</template>

<script>
// ...
export default {
  // ...
  methods: {
    handleChildEvent(data) {
      console.log('Received data from child:', data);
    }
  }
};
</script>
2. 父组件直接拿到子组件的数据
<List ref=‘child’></List>
this.$refs.child
下面是一个简单的例子,展示了如何在父组件中通过 $refs 访问子组件的方法:
<!-- ChildComponent.vue -->
<template>
  <div>
    <button @click="sayHello">Say Hello</button>
  </div>
</template>

<script>
export default {
  methods: {
    sayHello() {
      console.log('Hello from ChildComponent!');
    }
  }
};
</script>

<!-- ParentComponent.vue -->
<template>
  <div>
    <ChildComponent ref="child" />
    <button @click="callChildMethod">Call Child's Method</button>
  </div>
</template>

<script>
import ChildComponent from './ChildComponent.vue';

export default {
  components: {
    ChildComponent
  },
  methods: {
    callChildMethod() {
      this.$refs.child.sayHello(); // 调用子组件的 sayHello 方法
    }
  }
};
</script>
在这个例子中,点击父组件的按钮会触发 callChildMethod 方法,该方法通过 this.$refs.child.sayHello() 调用了子组件的 sayHello 方法。
3.平辈之间的传值 ( 兄弟可以拿到数据 )
通过新建bus.js文件来做
在 Vue.js 中,如果你想要在不直接依赖父子组件关系的情况下进行组件间的通信,一个常见的方法是创建一个全局的事件总线(Event Bus)。你可以通过创建一个新的 Vue 实例来作为这个事件总线,并在你的组件中通过它来进行事件的触发
($emit)和监听($on)。
以下是如何通过新建一个 bus.js 文件来创建全局事件总线的步骤:
创建 bus.js 文件
在你的项目根目录或合适的地方,创建一个 bus.js 文件,并导出一个新的 Vue 实例:
// bus.js
import Vue from 'vue';

export const EventBus = new Vue();
在组件中触发事件 ,在你的组件中,你可以导入 EventBus 并使用 $emit 方法来触发事件:
// ChildComponent.vue
<template>
  <button @click="notify">Notify Parent</button>
</template>

<script>
import { EventBus } from './bus.js'; // 假设 bus.js 和当前文件在同一目录下

export default {
  methods: {
    notify() {
      EventBus.$emit('child-event', 'Data from child');
    }
  }
};
</script>
在组件中监听事件, 在另一个组件中,你可以导入 EventBus 并使用 $on 方法来监听事件:
// ParentComponent.vue 或其他任何组件
<script>
import { EventBus } from './bus.js'; // 假设 bus.js 和当前文件在同一目录下

export default {
  created() {
    EventBus.$on('child-event', (data) => {
      console.log('Received data from child:', data);
    });
  },
  beforeDestroy() {
    // 清除事件监听,避免内存泄漏
    EventBus.$off('child-event');
  }
};
</script>
注意,在组件销毁(beforeDestroy 或 destroyed 钩子)时,你应该使用 $off 方法来移除事件监听器,以避免内存泄漏。
使用事件总线的一个缺点是它可能导致你的应用状态变得难以追踪,特别是当你的应用变得复杂并且有很多组件在相互通信时。因此,尽管事件总线在某些场景下很有用,但在设计你的应用架构时,也要考虑其他状态管理解决方案,如 Vuex。


 901
901


 被折叠的 条评论
为什么被折叠?
被折叠的 条评论
为什么被折叠?
 到【灌水乐园】发言


