


为什么要在项目中整合多数据源?
在一些中大型的项目中,业务需求复杂,数据分布散乱,项目的可维护性、稳定性、响应速度等时刻都面临着挑战,如何有效的解决这些问题,是我们需要考虑的问题。分布式数据库的读写分离,是一种不错的解决方案,要实现读写分离便离不开多数据源的整合。当然,这只是我们使用多数据源的一种情况。
接下来我们通过讲解 SpringBoot 整合 MyBatis 访问 MySQL 多数据源来总结相关知识点。
现在我们考虑,假设在实际的项目应用中,有两个不同的数据源 test01和test02,那么项目中应该如何区分数据源?
在本地MySQL数据库中分别创建t_user表,字段分别是 id(主键自增)、name(姓名)、age(年龄)

1、分包结构
将使用不同数据源的业务代码分别放到不同的目录结构中。
实现如下:
IDEA工具创建一个SpringBoot项目,并添加相关依赖。

Next

POM

编写application.properties配置文件,并添加多数据源配置
spring.datasource.test01.driver-class-name=com.mysql.cj.jdbc.Driver
spring.datasource.test01.jdbc-url=jdbc:mysql://localhost:3306/test01?useUnicode=true&characterEncoding=utf-8&serverTimezone=UTC
spring.datasource.test01.username=root
spring.datasource.test01.password=1q2w3e4r5t

spring.datasource.test02.driver-class-name=com.mysql.cj.jdbc.Driver
spring.datasource.test02.jdbc-url=jdbc:mysql://localhost:3306/test02?useUnicode=true&characterEncoding=utf-8&serverTimezone=UTC
spring.datasource.test02.username=root
spring.datasource.test02.password=1q2w3e4r5t
分别创建 Test01DataSourceConfig 和 Test02DataSourceConfig 数据源配置类
@Configuration
@MapperScan(basePackages = "com.demo.mapper01", sqlSessionTemplateRef = "test01SqlSessionTemplate")
public class Test01DataSourceConfig {

    @Bean(name = "test01DataSource")
    @Primary
    @ConfigurationProperties(prefix = "spring.datasource.test01") //读取配置文件中以 spring.datasource.test01 开头的配置
    public DataSource testDataSource() {
        return DataSourceBuilder.create().build();
    }
    @Bean(name = "test01SqlSessionFactory")
    @Primary
    public SqlSessionFactory testSqlSessionFactory(@Qualifier("test01DataSource") DataSource dataSource)
            throws Exception {
        SqlSessionFactoryBean bean = new SqlSessionFactoryBean();
        bean.setDataSource(dataSource);
        return bean.getObject();
    }

    @Bean(name = "test01SqlSessionTemplate")
    @Primary
    public SqlSessionTemplate testSqlSessionTemplate(
            @Qualifier("test01SqlSessionFactory") SqlSessionFactory sqlSessionFactory) throws Exception {
        return new SqlSessionTemplate(sqlSessionFactory);
    }

}
@Configuration
@MapperScan(basePackages = "com.demo.mapper02", sqlSessionTemplateRef = "test02SqlSessionTemplate")
public class Test02DataSourceConfig {
@Bean(name = "test02DataSource")
@ConfigurationProperties(prefix = "spring.datasource.test02")//读取配置文件中以 spring.datasource.test02 开头的配置
public DataSource testDataSource() {
return DataSourceBuilder.create().build();
}
@Bean(name = "test02SqlSessionFactory")
public SqlSessionFactory testSqlSessionFactory(@Qualifier("test02DataSource") DataSource dataSource)
throws Exception {
SqlSessionFactoryBean bean = new SqlSessionFactoryBean();
bean.setDataSource(dataSource);
return bean.getObject();
}
@Bean(name = "test02SqlSessionTemplate")
public SqlSessionTemplate testSqlSessionTemplate(
@Qualifier("test02SqlSessionFactory") SqlSessionFactory sqlSessionFactory) throws Exception {
return new SqlSessionTemplate(sqlSessionFactory);
}
}注意 MapperScan basePackages 扫包范围,对应不同的数据源
创建实体类对象 TUser
public class TUser {
    //主键id
    private Integer id;
    //姓名
    private String name;
    //年龄
    private Integer age;

    public Integer getId() {
        return id;
    }

    public void setId(Integer id) {
        this.id = id;
    }

    public String getName() {
        return name;
    }

    public void setName(String name) {
        this.name = name;
    }

    public Integer getAge() {
        return age;
    }

    public void setAge(Integer age) {
        this.age = age;
    }
}
创建文件目录 mapper01 及 mapper02,并新建MyBatis映射文件
/**
 * 对应 Test01DataSourceConfig
 **/
@Mapper
public interface UserMapper01 {
    //保存对象
    @Insert("insert into t_user (name,age) values (#{name},#{age})")
    void save(TUser tUser);
    //查找指定对象
    @Select("select * from t_user where id = #{id}")
    TUser findUser(Integer id);
    //删除指定对象
    @Delete("delete from t_user where id = #{id}")
    void deleteUser(Integer id);
}
/**
* 对应 Test02DataSourceConfig
**/
@Mapper
public interface UserMapper02 {
//保存对象
@Insert("insert into t_user (name,age) values (#{name},#{age})")
void save(TUser tUser);
//查找指定对象
@Select("select * from t_user where id = #{id}")
TUser findUser(Integer id);
//删除指定对象
@Delete("delete from t_user where id = #{id}")
void deleteUser(Integer id);
}
创建Controller并引入 Mapper 对象
@RestController
@RequestMapping("/user")
public class UserController {

    @Autowired
    private UserMapper01 userMapper01;
    @Autowired
    private UserMapper02 userMapper02;

    @RequestMapping("/save01")
    public String saveUser01(){
        TUser user = new TUser();
        user.setAge(30);
        user.setName("A");
        userMapper01.save(user);
        return "success";
    }

    @RequestMapping("/save02")
    public String saveUser02(){
        TUser user = new TUser();
        user.setAge(30);
        user.setName("B");
        userMapper02.save(user);
        return "success";
    }

    @RequestMapping("/findUser01")
    public TUser findUser01(@Param("id") Integer id){
       return userMapper01.findUser(id);
    }

    @RequestMapping("/findUser02")
    public TUser findUser02(@Param("id") Integer id){
        return userMapper02.findUser(id);
    }
}
以上就是全部代码,下面我们来看看配置好多数据源的效果
启动程序
访问:http://localhost:8080/user/save01

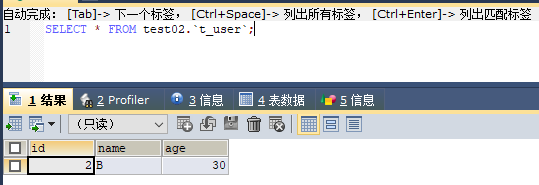
访问:http://localhost:8080/user/save02


 1541
1541


 被折叠的 条评论
为什么被折叠?
被折叠的 条评论
为什么被折叠?
 到【灌水乐园】发言


