


目录
2.1、安装 epel-release源和 源管理工具yum-utils
2.7.3、在Nginx的html目录下新建phpinfo.php文件
4.5、将Wordpress解压后的目录,复制到Nginx的html目录下
4.6、修改Nginx.conf中的根目录为/opt/nginx/html/wordpress
4.8.3、无法写入wp-config.php文件,手动创建wp-config.php
1、安装Nginx
1.1、Nginx下载
nginx下载地址:http://nginx.org/en/download.html
1.1.1、创建一个目录,存放下载的安装包
[root@VM-12-13-centos ~]# mkdir software1.1.2、进入目录,并使用wget下载安装包。
[root@VM-12-13-centos ~]# cd software
[root@VM-12-13-centos software]# wget http://nginx.org/download/nginx-1.21.6.tar.gz
--2022-06-13 10:28:56--  http://nginx.org/download/nginx-1.21.6.tar.gz
正在解析主机 nginx.org (nginx.org)... 52.58.199.22, 3.125.197.172, 2a05:d014:edb:5702::6, ...
正在连接 nginx.org (nginx.org)|52.58.199.22|:80... 已连接。
已发出 HTTP 请求,正在等待回应... 200 OK
长度:1073364 (1.0M) [application/octet-stream]
正在保存至: “nginx-1.21.6.tar.gz”

100%[==================================================================================================================>] 1,073,364    863KB/s 用时 1.2s

2022-06-13 10:28:58 (863 KB/s) - 已保存 “nginx-1.21.6.tar.gz” [1073364/1073364])
[root@VM-12-13-centos software]# ls -l
总用量 1052
-rw-r--r-- 1 root root 1073364 1月  25 23:11 nginx-1.21.6.tar.gz
1.2、Nginx安装包解压到当前目录
[root@VM-12-13-centos software]# tar -zvxf nginx-1.21.6.tar.gz
1.3、编译安装Nginx
1.3.1、指定安装目录,并启用SSL模块
简单说明:./configure:一般用来生成 Makefile,为下一步的编译做准备
#进入nginx解压目录
[root@VM-12-13-centos software]# cd nginx-1.21.6
#使用prefix参数指定安装目录,并启用SSL模块,后续使用https时需要用
[root@VM-12-13-centos nginx-1.21.6]# ./configure --prefix=/opt/nginx --with-http_ssl_module

#各配置文件目录情况
Configuration summary
  + using system PCRE library
  + using system OpenSSL library
  + using system zlib library

  nginx path prefix: "/opt/nginx"
  nginx binary file: "/opt/nginx/sbin/nginx"
  nginx modules path: "/opt/nginx/modules"
  nginx configuration prefix: "/opt/nginx/conf"
  nginx configuration file: "/opt/nginx/conf/nginx.conf"
  nginx pid file: "/opt/nginx/logs/nginx.pid"
  nginx error log file: "/opt/nginx/logs/error.log"
  nginx http access log file: "/opt/nginx/logs/access.log"
  nginx http client request body temporary files: "client_body_temp"
  nginx http proxy temporary files: "proxy_temp"
  nginx http fastcgi temporary files: "fastcgi_temp"
  nginx http uwsgi temporary files: "uwsgi_temp"
  nginx http scgi temporary files: "scgi_temp"

[root@VM-12-13-centos nginx-1.21.6]#
1.3.2、编译及安装
make:开始进行源代码编译,以及一些功能的提供,并将源码翻译成计算机能识别的二进制语言 make install:将make翻译的二进制文件,进行读写并安装
[root@VM-12-13-centos nginx-1.21.6]# make
[root@VM-12-13-centos nginx-1.21.6]# make install
1.3.3、启动Nginx
#进入安装目录
[root@VM-12-13-centos nginx-1.21.6]# cd /opt/nginx/sbin
#启动Nginx
[root@VM-12-13-centos sbin]# ./nginx
#查看Nginx进程是否启动
[root@VM-12-13-centos sbin]# ps -ef |grep nginx
root     25069     1  0 10:49 ?        00:00:00 nginx: master process ./nginx
nobody   25070 25069  0 10:49 ?        00:00:00 nginx: worker process
root     25368 11023  0 10:50 pts/0    00:00:00 grep --color=auto nginx
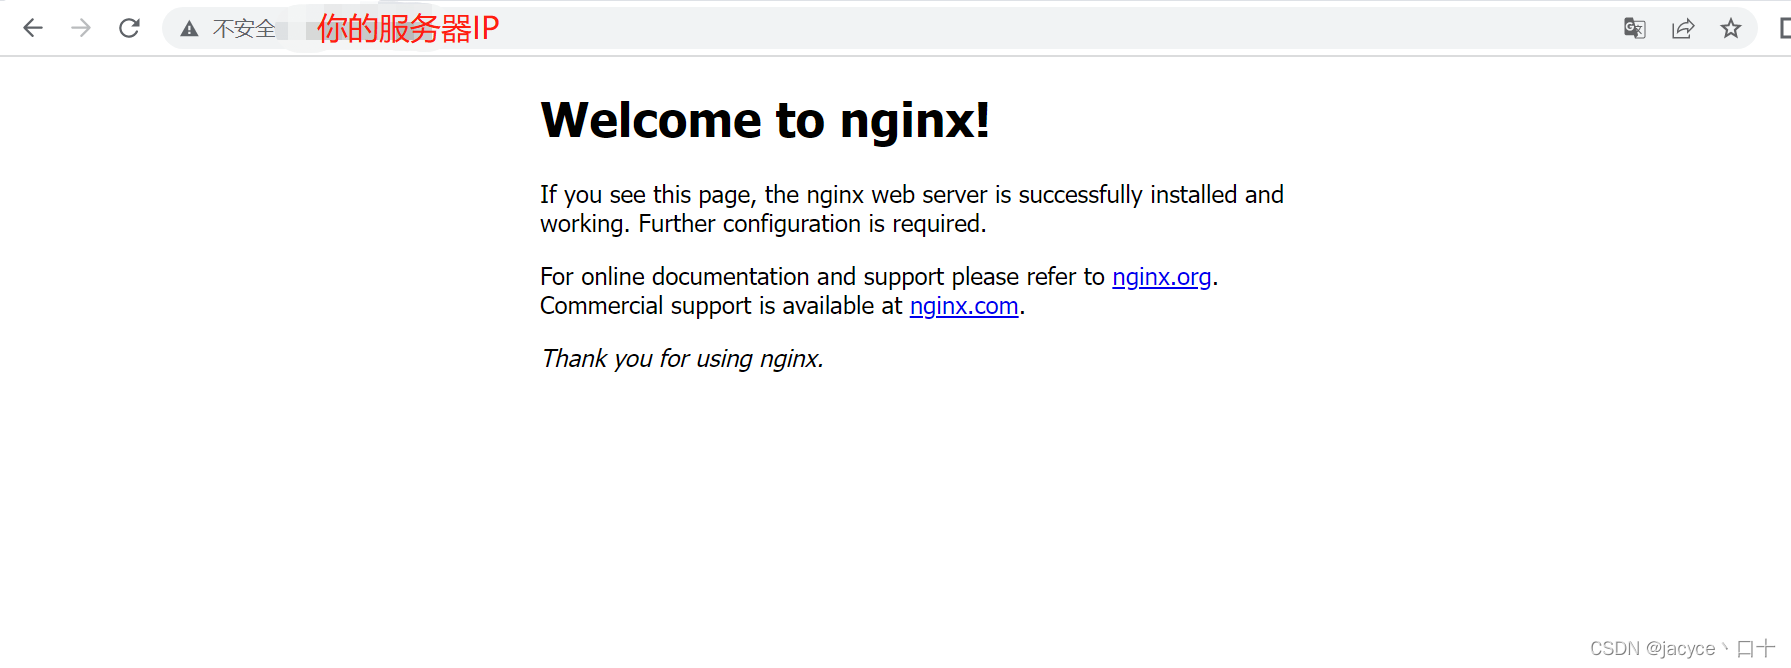
1.4、访问测试
1.5、其他注意事项说明
-----------------------------------------------------------------------------------------
出现错误 ./configure: error: C compiler cc is not found
 解决方法:yum -y install gcc gcc-c++
-----------------------------------------------------------------------------------------
出现错误  ./configure: error: the HTTP gzip module requires the zlib library.
 解决方法: yum -y install zlib-devel
-----------------------------------------------------------------------------------------
如果出现访问不了,尝试关闭防火墙 systemctl stop firewalld.service 再访问。
永久关闭防火墙 systemctl disable firewalld.service
-----------------------------------------------------------------------------------------
1.6、Nginx相关操作命令
nginx重启命令
nginx -s reload  :修改配置后重新加载生效
nginx -s reopen  :重新打开日志文件
nginx -t -c /path/to/nginx.conf 测试nginx配置文件是否正确

关闭nginx:
nginx -s stop  :快速停止nginx
quit  :完整有序的停止nginx

其他的停止nginx 方式:
ps -ef | grep nginx
kill -QUIT 主进程号     :从容停止Nginx
kill -TERM 主进程号     :快速停止Nginx
pkill -9 nginx          :强制停止Nginx
2、PHP安装
本次使用yum在线安装
2.1、安装 epel-release源和 源管理工具yum-utils
[root@VM-12-13-centos software]# yum -y install epel-release yum-utils2.2、安装Remi软件源
[root@VM-12-13-centos software]# yum -y install https://rpms.remirepo.net/enterprise/remi-release-7.rpm2.3、启用remi源php模块,安装php及扩展
yum启动php模块,根据需要选择自己格式的版本,如remi-php74模块,就是php7.4版本
[root@VM-12-13-centos software]# yum-config-manager --enable remi-php74注:如果显示没有这个命令,则需要先安装yum -y install yum-utils 插件。
2.4、安装php及相关扩展:
[root@VM-12-13-centos software]# yum -y install php php-cli php-fpm php-mysqlnd php-zip php-devel php-gd php-mbstring php-curl php-xml php-pear php-bcmath php-json php-redis2.5、查看版本
[root@VM-12-13-centos /]# php -v
PHP 7.4.30 (cli) (built: Jun  7 2022 08:38:19) ( NTS )
Copyright (c) The PHP Group
Zend Engine v3.4.0, Copyright (c) Zend Technologies
2.6、启动PHP,并设置开机启动
#设置开机启动
[root@VM-12-13-centos /]# systemctl enable php-fpm
Created symlink from /etc/systemd/system/multi-user.target.wants/php-fpm.service to /usr/lib/systemd/system/php-fpm.service.
#启动php服务
[root@VM-12-13-centos /]# systemctl start php-fpm
#查看PHP运行状态
[root@VM-12-13-centos /]# systemctl status php-fpm
● php-fpm.service - The PHP FastCGI Process Manager
   Loaded: loaded (/usr/lib/systemd/system/php-fpm.service; enabled; vendor preset: disabled)
   Active: active (running) since 一 2022-06-13 11:17:55 CST; 9s ago
 Main PID: 724 (php-fpm)
   Status: "Ready to handle connections"
   CGroup: /system.slice/php-fpm.service
           ├─724 php-fpm: master process (/etc/php-fpm.conf)
           ├─725 php-fpm: pool www
           ├─726 php-fpm: pool www
           ├─727 php-fpm: pool www
           ├─728 php-fpm: pool www
           └─729 php-fpm: pool www

6月 13 11:17:55 VM-12-13-centos systemd[1]: Starting The PHP FastCGI Process Manager...
6月 13 11:17:55 VM-12-13-centos systemd[1]: Started The PHP FastCGI Process Manager.
[root@VM-12-13-centos /]#
2.7、验证PHP
修改nginx配置文件支持php
2.7.1、修改nginx.conf文件
        location ~ \.php$ {
            root           /opt/nginx/html/;
            fastcgi_pass   127.0.0.1:9000;
            fastcgi_index  index.php;
            fastcgi_param  SCRIPT_FILENAME $document_root$fastcgi_script_name;
            include        fastcgi_params;
        }
完整配置文件
#user  nobody;
worker_processes  1;

#error_log  logs/error.log;
#error_log  logs/error.log  notice;
#error_log  logs/error.log  info;

#pid        logs/nginx.pid;


events {
    worker_connections  1024;
}


http {
    include       mime.types;
    default_type  application/octet-stream;

    #log_format  main  '$remote_addr - $remote_user [$time_local] "$request" '
    #                  '$status $body_bytes_sent "$http_referer" '
    #                  '"$http_user_agent" "$http_x_forwarded_for"';

    #access_log  logs/access.log  main;

    sendfile        on;
    #tcp_nopush     on;

    #keepalive_timeout  0;
    keepalive_timeout  65;

    #gzip  on;

    server {
        listen       80;
        server_name  localhost;

        #charset koi8-r;

        #access_log  logs/host.access.log  main;

        location / {
            root   html;
            index  index.html index.htm;
        }

        #error_page  404              /404.html;

        # redirect server error pages to the static page /50x.html
        #
        error_page   500 502 503 504  /50x.html;
        location = /50x.html {
            root   html;
        }

        # proxy the PHP scripts to Apache listening on 127.0.0.1:80
        #
        #location ~ \.php$ {
        #    proxy_pass   http://127.0.0.1;
        #}

        # pass the PHP scripts to FastCGI server listening on 127.0.0.1:9000
        #
        location ~ \.php$ {
            root           /opt/nginx/html/;
            fastcgi_pass   127.0.0.1:9000;
            fastcgi_index  index.php;
            fastcgi_param  SCRIPT_FILENAME $document_root$fastcgi_script_name;
            include        fastcgi_params;
        }
        #}

        # deny access to .htaccess files, if Apache's document root
        # concurs with nginx's one
        #
        #location ~ /\.ht {
        #    deny  all;
        #}
    }


    # another virtual host using mix of IP-, name-, and port-based configuration
    #
    #server {
    #    listen       8000;
    #    listen       somename:8080;
    #    server_name  somename  alias  another.alias;

    #    location / {
    #        root   html;
    #        index  index.html index.htm;
    #    }
    #}


    # HTTPS server
    #
    #server {
    #    listen       443 ssl;
    #    server_name  localhost;

    #    ssl_certificate      cert.pem;
    #    ssl_certificate_key  cert.key;

    #    ssl_session_cache    shared:SSL:1m;
    #    ssl_session_timeout  5m;

    #    ssl_ciphers  HIGH:!aNULL:!MD5;
    #    ssl_prefer_server_ciphers  on;

    #    location / {
    #        root   html;
    #        index  index.html index.htm;
    #    }
    #}

}
2.7.2、重启Nginx服务
[root@VM-12-13-centos conf]# cd /opt/nginx/sbin/
##重启前测试nginx配置文件是否有误
[root@VM-12-13-centos sbin]# ./nginx -t
nginx: the configuration file /opt/nginx/conf/nginx.conf syntax is ok
nginx: configuration file /opt/nginx/conf/nginx.conf test is successful
##提示配置文件测试正常后,重启
[root@VM-12-13-centos sbin]# ./nginx -s reload
[root@VM-12-13-centos sbin]#
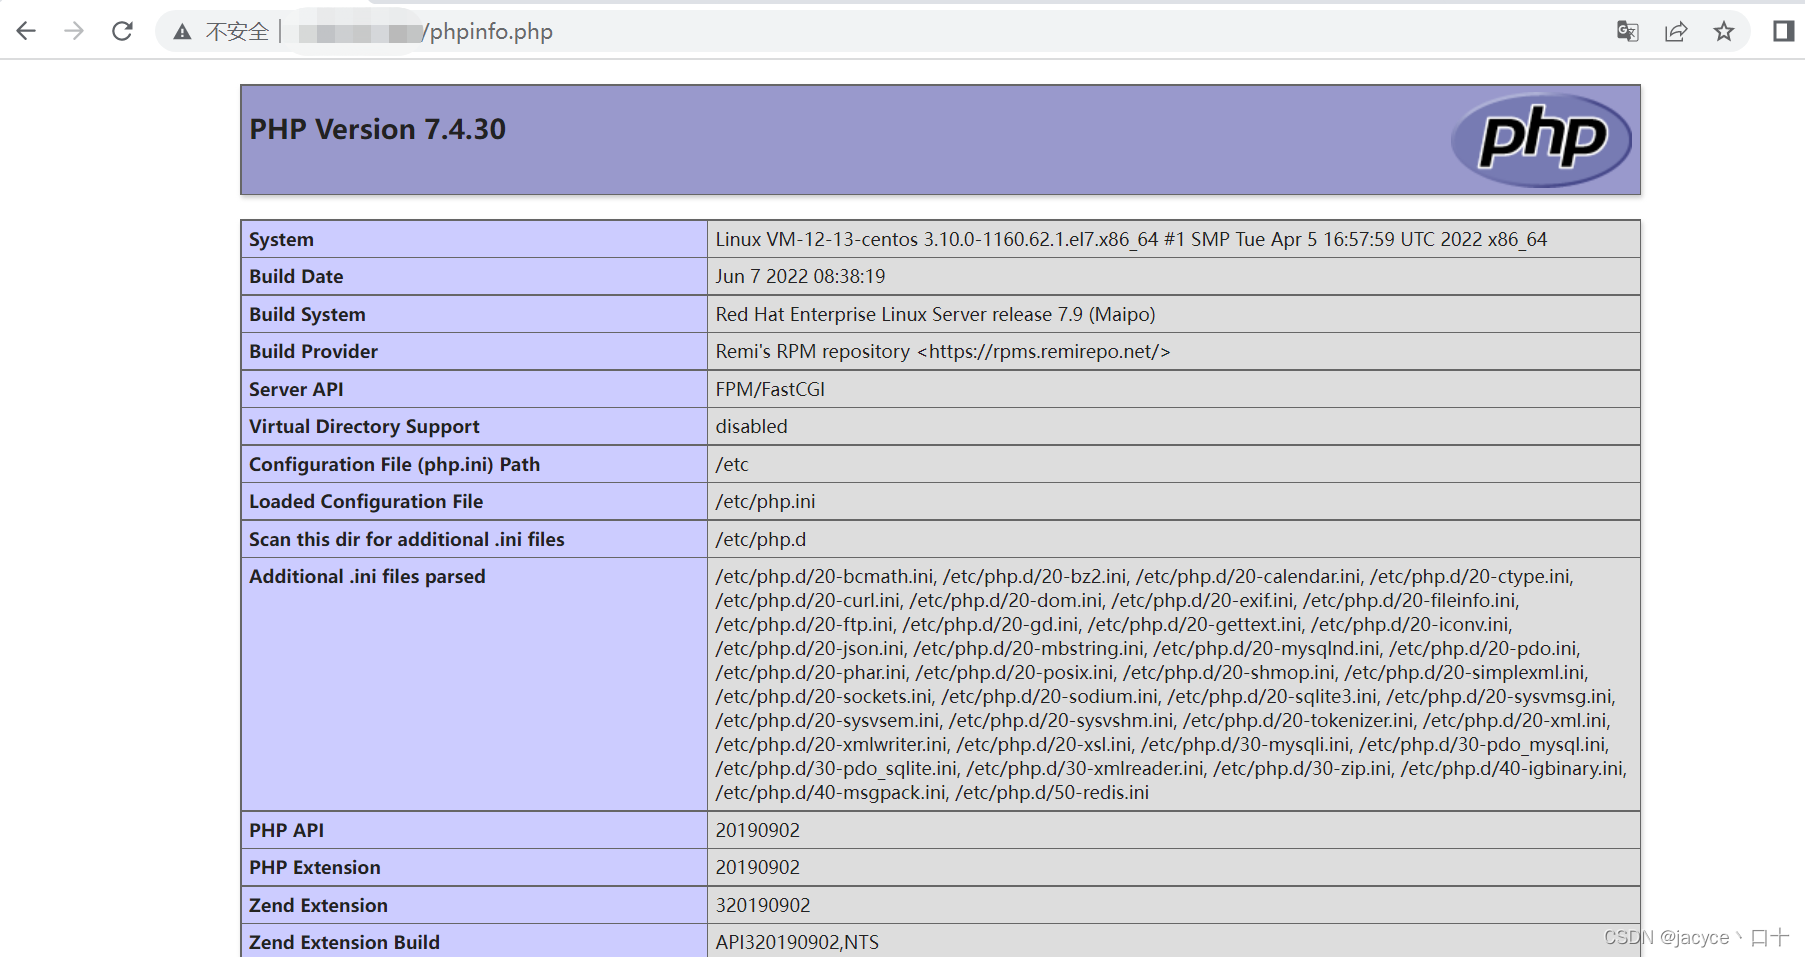
2.7.3、在Nginx的html目录下新建phpinfo.php文件
增加以下代码
<?php
   phpinfo ();
?>
2.7.4、浏览器访问测试
3、安装mariaDB
3.1、安装mariadb-server
[root@VM-12-13-centos html]# yum -y install mariadb-server3.2、安装mariadb相关环境
[root@VM-12-13-centos html]# yum -y install mariadb-embedded mariadb-libs mariadb-bench mariadb mariadb-sever3.3、安装mariadb
[root@VM-12-13-centos html]# yum install mariadb3.4、启动mariadb并设置开机启动
[root@VM-12-13-centos html]# systemctl start mariadb
[root@VM-12-13-centos html]# systemctl enable mariadb
Created symlink from /etc/systemd/system/multi-user.target.wants/mariadb.service to /usr/lib/systemd/system/mariadb.service.
3.5、配置数据库(设置密码)
[root@VM-12-13-centos html]# mysql_secure_installation

NOTE: RUNNING ALL PARTS OF THIS SCRIPT IS RECOMMENDED FOR ALL MariaDB
      SERVERS IN PRODUCTION USE!  PLEASE READ EACH STEP CAREFULLY!

In order to log into MariaDB to secure it, we'll need the current
password for the root user.  If you've just installed MariaDB, and
you haven't set the root password yet, the password will be blank,
so you should just press enter here.

Enter current password for root (enter for none):
OK, successfully used password, moving on...

Setting the root password ensures that nobody can log into the MariaDB
root user without the proper authorisation.

Set root password? [Y/n] y
New password:
Re-enter new password:
Password updated successfully!
Reloading privilege tables..
 ... Success!


By default, a MariaDB installation has an anonymous user, allowing anyone
to log into MariaDB without having to have a user account created for
them.  This is intended only for testing, and to make the installation
go a bit smoother.  You should remove them before moving into a
production environment.

Remove anonymous users? [Y/n]
 ... Success!

Normally, root should only be allowed to connect from 'localhost'.  This
ensures that someone cannot guess at the root password from the network.

Disallow root login remotely? [Y/n]
 ... Success!

By default, MariaDB comes with a database named 'test' that anyone can
access.  This is also intended only for testing, and should be removed
before moving into a production environment.

Remove test database and access to it? [Y/n]
 - Dropping test database...
 ... Success!
 - Removing privileges on test database...
 ... Success!

Reloading the privilege tables will ensure that all changes made so far
will take effect immediately.

Reload privilege tables now? [Y/n]
 ... Success!

Cleaning up...

All done!  If you've completed all of the above steps, your MariaDB
installation should now be secure.

Thanks for using MariaDB!
3.6、数据库操作相关命令
1.启动\重启\停止进程
systemctl start mariadb
systemctl restart mariadb
systemctl stop mariadb

2.查看数据库进程状态
 systemctl status mariadb

3.查询数据库
show databases;

4.进入某个数据库
use databasename;

5.列出数据库中的表
show tables;

6.查看某个表全部字段
desc slow_log;
show create table slow_log\G; (不仅可以显示表信息,还可以显示建表语句)

7.查看当前用户
select user();

8.查看当前所在数据库
select database();

9.创建新数据库(可以指定字符集)
create database db1 charset utf8;

10.创建新表
create table t1 (`id` int(4), `name` char(40));

11.查看数据库版本
select version();

12.查看数据库状态
show status;         当前会话状态
show global status;  全局数据库状态
show slave status\G;   查看主从数据库状态信息

13.查询数据库参数
show variables;

14.修改数据库参数
show variables like 'max_connect%';
set global max_connect_errors = 1000;(重启数据库会失效,要在配置文件中修改)

15.查看当前数据库队列
show processlist;

16.创建普通用户并授权给某个数据库
grant all on databasename.* to 'user1'@'localhost' identified by '123456';

17.查询表数据
select * from mysql.db;           //查询该表中的所有字段
select count(*) from mysql.user;  //count(*)表示表中有多少行
select db,user  from mysql.db;    //查询表中的多个字段
select * from mysql.db where host like '10.0.%';在查询语句中可以使用万能匹配 “%”

18.插入一行数据
insert into db1.t1 values (1, 'abc');

19.更改表的某一行数据
update db1.t1 set name='aaa' where id=1;

20.清空表数据
truncate table db1.t1;

21.删除表
drop table db1.t1;

22.清空数据库中的所有表(数据库名是eab12)
mysql -N -s information_schema -e "SELECT CONCAT('TRUNCATE TABLE ',TABLE_NAME,';') FROM TABLES WHERE TABLE_SCHEMA='eab12'" | mysql -f eab12

23.删除数据库
drop database db1;

24.数据库备份
mysqldump  -uroot -p'yourpassword' mysql >/tmp/mysql.sql

25.数据库恢复
mysql -uroot -p'yourpassword' mysql

26.新建普通用户
CREATE USER name IDENTIFIED BY 'ssapdrow';

27.更改普通用户密码
SET PASSWORD FOR name=PASSWORD('fdddfd');

28.查看name用户权限
SHOW GRANTS FOR name;

29.脚本中执行mysql命令
mysql -uuser -ppasswd -e"show databases"
echo "show databases"|mysql -uuser -ppassword
4、Wordpress安装配置
4.1、下载Wordpress
下载地址:https://cn.wordpress.org/latest-zh_CN.tar.gz
4.2、使用wget下载
[root@VM-12-13-centos software]# wget https://cn.wordpress.org/latest-zh_CN.tar.gz
4.3、Wordpress解压
[root@VM-12-13-centos software]# tar -zvxf latest-zh_CN.tar.gz
4.5、将Wordpress解压后的目录,复制到Nginx的html目录下
[root@VM-12-13-centos software]# cp -a wordpress/ /opt/nginx/html/
[root@VM-12-13-centos software]# ls /opt/nginx/html/
50x.html  index.html  phpinfo.php  wordpress
4.6、修改Nginx.conf中的根目录为/opt/nginx/html/wordpress
#user  nobody;
worker_processes  1;

#error_log  logs/error.log;
#error_log  logs/error.log  notice;
#error_log  logs/error.log  info;

#pid        logs/nginx.pid;


events {
    worker_connections  1024;
}


http {
    include       mime.types;
    default_type  application/octet-stream;

    #log_format  main  '$remote_addr - $remote_user [$time_local] "$request" '
    #                  '$status $body_bytes_sent "$http_referer" '
    #                  '"$http_user_agent" "$http_x_forwarded_for"';

    #access_log  logs/access.log  main;

    sendfile        on;
    #tcp_nopush     on;

    #keepalive_timeout  0;
    keepalive_timeout  65;

    #gzip  on;

    server {
        listen       80;
        server_name  localhost;

        #charset koi8-r;

        #access_log  logs/host.access.log  main;

        location / {
            root   html/wordpress/;
            index  index.html index.htm index.php;
        }

        #error_page  404              /404.html;

        # redirect server error pages to the static page /50x.html
        #
        error_page   500 502 503 504  /50x.html;
        location = /50x.html {
            root   html;
        }

        # proxy the PHP scripts to Apache listening on 127.0.0.1:80
        #
        #location ~ \.php$ {
        #    proxy_pass   http://127.0.0.1;
        #}

        # pass the PHP scripts to FastCGI server listening on 127.0.0.1:9000
        #
        location ~ \.php$ {
            root           /opt/nginx/html/wordpress/;
            fastcgi_pass   127.0.0.1:9000;
            fastcgi_index  index.php;
            fastcgi_param  SCRIPT_FILENAME $document_root$fastcgi_script_name;
            include        fastcgi_params;
        }
        #}

        # deny access to .htaccess files, if Apache's document root
        # concurs with nginx's one
        #
        #location ~ /\.ht {
        #    deny  all;
        #}
    }


    # another virtual host using mix of IP-, name-, and port-based configuration
    #
    #server {
    #    listen       8000;
    #    listen       somename:8080;
    #    server_name  somename  alias  another.alias;

    #    location / {
    #        root   html;
    #        index  index.html index.htm;
    #    }
    #}


    # HTTPS server
    #
    #server {
    #    listen       443 ssl;
    #    server_name  localhost;

    #    ssl_certificate      cert.pem;
    #    ssl_certificate_key  cert.key;

    #    ssl_session_cache    shared:SSL:1m;
    #    ssl_session_timeout  5m;

    #    ssl_ciphers  HIGH:!aNULL:!MD5;
    #    ssl_prefer_server_ciphers  on;

    #    location / {
    #        root   html;
    #        index  index.html index.htm;
    #    }
    #}

}
重启nginx
[root@VM-12-13-centos sbin]# ./nginx -t
nginx: the configuration file /opt/nginx/conf/nginx.conf syntax is ok
nginx: configuration file /opt/nginx/conf/nginx.conf test is successful
[root@VM-12-13-centos sbin]# ./nginx -s reload
[root@VM-12-13-centos sbin]#
4.7、创建Wordpresss数据库
[root@VM-12-13-centos sbin]# mysql -p
Enter password:
Welcome to the MariaDB monitor.  Commands end with ; or \g.
Your MariaDB connection id is 2
Server version: 5.5.68-MariaDB MariaDB Server

Copyright (c) 2000, 2018, Oracle, MariaDB Corporation Ab and others.

Type 'help;' or '\h' for help. Type '\c' to clear the current input statement.

MariaDB [(none)]> create database wordpress;
Query OK, 1 row affected (0.00 sec)

MariaDB [(none)]>
4.8、开始配置Wordpress
4.8.1、网页打开服务器地址
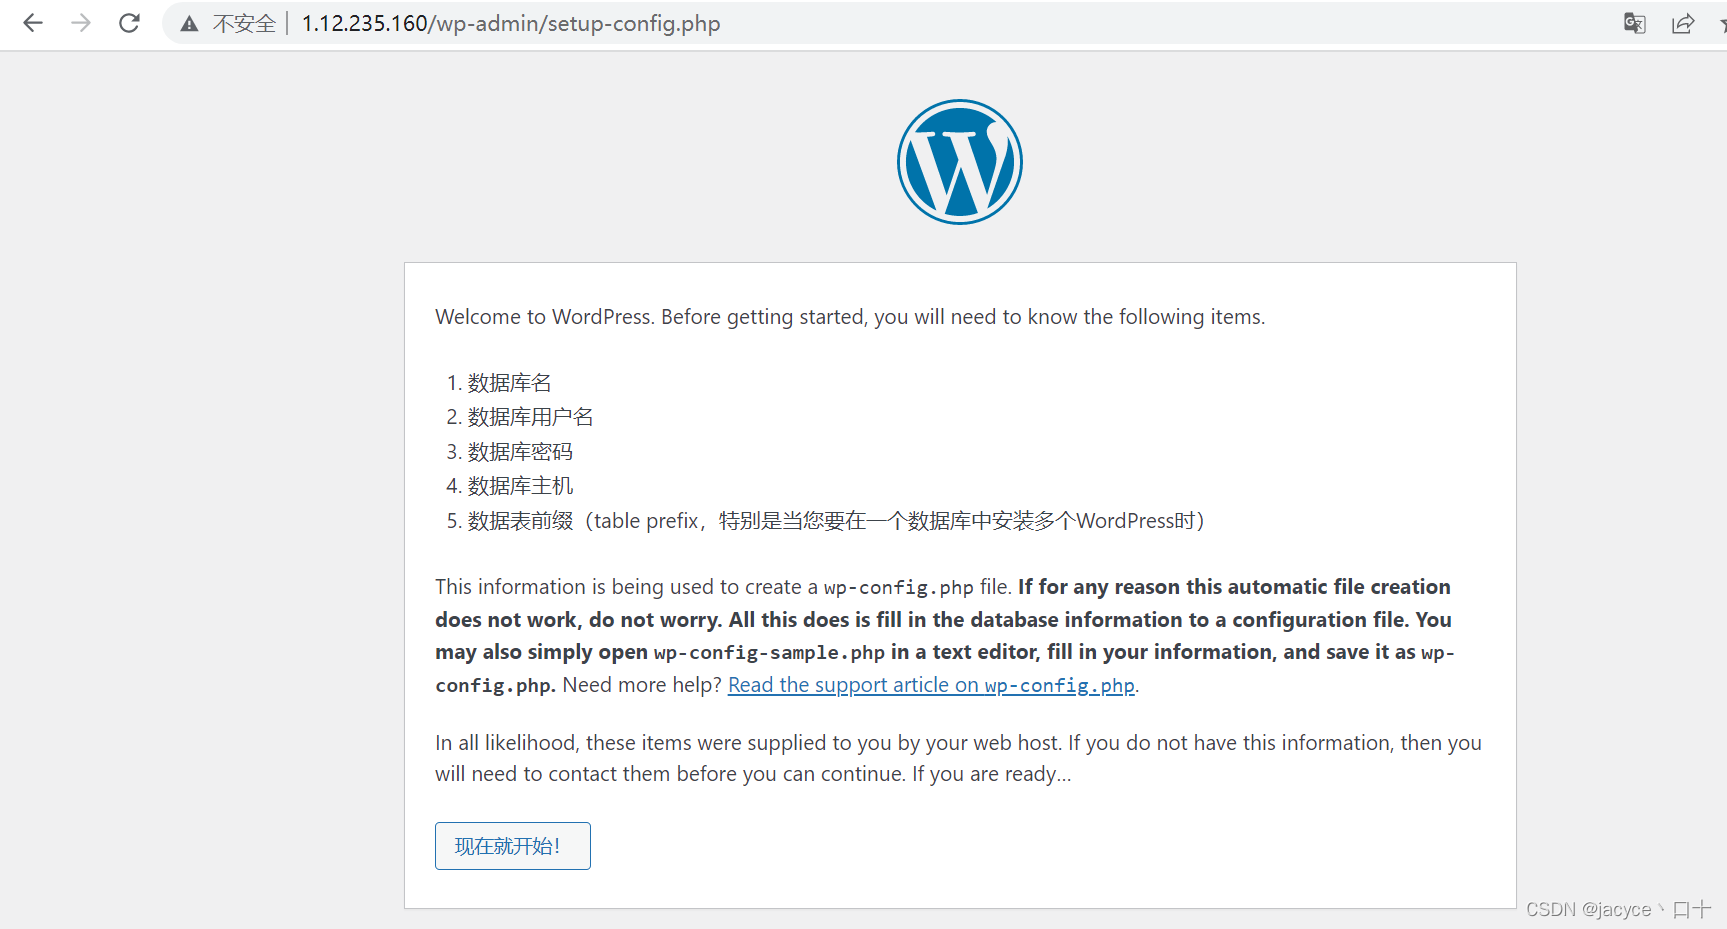
4.8.2、填写数据库信息

4.8.3、无法写入wp-config.php文件,手动创建wp-config.php

进入wordpress目录,创建wp-config.php文件,粘贴提示的php代码到该文件中,然后在运行安装程序
4.8.4、设置管理后台信息


 3047
3047


 被折叠的 条评论
为什么被折叠?
被折叠的 条评论
为什么被折叠?
 到【灌水乐园】发言


