


首先,我们需要先去注册我们的开发者证书。具体流程如下:
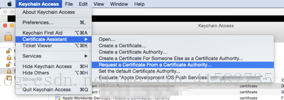
在Launchpad中找到我们钥匙串,在钥匙串中,打开Keychain Access > Certificate Assistant > Request a Certificate From a Certificate Authority… 菜单,如下图所示:
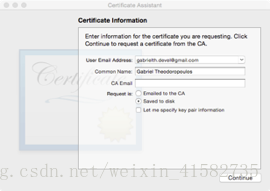
在弹出的窗口中,User Email Address 和 Common Name 字段是必須填的。填完后选中Saved to disk 选项,这样可以将 CSR 文件保存到磁盘,这个文件在后面的开发者平台会用到。
然后把文件保存下来就可以。
接下来,我们就要去我们的开发者网站了,网址是:https://developer.apple.com/membercenter/,账号密码就用老师给我们的账号密码就可以。登陆进去之后,我们点击Certificates,identifiers&profiles这个进入下一个页面,然后再点击identifiers中的appid,点击右上角的加号按钮,创建一个新的appid,然后按要求写好name和bundid就可以,由于我们要做推送,所以下面的push notifications也要勾上。点击continue按钮就走到最后就可以了,最后点击done按钮后回到appid中你就可以看到你刚才创建的app ID了。
然后在做好上一步之后,我们要配置App ID 的 Push Notifications 选项
在上一步Development 和 Distribution 模式下的 Push Notifications 一項仍然是Configurable而不是Enabled,所以我們还需要另外配置。

要怎么配置呢,从 App ID 列表中点击刚才新建的 App ID 。在所有的服务后面都会有Edit按钮。点击它进入配置页面。

这个我们需要上传我们刚才在钥匙串中保留下来的文件,然后点击提交按钮。提交之后,我们会得到一个新的证书,我们需要把它下载下来,并将它保留到钥匙串中去,然后在我们的钥匙串中找到它,如果没有找到,说明你保存错了,需要重新保存一下,找到它之后,我们右键点击它,然后选择export选项导出它,我们导出的格式确保为.p12文件就好,点击ok,然后这个时候他会提示你创建密码,这个密码必须记住,因为后面的使用都需要它的密码,忘记密码,这个文件就用不了了,这个文件是我们后面服务器测试的时候要用到的。
做好了这一步之后,我们回到我们的开发者网站,我们要注册我们的设备了,点击Devices下的all,同样是点击右上角的➕,添加我们的设备。点击之后,会跳转到一个页面,这个页面中,name可以随便写,写你自己想给你的设备的名称就可以。然后有udid这一行,这一行是我们每个设备独有的一串字符串,至于怎么获取,百度一下就知道了,把你的手机设备的udid填写在这行里面,然后点击提交按钮。然后一直点击提交确定到最后结束。注册好了之后,回到devices中,看看你刚才注册的设备是不是存在,是的话说明成功,不存在,按照刚才说的流程再来一遍。
做完这一步之后,我们在开发者网站上的操作就剩下接下来的一步了。
我们点击provisioning profiles下的development,同样进入后点击右上角的➕,点击第一个iOS App Development,然后点击提交按钮,然后在appid中,找到我们刚才的appid,点击选择它,点击提交。然后你要上传你的证书,同样是点击上传按钮,把你下载下来的证书上传上去,点击提交就可以了。然后会有一个文件,你把它下载下来就可以了。
好了做完上面的这些操作后,我们现在可以新建一个我们的项目,记得在项目里面,点击capabilities,把push notifications这个打开,没有打开的话,我们的应用也肯定接受不到推送。然后打开之后,我们还需要回到general中,选择team正确的设备,你需要添加一个新的appleid,也就是你的开发者账号,登陆之后,选择你注册的设备就好了。然后在点击buildsetting中的debug,点击automatic,选择我们刚刚最后下载并安装的那个文件。
做完之后,我们就打开我们的AppDelegate文件,开始注册通知,
在application(_:didFinishLaunchingWithOptions:)方法里面,在return前面,添加下面这几行代码用来注册我们的通知:
var str:NSString = UIDevice.current.systemVersion as NSString
var version:Float = str.floatValue
// 判断xcode版本是否超过8.0
if version >= 8.0 {
UIApplication.shared.registerUserNotificationSettings(UIUserNotificationSettings(types: [UIUserNotificationType.alert,UIUserNotificationType.badge,UIUserNotificationType.sound], categories: nil))
// UIApplication.shared.registerUserNotificationSettings(UIUserNotificationSettings(types: UIUserNotificationType.sound, categories: nil))
// UIApplication.shared.registerUserNotificationSettings(UIUserNotificationSettings(types: UIUserNotificationType.alert, categories: nil))
// UIApplication.shared.registerUserNotificationSettings(UIUserNotificationSettings(types: UIUserNotificationType.badge, categories: nil))
UIApplication.shared.registerForRemoteNotifications()
print(".........")
} else {
UIApplication.shared.registerForRemoteNotifications( matching: UIRemoteNotificationType.badge)
UIApplication.shared.registerForRemoteNotifications( matching: UIRemoteNotificationType.sound)
UIApplication.shared.registerForRemoteNotifications( matching: UIRemoteNotificationType.alert)
}
红色是比较重要的一句代码
注册完通知之后,我们需要获取device token,只有把我们的token给服务器,服务器才知道向谁发送推送,用下面这个方法获取我们的token:
func application(_ application: UIApplication, didRegisterForRemoteNotificationsWithDeviceToken deviceToken: Data) {
// 转换device token 的格式,将32 bytes转换为我们想要的字符串
let device = NSData.init(data: deviceToken)
// 获取token
let token : String = device.description.trimmingCharacters(in: CharacterSet(charactersIn: "<>"))
// 打印token
print("token==\(token)")
//将token发送到服务器
}
由于这个方法获取到的token是一个32bytes,所以我们需要对他进行解码,解码的代码就是上面这个方法里面的
// 转换device token 的格式,将32 bytes转换为我们想要的字符串
let device = NSData.init(data: deviceToken)
// 获取token
let token : String = device.description.trimmingCharacters(in: CharacterSet(charactersIn: “<>”))
这两行代码。这个时候运行的话,我们在控制台就打印出了我们的token。这个token是会带有空格的,根据你服务器的需求,如果不需要空格,把空格去掉就好。
接下来我们还要写一个获取token失败的方法,如果获取token失败,就会走下面这一个方法,代码如下:
func application(_ application: UIApplication, didFailToRegisterForRemoteNotificationsWithError error: Error) {
var alert:UIAlertView = UIAlertView(title: "", message: error.localizedDescription, delegate: nil, cancelButtonTitle: "OK")
// 测试是否走到didregisterforremotenotificawithdevicetoken这个方法里面去,如果走不到,则进入这个方法
print("------\(error)")
alert.show()
}
做完之后,我们根据我们app的运行状态,来决定我们获取推送的方式,这里我是自己做了做了一些考虑,你也可以不管什么状态,都是一种推送方式,我是分成app运行时,和app关闭时这两种状态来处理推送的方式的,在app关闭时,我是直接采用横幅推送以及锁屏的推送方式,而当app在前台运行时,我是直接创建了一个警示框,当接到推送的时候,判断app是不是正在运行,是的话,弹出一个警示框,询问用户是否前往那个页面,如果用户取消,则直接return,如果用户确定,我们就通过警示框的确定按钮的点击事件实现页面跳转,当然我这里就直接用print输出来代表这个按钮获取到了监听。代码如下:
func application(_ application: UIApplication, didReceiveRemoteNotification userInfo: [AnyHashable : Any], fetchCompletionHandler completionHandler: @escaping (UIBackgroundFetchResult) -> Void) {
print("userInfo==\(userInfo)")
UIApplication.shared.applicationIconBadgeNumber = 0
// 用户在前台,或者后台开启的状态下,不跳转页面,让用户选择
let title = "推送消息"
var userinfo :String?
var a : Dictionary<String,Any> = userInfo[AnyHashable("aps")].unsafelyUnwrapped as! Dictionary
// print(a["alert"]!)
let b = Int.init(String.init(describing: a["alert"]!))
if b == 0{
userinfo = "这是第一条推送"
}
else if b == 1{
userinfo = "这是第二条推送"
}
else if b == 2{
userinfo = "这是第三条推送"
}
else if b == 3{
userinfo = "这是第四条推送"
}
else if b == 4{
userinfo = "这是第五条推送"
}
else{
userinfo = "这是在开玩笑吧。。。。。"
}
if (application.applicationState == UIApplicationState.active) || (application.applicationState == UIApplicationState.background){
alert = UIAlertView(title: title, message: userinfo!, delegate: self, cancelButtonTitle: "确定", otherButtonTitles: "取消")
alert?.show()
// UIAlertView(title: title, message: userinfo, delegate: nil, cancelButtonTitle: "确定").show()
}
else{
}
// badge清零
application.applicationIconBadgeNumber = 0
completionHandler(UIBackgroundFetchResult.newData)
}
func alertView(_ alertView: UIAlertView, clickedButtonAt buttonIndex: Int) {
if buttonIndex == 0 {
print("6666")
}else{
print("999")
}
}
做到这里之后,我们需要到我们的服务器端,打开eclipse,配置一下我们的.p12文件的路径和密码,以及我们token和我们要推送的内容。代码如下:
package test;
import org.apache.log4j.PropertyConfigurator;
import javapns.back.PushNotificationManager;
import javapns.back.SSLConnectionHelper;
import javapns.data.Device;
import javapns.data.PayLoad;
public class Main {
public static void main(String arg[]) {
PropertyConfigurator.configure("lib/log4j.properties");
String certificatePath = "push.p12"; // 这里是.p12文件的路径
String certificatePassword = "361480"; // 你自己.p12文件的密码
String host = "gateway.sandbox.push.apple.com"; //测试用的苹果推送服务器
// String host = "gateway.push.apple.com";
String token = null; //推送的token
try {
PushNotificationManager pushManager = PushNotificationManager.getInstance();
pushManager.initializeConnection(host, 2195, certificatePath,certificatePassword, SSLConnectionHelper.KEYSTORE_TYPE_PKCS12);
// 发送5条推送
for (int i = 0; i < 5; ++i) {
String a = String.valueOf(i);// 推送的字符串
Device client;
PayLoad payLoad = new PayLoad();
payLoad.addBadge(1);
payLoad.addSound("default");
// token = "03ee97b842911060d691de096e715048f158d4d54a8a52b191b1aa6f25f6c4af"; // 输入你自己的token
token = "987af469371f33fc0d4f8f415909d000a520da177da33e7f22113a3daeb12bfa";
pushManager.addDevice(a, token);
client = pushManager.getDevice(a);
payLoad.addAlert(a);
pushManager.sendNotification(client, payLoad); //推送消息
pushManager.removeDevice(a);
}
} catch (Exception e) {
e.printStackTrace();
return;
}
}
}
我们首先需要把我们的.p12文件拖进我们的服务器,然后在上面的代码注释的地方分别修改p12文件的路径和密码,因为你直接拖进到项目里面,所以路径就是你的p12名称加上后缀就可以了,密码就是刚才我们导出的时候,我和你们说一定要记得的那个密码。token就是我们xcode运行之后,在控制台打印出来的token,注意,那个toekn拿到之后,要把所有的空格都删除掉,才可以。然后for循环是表示你java每运行一次,他会向你的应用推送几条推送,我们这里是写了5个循环,那就是5条,然后,for里面注释推送字符串的地方,就是我们推送过去的内容。写到这里,我们的推送demo就做完了,你运行xcode之后,在你的设备中会安装好你的应用,记得去设置中,信任一下你的应用,然后回到服务器,运行,我们就可以接受到推送信息了。
注意:.P12文件,是每台电脑唯一的,你换了电脑运行,就需要重新配置你的p12 文件,token也是每个应用唯一的,你把应用删除之后重新运行xcode安装,那么你就需要在服务器重新更改你新的token进来。


 1591
1591

 被折叠的 条评论
为什么被折叠?
被折叠的 条评论
为什么被折叠?
 到【灌水乐园】发言


