


 本文介绍了Vue3中的响应式原理,包括ref和reactive的区别与用法,如何创建和使用计算属性computed,以及监听数据变化的watch和watchEffect。此外,还讲解了父子组件通信、全局组件注册、过渡效果、状态管理和路由操作等核心概念。
1、ref、isRef
ref:支持所有类型,但一般用于js基本数据类型响应定义
// 定义
const data = ref(0)
// 取值方法 data.value
ref 获取dom元素
<template>
    <div ref='myDom'></div>
</template>
// 定义变量名称需保持与元素ref定义名称一致
const myDom = ref()isRef用于判断变量是否为响应式
const myRef = ref('1111')
const cur = '1111'
console.log(isRef(myRef)) // true
console.log(isRef(cur )) // false
2、reactive
reactive:只能用于响应式引用数据类型定义 (Array、Object、Map、Set.....)
// 定义
const data = reactive({
  name:'张三',
  age:99
})
// 取值区别于ref data.name 即可
console.log(data.name) // 张三
// 修改
data.name = '李四'
// reactive是proxy代理对象,直接赋值会使得原有数据失去响应式
data = {name:'好好'}
console.log(data.name)


// 解决方法:解构
const data = reactive({
  name:'张三',
  age:99
})
data = {...data,name:'李四'}
// 数组同理
const data = reactive([{name:'99}])

const arr = [{name:'0'}]

data = data.push(...arr)
如果想防止对象属性被修改可使用readonly
const data = reactive({name:'a'})
// readonly包裹对象即可
const newObj = readonly(data )
newObj.name = 'n' // 控制台报警
3、toRef、toRefs、toRaw
toRef:解构对象某个属性并创建一个 ref 响应式对象
toRefs:解构对象一个或者多个属性并创建一个或多个 ref 响应式对象
toRaw 将响应式对象,转为无响应式,防止视图更新
const obj = reactive({
  name: 1,
  age: 2
})
// toRef 解构对象某个属性并创建一个 ref 响应式对象
const c = toRef(obj, 'age')
// toRefs 解构对象一个或者多个属性并创建一个或多个 ref 响应式对象
const {name,age} = obj // 无响应式,视图不会更新

const { name, age } = toRefs(obj) // 响应式
// toRaw 将响应式对象,转为无响应式,防止视图更新
const obj1 = toRaw(obj)
4、computed计算属性
依赖的响应式数据发生变化时才会触发
x:<input type="number" v-model="x" />
y:<input type="number" v-model="y" />
sum:{{ count }}
<button @click="change">修改</button>
const x = ref(0)
const y = ref(0)
// 写法1:选项式,可以通过.value修改计算属性值
const count = computed({
get() {
return x.value + y.value
},
set(newVal) {
console.warn(newVal);
return newVal
}
})
const change = () => {
count.value = 6
console.log(count.value) // 6
}
// 写法2:函数式,写法只允许读取值
const count = computed(()=>{
return x.value + y.value
})5、watch 响应式数据监听
const a1 = ref('')
const a2 = ref('')
const obj3 = ref({ name: '' })
// watch监听单个
watch(a1, (newVal, oldVal) => {
  console.log(newVal, oldVal)
})
// watch监听多个,此时newVal、oldVal均为数组,顺序与传入需要监听的a1、a2顺序保持一致
watch([a1, a2], (newVal, oldVal) => {
  console.log(newVal, oldVal)
})
// watch监听对象时,需要开启深度监听
// 如果监听的对象是通过reactive创建,则默认开启deep,无需再写deep
const obj3 = ref({ name: '' })
watch(
  obj3,
  (newVal, oldVal) => {
    console.log(newVal, oldVal)
  },
  { deep: true }
)
6、watchEffect高级监听器
watchEffect(
  (init) => {
    console.log(a1.value, 'a1')
    console.log(a2.value)
    // 更新前执行方法,会先执行初始化方法,再按顺序执行watchEffect其他代码
    init(() => {
      console.log('更新前执行方法')
    })
  },
  {
    // pre 默认模式,页面初始化自动执行一次
    // post 在组件更新后触发,这样你就可以访问更新的 DOM。
    // sync 强制始终同步触发
    flush: 'post'
  }
)
7、父子组件传值
// ts写法
withDefaults(defineProps<{ title: string; arr: string[] }>(), {
  title: '',
  arr: () => {
    return []
  }
})

// js写法
const props = defineProps({
  title: {
    type: String,
    default: ''
  },
  arr: {
    type: Array,
    default: () => {
      return []
    }
  }
})
const emit = defineEmits(['submit'])

const send = () => {
  emit('submit', '666')
}
8、全局组件注册方法
// 引入
import test from '@views/test.vue'
// 注册
app.component('test', test)
9、匿名插槽、具名插槽、作用域插槽、动态插槽
<template>
<!-- 插槽组件 -->
  <div>
    <div>
      <div>匿名插槽</div>
      <slot></slot>
    </div>
    <div>
      <div>具名插槽</div>
      <slot name="footer"></slot>
    </div>
    <div>
      <div>作用域插槽</div>
      <slot name="header" :data="666"></slot>
    </div>
  </div>
</template>
<!-- 使用 -->
<test1>
<template #default> 我是匿名插槽内容 </template>
<template #footer> 我是具名插槽内容 </template>
<template #header="{ data }"> 我是具名插槽内容<br />我是插槽数据{{ data }} </template>
</test1>9.1动态插槽
<test1>
  <template #[slotName]> 我是匿名插槽内容666 </template>
</test1>
const slotName = ref('footer')10、异步组件
<Suspense>
        <template #default>
            <div>加载完成显示</div>
        </template>
        <template #fallback>
            <div>加载中显示</div>
        </template>
    </Suspense>
11、Teleport 传送组件
to:允许接收值: 期望接收一个 CSS 选择器字符串或者一个真实的 DOM 节点。
disabled:是否激活
<Teleport> 挂载时,传送的 to 目标必须已经存在于 DOM 中。理想情况下,这应该是整个 Vue 应用 DOM 树外部的一个元素。 如果目标元素也是由 Vue 渲染的,你需要确保在挂载 <Teleport> 之前先挂载该元素。
<Teleport :disabled="true" to="body">
  <div>666</div>
</Teleport>
12、keep-alive 缓存组件
<!--
  include:[] 允许缓存的组件名称
  exclude:[] 不缓存的组件名称
  max:10 最多允许缓存的组件个数,超过最大会删去缓存靠前或者不活跃的组件进行替换
-->
<keep-alive>
   <Test1></Test1>
</keep-alive>
组件被缓存时会添加两个生命周期
// 进入组件时触发
onActivated(()=>{})
// 离开组件时触发
onDeactivated(()=>{})
13、transition 过渡组件
<!--
  enter-active-class: 显示时的样式
  leave-active-class: 离开时的样式
  duration: 动画时间
-->
<transition enter-active-class="" leave-active-class="" :duration="100">
  <div></div>
</transition>
13.1 transition-group 渲染列表,添加或删除元素触发进入或离开动画效果
<transition-group enter-active-class="" leave-active-class="" :duration="100">
   <div v-for="item in 10" :key="item"></div>
</transition-group>
14、provide inject
<!-- 父组件 -->
provide: {{ str }}
<!-- 子组件 -->
<Test1></Test1>
<!-- test1 -->
<div>
<!-- 孙子组件-->
<Test2 />
</div>// 父组件
import { provide } from 'vue'
const str = ref('哈哈哈') // 数据
provide('myData', str) // myData:传值key名,str:数据// 子组件、孙子组件使用
import { inject } from 'vue'
import type { Ref } from 'vue'
const parentData = inject<Ref<string>>('myData')
console.log(parentData.value, '2')
const change = () => {
// 修改provide值
parentData.value = '111'
}15、v-model自定义方式实现双向数据流
15.1 v-model默认方式,默认传参名称为update:modelValue
<!-- 父组件 -->
{{ testVmodel }}
<!-- 子组件 -->
<Test1 v-model="testVmodel"></Test1>
const testVmodel = ref('自定义v-model')// 接收父组件v-model值
defineProps({
// modelValue为默认v-model传参名称
modelValue: {
type: String,
default: ''
}
})
// 定义事件,命名规范update:modelValue,默认事件名称为update:modelValue
const emit = defineEmits(['update:modelValue', 'update:text'])
const changeVal = () => {
emit('update:modelValue', '修改内容')
console.warn(666)
}15.2 v-model自定义方式,区别于默认方式v-model:自定义名称,自定义名称与子组件props接收值名称保持一致,自定义emit事件名为 update:自定义名称
<!-- 父组件 -->
{{ text2Str }}
<!-- 子组件 -->
<Test1 v-model="testVmodel" v-model:text="text2Str"></Test1>
// 接收父组件v-model:text值
defineProps({
// 自定义v-model传值名称,名称与v-model:text冒号后面的名称保持一致
text: {
type: String,
default: ''
}
})
// 自定义v-model名称,update:text,冒号后面名称与v-model:text保持一致
const emit = defineEmits(['update:text'])
const changeVal = () => {
emit('update:text', '修改text内容')
}16、Directive:自定义指令
const userPermisson = ref('admin')
// 自定义指令
// 命名规则小驼峰,例:vPermisson  页面上使用为v-permisson
// el:当前使用指令的dom元素   bingding:绑定的值,修饰符...等等
const vPermisson: Directive = (el, bingding) => {
  console.warn(el, bingding)
  // 例:若无权限则不显示
  if (bingding.value !== userPermisson.value) {
    el.remove()
  }
}
<!-- 使用 -->
<div v-permisson:admina.text="'admin'">我是管理员</div>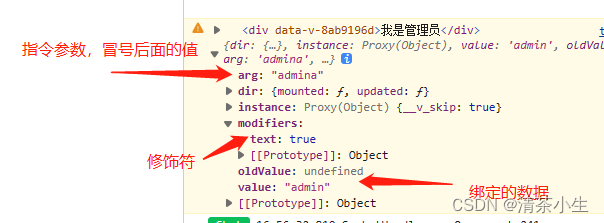
16.1 图片懒加载
<img
 v-for="item in imgData"
 :key="item"
 :style="{ width: '100%', height: '100%' }"
 v-lazy="item"
/>
// vite 脚手架动态引入图片
const imgFileList: Record<string, { default: string }> = import.meta.glob('@/assets/file-icon/*.*')
// 文件列表转数组,返回图片路径
const imgData = Object.values(imgFileList).map((item) => {
return item.name
})
// 懒加载指令
const vLazy: Directive = (el, bingding) => {
// 监听图片是否在可视区内
const observer = new IntersectionObserver((enr) => {
console.warn(enr)
// observer对象下intersectionRatio为0代表图片从未出现再可视区过,大于0代表出现过
if (enr[0].intersectionRatio > 0) {
// 动态复制
setTimeout(() => {
el.src = bingding.value
observer.unobserve(el)
}, 2000)
}
})
observer.observe(el)
}17、自定义插件
17.1 注意插件文件名定义要用index定义,不然无法读取

17.2 index.ts内容:
import type { App, VNode } from 'vue'
import Test from './index.vue'
import { createVNode, render } from 'vue'
export default {
  // 当插件在main.js中被使用时:app.use(),会调用install方法
  install(app: App) {
    // 使用createVNode方法,将组件转换为vNode(虚拟dom),此时组件还未挂载
    const vNode: VNode = createVNode(Test)
    // 调用render渲染函数,将创建的vNode挂载到全局body上
    render(vNode, document.body)
    // vNode.component.exposed可以取出插件内部defineExpose方法暴露出的方法以及变量
    app.config.globalProperties.$Test = {
      show: vNode.component?.exposed?.showTest,
      hide: vNode.component?.exposed?.hideTest
    }
  }
}
17.3 index.vue 组件内容:
<template>
  <div v-if="show">我是插件</div>
</template>
<script setup>
import { ref } from 'vue'
const show = ref(false)

const showTest = () => {
  show.value = true
}
const hideTest = () => {
  show.value = false
}
// 通过defineExpose暴露组件方法以及变量
defineExpose({
  show,
  showTest,
  hideTest
})
</script>
17.4 main.js中注册
import Test from '@views/test'
app.use(Test)
17.5 最后任意组件中通过全局变量就可以调用了
<template>
  <button @click="change">显示插件</button>
  <button  @click="hide">关闭插件</button>
</template>
<script setup lang="ts">
import { getCurrentInstance } from 'vue'
const instance = getCurrentInstance()
const change = () => {
  instance?.proxy?.$Test.show()
}
const hide =()=>{
    instance?.proxy?.$Test.hide()
}
</script>
18、pinia:轻量化状态管理,相比vuex更轻便好用
// 引入
import { createPinia } from 'pinia'
// 使用
app.use(createPinia())
import { defineStore } from 'pinia' // defineStore 用于创建store仓库
import { StoreNames } from './stroe-name'
type User = {
userName: string
age: number
}
// 模拟登录
const login = () => {
return new Promise((resolve, reject) => {
setTimeout(() => {
resolve({
userName: '用户1',
age: 99
})
}, 2000)
})
}
// 返回的函数统一使用useXXX作为命名方案
export const useSystemInfo = defineStore('USER', {
// 状态数据
state: () => {
return {
userName: 'hhh',
age: 888,
info: <User>{
userName: '用户',
age: 19
}
}
},
// 计算属性
getters: {
newName(): string {
return this.userName
}
},
// 提交方法,可异步
actions: {
setUserName(name: string = '') {
this.userName = name
},
async setInfo() {
const res = await login()
this.info = res
this.setUserName('555')
}
}
})
// 引入仓库
import { useSystemInfo } from '@piniaStore/user'
// 用于解构重新赋予响应式
import { storeToRefs } from 'pinia'
// 使用
const userInfo = useSystemInfo()
// // 会失去响应式
// const {userName } = userInfo
// 借助storeToRefs
const { userName } = storeToRefs(userInfo)
// 获取
userName.value
const changeStore = () => {
  // 修改pinia
  // 1.直接修改(不推荐)
   userInfo.userName = '555'
  // 2.$patch
  userInfo.$patch({userName:'888'})
  // 3.$patch 函数式修改,可以再函数内动态修改内容
  userInfo.$patch((state)=>{
     state.userName = 'llll'
   })
  // 4.$state 需要修改整个state对象,不能少传,少传会报错
   userInfo.$state = {
     userName: '32323',
     age: 77,
     info:{}
   }
  // 5.action
  userInfo.setUserName('pppp')
  // userInfo.setUserName()
}

const resetStore = () => {
  // 重置store
  userInfo.$reset()
}
// pinia 计算属性getter的监听函数
userInfo.$subscribe((args, state) => {
  // args:变更前数据,state变更后的值
  console.warn(args, state)
})
// pinia  action的监听函数,true:表示在当前组件销毁后依然可以监听action
userInfo.$onAction((arg)=>{

},true)
19、router 路由
19.1 路由跳转
import { createRouter, createWebHistory } from 'vue-router'

const router = createRouter({
  // 路由跳转方式 history,也可以用hash
  history: createWebHistory(import.meta.env.BASE_URL),
  routes: [
    {
      path: '/my/:id',
      name: 'My',
      component: () => import('@/views/my.vue')
    },
    {
      path: '/test',
      name: 'test',
      component: () => import('@/views/test.vue')
    }
  ]
})

export default router
<template>
<div>test</div>
<!-- 使用router-link跳转,不会保留路由历史记录 -->
<router-link to="/test"></router-link>
<!-- 函数式跳转 -->
<button @click="goPage">跳转</button>
</template>
<script setup lang="ts">
import { useRouter } from 'vue-router' // 使用useRouter() hooks
const router = useRouter()
const goPage = () => {
// 默认参数path
router.push('/my')
// repleace 不保留历史记录跳转
router.replace('/my')
// 可以使用name跳转
router.push({
// path:'',
name: 'My' //
})
// query会显示在url地址栏上,,页面刷新参数不会丢失
router.push({
name: 'My',
query: { id: 999 }
})
// params不会显示在url地址栏上,使用params传参时,只能使用路由名称name跳转,页面刷新参数会丢失
router.push({
name: 'My',
params: { id: 999 } // vue3直接传会获取不到参数,
})
}
</script>19.1 页面接收参数
import { useRoute } from 'vue-router'
const route = useRoute()
route.params
route.query
19.2 嵌套路由
<template>
  <!-- 父路由 -->
  aa
  <!-- 路由视图容器 -->
  <RouterView></RouterView>
</template>
import { createRouter, createWebHistory } from 'vue-router'
const router = createRouter({
history: createWebHistory(import.meta.env.BASE_URL),
routes: [
{
path: '/',
name: 'My',
component: () => import('@/views/install-test.vue'),
// redirect:'/test', // 重定向到/test
alias:['/aaa','/bbb'],//路由别名,当访问alias中的路由时都可以跳转到当前页面
children: [
{
// path:'',// 嵌套路由,子路由path为空,默认展示改路由
path: '/test',
name: 'test',
component: () => import('@/views/test2.vue')
}
]
}
]
})
export default router


 被折叠的 条评论
为什么被折叠?
被折叠的 条评论
为什么被折叠?
 到【灌水乐园】发言


