


文章目录
- 实现目标
- 一、环境准备:
- 二、主机设置:
- 三、pacemaker安装步骤
- 四.可能遇到的问题
- 五.参考文档:
转载原文地址:https://www.modb.pro/db/465484
实现目标
两台主机的oracle数据库存放在共享磁盘上,通过pcs实现oracle ha自动主备切换,任意一台主机出现宕机故障,另外一台主机可自动实现快速接管,最大限度保障业务的连续性运行。
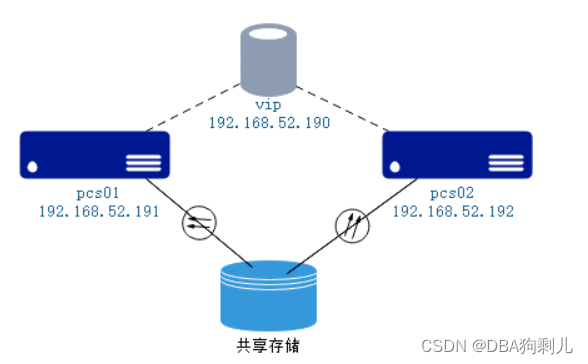
(您不再需要使用linux cluster、roseha等复杂的HA软件,PCS实现的效果完全可满足一般HA需求;本文虽然写的是oracle ha,但其同样适用于其它数据库mysql/pg等和其它应用软件,关键点就是两台主机配置相同的用户和环境变量,数据库或应用安装在共享存储上即可)
提示:以下是本篇文章正文内容,下面案例可供参考
一、环境准备:

操作系统 Oracle Linux7.9
root密码 secure_password
hacluster密码 secure_password
数据库版本11.2.0.4
数据库名称:orcl
system/sys密码oracle
其中:共享磁盘/dev/sdb通过lvm方式划分逻辑卷/dev/vg01/lvol01并挂接xfs类型的/u01文件系统,用来安装oracle数据库。
二、主机设置:
设置hosts:(所有节点)
[root@pcs01 ~]# cat /etc/hosts
127.0.0.1 localhost localhost.localdomain localhost4 localhost4.localdomain4
::1 localhost localhost.localdomain localhost6 localhost6.localdomain6
192.168.52.191 pcs01
192.168.52.192 pcs02
关闭防火墙:(所有节点)
systemctl disable firewalld
systemctl stop firewalld
sed -i 's/SELINUX=enforcing/SELINUX=disabled/g' etc/selinux/config
setenforce 0
设置时间同步:(所有节点)
yum install -y chrony
systemctl enable chronyd
systemctl start chronyd
systemctl status chronyd

添加时间同步服务器
vi /etc/chrony.conf
server 时钟服务器IP iburst
重启chronyd服务
systemctl restart chronyd.service
检查同步是否正常
chronyc sources –v
timedatectl
配置Oracle安装的基础环境:
系统参数:(所有节点)
vi /etc/sysctl.conf

fs.file-max = 6815744
kernel.sem = 250 32000 100 128
kernel.shmmni = 4096
kernel.shmall = 1073741824
kernel.shmmax = 64424509440 ##小于物理内存
kernel.panic_on_oops = 1
net.core.rmem_default = 262144
net.core.rmem_max = 4194304
net.core.wmem_default = 262144
net.core.wmem_max = 1048576
net.ipv4.conf.all.rp_filter = 2
net.ipv4.conf.default.rp_filter = 2
fs.aio-max-nr = 1048576
net.ipv4.ip_local_port_range = 9000 65500

执行生效sysctl -p
vi /etc/profile(所有节点)


if [ $USER = "oracle" ]; then
        if [ $SHELL = "/bin/ksh" ]; then
                ulimit -p 16384
                ulimit -n 65536
        else
                ulimit -u 16384 -n 65536
        fi
fi

执行生效:source /etc/profile
在 /etc/security/limits.conf 文件中添加:(所有节点)
oracle soft nofile 10240
oracle hard nofile 65536
oracle soft nproc 16384
oracle hard nproc 16384
oracle soft stack 10240
oracle hard stack 32768
oracle hard memlock unlimited
oracle soft memlock unlimited
安装包:(所有节点)
yum -y install binutils compat-libstdc++-33 gcc gcc-c++ glibc glibc-common glibc-devel ksh libaio libaio-devel libgcc libstdc++ libstdc++-devel make sysstat openssh-clients compat-libcap1 xorg-x11-utils xorg-x11-xauth elfutils unixODBC unixODBC-devel libXp elfutils-libelf elfutils-libelf-devel smartmontools unzip
建用户和组:(所有节点)
groupadd -g 54321 oinstall
groupadd -g 54322 dba
groupadd -g 54323 oper
useradd -u 54321 -g oinstall -G dba,oper oracle
目录权限(1节点)
mkdir -p /u01/db
mkdir -p /u01/soft
chown -R oracle:oinstall /u01
chmod -R 755 /u01
环境变量:(所有节点)
su - oracle
vi .bash_profile
export ORACLE_BASE=/u01/db/oracle
export ORACLE_HOME=$ORACLE_BASE/product/11.2.0/dbhome_1
export ORACLE_SID=orcl
export LANG=en_US.UTF-8
export NLS_LANG=american_america.ZHS16GBK
export NLS_DATE_FORMAT="yyyy-mm-dd hh24:mi:ss"
export PATH=.:${PATH}:$HOME/bin:$ORACLE_HOME/bin:$ORACLE_HOME/OPatch
export PATH=${PATH}:/usr/bin:/bin:/usr/bin/X11:/usr/local/bin
export PATH=${PATH}:$ORACLE_BASE/common/oracle/bin:/u01/oracle/run
export ORACLE_TERM=xterm
export LD_LIBRARY_PATH=$ORACLE_HOME/lib
export LD_LIBRARY_PATH=${LD_LIBRARY_PATH}:$ORACLE_HOME/oracm/lib
export LD_LIBRARY_PATH=${LD_LIBRARY_PATH}:/lib:/usr/lib:/usr/local/lib
export CLASSPATH=$ORACLE_HOME/JRE
export CLASSPATH=${CLASSPATH}:$ORACLE_HOME/jlib
export CLASSPATH=${CLASSPATH}:$ORACLE_HOME/rdbms/jlib
export CLASSPATH=${CLASSPATH}:$ORACLE_HOME/network/jlib
export THREADS_FLAG=native
export TEMP=/tmp
export TMPDIR=/tmp
umask 022
export TMOUT=0
三、pacemaker安装步骤
1.安装pcs软件:(所有节点)
其中:pcs为CRM的管理接口工具,pacemaker为集群资源管理器(Cluster Resource Management),corosync为集群消息事务层(Massage Layer)。
yum -y install pcs
离线情况下,需要配置本地yum源:
[redhat7.9]
name = redhat 7.9
baseurl=file:///mnt
gpgcheck=0
enabled=1

[HighAvailability]
name=HighAvailability
baseurl=file:///mnt/addons/HighAvailability
gpgcheck=0
enabled=1

[ResilientStorage]
name=ResilientStorage
baseurl=file:///mnt/addons/ResilientStorage
gpgcheck=0
enabled=1
systemctl start pcsd.service
systemctl enable pcsd.service
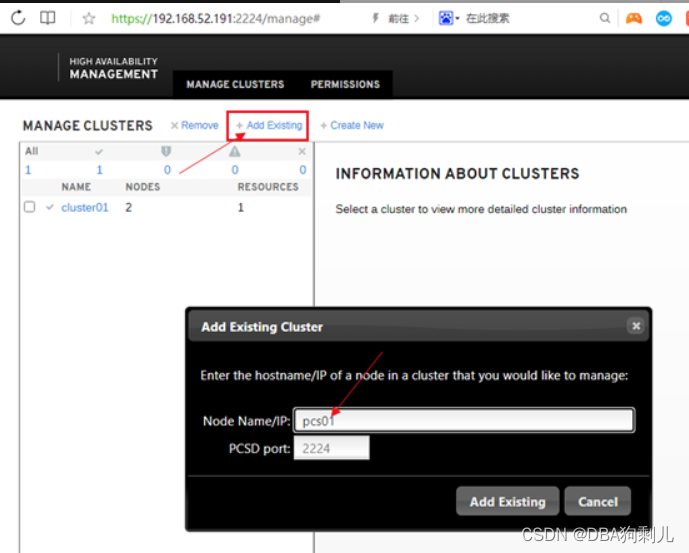
2.配置集群用户和互信权限:(1节点)
echo secure_password | passwd --stdin hacluster
pcs cluster auth pcs01 pcs02 -u hacluster -p secure_password
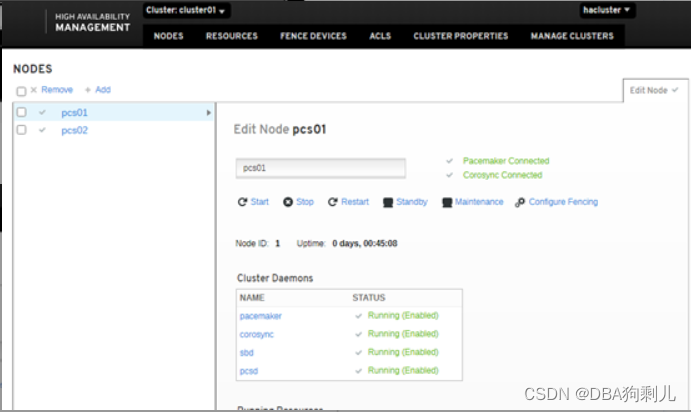
3.安装集群:(1节点)
pcs cluster setup --start --name cluster01 pcs01 pcs02
检查状态:忽略stonith的警告。
pcs status
启动集群:
pcs cluster enable --all
pcs cluster status
pcs property set stonith-enabled=false
pcs status
4.创建虚拟服务IP:(1节点)
pcs resource create virtualip IPaddr2 ip=192.168.52.190 cidr_netmask=24 nic=eth0 op monitor interval=10s
pcs status
通过如下方式确认ip正常挂接并可用,核查网卡名称比如eth0/ens32:
ip a
ping -c 2 192.168.52.190
ip addr show dev ens32
测试IP切换:
pcs resource move virtualip pcs02
5.创建共享磁盘卷组(1节点)
vgcreate vg01 /dev/sdb
vgdisplay|grep Free
lvcreate -n lvol01 -l 2598 vg01(根据柱面数划逻辑卷大小)
lvcreate -n lvol01 -L 9G vg01(直接分配大小,存在浪费空间问题)
mkfs -t xfs /dev/vg01/lvol01
mkdir /u01
systemctl daemon-reload
mount -t xfs /dev/vg01/lvol01 /u01
df -Th /u01

vi /etc/lvm/lvm.conf找到volume_list =修改volume_list = [],最终可能需改成volume_list = [ "ol" ],其中ol为本地vg(通过vgs等核查本地磁盘卷组排除掉)
egrep -v "#|^$" /etc/lvm/lvm.conf

lvmconf --enable-halvm --services --startstopservices

#创建卷组资源:
pcs resource create vg01 LVM volgrpname=vg01 exclusive=true
pcs resource show
pcs status
pcs resource move vg01 pcs02
pcs status
6.创建文件系统资源:(1节点)
pcs resource create u01 Filesystem device="/dev/vg01/lvol01" directory="/u01" fstype=“xfs”
pcs status
把资源加入oracle组
pcs resource group add oracle virtualip vg01 u01
pcs status
测试资源启停:
pcs cluster standby pcs01
pcs cluster unstandby pcs01
7.安装数据库软件:(1节点)
vi /etc/oraInst.loc
inventory_loc=/u01/db/oraInventory
inst_group=oinstall
./runInstaller -silent -debug -force -noconfig -IgnoreSysPreReqs \
FROM_LOCATION=/u01/soft/database/stage/products.xml \
oracle.install.option=INSTALL_DB_SWONLY \
UNIX_GROUP_NAME=oinstall \
INVENTORY_LOCATION=/u01/db/oraInventory \
ORACLE_HOME=/u01/db/oracle/product/11.2.0/dbhome_1 \
ORACLE_HOME_NAME="Oracle11g" \
ORACLE_BASE=/u01/db/oracle \
oracle.install.db.InstallEdition=EE \
oracle.install.db.isCustomInstall=false \
oracle.install.db.DBA_GROUP=dba \
oracle.install.db.OPER_GROUP=dba \
DECLINE_SECURITY_UPDATES=true
8.建库:(1节点)
cd /u01/db/oracle/product/11.2.0/dbhome_1/assistants/dbca/templates
dbca -silent -createDatabase -templateName General_Purpose.dbc -gdbname orcl -sid orcl -sysPassword oracle -systemPassword oracle -responseFile NO_VALUE -datafileDestination /u01/db/oracle/oradata -redoLogFileSize 200 -recoveryAreaDestination NO_VALUE -storageType FS -characterSet ZHS16GBK -nationalCharacterSet AL16UTF16 -sampleSchema false -memoryPercentage 60 -databaseType OLTP -emConfiguration NONE
9.创建监听:(1节点)
netca -silent -responsefile /u01/db/oracle/product/11.2.0/dbhome_1/assistants/netca/netca.rsp
10.服务名和静态监听修改(注意红色部分):(1节点)
[oracle@pcs02 ~]$ cd $ORACLE_HOME/network/admin
[oracle@pcs02 admin]$ more listener.ora
# listener.ora Network Configuration File: /u01/db/oracle/product/11.2.0/dbhome_1/network/admin/listener.ora
# Generated by Oracle configuration tools.

LISTENER =
  (DESCRIPTION_LIST =
    (DESCRIPTION =
      (ADDRESS = (PROTOCOL = IPC)(KEY = EXTPROC1521))
      (ADDRESS = (PROTOCOL = TCP)(HOST = 192.168.52.190)(PORT = 1521))
    )
  )
SID_LIST_LISTENER =
  (SID_LIST =
    (SID_DESC =
      (GLOBAL_DBNAME = orcl)
      (ORACLE_HOME = /u01/db/oracle/product/11.2.0/dbhome_1)
      (SID_NAME = orcl)
    )
  )

ADR_BASE_LISTENER = /u01/db/oracle

[oracle@pcs02 admin]$ more tnsnames.ora
# tnsnames.ora Network Configuration File: /u01/db/oracle/product/11.2.0/dbhome_1/network/admin/tnsnames.ora
# Generated by Oracle configuration tools.

ORCL =
  (DESCRIPTION =
    (ADDRESS = (PROTOCOL = TCP)(HOST = 192.168.52.190)(PORT = 1521))
    (CONNECT_DATA =
      (SERVER = DEDICATED)
      (SERVICE_NAME = orcl)
    )
  )
注意tnsnames的服务名ORCL必须与sid名称一致,否则当前节点的pcs服务会当掉发生切换,并且集群切换到另外一个节点,监听和数据库服务stop,如下图:

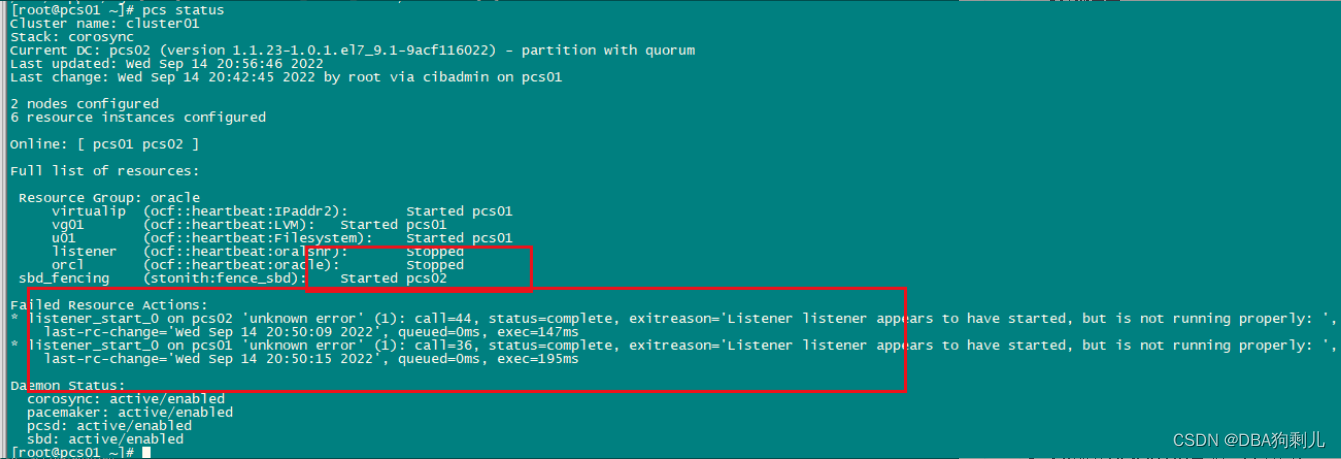
修改正确后,两节点都重启systemctl restart pacemaker恢复正常。
11.数据库调优基本参数:(1节点)
alter profile default limit failed_login_attempts unlimited;
alter profile default limit password_life_time unlimited;
alter system set audit_trail=none scope=spfile sid='*';
alter system set recyclebin=off scope=spfile sid='*';
alter system set sga_target=2000M scope=spfile sid='*';
alter system set pga_aggregate_target=500M sid='*';
12.拷贝节点1文件到节点2:
scp -p /etc/oraInst.loc pcs02:/etc/
scp -p /etc/oratab pcs02:/etc/
scp -p /usr/local/bin/coraenv pcs02:/usr/local/bin/
scp -p /usr/local/bin/dbhome pcs02:/usr/local/bin/
scp -p /usr/local/bin/oraenv pcs02:/usr/local/bin/
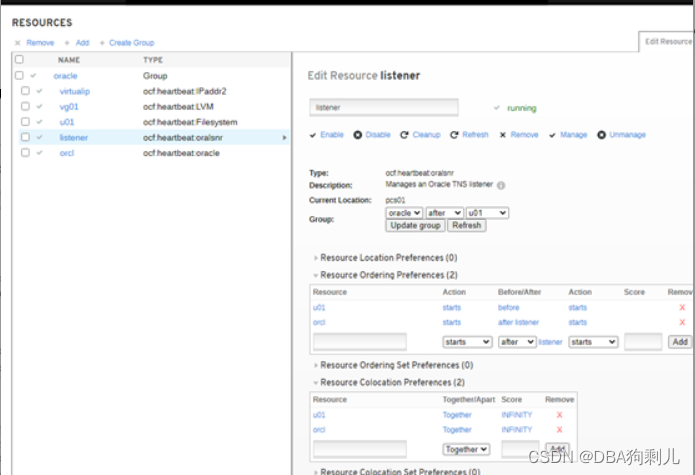
13.创建监听资源:(1节点)
pcs resource create listener_orcl oralsnr sid="orcl" listener="listener" --group=oracle
pcs status
14.创建oracle db资源:(1节点)
pcs resource create orcl oracle sid=“orcl” --group=oracle
pcs status
15.定义资源依赖(1节点)
pcs constraint colocation add vg01 with virtualip
pcs constraint colocation add u01 with vg01
pcs constraint colocation add listener with u01
pcs constraint colocation add orcl with listener
16.定义资源启动顺序(1节点)
pcs constraint order start virtualip then vg01
pcs constraint order start vg01 then start u01
pcs constraint order start u01 then start listener
pcs constraint order start listener then start orcl

查看所有依赖:

[root@pcs01 ~]# pcs constraint show --full
Location Constraints:
  Resource: vg01
    Enabled on: pcs02 (score:INFINITY) (role: Started) (id:cli-prefer-vg01)
  Resource: virtualip
    Enabled on: pcs01 (score:INFINITY) (role: Started) (id:cli-prefer-virtualip)
Ordering Constraints:
  start virtualip then start vg01 (kind:Mandatory) (id:order-virtualip-vg01-mandatory)
  start vg01 then start u01 (kind:Mandatory) (id:order-vg01-u01-mandatory)
  start u01 then start listener (kind:Mandatory) (id:order-u01-listener-mandatory)
  start listener then start orcl (kind:Mandatory) (id:order-listener-orcl-mandatory)
Colocation Constraints:
  vg01 with virtualip (score:INFINITY) (id:colocation-vg01-virtualip-INFINITY)
  u01 with vg01 (score:INFINITY) (id:colocation-u01-vg01-INFINITY)
  listener with u01 (score:INFINITY) (id:colocation-listener-u01-INFINITY)
  orcl with listener (score:INFINITY) (id:colocation-orcl-listener-INFINITY)
Ticket Constraints:
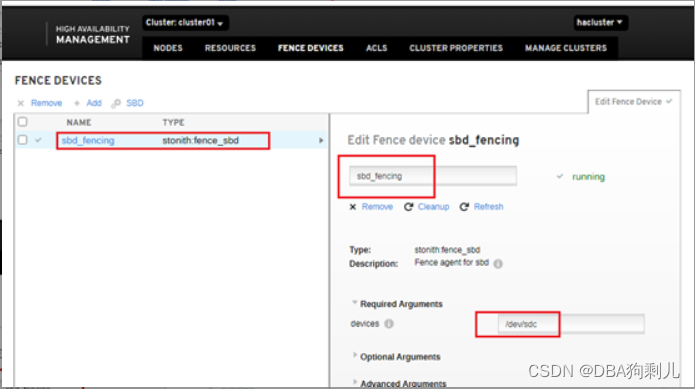
17.安装fence devices
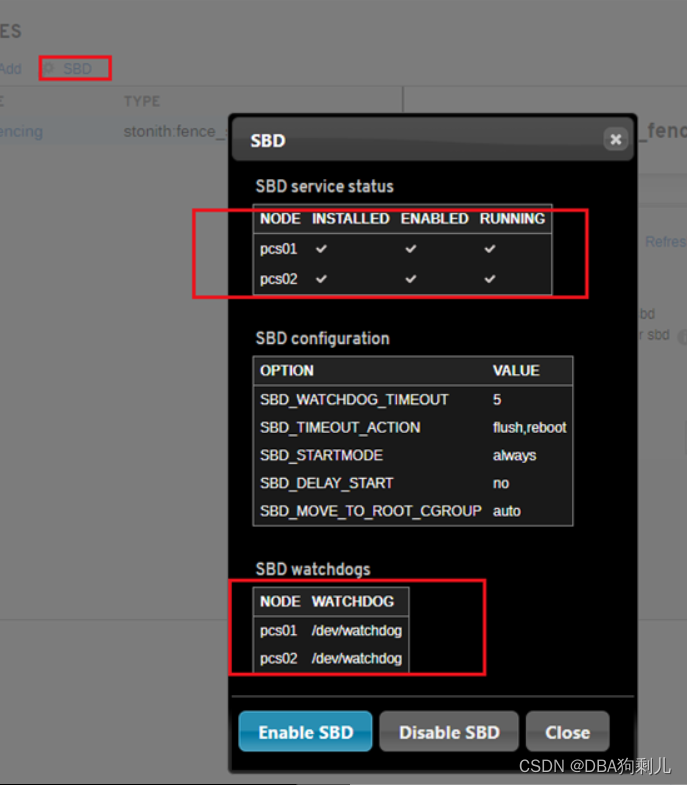
17.1.sbd方式
此处采有共享磁盘sbd方式,磁盘只需100M大小足够(理论上>4M即可)
#pcs property | grep stonith-enabled
#pcs property set stonith-enabled=true

#yum install fence-agents-ipmilan fence-agents-sbd fence-agents-drac5  (all nodes)

Configure softdog as a watchdog device and start automatic at boot time (all nodes):
# yum install -y watchdog sbd

Change the SBD configuration SBD_DEVICE to point to the shared disk (all nodes):
# echo softdog > /etc/modules-load.d/softdog.conf
# /sbin/modprobe softdog

Create the SBD device (just in one node)
# vi /etc/sysconfig/sbd
Change:
SBD_DEVICE="/dev/sdc" ? # /dev/sdc is the shared disk
SBD_OPTS="-n node1" ? ?? # if cluster node name is different from hostname this option must be used
++参考:
[root@pcs01 ~]# cat /etc/sysconfig/sbd|egrep -v "#|^$"
SBD_DEVICE="/dev/sdc"
SBD_PACEMAKER=yes
SBD_STARTMODE=always
SBD_DELAY_START=no
SBD_WATCHDOG_DEV=/dev/watchdog
SBD_WATCHDOG_TIMEOUT=5
SBD_TIMEOUT_ACTION=flush,reboot
SBD_MOVE_TO_ROOT_CGROUP=auto
SBD_OPTS=
++
Enable SBD service (all nodes):
#pcs stonith sbd device setup --device=/dev/sdc

The Pacemaker STONITH fence can be created (all node):
# systemctl enable --now sbd
SBD is configured.
# pcs stonith create sbd_fencing fence_sbd devices=/dev/sdc
To test is the SBD is working:
# pcs stonith fence pcs02
node2 should be rebooted.
17.2.idrac方式
This article explains how to configure fencing on a Dell physical server, which is the most commonly used server in NetEye 4 installations. A fencing configuration is not required for voting-only cluster nodes or for elastic-only nodes as they are not part of the PCS cluster.
Configuring iDRAC
Dell Remote Access Controller (iDRAC) is a hardware component located on the motherboard which provides both a web interface and a command line interface to perform remote management tasks.
Before beginning, you should properly configure IPMI settings (Intelligent Platform Management Interface) and create a new account.
You can access the iDRAC web interface and enable IPMI access Over Lan at: iDRAC Settings > Connectivity > Network > IPMI Settings:

Then create a new user with the username and password of your choice, read-only privileges for the console, and administrative privileges on IPMI.

Please note that you must replicate this configuration on each physical server.
Install Fence Devices
Next you need to install ipmilan fence devices on each server in order to use fencing on Dell servers:
yum install fence-agents-ipmilan
Now you will be able to find several new fence devices including fence_iDRAC and show its properties:
pcs stonith list
pcs stonith describe fence_idrac
Test that the iDRAC interface is reachable using the default port 623:
nmap -sU -p623 <idrac_ip>
Finally you can safely test your configuration by printing the chassis status on each node remotely.
ipmitool -I lanplus -H <iDRAC IP> -U <your_IPMI_username> -P <your_IPMI_password> -y <your_encryption_key> -v chassis status
Configuring PCS
Fencing can be enabled by setting the property called stonith, which is an acronym for Shoot-The-Other-Node-In-The-Head. Disable stonith until fencing is correctly configured in order to avoid any issues during the procedure:
pcs property set stonith-enabled=false
pcs stonith cleanup
At this point you can create a stonith resource for each node. In a 2-node cluster it may happen that both nodes are unable to contact each other and then each node tries to fence the other one. But you can’t reboot both nodes at the same time since that will result in downtime and possibly harm cluster integrity. To avoid this you need to configure a different delay (e.g., one without delay, and the other one with at least a 5 second delay). To ensure the safety of your cluster, you should set the reboot method to “cycle“ instead of “onoff”.
pcs stonith create fence_node1 fence_iDRAC ipaddr="<iDRAC ip or fqdn>" "delay=0" lanplus="1" login="IPMI_username" passwd_script="IPMI_password" method="cycle" pcmk_host_list="node1.neteyelocal"
pcs stonith create fence_node2 fence_iDRAC ipaddr="<iDRAC ip or fqdn>" "delay=5" lanplus="1" login="IPMI_username" passwd_script="IPMI_password" method="cycle" pcmk_host_list="node2.neteyelocal"
You should set up a password script instead of directly using your password, for instance with a very simple bash script like the one below. The script should be readable only by the root user, preventing your iDRAC password from being extracted from the PCS resource. You should place this script in /usr/local/bin/ allowing you to invoke it as a regular command:
#! /bin/bash
echo “my_secret_psw“
If everything has been properly configured, then running pcs status should show the fence device with status Started.
To prevent unwanted fencing in the event of minor network outages, increase the totem token timeout to at least 5 seconds by editing /etc/corosync/corosync.conf as follows:
totem {
    version: 2
    cluster_name: neteye
    secauth: off
    transport: udpu
    token: 5000
}
then sync this config file to all other cluster nodes and reload corosync:
pcs cluster sync
pcs cluster reload corosync
Unwanted fencing might happen also when a node “commit suicide”, i.e., shut itself down because it was not able to contact the other node of the cluster. This is an unwanted situation because all nodes of a cluster might be fenced at the same time. To avoid this you should set a constraint to prevent a node’s stonith resource from running on the cluster node itself:
pcs constraint location fence_node1 avoids node1.neteyelocal
Now that fencing is configured, you only need to set the stonith property to true to enable it:
pcs property set stonith-enabled=true
pcs stonith cleanup
Always remember to temporarily disable fencing during updates/upgrades.
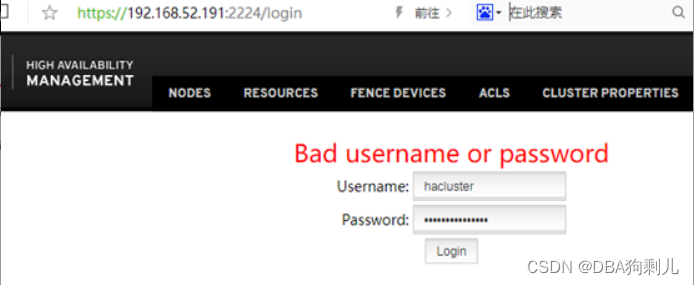
18.图形界面控制台:
netstat -tunlp|grep LISTEN|grep 2224
https://192.168.52.191:2224 建议用谷歌浏览器
hacluster/secure_password
19.主机宕机测试
crm_mon或pcs status观察
reboot或shutdown -h now重启某一台
pcs status观察
df -h
su - oracle
sqlplus system/oracle@orcl测试连接
任意重启一台机器,pcs resource均可正常切换。
但如果同时关闭了两台主机,然后再起其中任意一台(另外一台保持关闭状态,模拟无法修复启动),那么起来的那台资源resource显示一直是stopped状态。
此时只能手工强制启动资源。
操作步骤如下:
pcs resource
根据上述结果的顺序依赖关系依次启动资源
pcs resource debug-start xxx
四.可能遇到的问题
问题1:创建逻辑卷时的报错
如果涉及存储多路径问题,需要保证做了聚合成一个磁盘,否则创建lv会失败:

问题2:安装多路径软件做磁盘聚合

可参考:https://blog.csdn.net/weixin_41607523/article/details/126540525?spm=1001.2014.3001.5502
处理:
修改volume_list = []里边不要空格,如有本地卷组需要按提示写法加入

问题3:pcs状态正常,错误提示无法清理

处理:状态都正常,但存在历史错误信息,想清理掉:尝试pcs stonith cleanup未解决,最终systemctl stop pacemaker两台都停,然后都起systemctl start pacemaker,信息清理完毕。参考https://www.suse.com/support/kb/doc/?id=000019816
问题4:更新资源信息
[root@cxl-pcs01 ~]# pcs resource update clustervip01 Ipaddr2 ip=192.168.84.167 cidr_netmask=24 op monitor interval=30s
问题5:集群启动监听相关
https://blog.csdn.net/weixin_41607523/article/details/126868699?spm=1001.2014.3001.5502
五.参考文档:
Pacemaker configuration for an Oracle database and its listener
https://blog.yannickjaquier.com/linux/pacemaker-configuration-oracle-database.html
Configuring Fencing on Dell Servers
https://www.neteye-blog.com/2020/06/configuring-fencing-on-dell-servers/
pacemaker搭建oracle ha
https://cdn.modb.pro/db/66956
时间同步:
https://www.xiexianbin.cn/linux/softwares/2016-02-08-chrony/index.html?to_index=1
独占启用(exclusive activation)丛集中的卷册群组
https://access.redhat.com/documentation/zh-cn/red_hat_enterprise_linux/7/html/high_availability_add-on_administration/s1-exclusiveactivenfs-haaa
oracle11g快速安装参考:
https://blog.csdn.net/jycjyc/article/details/103198741
Centos7.6加pcs搭建高可用数据库集群
https://www.cnblogs.com/monkey6/p/14890292.html
pcs常用命令:
https://blog.csdn.net/hhhh2012/article/details/48313909
Dell Drac 5
https://access.redhat.com/documentation/zh-cn/red_hat_enterprise_linux/6/html/fence_configuration_guide/s1-software-fence-drac5-ca#tb-software-fence-drac5-CA
统信ha搭建和部分命令手册(非原创)
https://blog.csdn.net/m0_47670786/article/details/123382132
Active-Passive Cluster for Near HA Using Pacemaker, DRBD, Corosync and MySQL
https://houseofbrick.com/blog/active-passive-cluster-for-near-ha-using-pacemaker-drbd-corosync-and-mysql/
[命令] Pacemaker 命令 pcs resource (管理资源)
https://eternalcenter.com/pcs-resource/
Rhel 7 pcs 实现oracle 12c高可用
https://blog.csdn.net/solore/article/details/106492348
ssh互信脚本参考:(取自oracle12c软件包,此处并不需要配置互信,互信只是为了两台主机直接拷贝文件免密方便而已)
命令参考:./sshUserSetup.sh -user root -hosts “pcs01 pcs02” -advanced –noPromptPassphrase
根据提示输入密码和yes即可,然后验证:
ssh pcs01 date
ssh pcs02 date


 1万+
1万+

 被折叠的 条评论
为什么被折叠?
被折叠的 条评论
为什么被折叠?
 到【灌水乐园】发言


