


最近在做一个项目时,想到可不可以使用钩子函数根据加载的数据注册JS方法,渲染DOM结点的样式,然后用created和mounted试了一下都会报错DOM结点未定义。又去官网翻了一下官方文档关于Vue实例生命周期的部分,特此记录下来。
简介
先放一张官网的图示:
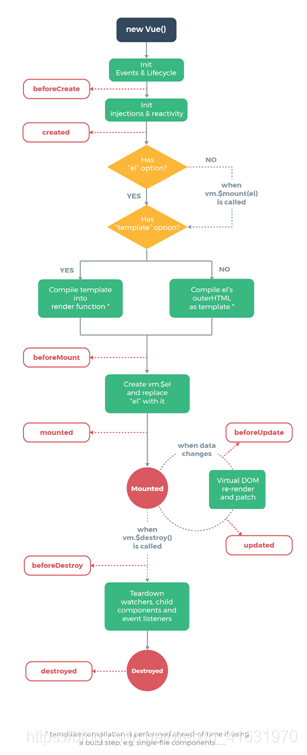
每个Vue实例在被创建时都要经过一系列的初始化过程。例如,需要设置数据监听、编译模板、将实例挂载到 DOM 并在数据变化时更新 DOM 等。这是官方文档中对Vue实例生命周期的介绍。通俗的来说,Vue实例的生命周期就是Vue实例从创建到销毁的过程。同时在这个过程中也会运行一些叫做生命周期钩子的函数,这给了用户在不同阶段添加自己的代码的机会。让我们可以在某些特定事件触发时(实例创建前后、挂载前后、数据更新前后等)注册JS方法。
照例还是上官方文档:
https://cn.vuejs.org/v2/guide/instance.html#实例生命周期钩子
https://cn.vuejs.org/v2/guide/instance.html#生命周期图示
通过一个例子看Vue实例的生命周期和钩子函数
我直接在我的工程文件里写了一个新的组件用来测试,因为所有的 Vue 组件都是 Vue 实例,并且接受相同的选项对象 (一些根实例特有的选项除外)。
直接看代码:
<template>
  <div>
    <p>{{ message }}</p>
    <div>
      <button @click="change">更新</button>
      <button @click="destroy">销毁</button>
    </div>
  </div>
</template>

<script>
    export default {
      name: "test",
      data() {
        return {
          message: '123456',
        }
      },
      methods:{
        change:function(){
          this.$data.message='789789'
        },
        destroy:function() {
          this.$destroy();
        }
      },
      beforeCreate: function () {
        console.group('《=============== beforeCreate ===============》');
        console.log("%s", "el     : " + this.$el); //undefined
        console.log("%s", "data   : " + this.$data); //undefined
        console.log("%s", "message: " + this.message); //undefined
      },
      created: function () {
        console.group('《=============== created ===============》');
        console.log("%c%s", "color:green", "el     : " + this.$el); //undefined
        console.log("%c%s", "color:green", "data   : " + this.$data);//已被初始化
        console.log("%c%s", "color:green", "message: " + this.message); //已被初始化
      },
      beforeMount: function () {
        console.group('《=============== beforeMount ===============》');
        console.log("%s", "el     : " + this.$el); //undefined
        console.log("%s", "data   : " + this.$data); //已被初始化
        console.log("%s", "message: " + this.message); //已被初始化
      },
      mounted: function () {
        console.group('《=============== mounted ===============》');
        console.log("%c%s", "color:green", "el     : " + this.$el);//已被初始化
        console.log(this.$el);
        console.log("%c%s", "color:green", "data   : " + this.$data); //已被初始化
        console.log("%c%s", "color:green", "message: " + this.message); //已被初始化
      },
      beforeUpdate: function () {
        console.group('《=============== beforeUpdate ===============》');
        console.log("%s", "el     : " + this.$el);
        console.log(this.$el);
        console.log("%s", "data   : " + this.$data);
        console.log("%s", "message: " + this.message);
      },
      updated: function () {
        console.group('《=============== updated ===============》');
        console.log("%c%s", "color:green", "el     : " + this.$el);
        console.log(this.$el);
        console.log("%c%s", "color:green", "data   : " + this.$data);
        console.log("%c%s", "color:green", "message: " + this.message);
      },
      beforeDestroy: function () {
        console.group('《=============== beforeDestroy ===============》');
        console.log("%s", "el     : " + this.$el);
        console.log(this.$el);
        console.log("%s", "data   : " + this.$data);
        console.log("%s", "message: " + this.message);
      },
      destroyed: function () {
        console.group('《=============== destroyed ===============》');
        console.log("%c%s", "color:red", "el     : " + this.$el);
        console.log(this.$el);
        console.log("%c%s", "color:red", "data   : " + this.$data);
        console.log("%c%s", "color:red", "message: " + this.message);
      },
    }
</script>

<style scoped>
</style>
我创建了一个组件(Vue实例),包含一个更新数据按钮和销毁按钮,并调用其钩子函数,结果如下。

1、created和mounted
beforecreated:el和data并未初始化
created:完成了data的初始化,el没有初始化
beforeMount:完成了data的初始化,el没有初始化
mounted :完成挂载,el和data均初始化
2、updated
之后我们点击更新按钮,更新message的值我们可以发现在beforeUpdate前data中的message的值就改了,这是因为这里的beforeUpdate指的是view层的数据更新前而不是data中的数据更新前。
3、destroyed
点击销毁按钮,将该Vue实例销毁,销毁后我们发现原先的DOM结点还在但是再执行更新时,Vue对该动作不再响应了,所以我们必须在销毁前手动删除结点,防止影响浏览器性能。
组件嵌套的时候钩子函数的调用顺序
先执行父组件的beforeCreate、created和beforeMount函数,然后执行子组件的beforeCreate、created和beforeMount函数,然后顺序执行子组件的mounted函数,最后执行父组件的mounted函数。
也就是说子组件在父组件未挂载之前挂载,子组件全部挂载完成后父组件再挂载。
钩子函数用在什么时候呢?
我大概总结了一下我使用过的钩子函数和使用场景,以供参考。
| 钩子函数 | 触发条件 | 用处 |
|---|---|---|
| beforeCreate | el和data都是undefined,均未初始化 | 加载loading事件 |
| created | data初始化完成,el未初始化 | 结束loading、从后端请求数据 |
| beforeMount | data初始化完成,el未初始化 | 暂时没用过 |
| mounted | el和data均初始化完成 | 从后端请求数据、配合路由钩子 |
| beforeUpdate | view层的数据发生变化时 | 暂时没用过 |
| updated | 数据更新完成后 | 数据发生变化时进行一些操作 |
| beforeDestory | 组件销毁前触发 | 暂时没用过 |
| destroyed | 组件销毁后触发 | 组件销毁后可以弹框提示(组件已销毁) |
本文是我参考官方资料和一些文章整理的Vue生命周期解释,如有错误还请大牛指正,希望对大家有所帮助。
参考文献
https://segmentfault.com/a/1190000008010666?utm_source=tag-newest
https://cn.vuejs.org/v2/api/#选项-生命周期钩子(官方API)


 243
243

 被折叠的 条评论
为什么被折叠?
被折叠的 条评论
为什么被折叠?
 到【灌水乐园】发言


