


FastDFS安装手册
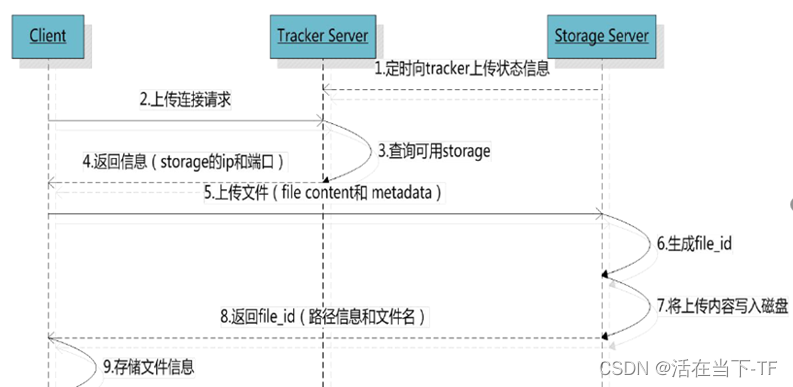
FastDFS原理简介
Trackerserver作用是负载均衡和调度,通过Trackerserver在文件上传时可以根据一些策略找到Storageserver提供文件上传服务。可以将tracker称为追踪服务器或调度服务器。
一、Tracker和storage安装
1.下载安装
下载的包都存放在/root/目录下。
下载libfastcommon、fastdfs、fastdfs-nginx-module:
cd /root/
wget https://github.com/happyfish100/libfastcommon/archive/V1.0.39.tar.gz -SO libfastcommon.tar.gz
wget https://github.com/happyfish100/fastdfs/archive/V5.11.tar.gz -SO fastdfs.tar.gz
wget https://github.com/happyfish100/fastdfs-nginx-module/archive/V1.20.tar.gz -SO fastdfs-nginx-module.tar.gz
解压
tar -zxf fastdfs.tar.gz
tar -zxf fastdfs-nginx-module.tar.gz
tar -zxf libfastcommon.tar.gz
安装
安装基础包:
yum install gcc-c++ libevent -y
安装libfastcommon
cd libfastcommon-1.0.39
./make.sh
./make.sh install
安装fastdfs
cd fastdfs-5.11
./make.sh
./make.sh install
安装好后,程序是在/usr/bin目录下:
which fdfs_trackerd

而配置文件是在/etc/fdfs目录下:
ls /etc/fdfs
client.conf.sample ; storage_ids.conf.sample ; tracker.conf.sample ; storage.conf.sample
但是这些配置文件是不全的,而且都是模板,所以需要从fastdfs包中拷贝过来,并修改配置:
cd /root/fastdfs-5.11/conf
ls
anti-steal.jpg ;client.conf ;http.conf ; mime.types storage.conf ;storage_ids.conf ;tracker.conf
2.配置文件修改
拷贝配置文件:
cp /root/fastdfs-5.11/conf/* /etc/fdfs
cp /root/fastdfs-nginx-module-1.20/src/mod_fastdfs.conf /etc/fdfs
修改配置文件
修改/etc/fdfs/tracker.conf
必改项:base_path
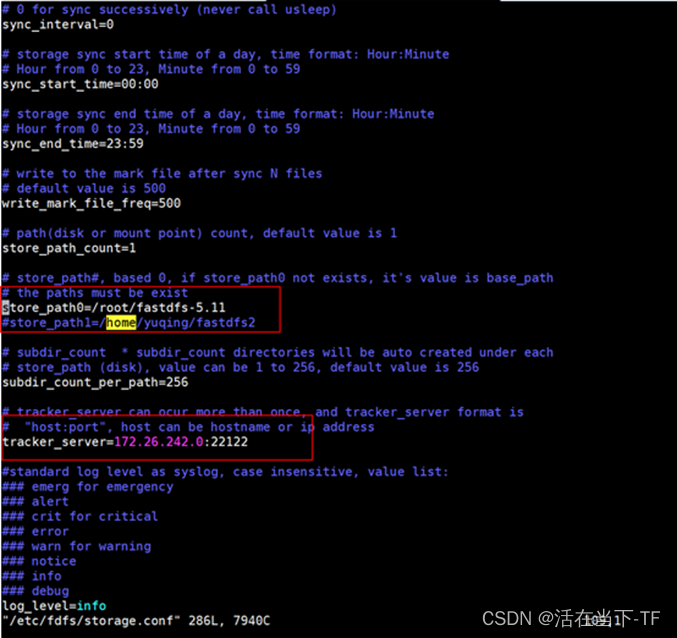
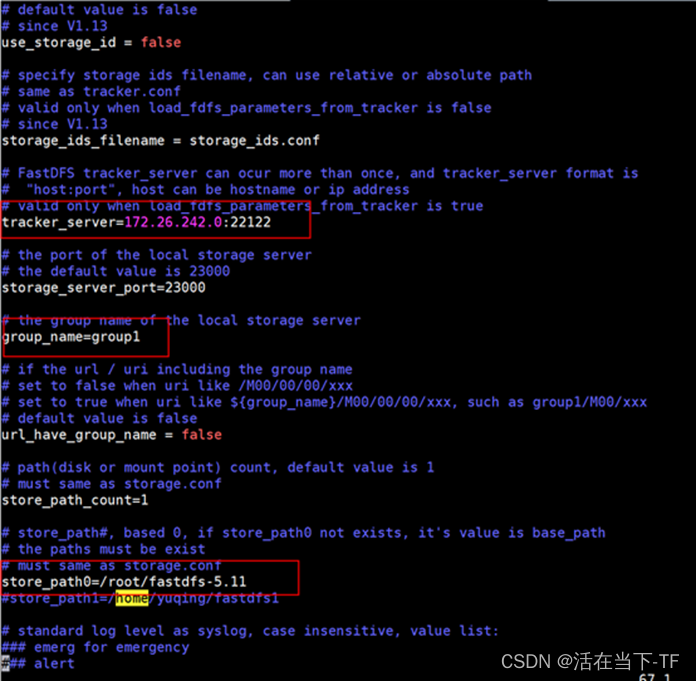
修改/etc/fdfs/storage.conf
横向扩展:多台storage即配置基本一致,变更group_name即可
纵向扩展:如果有多个挂载磁盘,则定义多个store_path即可
修改项:group_name base_path store_path0 tracker_server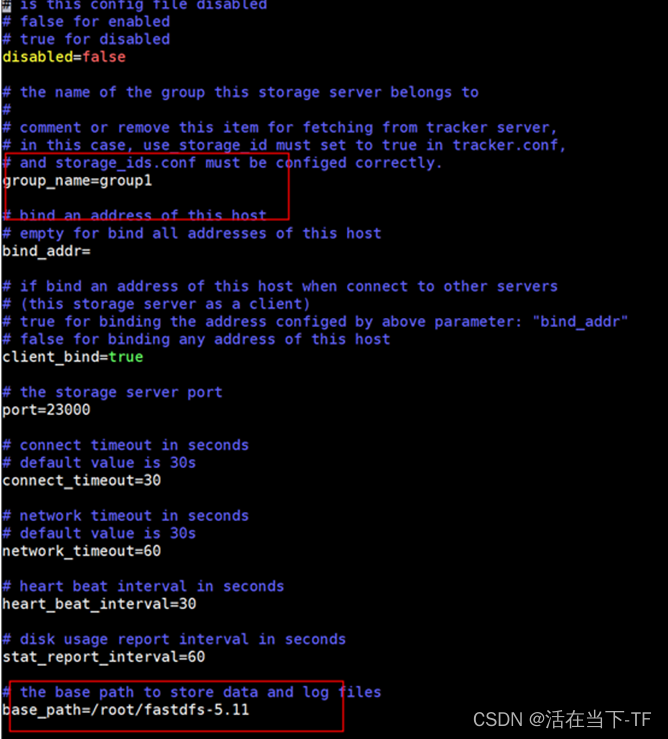
修改client.conf
修改项:base_path tracker_server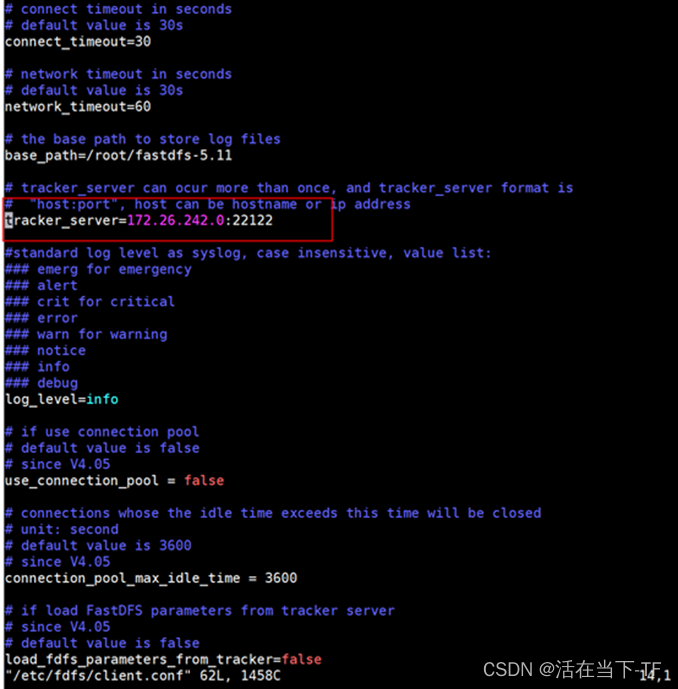
修改/etc/fdfs/mod_fastdfs.conf:
修改项:base_path tracker_server group_name
3.启动tracker和storage
启动
fdfs_trackerd /etc/fdfs/tracker.conf start
fdfs_storaged /etc/fdfs/storage.conf start
查看日志
tail -10f /root/fdfs-5.11/logs/trackerd.log
tail 10f /root/fdfs-5.11/logs/storaged.log
如果日志显示有错误信息,需要根据信息来查找错误原因
查看状态:

上传文件
fdfs_test /etc/fdfs/client.conf upload /root/fastdfs-5.11/test.jpg

到此tracker和storage安装完成,下面需要安装fastdfs-nginx-module
4.参考文档
FastDFS安装手册-阿里云开发者社区 (aliyun.com)
二、配置fastdfs-nginx-module
1.安装思路:
安装过程比较复杂,由于当前系统已经有一个nginx在运行了,所以要先确认当前系统nginx的版本,然后到官网下载对应版本的nginx源码,然后查看系统nginx的编译选项,用一模一样的编译选项外加fastdfs-nginx-module的源码,重新编译一个nginx程序。用新的nginx替换系统的nginx。
注意:
这里的安装场景是tracker和storage都装在同一个机器上。
查看已安装并在运行中的nginx的版本:
$ nginx -v
nginx version: nginx/1.10.3 (Ubuntu)
2.官网下载对应版本的nginx源码,并解压,改名为nginx-src,然后进入nginx-src目录
查看当前运行的ngxin原来的编译选项:$ nginx -V 大V可以查看版本以及环境信息
$ cd ~/caibh/nginx-src
$ nginx -V
nginx version: nginx/1.10.3 (Ubuntu)
built with OpenSSL 1.0.2g 1 Mar 2016
TLS SNI support enabled
configure arguments: --with-cc-opt='-g -O2 -fPIE -fstack-protector-strong -Wformat -Werror=format-security -Wdate-time -D_FORTIFY_SOURCE=2' --with-ld-opt='-Wl,-Bsymbolic-functions -fPIE -pie -Wl,-z,relro -Wl,-z,now' --prefix=/usr/share/nginx --conf-path=/etc/nginx/nginx.conf --http-log-path=/var/log/nginx/access.log --error-log-path=/var/log/nginx/error.log --lock-path=/var/lock/nginx.lock --pid-path=/run/nginx.pid --http-client-body-temp-path=/var/lib/nginx/body --http-fastcgi-temp-path=/var/lib/nginx/fastcgi --http-proxy-temp-path=/var/lib/nginx/proxy --http-scgi-temp-path=/var/lib/nginx/scgi --http-uwsgi-temp-path=/var/lib/nginx/uwsgi --with-debug --with-pcre-jit --with-ipv6 --with-http_ssl_module --with-http_stub_status_module --with-http_realip_module --with-http_auth_request_module --with-http_addition_module --with-http_dav_module --with-http_geoip_module --with-http_gunzip_module --with-http_gzip_static_module --with-http_image_filter_module --with-http_v2_module --with-http_sub_module --with-http_xslt_module --with-stream --with-stream_ssl_module --with-mail --with-mail_ssl_module --with-threads
3. 为了方便编辑,复制上面信息,在nginx-src目录下创建一个custom_configure.sh文件,把复制的内容拷贝进去,并在最后加上fastdfs-nginx-module的源码:
$ cd ~/caibh/nginx-src
$ cat custom_configure.sh
./configure \
--with-cc-opt='-g -O2 -fPIE -fstack-protector-strong -Wformat -Werror=format-security -Wdate-time -D_FORTIFY_SOURCE=2' \
--with-ld-opt='-Wl,-Bsymbolic-functions -fPIE -pie -Wl,-z,relro -Wl,-z,now' \
--prefix=/usr/share/nginx \
--conf-path=/etc/nginx/nginx.conf \
--http-log-path=/var/log/nginx/access.log \
--error-log-path=/var/log/nginx/error.log \
--lock-path=/var/lock/nginx.lock \
--pid-path=/run/nginx.pid \
--http-client-body-temp-path=/var/lib/nginx/body \
--http-fastcgi-temp-path=/var/lib/nginx/fastcgi \
--http-proxy-temp-path=/var/lib/nginx/proxy \
--http-scgi-temp-path=/var/lib/nginx/scgi \
--http-uwsgi-temp-path=/var/lib/nginx/uwsgi \
--with-debug \
--with-pcre-jit \
--with-ipv6 \
--with-http_ssl_module \
--with-http_stub_status_module \
--with-http_realip_module \
--with-http_auth_request_module \
--with-http_addition_module \
--with-http_dav_module \
--with-http_geoip_module \
--with-http_gunzip_module \
--with-http_gzip_static_module \
--with-http_image_filter_module \
--with-http_v2_module \
--with-http_sub_module \
--with-http_xslt_module \
--with-stream \
--with-stream_ssl_module \
--with-mail \
--with-mail_ssl_module \
--with-threads \
--add-module=~/caibh/fdfs-package/fastdfs-nginx-module-1.20/src
4.执行custom_configure.sh:
# ~/caibh/nginx-src# 执行编译
$ sudo ./custom_configure.sh # 报错
./configure: error: the HTTP XSLT module requires the libxml2/libxslt
libraries. You can either do not enable the module or install the libraries.# 解决
sudo apt-get install libxml2 libxml2-dev libxslt-dev
# 再次执行
$ sudo ./custom_configure.sh # 报错
./configure: error: the HTTP image filter module requires the GD library.
You can either do not enable the module or install the libraries.#解决
sudo apt-get install libgd-dev
# 再次执行
$ sudo ./custom_configure.sh # 报错
./configure: error: the GeoIP module requires the GeoIP library.
You can either do not enable the module or install the library.# 搜索
$ sudo apt-cache search geoip
geoclue-ubuntu-geoip - Provide positioning for GeoClue via Ubuntu GeoIP services
geoip-bin - IP lookup command line tools that use the GeoIP library
geoip-database - IP lookup command line tools that use the GeoIP library (country database)
geoip-dbg - debugging symbols for the GeoIP packages
libgeoip-dev - Development files for the GeoIP library
.....# 解决
$ sudo apt-install libgeoip-dev
5.执行后有用的信息,通过这些信息可以知道编译出来的nginx会装到哪里,配置文件会放在哪里,错误日志会放在哪里:
Configuration summary
+ using threads
+ using system PCRE library
+ using system OpenSSL library
+ md5: using OpenSSL library
+ sha1: using OpenSSL library
+ using system zlib library
nginx path prefix: "/usr/share/nginx"
nginx binary file: "/usr/share/nginx/sbin/nginx"
nginx modules path: "/usr/share/nginx/modules"
nginx configuration prefix: "/etc/nginx"
nginx configuration file: "/etc/nginx/nginx.conf"
nginx pid file: "/run/nginx.pid"
nginx error log file: "/var/log/nginx/error.log"
nginx http access log file: "/var/log/nginx/access.log"
nginx http client request body temporary files: "/var/lib/nginx/body"
nginx http proxy temporary files: "/var/lib/nginx/proxy"
nginx http fastcgi temporary files: "/var/lib/nginx/fastcgi"
nginx http uwsgi temporary files: "/var/lib/nginx/uwsgi"
nginx http scgi temporary files: "/var/lib/nginx/scgi"
6.停止nginx,并备份原来的nginx执行文件,和配置文件:
$ which nginx
/usr/sbin/nginx
$ sudo cp /usr/sbin/nginx /usr/sbin/nginx_org_bak
$ sudo cp /etc/nginx/nginx.conf /etc/nginx/nginx.conf.bak
7.继续在nginx-src目录执行make和make install:
$ cd ~/caibh/nginx-src
$ sudo make
# 报错
Fatal error: can't create objs/addon/src/ngx_http_fastdfs_module.o: Permission denied
In file included from /home/xxxx/caibh/fdfs-package/fastdfs-nginx-module-1.20/src/common.c:26:0,
from /home/xxxx/caibh/fdfs-package/fastdfs-nginx-module-1.20/src/ngx_http_fastdfs_module.c:6:
/usr/include/fastdfs/fdfs_define.h:15:27: fatal error: common_define.h: No such file or directory
# 解决
# 修改fastdfs-nginx-module的src/config文件
$ cd /home/xxxx/caibh/fdfs-package/fastdfs-nginx-module-1.20/src
$ sudo vi config
# 修改一下两项:
ngx_module_incs="/usr/include/fastdfs /usr/include/fastcommon/"
CORE_INCS="$CORE_INCS /usr/include/fastdfs /usr/include/fastcommon/"
# 重新运行 nginx-src/custom_configure.sh
$ pwd
/home/xxxx/caibh/nginx-src
$ sudo ./custom_configure.sh
$ sudo make
$ sudo make install
# make install 会在/usr/share/nginx/sbin目录下生成一个名为nginx的可执行文件
$ sudo ls /usr/share/nginx
html sbin
8.关闭系统原有的nginx,并备份好系统原来的nginx文件:
sudo nginx -s stopcd /usr/sbin
sudo cp mv /usr/sbin/nginx /usr/sbin/nginx_bak
9.备份好后创建一个软链接,放在/usr/sbin目录下:
# 检查自己编译出来的nginx能否运行
$ ./nginx -v
nginx version: nginx/1.10.3# 创建软链接
$ sudo ln -s /usr/share/nginx/sbin/nginx /usr/sbin/nginx
10.配置nginx,加入路由规则,映射到fastdfs的数据目录:
# config for fastdfs-nginx-module
server {
listen 80;
server_name 10.0.1.137;
location ~/group([0-9])/M00 {
root ~/fastdfs/fastdfs-5.11/data;
ngx_fastdfs_module;
}
}
11.测试上传图片:
$ fdfs_test /etc/fdfs/client.conf upload ~/caibh/test_images/XinXiJuZhiWang.jpg
This is FastDFS client test program v5.11
Copyright (C) 2008, Happy Fish / YuQing
FastDFS may be copied only under the terms of the GNU General
Public License V3, which may be found in the FastDFS source kit.
Please visit the FastDFS Home Page http://www.csource.org/ for more detail.
[2019-02-22 14:54:33] DEBUG - base_path=/home/xxxx/fdfs/client, connect_timeout=30, network_timeout=60, tracker_server_count=1, anti_steal_token=0, anti_steal_secret_key length=0, use_connection_pool=0, g_connection_pool_max_idle_time=3600s, use_storage_id=0, storage server id count: 0
tracker_query_storage_store_list_without_group:
server 1. group_name=, ip_addr=191.8.2.203, port=23000
group_name=group1, ip_addr=191.8.2.203, port=23000
storage_upload_by_filename
group_name=group1, remote_filename=M00/00/00/vwgCy1xvnKmAIDXDAAEM3XOobI4945.jpgsource ip address: 191.8.2.203
file timestamp=2019-02-22 14:54:33
file size=68829
file crc32=1940417678
example file url: http://191.8.2.203:9270/group1/M00/00/00/vwgCy1xvnKmAIDXDAAEM3XOobI4945.jpg
storage_upload_slave_by_filename
group_name=group1, remote_filename=M00/00/00/vwgCy1xvnKmAIDXDAAEM3XOobI4945_big.jpgsource ip address: 191.8.2.203
file timestamp=2019-02-22 14:54:33
file size=68829
file crc32=1940417678
example file url: http://191.8.2.203:9270/group1/M00/00/00/vwgCy1xvnKmAIDXDAAEM3XOobI4945_big.jpg
到此安装完成。
12.安装是碰见问题处理:
1./root/fastdfs/fastdfs-nginx-module-1.20/src
storage集成nginx访问文件报 errno: 13, error info: Permission denied
出现这个问题一般是nginx配置有问题,修改nginx配置文件的开头行,添加 user root这行配置即可解决这个问题。
2.需要将/etc/fdfs/http.conf 中的验证关闭,true改为false检查防盗链系统
vi /etc/fdfs/http.conf
http.anti_steal.check_token=false
3.fastdfs报错:file: ../common/fdfs_global.c, line: 52, the format of filename XXX is invalid
/etc/fdfs/mod_fastdfs.conf
将url_have_group_name改为:true
然后重启fastdfs服务和nginx服务即可
4.nginx启动命令:/usr/local/nginx/sbin/nginx -c /usr/local/nginx/conf/nginx.conf


 5553
5553


 被折叠的 条评论
为什么被折叠?
被折叠的 条评论
为什么被折叠?
 到【灌水乐园】发言


