


1. 表结构
还是是用标准的5张表来展现权限。如下图: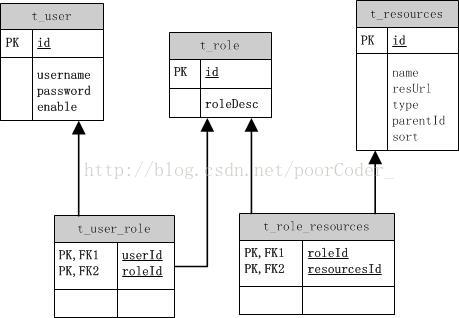
分别为用户表,角色表,资源表,用户角色表,角色资源表。在这个demo中使用了mybatis-generator自动生成代码。运行mybatis-generator:generate -e 根据数据库中的表,生成 相应的model,mapper单表的增删改查。不过如果是导入本项目的就别运行这个命令了。新增表的话,也要修改mybatis-generator-config.xml中的tableName,指定表名再运行。
2.pom.xml的依赖
<dependencies>
        <dependency>
            <groupId>org.springframework.boot</groupId>
            <artifactId>spring-boot-starter-data-jpa</artifactId>
        </dependency>
        <dependency>
            <groupId>org.springframework.boot</groupId>
            <artifactId>spring-boot-starter-thymeleaf</artifactId>
        </dependency>
        <dependency>
            <groupId>net.sourceforge.nekohtml</groupId>
            <artifactId>nekohtml</artifactId>
            <version>1.9.22</version>
        </dependency>
        <dependency>
            <groupId>org.springframework.boot</groupId>
            <artifactId>spring-boot-starter-web</artifactId>
        </dependency>
        <dependency>
            <groupId>org.apache.shiro</groupId>
            <artifactId>shiro-spring</artifactId>
            <version>1.4.0</version>
        </dependency>
        <dependency>
            <groupId>mysql</groupId>
            <artifactId>mysql-connector-java</artifactId>
            <scope>runtime</scope>
        </dependency>
    </dependencies>
重点是 shiro-spring包
3.配置文件
spring:
    datasource:
      url: jdbc:mysql://localhost:3306/test
      username: root
      password: root
      driver-class-name: com.mysql.jdbc.Driver

    jpa:
      database: mysql
      show-sql: true
      hibernate:
        ddl-auto: update
        naming:
          strategy: org.hibernate.cfg.DefaultComponentSafeNamingStrategy
      properties:
         hibernate:
            dialect: org.hibernate.dialect.MySQL5Dialect

    thymeleaf:
       cache: false
       mode: LEGACYHTML5
thymeleaf的配置是为了去掉html的校验
4.shiro配置

1.shiroConfig
package com.msp.whg.shiro;

import at.pollux.thymeleaf.shiro.dialect.ShiroDialect;
import org.apache.shiro.authc.credential.HashedCredentialsMatcher;
import org.apache.shiro.mgt.SecurityManager;
import org.apache.shiro.spring.LifecycleBeanPostProcessor;
import org.apache.shiro.spring.security.interceptor.AuthorizationAttributeSourceAdvisor;
import org.apache.shiro.spring.web.ShiroFilterFactoryBean;
import org.apache.shiro.web.mgt.DefaultWebSecurityManager;
import org.springframework.aop.framework.autoproxy.DefaultAdvisorAutoProxyCreator;
import org.springframework.context.annotation.Bean;
import org.springframework.context.annotation.Configuration;
import org.springframework.context.annotation.DependsOn;

import java.util.LinkedHashMap;
import java.util.Map;

/**
 * Shiro 配置
 *
 Apache Shiro 核心通过 Filter 来实现,就好像SpringMvc 通过DispachServlet 来主控制一样。
 既然是使用 Filter 一般也就能猜到,是通过URL规则来进行过滤和权限校验,所以我们需要定义一系列关于URL的规则和访问权限。
 */
@Configuration
public class ShiroConfiguration {

    /**
     * ShiroFilterFactoryBean 处理拦截资源文件问题。
     * 注意:单独一个ShiroFilterFactoryBean配置是或报错的,以为在
     * 初始化ShiroFilterFactoryBean的时候需要注入:SecurityManager
     *
     Filter Chain定义说明
     1、一个URL可以配置多个Filter,使用逗号分隔
     2、当设置多个过滤器时,全部验证通过,才视为通过
     3、部分过滤器可指定参数,如perms,roles
     *
     */
    @Bean
    public ShiroFilterFactoryBean shirFilter(SecurityManager securityManager){

        System.out.println("ShiroConfiguration.shirFilter()");
        ShiroFilterFactoryBean shiroFilterFactoryBean  = new ShiroFilterFactoryBean();

        // 必须设置 SecurityManager
        shiroFilterFactoryBean.setSecurityManager(securityManager);

        // 如果不设置默认会自动寻找Web工程根目录下的"/login.jsp"页面
        shiroFilterFactoryBean.setLoginUrl("/index");
        // 登录成功后要跳转的链接
        shiroFilterFactoryBean.setSuccessUrl("/main");
        //未授权界面;
        shiroFilterFactoryBean.setUnauthorizedUrl("/403");
        //拦截器.
        Map<String,String> filterChainDefinitionMap = new LinkedHashMap<String,String>();

        //配置退出 过滤器,其中的具体的退出代码Shiro已经替我们实现了
        filterChainDefinitionMap.put("/logout", "logout");
        filterChainDefinitionMap.put("/css/**","anon");
        filterChainDefinitionMap.put("/js/**","anon");
        filterChainDefinitionMap.put("/img/**","anon");
        filterChainDefinitionMap.put("/font-awesome/**","anon");
        filterChainDefinitionMap.put("/favicon.ico", "anon");

        filterChainDefinitionMap.put("/**", "authc");

        shiroFilterFactoryBean.setFilterChainDefinitionMap(filterChainDefinitionMap);
        return shiroFilterFactoryBean;
    }

    @Bean
    public SecurityManager securityManager(){
        DefaultWebSecurityManager securityManager =  new DefaultWebSecurityManager();
        //设置realm.
        securityManager.setRealm(myShiroRealm());
        return securityManager;
    }

    /**
     * 身份认证realm;
     * (这个需要自己写,账号密码校验;权限等)
     * @return
     */
    @Bean
    public MyShiroRealm myShiroRealm(){
        MyShiroRealm myShiroRealm = new MyShiroRealm();
        myShiroRealm.setCredentialsMatcher(hashedCredentialsMatcher());
        return myShiroRealm;
    }

    /**
     * 凭证匹配器
     * (由于我们的密码校验交给Shiro的SimpleAuthenticationInfo进行处理了
     *  所以我们需要修改下doGetAuthenticationInfo中的代码;
     * )
     * @return
     */
    @Bean
    public HashedCredentialsMatcher hashedCredentialsMatcher(){
        HashedCredentialsMatcher hashedCredentialsMatcher = new HashedCredentialsMatcher();
        hashedCredentialsMatcher.setHashAlgorithmName("md5");//散列算法:这里使用MD5算法;
        hashedCredentialsMatcher.setHashIterations(1);//散列的次数,比如散列两次,相当于 md5(md5(""));
        return hashedCredentialsMatcher;
    }

    /**
     *  开启shiro aop注解支持.
     *  使用代理方式;所以需要开启代码支持;
     * @param securityManager
     * @return
     */
    @Bean
    public AuthorizationAttributeSourceAdvisor authorizationAttributeSourceAdvisor(SecurityManager securityManager){
        AuthorizationAttributeSourceAdvisor authorizationAttributeSourceAdvisor = new AuthorizationAttributeSourceAdvisor();
        authorizationAttributeSourceAdvisor.setSecurityManager(securityManager);
        return authorizationAttributeSourceAdvisor;
    }

    @Bean
    public ShiroDialect shiroDialect() {
        return new ShiroDialect();
    }


    @Bean
    public LifecycleBeanPostProcessor lifecycleBeanPostProcessor() {
        return new LifecycleBeanPostProcessor();
    }

    @Bean
    @DependsOn("lifecycleBeanPostProcessor")
    public DefaultAdvisorAutoProxyCreator defaultAdvisorAutoProxyCreator() {
        DefaultAdvisorAutoProxyCreator proxyCreator = new DefaultAdvisorAutoProxyCreator();
        proxyCreator.setProxyTargetClass(true); // this SETTING
        return proxyCreator;
    }

    @Bean
    public AuthorizationAttributeSourceAdvisor authorizationAttributeSourceAdvisor() {
        AuthorizationAttributeSourceAdvisor advisor = new AuthorizationAttributeSourceAdvisor();
        advisor.setSecurityManager(securityManager());
        return advisor;
    }
}

2.自定义realm
package com.msp.whg.shiro;

import com.msp.whg.domain.UserManage;
import com.msp.whg.service.UserManageService;
import org.apache.shiro.authc.AuthenticationException;
import org.apache.shiro.authc.AuthenticationInfo;
import org.apache.shiro.authc.AuthenticationToken;
import org.apache.shiro.authc.SimpleAuthenticationInfo;
import org.apache.shiro.authz.AuthorizationInfo;
import org.apache.shiro.authz.SimpleAuthorizationInfo;
import org.apache.shiro.realm.AuthorizingRealm;
import org.apache.shiro.subject.PrincipalCollection;
import org.springframework.beans.factory.annotation.Autowired;

import java.util.List;

/**
 * Created by Administrator on 2018\2\28 0028.
 * 自定义realm实现认证
 */
public class MyShiroRealm extends AuthorizingRealm {

    @Autowired
    private UserManageService userService;

    /**
     * 认证信息.(身份验证)
     * :
     * Authentication 是用来验证用户身份
     * @param token
     * @return
     * @throws AuthenticationException
     */
    @Override
    protected AuthenticationInfo doGetAuthenticationInfo(AuthenticationToken token) throws AuthenticationException {

        //获取用户的输入的账号.
        String username = (String)token.getPrincipal();
        UserManage userManage = new UserManage();
        userManage.setUserName(username);
        //根据用户名去数据库查询是否有该用户
        UserManage user = userService.selectOne(userManage);

        if(user == null){
            return null;
        }
        SimpleAuthenticationInfo authenticationInfo = new SimpleAuthenticationInfo(
                user, //用户名
                user.getUserPwd(), //密码
                getName()  //realm name
        );
        return authenticationInfo;
    }

    // 授权校验
    @Override
    protected AuthorizationInfo doGetAuthorizationInfo(PrincipalCollection principals) {

        //获取用户的信息
        UserManage user = (UserManage)principals.getPrimaryPrincipal();

        //返回的对象
        SimpleAuthorizationInfo authorizationInfo = new SimpleAuthorizationInfo();
        //根据用户信息查询用户有哪些权限
        List<String> permissionList = userService.findPermissionByUserManage(user);
        authorizationInfo.addStringPermissions(permissionList);
        return authorizationInfo;
    }
}
去UserService中调用findPermission()方法查询有哪些权限,然后在页面上使用shiro的标签haspermission来实现动态显示

在service中将菜单的ingcheng加入到permissionList集合中,在shiro:hasPermission标签中为名称(要对应)
UserService:

效果:


 9997
9997

 被折叠的 条评论
为什么被折叠?
被折叠的 条评论
为什么被折叠?
 到【灌水乐园】发言


